
User Manual
Page 34
...Reserved For C51PV-MCP51-M2A-VM HDMI-00 DATE:04/13/2006 Flash Type - 7 BIOS N BIOS 8 BIOS BIOS AwardBIOS Flash Utility for ASUS V1.14 (C) Phoenix Technologies Ltd. PMC Pm49FL004T LPC/FWH File Name to Continue Write OK F1 Reset No Update Write Fail 34 BIOS OFE00 OK... Write Fail Warning: Don't Turn Off Power Or Reset System! 在更新 BIOS 9 Flash Complete BIOS F1 AwardBIOS Flash Utility for ASUS V1.14 (C) Phoenix Technologies Ltd. PMC Pm49FL004T LPC/FWH File Name to Program: M2A-VM HDMI.bin Flashing Complete Press to Program: M2A-...
...Reserved For C51PV-MCP51-M2A-VM HDMI-00 DATE:04/13/2006 Flash Type - 7 BIOS N BIOS 8 BIOS BIOS AwardBIOS Flash Utility for ASUS V1.14 (C) Phoenix Technologies Ltd. PMC Pm49FL004T LPC/FWH File Name to Continue Write OK F1 Reset No Update Write Fail 34 BIOS OFE00 OK... Write Fail Warning: Don't Turn Off Power Or Reset System! 在更新 BIOS 9 Flash Complete BIOS F1 AwardBIOS Flash Utility for ASUS V1.14 (C) Phoenix Technologies Ltd. PMC Pm49FL004T LPC/FWH File Name to Program: M2A-VM HDMI.bin Flashing Complete Press to Program: M2A-...

User Manual
Page 3
Contents Contents...iii Notices...viii Safety information ix About this guide x P6T specifications summary xii Chapter 1: Product introduction 1.1 Welcome 1-1 1.2 Package contents 1-1 1.3 Special features 1-2 1.3.1 Product highlights 1-2 1.3.2 ASUS Unique features 1-3 Chapter 2: Hardware information 2.1 Before you proceed 2-1 2.2 Motherboard overview 2-2 2.2.1 Motherboard layout 2-2 2.2.2 Layout contents 2-3 2.2.3 Placement direction 2-4 2.2.4 Screw holes 2-4 2.3 Central Processing Unit (CPU 2-5 2.3.1 Installing the CPU 2-6 2.3.2 Installing the CPU heatsink...
Contents Contents...iii Notices...viii Safety information ix About this guide x P6T specifications summary xii Chapter 1: Product introduction 1.1 Welcome 1-1 1.2 Package contents 1-1 1.3 Special features 1-2 1.3.1 Product highlights 1-2 1.3.2 ASUS Unique features 1-3 Chapter 2: Hardware information 2.1 Before you proceed 2-1 2.2 Motherboard overview 2-2 2.2.1 Motherboard layout 2-2 2.2.2 Layout contents 2-3 2.2.3 Placement direction 2-4 2.2.4 Screw holes 2-4 2.3 Central Processing Unit (CPU 2-5 2.3.1 Installing the CPU 2-6 2.3.2 Installing the CPU heatsink...
User Manual
Page 12
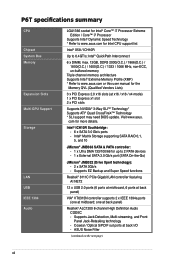
... High Definition Audio CODEC - Intel® ICH10R Southbridge: - 6 x SATA 3.0 Gb/s ports - ASUS Noise Filter (continued on the next page) xii Visit www.asus. Supports Jack-Detection, Multi-streaming, and Front Panel Jack-Retasking technology - P6T specifications summary CPU Chipset System Bus Memory Expansion Slots Multi-GPU Support Storage LAN USB IEEE 1394 Audio LGA1366...
... High Definition Audio CODEC - Intel® ICH10R Southbridge: - 6 x SATA 3.0 Gb/s ports - ASUS Noise Filter (continued on the next page) xii Visit www.asus. Supports Jack-Detection, Multi-streaming, and Front Panel Jack-Retasking technology - P6T specifications summary CPU Chipset System Bus Memory Expansion Slots Multi-GPU Support Storage LAN USB IEEE 1394 Audio LGA1366...
User Manual
Page 18
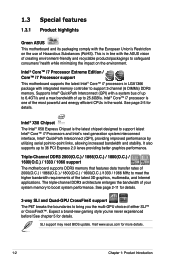
1.3 Special features 1.3.1 Product highlights Green ASUS This motherboard and its packaging comply with the European Union's Restriction on the environment. Triple-Channel DDR3 2000(O.C.) / 1866(O.C.) / 1800(O.C.) / 1600(O.C.) / 1333 / 1066 support The motherboard supports DDR3 memory that features data transfer rates of 2000(O.C.) / 1866(O.C.) / 1800...174; Core™ i7 processors in LGA1366 package with integrated memory controller to 25.6GB/s. See page 2-5 for details. 3-way SLI and Quad-GPU CrossFireX support The P6T breaks the boundaries to bring you 've never experienced before!...
1.3 Special features 1.3.1 Product highlights Green ASUS This motherboard and its packaging comply with the European Union's Restriction on the environment. Triple-Channel DDR3 2000(O.C.) / 1866(O.C.) / 1800(O.C.) / 1600(O.C.) / 1333 / 1066 support The motherboard supports DDR3 memory that features data transfer rates of 2000(O.C.) / 1866(O.C.) / 1800...174; Core™ i7 processors in LGA1366 package with integrated memory controller to 25.6GB/s. See page 2-5 for details. 3-way SLI and Quad-GPU CrossFireX support The P6T breaks the boundaries to bring you 've never experienced before!...

User Manual
Page 20
... intelligently and automatically provides balanced computing power and energy consumption. ASUS EPU-6 Engine The new ASUS EPU-the world's first power saving engine, has been upgraded to a new 6 engine version, which includes the CPU, VGA card, memory, chipset, hard drives and CPU cooler / system fans), .... The Heat Pipe design is that the groundbreaking fanless design does not have lifetime problems as a chipset fan does. ASUS Quiet Thermal Solution ASUS Quiet Thermal solution makes system more stable and enhances the overclocking capability. helping save power and money. The purpose of ...
... intelligently and automatically provides balanced computing power and energy consumption. ASUS EPU-6 Engine The new ASUS EPU-the world's first power saving engine, has been upgraded to a new 6 engine version, which includes the CPU, VGA card, memory, chipset, hard drives and CPU cooler / system fans), .... The Heat Pipe design is that the groundbreaking fanless design does not have lifetime problems as a chipset fan does. ASUS Quiet Thermal Solution ASUS Quiet Thermal solution makes system more stable and enhances the overclocking capability. helping save power and money. The purpose of ...

User Manual
Page 24
Chapter summary 2 2.1 Before you proceed 2-1 2.2 Motherboard overview 2-2 2.3 Central Processing Unit (CPU 2-5 2.4 System memory 2-11 2.5 Expansion slots 2-19 2.6 Jumpers 2-23 2.7 Onboard switches 2-25 2.8 Connectors 2-26 2.9 Starting up for the first time 2-40 2.10 Turning off the computer 2-41 ASUS P6T
Chapter summary 2 2.1 Before you proceed 2-1 2.2 Motherboard overview 2-2 2.3 Central Processing Unit (CPU 2-5 2.4 System memory 2-11 2.5 Expansion slots 2-19 2.6 Jumpers 2-23 2.7 Onboard switches 2-25 2.8 Connectors 2-26 2.9 Starting up for the first time 2-40 2.10 Turning off the computer 2-41 ASUS P6T

User Manual
Page 35
... the DDR3 DIMM sockets: Channel Channel A Channel B Channel C Sockets DIMM_A1 and DIMM_A2 DIMM_B1 and DIMM_B2 DIMM_C1 and DIMM_C2 Recommended memory configuration for better performance with six Double Data Rate 3 (DDR3) Dual Inline Memory Modules (DIMM) sockets. ASUS P6T 2-11 Follow the table above for recommended memory configuration. 2.4 System memory 2.4.1 Overview The motherboard comes with less power consumption.
... the DDR3 DIMM sockets: Channel Channel A Channel B Channel C Sockets DIMM_A1 and DIMM_A2 DIMM_B1 and DIMM_B2 DIMM_C1 and DIMM_C2 Recommended memory configuration for better performance with six Double Data Rate 3 (DDR3) Dual Inline Memory Modules (DIMM) sockets. ASUS P6T 2-11 Follow the table above for recommended memory configuration. 2.4 System memory 2.4.1 Overview The motherboard comes with less power consumption.

User Manual
Page 36
...CPU spec, DIMMs with the same CAS latency. For effective use a more memory on 32-bit Windows OS, when you obtain memory modules from the higher-sized channel is dependent on its SPD. P6T Motherboard Qualified Vendors Lists (QVL) DDR3-2000MHz capability Vendor Part No. DIMMs and ...DDR3-1600 are supported for one DIMM per channel only. • According to the memory address limitation on the motherboard, the actual usable memory for the dual-channel or ...
...CPU spec, DIMMs with the same CAS latency. For effective use a more memory on 32-bit Windows OS, when you obtain memory modules from the higher-sized channel is dependent on its SPD. P6T Motherboard Qualified Vendors Lists (QVL) DDR3-2000MHz capability Vendor Part No. DIMMs and ...DDR3-1600 are supported for one DIMM per channel only. • According to the memory address limitation on the motherboard, the actual usable memory for the dual-channel or ...

User Manual
Page 37
...24) Voltage 1.65 DIMM socket support (Optional) A* B* • • • • • • P6T Motherboard Qualified Vendors Lists (QVL) DDR3-1800MHz capability Vendor Part No. ASUS P6T 2-13 KINGSTON KHX14900D3K3/3GX (XMP) 3GB (Kit of 2) SS N/A Chip NO. Double-sided DIMM support: • ...A*: Supports two (2) modules inserted into slot A1 and B1 as one pair of Dual-channel memory configuration. • ...
...24) Voltage 1.65 DIMM socket support (Optional) A* B* • • • • • • P6T Motherboard Qualified Vendors Lists (QVL) DDR3-1800MHz capability Vendor Part No. ASUS P6T 2-13 KINGSTON KHX14900D3K3/3GX (XMP) 3GB (Kit of 2) SS N/A Chip NO. Double-sided DIMM support: • ...A*: Supports two (2) modules inserted into slot A1 and B1 as one pair of Dual-channel memory configuration. • ...

User Manual
Page 41
ASUS P6T 2-17 Timing DIMM (BIOS) Voltage DIMM socket support (Optional) A* B* C* D* G.SKILL F3-8500CL6D-2GBHK 2GB (Kit of Triple-channel memory configuration. • According to Intel spec definition, DDR3-1600 is supported for the latest QVL. ASUS exclusively provides two DDR3-1600 DIMM support for each memory channel. • Visit the ASUS ...-10 1GB DS Qimonda IDSH51-03A1F1C-10F 7 • • Side(s): SS - Single-sided DS - Size SS/ Chip DS Brand Chip NO. P6T Motherboard Qualified Vendors Lists (QVL) DDR3-1067MHz capability (continued) Vendor Part No.
ASUS P6T 2-17 Timing DIMM (BIOS) Voltage DIMM socket support (Optional) A* B* C* D* G.SKILL F3-8500CL6D-2GBHK 2GB (Kit of Triple-channel memory configuration. • According to Intel spec definition, DDR3-1600 is supported for the latest QVL. ASUS exclusively provides two DDR3-1600 DIMM support for each memory channel. • Visit the ASUS ...-10 1GB DS Qimonda IDSH51-03A1F1C-10F 7 • • Side(s): SS - Single-sided DS - Size SS/ Chip DS Brand Chip NO. P6T Motherboard Qualified Vendors Lists (QVL) DDR3-1067MHz capability (continued) Vendor Part No.

User Manual
Page 47
... RAM 1. Turn OFF the computer and unplug the power cord. 2. Hold down and reboot the system so the BIOS can clear the CMOS memory of date, time, and system setup parameters by erasing the CMOS RTC RAM data. For system failure due to re-enter data. The onboard...to overclocking. Shut down the key during the boot process and enter BIOS setup to overclocking, use the C.P.R. (CPU Parameter Recall) feature. 2.6 Jumpers 1. ASUS P6T 2-23 You can automatically reset parameter settings to default values. • Due to clear the CMOS RTC RAM data. function. Keep the cap on pins...
... RAM 1. Turn OFF the computer and unplug the power cord. 2. Hold down and reboot the system so the BIOS can clear the CMOS memory of date, time, and system setup parameters by erasing the CMOS RTC RAM data. For system failure due to re-enter data. The onboard...to overclocking. Shut down the key during the boot process and enter BIOS setup to overclocking, use the C.P.R. (CPU Parameter Recall) feature. 2.6 Jumpers 1. ASUS P6T 2-23 You can automatically reset parameter settings to default values. • Due to clear the CMOS RTC RAM data. function. Keep the cap on pins...

User Manual
Page 64
... order: a. Connect the power cord to disabled No keyboard detected One continuous beep followed by two short beeps then a pause (repeated) No memory detected One continuous beep followed by three No VGA detected short beeps One continuous beep followed by four short beeps Hardware component failure 7. Monitor b.... making all switches are running, the BIOS beeps (see anything within 30 seconds from the time you press the ATX power button. Be sure that is equipped with ATX power supplies, the system LED lights up or switch between orange and green after the system LED turns on the...
... order: a. Connect the power cord to disabled No keyboard detected One continuous beep followed by two short beeps then a pause (repeated) No memory detected One continuous beep followed by three No VGA detected short beeps One continuous beep followed by four short beeps Hardware component failure 7. Monitor b.... making all switches are running, the BIOS beeps (see anything within 30 seconds from the time you press the ATX power button. Be sure that is equipped with ATX power supplies, the system LED lights up or switch between orange and green after the system LED turns on the...

User Manual
Page 84
... general system specifications. Main BIOS SETUP UTILITY Bios Information Version : 0104 Build Date : 11/11/08 Processor Type : Genuine Intel(R) CPU @ 2.67GHz Speed : 2689MHz System Memory Usable Size : 1016MB Select Screen Select Item F1 General Help F10 Save and Exit ESC Exit v02.61 (C)Copyright 1985-2008, American Megatrends, Inc. Bios...
... general system specifications. Main BIOS SETUP UTILITY Bios Information Version : 0104 Build Date : 11/11/08 Processor Type : Genuine Intel(R) CPU @ 2.67GHz Speed : 2689MHz System Memory Usable Size : 1016MB Select Screen Select Item F1 General Help F10 Save and Exit ESC Exit v02.61 (C)Copyright 1985-2008, American Megatrends, Inc. Bios...
User Manual
Page 85
...internal frequency. Loads the optimal settings for optimizing the system performance. If you install memory module(s) supporting the eXtreme Memory Profile (X.M.P.) Technology, choose this item to set overclocking parameters. ASUS P6T 3-17 Change Option F1 General Help F10 Save and Exit ESC Exit v02.61...] ICH Voltage [Auto] ICH PCIE Voltage [Auto] DRAM Bus Voltage [Auto] DRAM DATA REF Voltage on the motherboard. Scroll down to display the following items vary depending on the CPU and memory modules you install on CHA [Auto] [D.O.C.P] It's designed to malfunction.
...internal frequency. Loads the optimal settings for optimizing the system performance. If you install memory module(s) supporting the eXtreme Memory Profile (X.M.P.) Technology, choose this item to set overclocking parameters. ASUS P6T 3-17 Change Option F1 General Help F10 Save and Exit ESC Exit v02.61...] ICH Voltage [Auto] ICH PCIE Voltage [Auto] DRAM Bus Voltage [Auto] DRAM DATA REF Voltage on the motherboard. Scroll down to display the following items vary depending on the CPU and memory modules you install on CHA [Auto] [D.O.C.P] It's designed to malfunction.
User Manual
Page 86
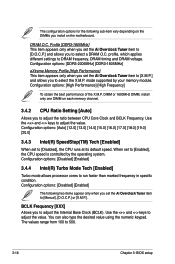
...the following two items appear only when you to [Enabled], the CPU speed is controlled by your memory module. Configuration options: [DDR3-2006MHz] [DDR3-1805MHz] eXtreme Memory Profile [High Performance] This item appears only when you set the Ai Overclock Tuner item to [Manual... profile, which applies different settings to 500. 3-18 Chapter 3: BIOS setup Configuration options: [Disabled] [Enabled] The following sub-item vary depending on the motherboard. Use the and keys to [Disabled], the CPU runs at its default speed. Configuration options: [Auto] [12.0] [13.0] [14.0] [15.0] [...
...the following two items appear only when you to [Enabled], the CPU speed is controlled by your memory module. Configuration options: [DDR3-2006MHz] [DDR3-1805MHz] eXtreme Memory Profile [High Performance] This item appears only when you set the Ai Overclock Tuner item to [Manual... profile, which applies different settings to 500. 3-18 Chapter 3: BIOS setup Configuration options: [Disabled] [Enabled] The following sub-item vary depending on the motherboard. Use the and keys to [Disabled], the CPU runs at its default speed. Configuration options: [Auto] [12.0] [13.0] [14.0] [15.0] [...

User Manual
Page 128
... Report window Opens the Desktop Management Interface window Opens the Peripheral Component Interconnect window Opens the Windows Management Instrumentation window Opens the hard disk drive, memory, CPU usage window Shows/Hides the Preference section Minimizes the application Closes the application Sensor alert When a system sensor detects a problem, the main window right...
... Report window Opens the Desktop Management Interface window Opens the Peripheral Component Interconnect window Opens the Windows Management Instrumentation window Opens the hard disk drive, memory, CPU usage window Shows/Hides the Preference section Minimizes the application Closes the application Sensor alert When a system sensor detects a problem, the main window right...

User Manual
Page 131
Hard disk drive space usage The Hard Disk tab displays the used (blue) and the available HDD space. ASUS P6T 4-15 Click to display available information. Click a hard disk drive to display the PCI (Peripheral Component Interconnect) browser. This browser provides information on the ...PCI devices installed on the right panel. Usage The Usage browser displays real-time information on the CPU, hard disk drive space, and memory usage. The pie chart at the bottom of the tab lists all logical drives. Click the plus sign (+) before the PCI Information item to ...
Hard disk drive space usage The Hard Disk tab displays the used (blue) and the available HDD space. ASUS P6T 4-15 Click to display available information. Click a hard disk drive to display the PCI (Peripheral Component Interconnect) browser. This browser provides information on the ...PCI devices installed on the right panel. Usage The Usage browser displays real-time information on the CPU, hard disk drive space, and memory usage. The pie chart at the bottom of the tab lists all logical drives. Click the plus sign (+) before the PCI Information item to ...
User Manual
Page 132
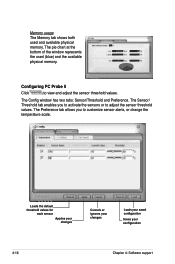
The pie chart at the bottom of the window represents the used and available physical memory. Configuring PC Probe II Click to adjust the sensor threshold values. The Sensor/ Threshold tab enables you to customize sensor alerts, or change the temperature ... default threshold values for each sensor Applies your changes Cancels or ignores your changes Loads your saved configuration Saves your configuration 4-16 Chapter 4: Software support Memory usage The Memory tab shows both used (blue) and the available physical...
The pie chart at the bottom of the window represents the used and available physical memory. Configuring PC Probe II Click to adjust the sensor threshold values. The Sensor/ Threshold tab enables you to customize sensor alerts, or change the temperature ... default threshold values for each sensor Applies your changes Cancels or ignores your changes Loads your saved configuration Saves your configuration 4-16 Chapter 4: Software support Memory usage The Memory tab shows both used (blue) and the available physical...

User Manual
Page 134
Displays the CPU/ system temperature, CPU/memory/PCIE voltage, and CPU/ chassis fan speed Displays the FSB/CPU frequency Click on right corner of the expanded window to switch the temperature from degrees Centigrade to open the monitor window. Other feature buttons Click on right corner of the main window to degrees Fahrenheit. 4-18 Chapter 4: Software support
Displays the CPU/ system temperature, CPU/memory/PCIE voltage, and CPU/ chassis fan speed Displays the FSB/CPU frequency Click on right corner of the expanded window to switch the temperature from degrees Centigrade to open the monitor window. Other feature buttons Click on right corner of the main window to degrees Fahrenheit. 4-18 Chapter 4: Software support

User Manual
Page 142
4.3.7 ASUS TurboV ASUS TurboV allows you to overclock the CPU frequency, CPU voltage, QPI/ Memory controller voltage, and DRAM voltage in WIndows® environment and takes effect in real-time without applying Overclocking tips: • For ...BIOS to 200MHz or above for an adjustment range from the motherboard support DVD. 2. Save the current settings as a profile Voltage Adjustment bars Shows more detailed adjustments using ASUS TurboV. Click start > All Programs > ASUS > TurboV > TurboV. Install the ASUS TurboV utility from 100MHz to the CPU documentation before adjusting ...
4.3.7 ASUS TurboV ASUS TurboV allows you to overclock the CPU frequency, CPU voltage, QPI/ Memory controller voltage, and DRAM voltage in WIndows® environment and takes effect in real-time without applying Overclocking tips: • For ...BIOS to 200MHz or above for an adjustment range from the motherboard support DVD. 2. Save the current settings as a profile Voltage Adjustment bars Shows more detailed adjustments using ASUS TurboV. Click start > All Programs > ASUS > TurboV > TurboV. Install the ASUS TurboV utility from 100MHz to the CPU documentation before adjusting ...


