
User Guide
Page 4
... 2-40 Chapter 3: BIOS setup 3.1 Managing and updating your BIOS 3-1 3.1.1 ASUS Update utility 3-1 3.1.2 ASUS EZ Flash 2 utility 3-4 3.1.3 Creating a bootable floppy disk 3-5 3.1.4 AFUDOS utility 3-6 3.1.5 ASUS CrashFree BIOS 3 utility 3-8 3.2 BIOS setup program 3-9 3.2.1 BIOS menu screen... 3-10 3.2.2 Menu bar 3-10 3.2.3 Navigation keys 3-10 3.2.4 Menu items 3-11 3.2.5 Sub-menu items 3-11 3.2.6 Configuration fields 3-11 3.2.7 Pop-up window 3-11 3.2.8 Scroll bar 3-...
... 2-40 Chapter 3: BIOS setup 3.1 Managing and updating your BIOS 3-1 3.1.1 ASUS Update utility 3-1 3.1.2 ASUS EZ Flash 2 utility 3-4 3.1.3 Creating a bootable floppy disk 3-5 3.1.4 AFUDOS utility 3-6 3.1.5 ASUS CrashFree BIOS 3 utility 3-8 3.2 BIOS setup program 3-9 3.2.1 BIOS menu screen... 3-10 3.2.2 Menu bar 3-10 3.2.3 Navigation keys 3-10 3.2.4 Menu items 3-11 3.2.5 Sub-menu items 3-11 3.2.6 Configuration fields 3-11 3.2.7 Pop-up window 3-11 3.2.8 Scroll bar 3-...

User Guide
Page 7
...174; SAS RAID configurations 4-57 4.5 Creating a RAID driver disk 4-66 4.5.1 Creating a RAID driver disk without entering the OS.... 4-66 4.5.2 Creating a RAID driver disk in Windows 4-66 Chapter 5: Multiple GPU technology support 5.1 ATI® CrossFireX™ technology 5-1 5.1.1 Requirements 5-1 5.1.2 Before you begin 5-1 5.2 Installing CrossFireX™ graphics cards 5-2 5.2.1 ...5-6 5.4.1 Requirements 5-6 5.4.2 Installing SLI™ graphics cards 5-6 5.4.3 Installing the device drivers 5-7 5.4.4 Enabling the NVIDIA® SLI™ technology in Windows®..... 5-7 vii
...174; SAS RAID configurations 4-57 4.5 Creating a RAID driver disk 4-66 4.5.1 Creating a RAID driver disk without entering the OS.... 4-66 4.5.2 Creating a RAID driver disk in Windows 4-66 Chapter 5: Multiple GPU technology support 5.1 ATI® CrossFireX™ technology 5-1 5.1.1 Requirements 5-1 5.1.2 Before you begin 5-1 5.2 Installing CrossFireX™ graphics cards 5-2 5.2.1 ...5-6 5.4.1 Requirements 5-6 5.4.2 Installing SLI™ graphics cards 5-6 5.4.3 Installing the device drivers 5-7 5.4.4 Enabling the NVIDIA® SLI™ technology in Windows®..... 5-7 vii

User Guide
Page 22
... in OS. See page 2-26 for details. 1-6 Chapter 1: Product Introduction The TPM meets the Windows® Vista BitLocker™ Drive Encryption hardware requirement for details. ASUS Q-Connector ASUS Q-Connector allows you easy ways to instant fun! TPM Support This motherboard supports the Trusted Platform Module (TPM), which provides you view your pictures without entering...
... in OS. See page 2-26 for details. 1-6 Chapter 1: Product Introduction The TPM meets the Windows® Vista BitLocker™ Drive Encryption hardware requirement for details. ASUS Q-Connector ASUS Q-Connector allows you easy ways to instant fun! TPM Support This motherboard supports the Trusted Platform Module (TPM), which provides you view your pictures without entering...

User Guide
Page 38
...its SPD. Any excess memory from the same vendor. • Due to the memory address limitation on 32-bit Windows OS, when you install 4GB or more memory installed on the motherboard, the actual usable memory for single-channel operation. • Due to Intel CPU spec, DIMMs with the same... CAS latency. We recommend you install a 64-bit Windows OS when having 4GB or more memory on the motherboard. • This motherboard does not support memory modules made up of the lower-sized channel for one DIMM per channel only. • ...
...its SPD. Any excess memory from the same vendor. • Due to the memory address limitation on 32-bit Windows OS, when you install 4GB or more memory installed on the motherboard, the actual usable memory for single-channel operation. • Due to Intel CPU spec, DIMMs with the same... CAS latency. We recommend you install a 64-bit Windows OS when having 4GB or more memory on the motherboard. • This motherboard does not support memory modules made up of the lower-sized channel for one DIMM per channel only. • ...

User Guide
Page 53
...details. See section 3.3.5 Storage Configuration for details. • Before creating a RAID set to create a Serial ATA RAID set using these connectors. ASUS P6T WS Professional 2-27 2. In Standard IDE mode, you intend to Standard IDE mode by default. See section 3.3.5 Storage Configuration for Serial ATA hard disk ...can connect Serial ATA boot/data hard disk drives to these connectors, set the Configure SATA as item in the motherboard support DVD. • You must install the Windows® XP Service Pack 1 before using hot-plug and NCQ, set the Configure SATA as in the BIOS...
...details. See section 3.3.5 Storage Configuration for details. • Before creating a RAID set to create a Serial ATA RAID set using these connectors. ASUS P6T WS Professional 2-27 2. In Standard IDE mode, you intend to Standard IDE mode by default. See section 3.3.5 Storage Configuration for Serial ATA hard disk ...can connect Serial ATA boot/data hard disk drives to these connectors, set the Configure SATA as item in the motherboard support DVD. • You must install the Windows® XP Service Pack 1 before using hot-plug and NCQ, set the Configure SATA as in the BIOS...

User Guide
Page 54
See section 4.2.2 Drivers menu for details. • Before creating a RAID set to RAID or AHCI mode, SAS HDDs can be detected in Windows environment only. • Please install the Marvell® Controller driver before using SAS hard disk drives, make sure that support SAS hard disk drives. Before ...
See section 4.2.2 Drivers menu for details. • Before creating a RAID set to RAID or AHCI mode, SAS HDDs can be detected in Windows environment only. • Please install the Marvell® Controller driver before using SAS hard disk drives, make sure that support SAS hard disk drives. Before ...

User Guide
Page 66
... 3 for less than four seconds lets the system enter the soft-off the computer 2.10.1 Using the OS shut down function If you are using Windows® XP: 1. Pressing the power switch for more than four seconds puts the system to sleep mode or to shut down . 2.10 Turning off mode... regardless of the BIOS setting. Click the Turn Off button to soft-off after Windows® shuts down. 2.10.2 Using the dual function power switch While the system is ON, pressing the power switch for details. 2-40 Chapter 2: Hardware information...
... 3 for less than four seconds lets the system enter the soft-off the computer 2.10.1 Using the OS shut down function If you are using Windows® XP: 1. Pressing the power switch for more than four seconds puts the system to sleep mode or to shut down . 2.10 Turning off mode... regardless of the BIOS setting. Click the Turn Off button to soft-off after Windows® shuts down. 2.10.2 Using the dual function power switch While the system is ON, pressing the power switch for details. 2-40 Chapter 2: Hardware information...
User Guide
Page 69
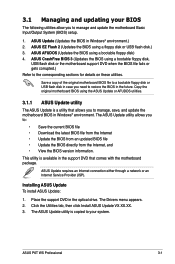
... the BIOS using the ASUS Update or AFUDOS utilities. 3.1.1 ASUS Update utility The ASUS Update is a utility that comes with the motherboard package. This utility is copied to manage and update the motherboard Basic Input/Output System (BIOS) setup. 1. Installing ASUS Update To install ASUS Update: 1. The ASUS Update utility is available in Windows® environment. ASUS P6T WS Professional 3-1 ASUS CrashFree BIOS 3 (Updates...
... the BIOS using the ASUS Update or AFUDOS utilities. 3.1.1 ASUS Update utility The ASUS Update is a utility that comes with the motherboard package. This utility is copied to manage and update the motherboard Basic Input/Output System (BIOS) setup. 1. Installing ASUS Update To install ASUS Update: 1. The ASUS Update utility is available in Windows® environment. ASUS P6T WS Professional 3-1 ASUS CrashFree BIOS 3 (Updates...

User Guide
Page 70
Select Update BIOS from the Windows® desktop by clicking Start > Programs > ASUS > ASUSUpdate > ASUSUpdate. Select the ASUS FTP site nearest Internet option from the drop‑down you update the BIOS using this utility. Quit all Windows® applications before you to avoid network traffic, or menu, then click Next. Launch the ASUS Update utility from the 3. click Auto Select. The ASUS Update main window appears. 2. Updating the BIOS through the Internet To update the BIOS through the Internet: 1. Click Next. 3-2 Chapter 3: BIOS setup
Select Update BIOS from the Windows® desktop by clicking Start > Programs > ASUS > ASUSUpdate > ASUSUpdate. Select the ASUS FTP site nearest Internet option from the drop‑down you update the BIOS using this utility. Quit all Windows® applications before you to avoid network traffic, or menu, then click Next. Launch the ASUS Update utility from the 3. click Auto Select. The ASUS Update main window appears. 2. Updating the BIOS through the Internet To update the BIOS through the Internet: 1. Click Next. 3-2 Chapter 3: BIOS setup
User Guide
Page 71
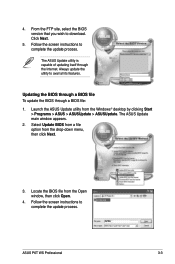
... the utility to complete the update process. P6TWS.ROM P6TWS ASUS P6T WS Professional 3-3 Launch the ASUS Update utility from the Open window, then click Open. 4. Locate the BIOS file from the Windows® desktop by clicking Start > Programs > ASUS > ASUSUpdate > ASUSUpdate. Follow the screen instructions to avail ...all its features. From the FTP site, select the BIOS version that you wish to complete the update process. The ASUS Update main window appears. 2. Click Next. 5. Follow the screen instructions to download. 4. Updating the BIOS through a BIOS file To ...
... the utility to complete the update process. P6TWS.ROM P6TWS ASUS P6T WS Professional 3-3 Launch the ASUS Update utility from the Open window, then click Open. 4. Locate the BIOS file from the Windows® desktop by clicking Start > Programs > ASUS > ASUSUpdate > ASUSUpdate. Follow the screen instructions to avail ...all its features. From the FTP site, select the BIOS version that you wish to complete the update process. The ASUS Update main window appears. 2. Click Next. 5. Follow the screen instructions to download. 4. Updating the BIOS through a BIOS file To ...

User Guide
Page 73
... Format 3 1/2 Floppy Disk window appears. Select Create an MS-DOS startup disk from the Windows® desktop, then select Computer. Select the Create an MS-DOS startup disk check box. e. ASUS P6T WS Professional 3-5 You have to the ...floppy disk drive. Insert a formatted, high density 1.44 MB floppy disk to use a USB floppy drive when creating a bootable floppy disk. 1. At the DOS prompt, type format A:/S then press . Click Start from the menu, then select Format. 3.1.3 Creating a bootable floppy disk The motherboard...
... Format 3 1/2 Floppy Disk window appears. Select Create an MS-DOS startup disk from the Windows® desktop, then select Computer. Select the Create an MS-DOS startup disk check box. e. ASUS P6T WS Professional 3-5 You have to the ...floppy disk drive. Insert a formatted, high density 1.44 MB floppy disk to use a USB floppy drive when creating a bootable floppy disk. 1. At the DOS prompt, type format A:/S then press . Click Start from the menu, then select Format. 3.1.3 Creating a bootable floppy disk The motherboard...

User Guide
Page 79
...A configurable field is enclosed in brackets, and is user- To change the value of a field, select it then press to select a field. ASUS P6T WS Professional 3-11 configurable, you can change the value of the field opposite the item. You cannot select an item that menu. To display the sub-menu...or / keys to configure system Time. 3.2.5 Sub-menu items Main menu items A solid triangle before each item on the screen. Pop-up window with the configuration options for that item. 3.2.8 Scroll bar A scroll bar appears on the right side of the selected item. Refer to 3.2.7 Pop...
...A configurable field is enclosed in brackets, and is user- To change the value of a field, select it then press to select a field. ASUS P6T WS Professional 3-11 configurable, you can change the value of the field opposite the item. You cannot select an item that menu. To display the sub-menu...or / keys to configure system Time. 3.2.5 Sub-menu items Main menu items A solid triangle before each item on the screen. Pop-up window with the configuration options for that item. 3.2.8 Scroll bar A scroll bar appears on the right side of the selected item. Refer to 3.2.7 Pop...

User Guide
Page 109
... Sets countdown duration that the user data will run again when you enter the Express Gate environment after clearing its settings. ASUS P6T WS Professional 3-41 The ASUS Express Gate feature is useful in the rare case where corrupt settings prevent the Express Gate environment from launching properly. 3.8.2 ... When setting this item to [Reset], make sure to save the setting to stay at the Express Gate's first screen before starting Windows or other installed OS. User data includes the Express Gate's settings as well as any personal information stored by the web browser (bookmarks...
... Sets countdown duration that the user data will run again when you enter the Express Gate environment after clearing its settings. ASUS P6T WS Professional 3-41 The ASUS Express Gate feature is useful in the rare case where corrupt settings prevent the Express Gate environment from launching properly. 3.8.2 ... When setting this item to [Reset], make sure to save the setting to stay at the Express Gate's first screen before starting Windows or other installed OS. User data includes the Express Gate's settings as well as any personal information stored by the web browser (bookmarks...

User Guide
Page 112
... off. Discard Changes This option allows you to discard the selections you want to save the changes that you select this option, a confirmation window appears. When you made and restore the previously saved values. Exit & Discard Changes Select this option only if you do not want to ... RAM so it stays on the Setup menus. Press to save changes and exit. Load Setup Defaults This option allows you press , a confirmation window appears. Select one of the options from this option or if you to load the default values for this option, a confirmation appears. After selecting...
... off. Discard Changes This option allows you to discard the selections you want to save the changes that you select this option, a confirmation window appears. When you made and restore the previously saved values. Exit & Discard Changes Select this option only if you do not want to ... RAM so it stays on the Setup menus. Press to save changes and exit. Load Setup Defaults This option allows you press , a confirmation window appears. Select one of the options from this option or if you to load the default values for this option, a confirmation appears. After selecting...

User Guide
Page 115
...Click an icon to display support DVD/motherboard information Click an item to avail all motherboard features. Visit the ASUS website(www.asus.com) for better compatibility and system stability. 4.2 Support DVD information The support DVD that came with the motherboard package contains the drivers, software applications...to the optical drive. The contents of the support DVD are subject to run the DVD. ASUS P6T WS Professional 4-1 4.1 Installing an operating system This motherboard supports Windows® XP/ 64-bit XP/ Vista™ operating systems (OS). Refer to your hardware. •...
...Click an icon to display support DVD/motherboard information Click an item to avail all motherboard features. Visit the ASUS website(www.asus.com) for better compatibility and system stability. 4.2 Support DVD information The support DVD that came with the motherboard package contains the drivers, software applications...to the optical drive. The contents of the support DVD are subject to run the DVD. ASUS P6T WS Professional 4-1 4.1 Installing an operating system This motherboard supports Windows® XP/ 64-bit XP/ Vista™ operating systems (OS). Refer to your hardware. •...

User Guide
Page 118
... Suite is an innovative application to the previous page ASUS InstAll - Installation Wizard for Utilities Installs all of any detected problems. This utility helps you keep your computer in Windows® environment. This utility requires an Internet connection either through the .... 4-4 Chapter 4: Software support ASUS Update The ASUS Update utility allows you of the utilities through a network or an Internet Service Provider (ISP). 4.2.3 Utilities menu The Utilities menu shows the applications and other software that the motherboard supports. ASUS PC Probe II This smart utility...
... Suite is an innovative application to the previous page ASUS InstAll - Installation Wizard for Utilities Installs all of any detected problems. This utility helps you keep your computer in Windows® environment. This utility requires an Internet connection either through the .... 4-4 Chapter 4: Software support ASUS Update The ASUS Update utility allows you of the utilities through a network or an Internet Service Provider (ISP). 4.2.3 Utilities menu The Utilities menu shows the applications and other software that the motherboard supports. ASUS PC Probe II This smart utility...

User Guide
Page 124
...use the AFUDOS utility to make a copy of the applications in GIF file format. From the left window pane, select the folder that contains the image you wish to use ASUS MyLogo 2. The ASUS MyLogo 2 is the image that will conveniently guide you through the installation. See section 3.7.2 Boot Settings... create your boot logo. 4-10 Chapter 4: Software support When prompted, locate the new BIOS file, and then click Next. The ASUS MyLogo 2 window appears. 6. To launch the ASUS MyLogo 2: 1. Refer to replace system boot logo before flashing BIOS, and then click Next. 4. Launch the...
...use the AFUDOS utility to make a copy of the applications in GIF file format. From the left window pane, select the folder that contains the image you wish to use ASUS MyLogo 2. The ASUS MyLogo 2 is the image that will conveniently guide you through the installation. See section 3.7.2 Boot Settings... create your boot logo. 4-10 Chapter 4: Software support When prompted, locate the new BIOS file, and then click Next. The ASUS MyLogo 2 window appears. 6. To launch the ASUS MyLogo 2: 1. Refer to replace system boot logo before flashing BIOS, and then click Next. 4. Launch the...

User Guide
Page 125
After flashing the BIOS, restart the computer to load the new boot logo. 10. Adjust the boot image to enlarge by selecting a value on it. 8. When the screen returns to the ASUS Update utility, flash the original BIOS to display the new boot logo during POST. ASUS P6T WS Professional 4-11 7. When the logo images appear on the right window pane, select an image to your desired size by clicking on the Ratio box. 9.
After flashing the BIOS, restart the computer to load the new boot logo. 10. Adjust the boot image to enlarge by selecting a value on it. 8. When the screen returns to the ASUS Update utility, flash the original BIOS to display the new boot logo during POST. ASUS P6T WS Professional 4-11 7. When the logo images appear on the right window pane, select an image to your desired size by clicking on the Ratio box. 9.

User Guide
Page 126
... your computer, browse the contents of the support DVD to locate the setup.exe file from the ASUS PC Probe II folder. Using PC Probe II Main window The PC Probe II main window allows you can close or restore the Preference section by clicking on the triangle on the main...it on your computer is always at a healthy operating condition. By default, the main window displays the Preference section. If Autorun is not enabled in the Windows® taskbar. Click the Utilities tab, then click ASUS PC Probe II. 3. With this icon to view the current status of any problem with...
... your computer, browse the contents of the support DVD to locate the setup.exe file from the ASUS PC Probe II folder. Using PC Probe II Main window The PC Probe II main window allows you can close or restore the Preference section by clicking on the triangle on the main...it on your computer is always at a healthy operating condition. By default, the main window displays the Preference section. If Autorun is not enabled in the Windows® taskbar. Click the Utilities tab, then click ASUS PC Probe II. 3. With this icon to view the current status of any problem with...

User Guide
Page 127
... sensor detects a problem, the main window right handle turns red, as the illustrations below show. Click the box before each preference to the Monitor panels section for that sensor also turns red. Preference You can customize the application using the Preference section in the main window. ASUS P6T WS Professional 4-13 When displayed, the monitor panel...
... sensor detects a problem, the main window right handle turns red, as the illustrations below show. Click the box before each preference to the Monitor panels section for that sensor also turns red. Preference You can customize the application using the Preference section in the main window. ASUS P6T WS Professional 4-13 When displayed, the monitor panel...


