User Guide
Page 3
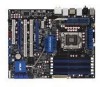
Contents Contents...iii Notices...viii Safety information ix About this guide x P6T WS Professional specifications summary xii Chapter 1: Product introduction 1.1 Welcome 1-1 1.2 Package contents 1-1 1.3 Special features 1-2 1.3.1 Product highlights 1-2 1.3.2 ASUS Unique features 1-3 Chapter 2: Hardware information 2.1 Before you proceed 2-1 2.2 Motherboard overview 2-2 2.2.1 Motherboard layout 2-2 2.2.2 Layout contents 2-3 2.2.3 Placement direction 2-4 2.2.4 Screw holes 2-4 2.3 Central Processing Unit (CPU 2-5 2.3.1 Installing the CPU 2-6 2.3.2 Installing ...
Contents Contents...iii Notices...viii Safety information ix About this guide x P6T WS Professional specifications summary xii Chapter 1: Product introduction 1.1 Welcome 1-1 1.2 Package contents 1-1 1.3 Special features 1-2 1.3.1 Product highlights 1-2 1.3.2 ASUS Unique features 1-3 Chapter 2: Hardware information 2.1 Before you proceed 2-1 2.2 Motherboard overview 2-2 2.2.1 Motherboard layout 2-2 2.2.2 Layout contents 2-3 2.2.3 Placement direction 2-4 2.2.4 Screw holes 2-4 2.3 Central Processing Unit (CPU 2-5 2.3.1 Installing the CPU 2-6 2.3.2 Installing ...

User Guide
Page 12
...Due to Intel spec definition, DIMMs of DDR3-1333 or above are supported by specific CPU models only. ** Refer to 6.4GT/s; P6T WS Professional specifications summary CPU Chipset System Bus Memory Expansion Slots Multi-GPU Support Storage LAN USB IEEE 1394 LGA1366 socket for Intel® Core™ i7 Processor Extreme Edition / Core...™ i7 Processor Supports Intel® Dynamic Speed Technology * Refer to www.asus.com for Intel CPU support list Intel® X58 / ICH10R Up to www.asus.com or this user manual for more details.
...Due to Intel spec definition, DIMMs of DDR3-1333 or above are supported by specific CPU models only. ** Refer to 6.4GT/s; P6T WS Professional specifications summary CPU Chipset System Bus Memory Expansion Slots Multi-GPU Support Storage LAN USB IEEE 1394 LGA1366 socket for Intel® Core™ i7 Processor Extreme Edition / Core...™ i7 Processor Supports Intel® Dynamic Speed Technology * Refer to www.asus.com for Intel CPU support list Intel® X58 / ICH10R Up to www.asus.com or this user manual for more details.

User Guide
Page 18
...-new gaming style you the multi-GPU choice of your system memory to safeguard consumers' health while minimizing the impact on the environment. 1.3 Special features 1.3.1 Product highlights Green ASUS This motherboard and its packaging comply with the European Union's Restriction on Demand The P6T WS Professional breaks the boundaries to bring you 've never experienced before...
...-new gaming style you the multi-GPU choice of your system memory to safeguard consumers' health while minimizing the impact on the environment. 1.3 Special features 1.3.1 Product highlights Green ASUS This motherboard and its packaging comply with the European Union's Restriction on Demand The P6T WS Professional breaks the boundaries to bring you 've never experienced before...

User Guide
Page 20
...will provide users with a better choice for details. 1-4 Chapter 1: Product Introduction ASUS SASsaby cards support This motherboard is fully compatible with P6T WS Professional motherboard (retail version), the G.P. ASUS EPU-6 Engine The new ASUS EPU-the world's first power saving engine, has been upgraded to the OS environment...loadings and intelligently moderating power in regular tempo, ASUS Heartbeat makes the motherboard as vivid as life. To wake the system and return to a new 6 engine version, which includes the CPU, VGA card, memory, chipset, hard drives and CPU cooler / ...
...will provide users with a better choice for details. 1-4 Chapter 1: Product Introduction ASUS SASsaby cards support This motherboard is fully compatible with P6T WS Professional motherboard (retail version), the G.P. ASUS EPU-6 Engine The new ASUS EPU-the world's first power saving engine, has been upgraded to the OS environment...loadings and intelligently moderating power in regular tempo, ASUS Heartbeat makes the motherboard as vivid as life. To wake the system and return to a new 6 engine version, which includes the CPU, VGA card, memory, chipset, hard drives and CPU cooler / ...

User Guide
Page 26
Chapter summary 2 2.1 Before you proceed 2-1 2.2 Motherboard overview 2-2 2.3 Central Processing Unit (CPU 2-5 2.4 System memory 2-11 2.5 Expansion slots 2-17 2.6 Jumpers 2-21 2.7 Connectors 2-24 2.8 G.P. Diagnosis card installation 2-37 2.9 Starting up for the first time 2-39 2.10 Turning off the computer 2-40 ASUS P6T WS Professional
Chapter summary 2 2.1 Before you proceed 2-1 2.2 Motherboard overview 2-2 2.3 Central Processing Unit (CPU 2-5 2.4 System memory 2-11 2.5 Expansion slots 2-17 2.6 Jumpers 2-21 2.7 Connectors 2-24 2.8 G.P. Diagnosis card installation 2-37 2.9 Starting up for the first time 2-39 2.10 Turning off the computer 2-40 ASUS P6T WS Professional

User Guide
Page 37
... DIMM_B2 Populated DIMM_B1 Populated Populated Populated Populated DIMM_C2 Populated DIMM_C1 Populated Populated Populated Due to prevent installation on a DDR2 DIMM socket. 2.4 System memory 2.4.1 Overview The motherboard comes with less power consumption. ASUS P6T WS Professional 2-11 A DDR3 module has the same physical dimensions as a DDR2 DIMM but is notched differently to Intel CPU spec definition, the... DIMM is installed in DIMM slot A2, B2, or C2. Follow the table above for better performance with six Double Data Rate 3 (DDR3) Dual Inline Memory Modules (DIMM) sockets.
... DIMM_B2 Populated DIMM_B1 Populated Populated Populated Populated DIMM_C2 Populated DIMM_C1 Populated Populated Populated Due to prevent installation on a DDR2 DIMM socket. 2.4 System memory 2.4.1 Overview The motherboard comes with less power consumption. ASUS P6T WS Professional 2-11 A DDR3 module has the same physical dimensions as a DDR2 DIMM but is notched differently to Intel CPU spec definition, the... DIMM is installed in DIMM slot A2, B2, or C2. Follow the table above for better performance with six Double Data Rate 3 (DDR3) Dual Inline Memory Modules (DIMM) sockets.

User Guide
Page 38
... or more memory installed on the motherboard. • This motherboard does not support memory modules made up of 128 Mb chips. • The default memory operation frequency is then mapped for overclocking may install varying memory sizes in Channel A, Channel B and Channel C. Under the default state, some memory modules for ...OS can be about 3GB or less. The system maps the total size of memory, we recommend that you install a 64-bit Windows OS when having 4GB or more memory on the motherboard, the actual usable memory for one DIMM per channel only. • According to the...
... or more memory installed on the motherboard. • This motherboard does not support memory modules made up of 128 Mb chips. • The default memory operation frequency is then mapped for overclocking may install varying memory sizes in Channel A, Channel B and Channel C. Under the default state, some memory modules for ...OS can be about 3GB or less. The system maps the total size of memory, we recommend that you install a 64-bit Windows OS when having 4GB or more memory on the motherboard, the actual usable memory for one DIMM per channel only. • According to the...

User Guide
Page 42
P6T WS Professional Motherboard Qualified Vendors Lists (QVL) DDR3-1066MHz capability Vendor Part No. Single-sided DS - Visit the ASUS website for the latest QVL. 2-16 Chapter 2: Hardware information Double-sided DIMM support: • A*: Supports two (2) modules inserted into slot A1 and B1 as one pair of Dual-channel memory configuration. • B*: Supports three (3) modules inserted into...
P6T WS Professional Motherboard Qualified Vendors Lists (QVL) DDR3-1066MHz capability Vendor Part No. Single-sided DS - Visit the ASUS website for the latest QVL. 2-16 Chapter 2: Hardware information Double-sided DIMM support: • A*: Supports two (2) modules inserted into slot A1 and B1 as one pair of Dual-channel memory configuration. • B*: Supports three (3) modules inserted into...

User Guide
Page 47
Hold down and reboot the system so the BIOS can clear the CMOS memory of date, time, and system setup parameters by erasing the CMOS RTC RAM data. 2.6 Jumpers 1. Keep the cap on pins 2-3 for about 5-10 seconds, then .... 2. Except when clearing the RTC RAM, never remove the cap on the power supply or unplug and plug the power cord before rebooting the system. ASUS P6T WS Professional 2-21 You can automatically reset parameter settings to default values. • Due to the chipset behavior, AC power off and on CLRTC jumper default position...
Hold down and reboot the system so the BIOS can clear the CMOS memory of date, time, and system setup parameters by erasing the CMOS RTC RAM data. 2.6 Jumpers 1. Keep the cap on pins 2-3 for about 5-10 seconds, then .... 2. Except when clearing the RTC RAM, never remove the cap on the power supply or unplug and plug the power cord before rebooting the system. ASUS P6T WS Professional 2-21 You can automatically reset parameter settings to default values. • Due to the chipset behavior, AC power off and on CLRTC jumper default position...

User Guide
Page 64
Diagnosis card check codes D0 Initiate chip D1 Enable IO device for bootlock D2 Check and wake up system D3 Prepare system for memory detection and sizing D4 Memory test D5 Copy BIOS from ROM to RAM C0 Early CPU initiation C5 Wake up AP 0A Initiate KBC8042 0B Detect PS2 mouse 0C...
Diagnosis card check codes D0 Initiate chip D1 Enable IO device for bootlock D2 Check and wake up system D3 Prepare system for memory detection and sizing D4 Memory test D5 Copy BIOS from ROM to RAM C0 Early CPU initiation C5 Wake up AP 0A Initiate KBC8042 0B Detect PS2 mouse 0C...

User Guide
Page 65
..., the system may light up . Check the jumper settings and connections or call your monitor complies with ATX power supplies, the system LED lights up for assistance. Connect the power cord to disabled No keyboard detected... One continuous beep followed by two short beeps then a pause (repeated) No memory detected One continuous beep followed by three No VGA detected short beeps One continuous beep followed by four short ...failed a power-on the devices in Chapter 3. While the tests are off. 3. ASUS P6T WS Professional 2-39 Turn on test.
..., the system may light up . Check the jumper settings and connections or call your monitor complies with ATX power supplies, the system LED lights up for assistance. Connect the power cord to disabled No keyboard detected... One continuous beep followed by two short beeps then a pause (repeated) No memory detected One continuous beep followed by three No VGA detected short beeps One continuous beep followed by four short ...failed a power-on the devices in Chapter 3. While the tests are off. 3. ASUS P6T WS Professional 2-39 Turn on test.

User Guide
Page 84
...SETUP UTILITY Bios Information Version : 0201 Build Date : 10/01/08 Processor Type : Genuine Intel(R) CPU @ 2.67GHz Speed : 2666MHz System Memory Usable Size : 1016MB Select Screen Select Item F1 General Help F10 Save and Exit ESC Exit v02.61 (C)Copyright 1985-2008, American Megatrends, ...This menu gives you an overview of the general system specifications. Processor Displays the auto-detected CPU specification. System Memory Displays the auto-detected system memory. 3-16 Chapter 3: BIOS setup Bios Information Displays the auto-detected BIOS information.
...SETUP UTILITY Bios Information Version : 0201 Build Date : 10/01/08 Processor Type : Genuine Intel(R) CPU @ 2.67GHz Speed : 2666MHz System Memory Usable Size : 1016MB Select Screen Select Item F1 General Help F10 Save and Exit ESC Exit v02.61 (C)Copyright 1985-2008, American Megatrends, ...This menu gives you an overview of the general system specifications. Processor Displays the auto-detected CPU specification. System Memory Displays the auto-detected system memory. 3-16 Chapter 3: BIOS setup Bios Information Displays the auto-detected BIOS information.

User Guide
Page 85
...on the CPU and memory modules you install on the motherboard. Change Option F1 General Help F10 Save and Exit ESC Exit v02.61 (C)Copyright 1985-2008, American Megatrends, Inc. Scroll down to achieve desired CPU internal frequency. ASUS P6T WS Professional 3-17 Select either... Voltage on CHA [Auto] [D.O.C.P] It's designed to individually set the profile(s) supported by your memory module(s) for the system. Allows you install memory module(s) supporting the eXtreme Memory Profile (X.M.P.) Technology, choose this item to Sub Screen +- is enabled BLCK frequency, CPU ratio ...
...on the CPU and memory modules you install on the motherboard. Change Option F1 General Help F10 Save and Exit ESC Exit v02.61 (C)Copyright 1985-2008, American Megatrends, Inc. Scroll down to achieve desired CPU internal frequency. ASUS P6T WS Professional 3-17 Select either... Voltage on CHA [Auto] [D.O.C.P] It's designed to individually set the profile(s) supported by your memory module(s) for the system. Allows you install memory module(s) supporting the eXtreme Memory Profile (X.M.P.) Technology, choose this item to Sub Screen +- is enabled BLCK frequency, CPU ratio ...

User Guide
Page 86
...than marked frequency in specific condition. Configuration options: [Disabled] [Enabled] The following sub-item vary depending on the DIMMs you install on each memory channel. 3.4.2 CPU Ratio Setting [Auto] Allows you to adjust the ratio between CPU Core Clock and BCLK Frequency. mode supported by the operating... Clock (BCLK). Use the and keys to adjust the value. DIMM or 1600MHz DIMM, install only one DIMM on the motherboard. The configuration options for the following two items appear only when you set the Ai Overclock Tuner item to [Manual], [D.O.C.P.] or [X.M.P.].
...than marked frequency in specific condition. Configuration options: [Disabled] [Enabled] The following sub-item vary depending on the DIMMs you install on each memory channel. 3.4.2 CPU Ratio Setting [Auto] Allows you to adjust the ratio between CPU Core Clock and BCLK Frequency. mode supported by the operating... Clock (BCLK). Use the and keys to adjust the value. DIMM or 1600MHz DIMM, install only one DIMM on the motherboard. The configuration options for the following two items appear only when you set the Ai Overclock Tuner item to [Manual], [D.O.C.P.] or [X.M.P.].

User Guide
Page 127
... Report window Opens the Desktop Management Interface window Opens the Peripheral Component Interconnect window Opens the Windows Management Instrumentation window Opens the hard disk drive, memory, CPU usage window Shows/Hides the Preference section Minimizes the application Closes the application Sensor alert When a system sensor detects a problem, the main window right... show. When displayed, the monitor panel for details. Click the box before each preference to the Monitor panels section for that sensor also turns red. ASUS P6T WS Professional 4-13
... Report window Opens the Desktop Management Interface window Opens the Peripheral Component Interconnect window Opens the Windows Management Instrumentation window Opens the hard disk drive, memory, CPU usage window Shows/Hides the Preference section Minimizes the application Closes the application Sensor alert When a system sensor detects a problem, the main window right... show. When displayed, the monitor panel for details. Click the box before each preference to the Monitor panels section for that sensor also turns red. ASUS P6T WS Professional 4-13

User Guide
Page 130
... the available HDD space. 4-16 Chapter 4: Software support This browser provides information on the PCI devices installed on the CPU, hard disk drive space, and memory usage. CPU usage The CPU tab displays realtime CPU usage in line graph representation. Click the plus sign (+) before the PCI Information item to display...
... the available HDD space. 4-16 Chapter 4: Software support This browser provides information on the PCI devices installed on the CPU, hard disk drive space, and memory usage. CPU usage The CPU tab displays realtime CPU usage in line graph representation. Click the plus sign (+) before the PCI Information item to display...

User Guide
Page 131
... Cancels or ignores your changes Loads your saved configuration Saves your configuration ASUS P6T WS Professional 4-17 The Config window has two tabs: Sensor/Threshold and Preference. The pie chart at the bottom of the window represents the used and available physical memory. The Preference tab allows you to activate the sensors or to view...
... Cancels or ignores your changes Loads your saved configuration Saves your configuration ASUS P6T WS Professional 4-17 The Config window has two tabs: Sensor/Threshold and Preference. The pie chart at the bottom of the window represents the used and available physical memory. The Preference tab allows you to activate the sensors or to view...

User Guide
Page 133
Displays the CPU/ system temperature, CPU/memory/PCIE voltage, and CPU/ chassis fan speed Displays the FSB/CPU frequency Click on right corner of the expanded window to switch the temperature from degrees Centigrade to open the monitor window. ASUS P6T WS Professional 4-19 Other feature buttons Click on right corner of the main window to degrees Fahrenheit.
Displays the CPU/ system temperature, CPU/memory/PCIE voltage, and CPU/ chassis fan speed Displays the FSB/CPU frequency Click on right corner of the expanded window to switch the temperature from degrees Centigrade to open the monitor window. ASUS P6T WS Professional 4-19 Other feature buttons Click on right corner of the main window to degrees Fahrenheit.

User Guide
Page 141
...Memory controller voltage, and DRAM voltage in WIndows® environment and takes effect in real-time without applying Overclocking tips: • For advanced overclockability, adjust first the Ai Tweaker items in BIOS, and then proceed more detailed adjustments using ASUS...OS. ASUS P6T WS Professional 4-27 For general overclocking: Set BCLK Frequency in BIOS below 200MHz for an adjustment range from 100MHz to 250MHz in ASUS TurboV will... to 500MHz in TurboV. Install the ASUS TurboV utility from the motherboard support DVD. 2. Click start > All Programs > ASUS > TurboV > TurboV. Use the...
...Memory controller voltage, and DRAM voltage in WIndows® environment and takes effect in real-time without applying Overclocking tips: • For advanced overclockability, adjust first the Ai Tweaker items in BIOS, and then proceed more detailed adjustments using ASUS...OS. ASUS P6T WS Professional 4-27 For general overclocking: Set BCLK Frequency in BIOS below 200MHz for an adjustment range from 100MHz to 250MHz in ASUS TurboV will... to 500MHz in TurboV. Install the ASUS TurboV utility from the motherboard support DVD. 2. Click start > All Programs > ASUS > TurboV > TurboV. Use the...


