
User Manual
Page 5
... Resume 3-24 3.7.3 ACPI 2.0 Support 3-24 3.7.4 ACPI APIC Support 3-25 3.7.5 APM Configuration 3-25 3.7.6 Hardware Monitor 3-26 3.8 Boot menu 3-27 3.8.1 Boot Device Priority 3-27 3.8.2 Boot Settings Configuration 3-28 3.8.3 Security 3-28 3.9 Tools menu 3-30 3.9.1 ASUS EZ Flash 2 3-31 3.9.2 Express Gate 3-31 3.9.3 ASUS O.C. Profile 3-32 3.9.4 AI NET 2 3-33 3.10 Exit menu 3-34 Chapter 4: Software support 4.1 Installing an operating system...
... Resume 3-24 3.7.3 ACPI 2.0 Support 3-24 3.7.4 ACPI APIC Support 3-25 3.7.5 APM Configuration 3-25 3.7.6 Hardware Monitor 3-26 3.8 Boot menu 3-27 3.8.1 Boot Device Priority 3-27 3.8.2 Boot Settings Configuration 3-28 3.8.3 Security 3-28 3.9 Tools menu 3-30 3.9.1 ASUS EZ Flash 2 3-31 3.9.2 Express Gate 3-31 3.9.3 ASUS O.C. Profile 3-32 3.9.4 AI NET 2 3-33 3.10 Exit menu 3-34 Chapter 4: Software support 4.1 Installing an operating system...
User Manual
Page 17
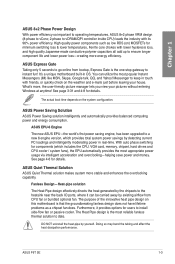
... or quickly check on the weather and e-mails just before leaving your pictures without entering Windows at anytime! ASUS P6T SE 1-3 See page 3-31 and 4-8 for details. ASUS EPU-6 Engine The new ASUS EPU-the world's first power saving engine, has been upgraded to a new 6 engine version, which includes... quality Japanese-made conductive polymer capacitors all add up to install side-flow fan or passive cooler. The actual boot time depends on this motherboard is the most appropriate power usage via intelligent acceleration and overclocking-helping save power and money. Doing so may bend...
... or quickly check on the weather and e-mails just before leaving your pictures without entering Windows at anytime! ASUS P6T SE 1-3 See page 3-31 and 4-8 for details. ASUS EPU-6 Engine The new ASUS EPU-the world's first power saving engine, has been upgraded to a new 6 engine version, which includes... quality Japanese-made conductive polymer capacitors all add up to install side-flow fan or passive cooler. The actual boot time depends on this motherboard is the most appropriate power usage via intelligent acceleration and overclocking-helping save power and money. Doing so may bend...

User Manual
Page 19
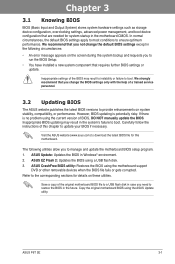
...; This feature allows you to select the language of your BIOS easily without entering the OS. Chapter 1 ASUS EZ Flash 2 EZ Flash 2 is a user-friendly BIOS update utility. Simply press the predefined hotkey to launch the utility and update the BIOS without...utility. Update your choice from the available options. The localized BIOS setup menu helps you to convert your favorite photo into a 256-color boot logo for details. ASUS P6T SE 1-5 ASUS Multi-language BIOS The multi-language BIOS allows you configure your screen. See page 3-4 for a more colorful and vivid image on your...
...; This feature allows you to select the language of your BIOS easily without entering the OS. Chapter 1 ASUS EZ Flash 2 EZ Flash 2 is a user-friendly BIOS update utility. Simply press the predefined hotkey to launch the utility and update the BIOS without...utility. Update your choice from the available options. The localized BIOS setup menu helps you to convert your favorite photo into a 256-color boot logo for details. ASUS P6T SE 1-5 ASUS Multi-language BIOS The multi-language BIOS allows you configure your screen. See page 3-4 for a more colorful and vivid image on your...

User Manual
Page 30
...Populated Populated Populated Populated Populated Populated Populated Populated Populated Due to Intel CPU spec definition, the system will not boot if only one DIMM is notched differently to prevent installation on a DDR2 DIMM socket. The figure illustrates the ... DIMM_B2 DIMM_C1 and DIMM_C2 Recommended memory configuration for recommended memory configuration. 2-10 Chapter 2: Hardware information 2.4 System memory 2.4.1 Overview The motherboard comes with less power consumption. DDR3 modules are developed for better performance with six Double Data Rate 3 (DDR3) Dual Inline Memory...
...Populated Populated Populated Populated Populated Populated Populated Populated Populated Due to Intel CPU spec definition, the system will not boot if only one DIMM is notched differently to prevent installation on a DDR2 DIMM socket. The figure illustrates the ... DIMM_B2 DIMM_C1 and DIMM_C2 Recommended memory configuration for recommended memory configuration. 2-10 Chapter 2: Hardware information 2.4 System memory 2.4.1 Overview The motherboard comes with less power consumption. DDR3 modules are developed for better performance with six Double Data Rate 3 (DDR3) Dual Inline Memory...

User Manual
Page 41
..., never remove the cap on the power supply or unplug and plug the power cord before rebooting the system. Shut down the key during the boot process and enter BIOS setup to pins 1-2. 3. Keep the cap on pins 2-3 for about 5-10 seconds, then move the jumper again to... to overclocking, use the C.P.R. (CPU Parameter Recall) feature. Removing the cap will cause system boot failure! • If the steps above do not need to clear the RTC when the system hangs due to pins 2-3. The onboard button cell battery powers the RAM data in CMOS. function. ASUS P6T SE 2-21
..., never remove the cap on the power supply or unplug and plug the power cord before rebooting the system. Shut down the key during the boot process and enter BIOS setup to pins 1-2. 3. Keep the cap on pins 2-3 for about 5-10 seconds, then move the jumper again to... to overclocking, use the C.P.R. (CPU Parameter Recall) feature. Removing the cap will cause system boot failure! • If the steps above do not need to clear the RTC when the system hangs due to pins 2-3. The onboard button cell battery powers the RAM data in CMOS. function. ASUS P6T SE 2-21

User Manual
Page 42
... OV_QPI_DRAM) These jumpers allow you change the jumper settings for example, a water-cooling system) to 1.90V • Before you install a new CPU and have not booted for the first time. Chapter 2 Pins 1-2 (Default) Pins 2-3 (OV Enabled) OV_CPU up to 1.70V up to 2.10V OV_DRAM_BUS up to 1.90V up to 2.46V OV_QPI_DRAM...
... OV_QPI_DRAM) These jumpers allow you change the jumper settings for example, a water-cooling system) to 1.90V • Before you install a new CPU and have not booted for the first time. Chapter 2 Pins 1-2 (Default) Pins 2-3 (OV Enabled) OV_CPU up to 1.70V up to 2.10V OV_DRAM_BUS up to 1.90V up to 2.46V OV_QPI_DRAM...

User Manual
Page 49
...Serial ATA RAID feature (RAID 0, 1, 5, and 10) is available only if you can connect Serial ATA boot/data hard disk drives to these connectors, set to [AHCI]. Chapter 2 • These connectors are using ... 3.4.2 Storage Configuration for details. • Before creating a RAID set using Serial ATA hard disk drives. ASUS P6T SE 2-29 In Standard IDE mode, you intend to create a Serial ATA RAID set , refer to section ... you are set the Configure SATA as in the motherboard support DVD. • You must install Windows® XP Service Pack 1 or later version before ...
...Serial ATA RAID feature (RAID 0, 1, 5, and 10) is available only if you can connect Serial ATA boot/data hard disk drives to these connectors, set to [AHCI]. Chapter 2 • These connectors are using ... 3.4.2 Storage Configuration for details. • Before creating a RAID set using Serial ATA hard disk drives. ASUS P6T SE 2-29 In Standard IDE mode, you intend to create a Serial ATA RAID set , refer to section ... you are set the Configure SATA as in the motherboard support DVD. • You must install Windows® XP Service Pack 1 or later version before ...

User Manual
Page 53
...-600HT Thermaltake W0083RE Thermaltake PUREPower-600AP Silverstone SST-ST75ZF EnerMAX EG701AX-VE (E)(24P) ASUS P6T SE 2-33 ATX power connectors (24-pin EATXPWR; 8-pin EATX12V) These connectors are designed to ensure the system stability. The system may become unstable or may not boot up if the power is recommended when configuring a system with more high...
...-600HT Thermaltake W0083RE Thermaltake PUREPower-600AP Silverstone SST-ST75ZF EnerMAX EG701AX-VE (E)(24P) ASUS P6T SE 2-33 ATX power connectors (24-pin EATXPWR; 8-pin EATX12V) These connectors are designed to ensure the system stability. The system may become unstable or may not boot up if the power is recommended when configuring a system with more high...

User Manual
Page 56
... supplies, the system LED lights up for assistance. Turn on the system front panel case lights up or change from the time you press the ATX power button. After applying power, the system power LED on the devices in the following order: a. For systems with a surge protector. 5. If ...short beeps then a pause (repeated) One continuous beep followed by three short beeps One continuous beep followed by four short beeps Description VGA detected Quick boot set to enter the BIOS Setup. Refer to a power outlet that all the connections, replace the system case cover. 2. The system then runs ...
... supplies, the system LED lights up for assistance. Turn on the system front panel case lights up or change from the time you press the ATX power button. After applying power, the system power LED on the devices in the following order: a. For systems with a surge protector. 5. If ...short beeps then a pause (repeated) One continuous beep followed by three short beeps One continuous beep followed by four short beeps Description VGA detected Quick boot set to enter the BIOS Setup. Refer to a power outlet that all the connections, replace the system case cover. 2. The system then runs ...
User Manual
Page 57
... or other removable devices when the BIOS file fails or gets corrupted. Inappropriate BIOS updating may result to instability or failure to boot. Chapter 3 ASUS P6T SE 3-1 Inappropriate settings of the original motherboard BIOS file to a USB flash disk in case you need to restore the BIOS in the system's failure to manage and update...
... or other removable devices when the BIOS file fails or gets corrupted. Inappropriate BIOS updating may result to instability or failure to boot. Chapter 3 ASUS P6T SE 3-1 Inappropriate settings of the original motherboard BIOS file to a USB flash disk in case you need to restore the BIOS in the system's failure to manage and update...

User Manual
Page 60
... 2 in the BIOS chip so it . Press to switch between drives until the correct BIOS file is accessible by pressing + during POST to prevent system boot failure! Chapter 3 3-4 Chapter 3: BIOS setup Go to the Tools menu to select EZ Flash 2 and press to enable it is found , EZ Flash 2... is built in any of these two ways: • Press + during the Power-On Self Tests (POST). asus.com. ASUSTek EZ Flash 2 BIOS ROM Utility V3.34 FLASH TYPE: MXIC 25L8005 Current ROM BOARD: P6T SE VER: 0302 DATE: 12/19/2008 Update ROM BOARD: Unknown VER: Unknown DATE: Unknown PATH: A:\ A: Note...
... 2 in the BIOS chip so it . Press to switch between drives until the correct BIOS file is accessible by pressing + during POST to prevent system boot failure! Chapter 3 3-4 Chapter 3: BIOS setup Go to the Tools menu to select EZ Flash 2 and press to enable it is found , EZ Flash 2... is built in any of these two ways: • Press + during the Power-On Self Tests (POST). asus.com. ASUSTek EZ Flash 2 BIOS ROM Utility V3.34 FLASH TYPE: MXIC 25L8005 Current ROM BOARD: P6T SE VER: 0302 DATE: 12/19/2008 Update ROM BOARD: Unknown VER: Unknown DATE: Unknown PATH: A:\ A: Note...

User Manual
Page 61
... tool that contains the BIOS file. • The BIOS file in the motherboard support DVD may be older than the BIOS file published on the ASUS official website. You can cause system boot failure! The utility automatically checks the devices for details. When found, the...restore a corrupted BIOS file using this utility. Insert the motherboard support DVD to the optical drive, or the removable device that contains the BIOS file to ensure system compatibility and stability. Select the Load Setup Defaults item under the Exit menu. Turn on again. Chapter 3 ASUS P6T SE 3-5
... tool that contains the BIOS file. • The BIOS file in the motherboard support DVD may be older than the BIOS file published on the ASUS official website. You can cause system boot failure! The utility automatically checks the devices for details. When found, the...restore a corrupted BIOS file using this utility. Insert the motherboard support DVD to the optical drive, or the removable device that contains the BIOS file to ensure system compatibility and stability. Select the Load Setup Defaults item under the Exit menu. Turn on again. Chapter 3 ASUS P6T SE 3-5

User Manual
Page 62
...provided for details. 3.3.1 BIOS menu screen Menu items Menu bar Configuration fields General help BIOS SETUP UTILITY Main Ai Tweaker Advanced Power Boot Tools Exit System Time System Date Language SATA1 SATA2 SATA3 SATA4 SATA5 SATA6 Storage Configuration �Sy�s�t�e�m�&#...on your screen. • If the system becomes unstable after changing any BIOS setting, try to clear the CMOS and reset the motherboard to use as possible. When you start up the computer, the system provides you see on top of the screen has the following...
...provided for details. 3.3.1 BIOS menu screen Menu items Menu bar Configuration fields General help BIOS SETUP UTILITY Main Ai Tweaker Advanced Power Boot Tools Exit System Time System Date Language SATA1 SATA2 SATA3 SATA4 SATA5 SATA6 Storage Configuration �Sy�s�t�e�m�&#...on your screen. • If the system becomes unstable after changing any BIOS setting, try to clear the CMOS and reset the motherboard to use as possible. When you start up the computer, the system provides you see on top of the screen has the following...

User Manual
Page 63
... [+] or [-] to display the other items (Advanced, Power, Boot, and Exit) on the menu bar have their respective menu items. 3.3.5 Submenu items A solid triangle before each item on the menu bar displays the specific items for that the iteam has a submenu. Chapter 3 ASUS P6T SE 3-7 3.3.3 Navigation keys At the bottom right corner of a menu...
... [+] or [-] to display the other items (Advanced, Power, Boot, and Exit) on the menu bar have their respective menu items. 3.3.5 Submenu items A solid triangle before each item on the menu bar displays the specific items for that the iteam has a submenu. Chapter 3 ASUS P6T SE 3-7 3.3.3 Navigation keys At the bottom right corner of a menu...

User Manual
Page 64
BIOS SETUP UTILITY Main Ai Tweaker Advanced Power Boot Tools Exit System Time System Date Language SATA1 SATA2 SATA3 SATA4 SATA5 SATA6 Storage Configuration �Sy�s�t�e�m��I�n�f&#...
BIOS SETUP UTILITY Main Ai Tweaker Advanced Power Boot Tools Exit System Time System Date Language SATA1 SATA2 SATA3 SATA4 SATA5 SATA6 Storage Configuration �Sy�s�t�e�m��I�n�f&#...

User Manual
Page 66
... . Hard Disk Write Protect [Disabled] Disables or enables device write protection. WIN ME, 98, NT4.0, MS DOS) is used . Main AHCI Settings AHCI CD/DVD Boot Time out SATA Port1 [Not Detected] SATA Port2 [Not Detected] SATA Port3 [Not Detected] SATA Port4 [Not Detected] SATA Port5 [Not Detected] SATA Port6 [Not...
... . Hard Disk Write Protect [Disabled] Disables or enables device write protection. WIN ME, 98, NT4.0, MS DOS) is used . Main AHCI Settings AHCI CD/DVD Boot Time out SATA Port1 [Not Detected] SATA Port2 [Not Detected] SATA Port3 [Not Detected] SATA Port4 [Not Detected] SATA Port5 [Not Detected] SATA Port6 [Not...

User Manual
Page 67
... to the system. AHCI CD/DVD Boot Time out [35] Selects the boot time out value for SATA CD/DVD devices in this menu. Main BIOS Information Version : 0103 Build Date: 01/08/09 BIOS SETUP UTILITY Processor Type : Genuine Intel(R) CPU @ 2.67GHz Speed : 2666MHz System Memory Usable Size : 1016MB Chapter 3 ASUS P6T SE 3-11
... to the system. AHCI CD/DVD Boot Time out [35] Selects the boot time out value for SATA CD/DVD devices in this menu. Main BIOS Information Version : 0103 Build Date: 01/08/09 BIOS SETUP UTILITY Processor Type : Genuine Intel(R) CPU @ 2.67GHz Speed : 2666MHz System Memory Usable Size : 1016MB Chapter 3 ASUS P6T SE 3-11

User Manual
Page 68
...General Help F10 Save and Exit ESC Exit v02.61 (C)Copyright 1985-2008, American Megatrends, Inc. If you installed on the motherboard. Overclocks DRAM frequency by adjusting BCLK frequency. [X.M.P.] When X.M.P. Change Option F1 General Help F10 Save and Exit ESC Exit v02....field values can cause the system to overclock DRAM frequency by adjusting BCLK frequency. BIOS SETUP UTILITY Main Ai Tweaker Advanced Power Boot Tools Exit Configure System Performance Settings Ai Overclock Tuner CPU Ratio Setting Intel(R) SpeedStep(TM) Tech Intel(R) Turbo Mode Tech ...
...General Help F10 Save and Exit ESC Exit v02.61 (C)Copyright 1985-2008, American Megatrends, Inc. If you installed on the motherboard. Overclocks DRAM frequency by adjusting BCLK frequency. [X.M.P.] When X.M.P. Change Option F1 General Help F10 Save and Exit ESC Exit v02....field values can cause the system to overclock DRAM frequency by adjusting BCLK frequency. BIOS SETUP UTILITY Main Ai Tweaker Advanced Power Boot Tools Exit Configure System Performance Settings Ai Overclock Tuner CPU Ratio Setting Intel(R) SpeedStep(TM) Tech Intel(R) Turbo Mode Tech ...

User Manual
Page 75
...v02.61 (C)Copyright 1985-2008, American Megatrends, Inc. The items shown in this menu show the CPU-related information that the BIOS automatically detects. ASUS P6T SE 3-19 NOTE: Please key in ratio numbers directly ←→ Select Screen ↑↓ Select Item F1 General Help F10 Save and Exit ... function [Enabled] Sets the ratio between CPU Core Clock and the FSB Frequency. BIOS SETUP UTILITY Main Ai Tweaker Advanced Power Boot Tools Exit CPU Configuration Chipset Onboard Devices Configuration USB Configuration PCIPnP Configure CPU.
...v02.61 (C)Copyright 1985-2008, American Megatrends, Inc. The items shown in this menu show the CPU-related information that the BIOS automatically detects. ASUS P6T SE 3-19 NOTE: Please key in ratio numbers directly ←→ Select Screen ↑↓ Select Item F1 General Help F10 Save and Exit ... function [Enabled] Sets the ratio between CPU Core Clock and the FSB Frequency. BIOS SETUP UTILITY Main Ai Tweaker Advanced Power Boot Tools Exit CPU Configuration Chipset Onboard Devices Configuration USB Configuration PCIPnP Configure CPU.

User Manual
Page 78
... the HDMI port on the audio standard that the front panel audio module supports. Configuration options: [Enabled] [Disabled] LAN Boot ROM [Disabled] This item appears only when you to [SPDIF Output]. Configuration options: [Enabled] [Disabled] Controller Mode [...HD Audio] SPDIF Mode Setting [SPDIF Output] J-Micron eSATA/PATA Controller [Enabled] Controller Mode [IDE] Realtek LAN [Enabled] LAN Boot ROM [Disabled] Onboard 1394 Controller [Enabled] Options Enabled Disabled High Definition Audio [Enabled] Allows you to select the J-Micron controller mode...
... the HDMI port on the audio standard that the front panel audio module supports. Configuration options: [Enabled] [Disabled] LAN Boot ROM [Disabled] This item appears only when you to [SPDIF Output]. Configuration options: [Enabled] [Disabled] Controller Mode [...HD Audio] SPDIF Mode Setting [SPDIF Output] J-Micron eSATA/PATA Controller [Enabled] Controller Mode [IDE] Realtek LAN [Enabled] LAN Boot ROM [Disabled] Onboard 1394 Controller [Enabled] Options Enabled Disabled High Definition Audio [Enabled] Allows you to select the J-Micron controller mode...


