P5WD2-E Premium User's Manual for English Edition
Page 5
... Utilities menu 5-3 5.2.4 Make Disk menu 5-4 5.2.5 Manual menu 5-5 5.2.6 Contact information 5-5 5.2.7 Other information 5-6 5.3 Software information 5-8 5.3.1 ASUS MyLogo2 5-8 5.3.2 AI NET2 5-10 Using the Virtual Cable Tester 5-10 5.3.3 Audio configurations 5-11 5.4 RAID configurations 5-18 5.4.1 Installing Serial ATA hard disks 5-19 5.4.2 Intel® RAID configurations 5-19 5.5 Creating a RAID driver disk 5-30 Chapter 6: ATI CrossFire™ technology support 6.1 Overview 6-1 6.1.1 Requirements 6-1 6.1.2 Before you begin 6-1 6.2 Installing CrossFire™ graphics cards...
... Utilities menu 5-3 5.2.4 Make Disk menu 5-4 5.2.5 Manual menu 5-5 5.2.6 Contact information 5-5 5.2.7 Other information 5-6 5.3 Software information 5-8 5.3.1 ASUS MyLogo2 5-8 5.3.2 AI NET2 5-10 Using the Virtual Cable Tester 5-10 5.3.3 Audio configurations 5-11 5.4 RAID configurations 5-18 5.4.1 Installing Serial ATA hard disks 5-19 5.4.2 Intel® RAID configurations 5-19 5.5 Creating a RAID driver disk 5-30 Chapter 6: ATI CrossFire™ technology support 6.1 Overview 6-1 6.1.1 Requirements 6-1 6.1.2 Before you begin 6-1 6.2 Installing CrossFire™ graphics cards...
P5WD2-E Premium User's Manual for English Edition
Page 24
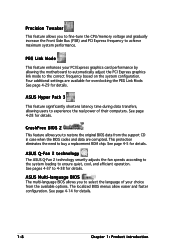
... to fine-tune the CPU/memory voltage and gradually increase the Front Side Bus (FSB) and PCI Express frequency to the correct frequency based on the system configuration. This protection eliminates the need to ensure quiet, cool, and efficient operation. ASUS Q-Fan 2 technology The ASUS Q-Fan 2 technology smartly adjusts the fan speeds according to the system loading to buy a replacement ROM chip. The localized BIOS menus allow easier and faster configuration. See page 4-29...
... to fine-tune the CPU/memory voltage and gradually increase the Front Side Bus (FSB) and PCI Express frequency to the correct frequency based on the system configuration. This protection eliminates the need to ensure quiet, cool, and efficient operation. ASUS Q-Fan 2 technology The ASUS Q-Fan 2 technology smartly adjusts the fan speeds according to the system loading to buy a replacement ROM chip. The localized BIOS menus allow easier and faster configuration. See page 4-29...
P5WD2-E Premium User's Manual for English Edition
Page 47
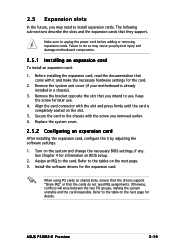
... change the necessary BIOS settings, if any. See Chapter 4 for later use . Before installing the expansion card, read the documentation that they support. Install the software drivers for details. Failure to do not need to use . 4. Turn on BIOS setup. 2. Assign an IRQ to unplug the power cord before adding or removing expansion cards. Secure the card to the chassis with the slot and press firmly until the card is already installed in a chassis...
... change the necessary BIOS settings, if any. See Chapter 4 for later use . Before installing the expansion card, read the documentation that they support. Install the software drivers for details. Failure to do not need to use . 4. Turn on BIOS setup. 2. Assign an IRQ to unplug the power cord before adding or removing expansion cards. Secure the card to the chassis with the slot and press firmly until the card is already installed in a chassis...
P5WD2-E Premium User's Manual for English Edition
Page 50
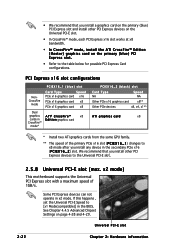
... motherboard supports the Universal PCI Express slot with a maximum speed of the primary PCIe x16 slot (P C I E X 1 6 _ 1) changes to [x1 Mode(compatible)] in the secondary PCIe x16 (P C I E X 1 6 _ 2) slot. If this happens , set the Universal PCI-E Speed to x8 mode after you install any device in the BIOS. We recommend that you install a graphics card on the primary (blue) PCI Express slot and install other PCI Express devices to the Universal PCI-E slot. 2.5.8 Universal PCI-E slot (max. Some PCI Express devices can not operate in CrossFire™ mode* PCIEX16_1 (blue) slot Card...
... motherboard supports the Universal PCI Express slot with a maximum speed of the primary PCIe x16 slot (P C I E X 1 6 _ 1) changes to [x1 Mode(compatible)] in the secondary PCIe x16 (P C I E X 1 6 _ 2) slot. If this happens , set the Universal PCI-E Speed to x8 mode after you install any device in the BIOS. We recommend that you install a graphics card on the primary (blue) PCI Express slot and install other PCI Express devices to the Universal PCI-E slot. 2.5.8 Universal PCI-E slot (max. Some PCI Express devices can not operate in CrossFire™ mode* PCIEX16_1 (blue) slot Card...

P5WD2-E Premium User's Manual for English Edition
Page 82
... drive. ASUS Update requires an Internet connection either through a network or an Internet Service Provider (ISP). Place the support CD in the support CD that allows you update the BIOS using this utility. 4-8 Chapter 4: BIOS setup See page 5-3 for the U t i l i t i e s screen menu. 3. Quit all Windows® applications before you to manage, save, and update the motherboard BIOS in Windows® environment. Click the U t i l i t i e s tab, then click A S U S U p d a t e. Installing ASUS Update To install ASUS Update: 1. 4.1.5 ASUS Update utility The ASUS Update is a utility...
... drive. ASUS Update requires an Internet connection either through a network or an Internet Service Provider (ISP). Place the support CD in the support CD that allows you update the BIOS using this utility. 4-8 Chapter 4: BIOS setup See page 5-3 for the U t i l i t i e s screen menu. 3. Quit all Windows® applications before you to manage, save, and update the motherboard BIOS in Windows® environment. Click the U t i l i t i e s tab, then click A S U S U p d a t e. Installing ASUS Update To install ASUS Update: 1. 4.1.5 ASUS Update utility The ASUS Update is a utility...
P5WD2-E Premium User's Manual for English Edition
Page 87
... Timer DRAm Refresh Rate [Enabled] [Auto] [Auto] [Auto] Graphic Adapter Priority Graphics Aperture Size Spread Spectrum [AGP/PCI] [ 64 MB] [Enabled] ICH Delayed Transaction [Enabled] MPS Revision [1.4] Select Screen Select Item +- Primary IDE Master [ST320413A] Primary IDE Slave [ASUS CD-S520/A] Third IDE Master [Not Detected] Third IDE Slave [Not Detected] Fourth IDE Master [Not Detected] Fourth IDE Slave [Not Detected] IDE Configuration System Information Use [+] or [-] to display a pop-up window Scroll bar ASUS P5WD2-E Premium...
... Timer DRAm Refresh Rate [Enabled] [Auto] [Auto] [Auto] Graphic Adapter Priority Graphics Aperture Size Spread Spectrum [AGP/PCI] [ 64 MB] [Enabled] ICH Delayed Transaction [Enabled] MPS Revision [1.4] Select Screen Select Item +- Primary IDE Master [ST320413A] Primary IDE Slave [ASUS CD-S520/A] Third IDE Master [Not Detected] Third IDE Slave [Not Detected] Fourth IDE Master [Not Detected] Fourth IDE Slave [Not Detected] IDE Configuration System Information Use [+] or [-] to display a pop-up window Scroll bar ASUS P5WD2-E Premium...
P5WD2-E Premium User's Manual for English Edition
Page 89
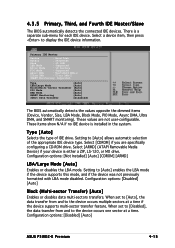
... mode disabled. Configuration options: [Disabled] [Auto] ASUS P5WD2-E Premium 4-15 There is a separate sub-menu for each IDE device. Setting to [Auto] allows automatic selection of IDE drive. Configuration options: [Not Installed] [Auto] [CDROM] [ARMD] LBA/Large Mode [Auto] Enables or disables the LBA mode. 4.3.5 Primary, Third, and Fourth IDE Master/Slave The BIOS automatically detects the connected IDE devices. Select a device item, then press to the device occurs one sector at a time if the device supports multi-sector transfer feature. Primary IDE Master Device : Hard...
... mode disabled. Configuration options: [Disabled] [Auto] ASUS P5WD2-E Premium 4-15 There is a separate sub-menu for each IDE device. Setting to [Auto] allows automatic selection of IDE drive. Configuration options: [Not Installed] [Auto] [CDROM] [ARMD] LBA/Large Mode [Auto] Enables or disables the LBA mode. 4.3.5 Primary, Third, and Fourth IDE Master/Slave The BIOS automatically detects the connected IDE devices. Select a device item, then press to the device occurs one sector at a time if the device supports multi-sector transfer feature. Primary IDE Master Device : Hard...

P5WD2-E Premium User's Manual for English Edition
Page 90
...for the IDE devices installed in the system. If you to set this item to use the Serial ATA hard disk drives as Parallel ATA physical storage devices, keep the defaul setting [Standard IDE]. Configuration options: [Auto] [SWDMA0] [SWDMA1] [SWDMA2] [MWDMA0] [MWDMA1] [MWDMA2] [UDMA0] [UDMA1] [UDMA2] [UDMA3] [UDMA4] [UDMA5] SMART Monitoring [Auto] Sets the Smart Monitoring, Analysis, and Reporting Technology. The AHCI allows the onboard storage driver to [RAID]. Configuration options: [Disabled] [Enabled] 4.3.6 IDE Configuration The items in AHCI/RAID mode SATA controller is forced...
...for the IDE devices installed in the system. If you to set this item to use the Serial ATA hard disk drives as Parallel ATA physical storage devices, keep the defaul setting [Standard IDE]. Configuration options: [Auto] [SWDMA0] [SWDMA1] [SWDMA2] [MWDMA0] [MWDMA1] [MWDMA2] [UDMA0] [UDMA1] [UDMA2] [UDMA3] [UDMA4] [UDMA5] SMART Monitoring [Auto] Sets the Smart Monitoring, Analysis, and Reporting Technology. The AHCI allows the onboard storage driver to [RAID]. Configuration options: [Disabled] [Enabled] 4.3.6 IDE Configuration The items in AHCI/RAID mode SATA controller is forced...
P5WD2-E Premium User's Manual for English Edition
Page 92
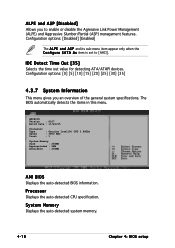
... Displays the auto-detected CPU specification. Configuration options: [0] [5] [10] [15] [20] [25] [30] [35] 4.3.7 System Information This menu gives you to [AHCI]. The BIOS automatically detects the items in this menu. AMIBIOS Version : 0107 Build Date : 11/22/05 Processor Type Speed Count : Genuine Intel(R) CPU 3.80GHz : 3800 MHz : 1 System Memory Size : 256MB Appropriated : 0MB Available : 256MB AMI BIOS Displays the auto-detected BIOS information. System Memory Displays the auto-detected system memory. 4-18 Chapter 4: BIOS setup Configuration options: [Disabled] [Enabled...
... Displays the auto-detected CPU specification. Configuration options: [0] [5] [10] [15] [20] [25] [30] [35] 4.3.7 System Information This menu gives you to [AHCI]. The BIOS automatically detects the items in this menu. AMIBIOS Version : 0107 Build Date : 11/22/05 Processor Type Speed Count : Genuine Intel(R) CPU 3.80GHz : 3800 MHz : 1 System Memory Size : 256MB Appropriated : 0MB Available : 256MB AMI BIOS Displays the auto-detected BIOS information. System Memory Displays the auto-detected system memory. 4-18 Chapter 4: BIOS setup Configuration options: [Disabled] [Enabled...
P5WD2-E Premium User's Manual for English Edition
Page 98
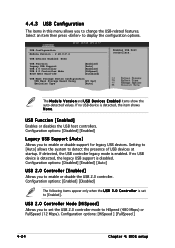
... USB Configuration Module Version - 2.24.0-F.4 USB Devices Enabled: None USB Function Legacy USB Support USB 2.0 Controller USB 2.0 Controller Mode BIOS EHCI Hand-off [Enabled] [Auto] [Enabled] [HiSpeed] [Disabled] USB Mass Storage Device Configuration USB Mass Storage Reset Delay [20 Sec] Emulation Type [Auto] Enables USB host controllers. If no USB device is set the USB 2.0 controller mode to enable or disable the USB 2.0 controller. If no USB device is detected, the legacy USB support is enabled. Configuration options: [HiSpeed ] [FullSpeed ] 4-24 Chapter 4: BIOS setup...
... USB Configuration Module Version - 2.24.0-F.4 USB Devices Enabled: None USB Function Legacy USB Support USB 2.0 Controller USB 2.0 Controller Mode BIOS EHCI Hand-off [Enabled] [Auto] [Enabled] [HiSpeed] [Disabled] USB Mass Storage Device Configuration USB Mass Storage Reset Delay [20 Sec] Emulation Type [Auto] Enables USB host controllers. If no USB device is set the USB 2.0 controller mode to enable or disable the USB 2.0 controller. If no USB device is detected, the legacy USB support is enabled. Configuration options: [HiSpeed ] [FullSpeed ] 4-24 Chapter 4: BIOS setup...
P5WD2-E Premium User's Manual for English Edition
Page 102
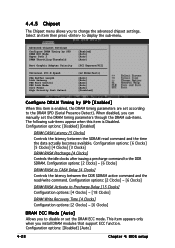
...). Configuration options: [Disabled] [Auto] 4-28 Chapter 4: BIOS setup This item appears only when you install DRAM modules that support ECC function. 4.4.5 Chipset The Chipset menu allows you to CAS# Delay [4 Clocks] Controls the latency between the SDRAM read /write command. Advanced Chipset Settings Configure DRAM Timing by SPD DRAM ECC Mode Hyper Path 3 DRAM Throttling Threshold Boot Graphic Adapter Priority [Enabled] [Auto] [Auto] [Auto] [PCI Express/PCI] Universal PCI-E Speed PEG Buffer Length Link Latency PEG Root Control PEG Link Mode Slot Power High Priority Port Select...
...). Configuration options: [Disabled] [Auto] 4-28 Chapter 4: BIOS setup This item appears only when you install DRAM modules that support ECC function. 4.4.5 Chipset The Chipset menu allows you to CAS# Delay [4 Clocks] Controls the latency between the SDRAM read /write command. Advanced Chipset Settings Configure DRAM Timing by SPD DRAM ECC Mode Hyper Path 3 DRAM Throttling Threshold Boot Graphic Adapter Priority [Enabled] [Auto] [Auto] [Auto] [PCI Express/PCI] Universal PCI-E Speed PEG Buffer Length Link Latency PEG Root Control PEG Link Mode Slot Power High Priority Port Select...
P5WD2-E Premium User's Manual for English Edition
Page 103
... Throttling feature. Set to enable, disable, or set the PCI-E Universal slot speed. Configuration options: [Auto] [Light] [Normal] [Heavy] [Heavier] High Priority Port Select [Disabled] Allows you to [Auto] for overclocking the PEG Link Mode. Configuration options: [x1 Mode(compatible)] [x2 Mode (fast)] PEG Buffer Length [Auto] Sets the length of the graphics controller to the correct frequency based on the system configuration. Setting this item to [Auto] allows the motherboard to automatically adjust the PCI Express graphics link mode to use as primary boot device.
... Throttling feature. Set to enable, disable, or set the PCI-E Universal slot speed. Configuration options: [Auto] [Light] [Normal] [Heavy] [Heavier] High Priority Port Select [Disabled] Allows you to [Auto] for overclocking the PEG Link Mode. Configuration options: [x1 Mode(compatible)] [x2 Mode (fast)] PEG Buffer Length [Auto] Sets the length of the graphics controller to the correct frequency based on the system configuration. Setting this item to [Auto] allows the motherboard to automatically adjust the PCI Express graphics link mode to use as primary boot device.
P5WD2-E Premium User's Manual for English Edition
Page 104
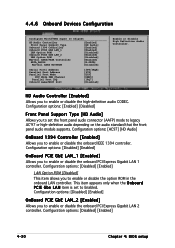
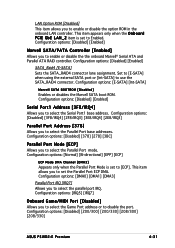
...you to Enabled. 4.4.6 Onboard Devices Configuration Configure Win627EHG Super IO Chipset HD Audio Controller Front Panel Support Type Onboard 1394 Controller Onboard PCIE GbE LAN_1 LAN Option ROM Onboard PCIE GbE LAN_2 LAN Option ROM Marvell SATA/PATA Controller SATA_RAID4 Marvell SATA BOOTROM [Enabled] [HD Audio] [Enabled] [Enabled] [Disabled] [Enabled] [Disabled] [Enabled] [E-SATA] [Disabled] Serial Port1 Address Parallel Port Address Parallel Port Mode ECP Mode DMA Channel Parallel Port IRQ Onboard Game/MIDI Port [3F8/IRQ4] [378] [ECP] [DMA3] [IRQ7] [Disabled] Enable or disable High...
...you to Enabled. 4.4.6 Onboard Devices Configuration Configure Win627EHG Super IO Chipset HD Audio Controller Front Panel Support Type Onboard 1394 Controller Onboard PCIE GbE LAN_1 LAN Option ROM Onboard PCIE GbE LAN_2 LAN Option ROM Marvell SATA/PATA Controller SATA_RAID4 Marvell SATA BOOTROM [Enabled] [HD Audio] [Enabled] [Enabled] [Disabled] [Enabled] [Disabled] [Enabled] [E-SATA] [Disabled] Serial Port1 Address Parallel Port Address Parallel Port Mode ECP Mode DMA Channel Parallel Port IRQ Onboard Game/MIDI Port [3F8/IRQ4] [378] [ECP] [DMA3] [IRQ7] [Disabled] Enable or disable High...
P5WD2-E Premium User's Manual for English Edition
Page 105
... you to enable or disable the the onboard Marvell® Serial ATA and Parallel ATA RAID controller. Configuration options: [Disabled] [200/300] [200/330] [208/300] [208/330] ASUS P5WD2-E Premium 4-31 Configuration options: [Disabled] [Enabled] SATA_Raid4 [E-SATA] Sets the SATA_RAID4 connector lane assignment. Set to [E-SATA] when using the external SATA port or [Int-SATA] to use the SATA_RAID4 connector. Configuration options: [Normal] [Bi-directional] [EPP] [ECP] ECP Mode DMA Channel [DMA3] Appears only when the Parallel Port Mode is set to Enabled. Configuration options: [IRQ5...
... you to enable or disable the the onboard Marvell® Serial ATA and Parallel ATA RAID controller. Configuration options: [Disabled] [200/300] [200/330] [208/300] [208/330] ASUS P5WD2-E Premium 4-31 Configuration options: [Disabled] [Enabled] SATA_Raid4 [E-SATA] Sets the SATA_RAID4 connector lane assignment. Set to [E-SATA] when using the external SATA port or [Int-SATA] to use the SATA_RAID4 connector. Configuration options: [Normal] [Bi-directional] [EPP] [ECP] ECP Mode DMA Channel [DMA3] Appears only when the Parallel Port Mode is set to Enabled. Configuration options: [IRQ5...
P5WD2-E Premium User's Manual for English Edition
Page 115
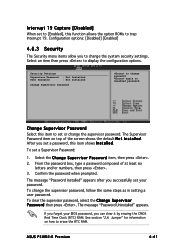
..., type a password composed of the screen shows the default N o t I n s t a l l e d. ASUS P5WD2-E Premium 4-41 again to change password. To set a Supervisor Password: 1. The message "Password Installed" appears after you to change the system security settings. The message "Password Uninstalled" appears. Select an item then press to display the configuration options. Confirm the password when prompted. See section "2.6 Jumper" for information on top of at least six letters and/or numbers, then press . 3. Configuration options: [Disabled] [Enabled...
..., type a password composed of the screen shows the default N o t I n s t a l l e d. ASUS P5WD2-E Premium 4-41 again to change password. To set a Supervisor Password: 1. The message "Password Installed" appears after you to change the system security settings. The message "Password Uninstalled" appears. Select an item then press to display the configuration options. Confirm the password when prompted. See section "2.6 Jumper" for information on top of at least six letters and/or numbers, then press . 3. Configuration options: [Disabled] [Enabled...
P5WD2-E Premium User's Manual for English Edition
Page 123
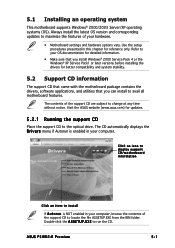
... BIN folder. 5.1 Installing an operating system This motherboard supports Windows® 2000/2003 Server/XP operating systems (OS). Use the setup procedures presented in your hardware. • Motherboard settings and hardware options vary. The contents of your computer, browse the contents of the support CD to the optical drive. Double-click the A S S E T U P . ASUS P5WD2-E Premium 5-1 Always install the latest OS version and corresponding updates to run the...
... BIN folder. 5.1 Installing an operating system This motherboard supports Windows® 2000/2003 Server/XP operating systems (OS). Use the setup procedures presented in your hardware. • Motherboard settings and hardware options vary. The contents of your computer, browse the contents of the support CD to the optical drive. Double-click the A S S E T U P . ASUS P5WD2-E Premium 5-1 Always install the latest OS version and corresponding updates to run the...
P5WD2-E Premium User's Manual for English Edition
Page 124
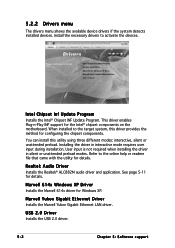
... driver enables Plug-n-Play INF support for details. Refer to the online help or readme file that came with the utility for the Intel® chipset components on the motherboard. Realtek Audio Driver Installs the Realtek® ALC882M audio driver and application. Installing the driver in silent or unattended preload modes. See page 5-11 for Windows XP. Marvell Yukon Gigabit Ethernet Driver Installs the Marvell Yukon Gigabit Ethernet LAN driver. Intel Chipset...
... driver enables Plug-n-Play INF support for details. Refer to the online help or readme file that came with the utility for the Intel® chipset components on the motherboard. Realtek Audio Driver Installs the Realtek® ALC882M audio driver and application. Installing the driver in silent or unattended preload modes. See page 5-11 for Windows XP. Marvell Yukon Gigabit Ethernet Driver Installs the Marvell Yukon Gigabit Ethernet LAN driver. Intel Chipset...
P5WD2-E Premium User's Manual for English Edition
Page 125
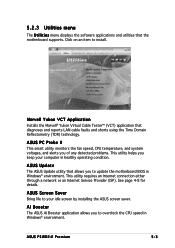
.... ASUS P5WD2-E Premium 5-3 See page 4-8 for details. AI Booster The ASUS AI Booster application allows you to install. ASUS Update The ASUS Update utility that diagnoses and reports LAN cable faults and shorts using the Time Domain Reflectometry (TDR) technology. Click on an item to update the motherboard BIOS in Windows® environment. This utility requires an Internet connection either through a network or an Internet Service Provider (ISP). 5.2.3 Utilities menu The U t i l i t i e s menu displays the software applications and utilities that...
.... ASUS P5WD2-E Premium 5-3 See page 4-8 for details. AI Booster The ASUS AI Booster application allows you to install. ASUS Update The ASUS Update utility that diagnoses and reports LAN cable faults and shorts using the Time Domain Reflectometry (TDR) technology. Click on an item to update the motherboard BIOS in Windows® environment. This utility requires an Internet connection either through a network or an Internet Service Provider (ISP). 5.2.3 Utilities menu The U t i l i t i e s menu displays the software applications and utilities that...
P5WD2-E Premium User's Manual for English Edition
Page 141
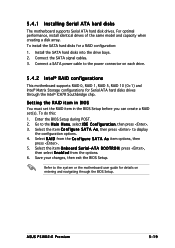
... Intel® Matrix Storage configurations for a RAID configuration: 1. Select the item C o n f i g u r e S A T A A s, then press to the Main Menu, select IDE Configuration, then press . 3. Connect the SATA signal cables. 3. Enter the BIOS Setup during POST. 2. For optimal performance, install identical drives of the same model and capacity when creating a disk array. Select R A I D from the options. 6. Select the item O n b o a r d S e r i a l - ASUS P5WD2-E Premium 5-19 5.4.1 Installing Serial ATA hard disks The motherboard supports Serial ATA hard disk drives...
... Intel® Matrix Storage configurations for a RAID configuration: 1. Select the item C o n f i g u r e S A T A A s, then press to the Main Menu, select IDE Configuration, then press . 3. Connect the SATA signal cables. 3. Enter the BIOS Setup during POST. 2. For optimal performance, install identical drives of the same model and capacity when creating a disk array. Select R A I D from the options. 6. Select the item O n b o a r d S e r i a l - ASUS P5WD2-E Premium 5-19 5.4.1 Installing Serial ATA hard disks The motherboard supports Serial ATA hard disk drives...

P5WD2-E Premium User's Manual for English Edition
Page 154
... infection. After creating a RAID driver disk, eject the floppy disk, then write-protect it to the selected hard disk drive. During installation, the computer prompts you are installing a third-party SCSI or RAID driver. 2. Follow screen instructions to press the F 6 key if you to install the RAID drivers. 5-32 Chapter 5: Software support Insert a formatted high-density floppy disk to the floppy disk drive. 3. 3. To install the RAID driver: 1. Press , then insert the RAID driver disk to the floppy disk drive. 4. Follow screen instructions to complete the process...
... infection. After creating a RAID driver disk, eject the floppy disk, then write-protect it to the selected hard disk drive. During installation, the computer prompts you are installing a third-party SCSI or RAID driver. 2. Follow screen instructions to press the F 6 key if you to install the RAID drivers. 5-32 Chapter 5: Software support Insert a formatted high-density floppy disk to the floppy disk drive. 3. 3. To install the RAID driver: 1. Press , then insert the RAID driver disk to the floppy disk drive. 4. Follow screen instructions to complete the process...


