Motherboard Installation Guide
Page 7
... CrossFire™ graphics cards 6-2 6.3 Software information 6-5 6.3.1 Installing the device drivers 6-5 6.3.2 Using the Catalyst™ Control Center 6-7 Appendix: CPU features A.1 Intel® EM64T A-1 Using the Intel® EM64T feature A-1 A.2 Enhanced Intel SpeedStep® Technology (EIST A-1 A.2.1 System requirements A-1 A.2.2 Using the EIST A-2 A.3 Intel® Hyper-Threading Technology A-3 Using the Hyper-Threading Technology A-3 vii Contents 5.3.4 ASUS...
... CrossFire™ graphics cards 6-2 6.3 Software information 6-5 6.3.1 Installing the device drivers 6-5 6.3.2 Using the Catalyst™ Control Center 6-7 Appendix: CPU features A.1 Intel® EM64T A-1 Using the Intel® EM64T feature A-1 A.2 Enhanced Intel SpeedStep® Technology (EIST A-1 A.2.1 System requirements A-1 A.2.2 Using the EIST A-2 A.3 Intel® Hyper-Threading Technology A-3 Using the Hyper-Threading Technology A-3 vii Contents 5.3.4 ASUS...

Motherboard Installation Guide
Page 10
... includes description of the support DVD that comes with the motherboard package. • Chapter 6: ATI CrossFire™ support This chapter describes the ATI CrossFire™ feature and shows the graphics card installation procedures. • Appendix: CPU features The Appendix ...describes the CPU features and technologies that you need when installing and configuring the motherboard. ASUS websites The ASUS website provides updated ...
... includes description of the support DVD that comes with the motherboard package. • Chapter 6: ATI CrossFire™ support This chapter describes the ATI CrossFire™ feature and shows the graphics card installation procedures. • Appendix: CPU features The Appendix ...describes the CPU features and technologies that you need when installing and configuring the motherboard. ASUS websites The ASUS website provides updated ...
Motherboard Installation Guide
Page 47
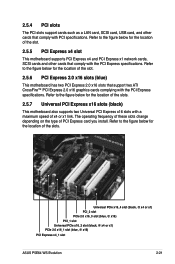
...@ x16) PCI_1 slot Universal PCIe x16_2 slot (black, @ x4 or x1) PCIe 2.0 x16_1 slot (blue, @ x16) PCI Express x4_1 slot ASUS P5E64 WS Evolution 2-21 Refer to the figure below for the location of the slots. 2.5.7 Universal PCI Express x16 slots (black) This motherboard also supports two ...maximum speed of the slot. 2.5.6 PCI Express 2.0 x16 slots (blue) This motherboard has two PCI Express 2.0 x16 slots that support two ATI CrossFire™ PCI Express 2.0 x16 graphics cards complying with the PCI Express specifications. 2.5.4 PCI slots The PCI slots support cards such as a LAN card...
...@ x16) PCI_1 slot Universal PCIe x16_2 slot (black, @ x4 or x1) PCIe 2.0 x16_1 slot (blue, @ x16) PCI Express x4_1 slot ASUS P5E64 WS Evolution 2-21 Refer to the figure below for the location of the slots. 2.5.7 Universal PCI Express x16 slots (black) This motherboard also supports two ...maximum speed of the slot. 2.5.6 PCI Express 2.0 x16 slots (blue) This motherboard has two PCI Express 2.0 x16 slots that support two ATI CrossFire™ PCI Express 2.0 x16 graphics cards complying with the PCI Express specifications. 2.5.4 PCI slots The PCI slots support cards such as a LAN card...

Motherboard Installation Guide
Page 161
This chapter tells how to install ATI® CrossFire™ graphics cards to avail of ATI's Multi-Video Processing technology. 6 Chapetr 6: ATI® CrossFire™ technology support
This chapter tells how to install ATI® CrossFire™ graphics cards to avail of ATI's Multi-Video Processing technology. 6 Chapetr 6: ATI® CrossFire™ technology support

Motherboard Installation Guide
Page 162
Chapter summary 6 6.1 Overview 6-1 6.2 Installing CrossFire™ graphics cards 6-2 6.3 Software information 6-5 ASUS P5E64 WS Evolution
Chapter summary 6 6.1 Overview 6-1 6.2 Installing CrossFire™ graphics cards 6-2 6.3 Software information 6-5 ASUS P5E64 WS Evolution

Motherboard Installation Guide
Page 163
... that allows you begin Uninstall other graphics card drivers: 1. ATX Power connectors on page 2-34 for detailed hardware requirements and installation procedures. • The ATI CrossFire™ technology supports only the following operating systems: - Go to install multi-graphics processing units (GPU) graphics cards. Windows® XP Professional 64-bit Edition... sure that your system. Close all current applications. 2. Select Add/Remove. 5. Windows® XP 32-bit (Home or Professional) with Service Pack 2 (SP2) - See 13. ASUS P5E64 WS Evolution 6-1
... that allows you begin Uninstall other graphics card drivers: 1. ATX Power connectors on page 2-34 for detailed hardware requirements and installation procedures. • The ATI CrossFire™ technology supports only the following operating systems: - Go to install multi-graphics processing units (GPU) graphics cards. Windows® XP Professional 64-bit Edition... sure that your system. Close all current applications. 2. Select Add/Remove. 5. Windows® XP 32-bit (Home or Professional) with Service Pack 2 (SP2) - See 13. ASUS P5E64 WS Evolution 6-1

Motherboard Installation Guide
Page 164
To install the graphics cards: 1. Prepare one CrossFire™ Edition (Master) graphics card and one CrossFire™-ready (Slave) graphics card. Insert the CrossFire™ Edition (Master) graphics card into the PCI Express x16 blue slot. Make sure that came with the ATI® CrossFire™ Edition graphics card. Slave graphics card Master graphics card 2. 6.2 Installing CrossFire™ graphics cards Before installing a CrossFire™ system, refer to the user guide that the card is properly seated on the slot. 6-2 Chapter 6: ATI® MVP technology support
To install the graphics cards: 1. Prepare one CrossFire™ Edition (Master) graphics card and one CrossFire™-ready (Slave) graphics card. Insert the CrossFire™ Edition (Master) graphics card into the PCI Express x16 blue slot. Make sure that came with the ATI® CrossFire™ Edition graphics card. Slave graphics card Master graphics card 2. 6.2 Installing CrossFire™ graphics cards Before installing a CrossFire™ system, refer to the user guide that the card is properly seated on the slot. 6-2 Chapter 6: ATI® MVP technology support
Motherboard Installation Guide
Page 165
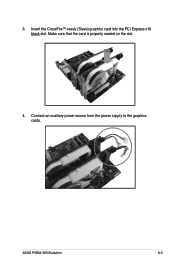
Make sure that the card is properly seated on the slot. 4. Insert the CrossFire™-ready (Slave) graphics card into the PCI Express x16 black slot. Connect an auxiliary power source from the power supply to the graphics cards. 3. ASUS P5E64 WS Evolution 6-3
Make sure that the card is properly seated on the slot. 4. Insert the CrossFire™-ready (Slave) graphics card into the PCI Express x16 black slot. Connect an auxiliary power source from the power supply to the graphics cards. 3. ASUS P5E64 WS Evolution 6-3
Motherboard Installation Guide
Page 167
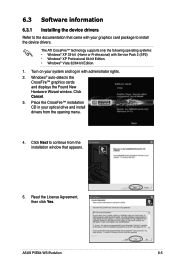
ASUS P5E64 WS Evolution 6-5 The ATI CrossFire™ technology supports only the following operating systems: • Windows® XP 32-bit (Home or Professional) with administrator rights. 2. Click Cancel. 3. Click Next...menu. 4. 6.3 Software information 6.3.1 Installing the device drivers Refer to the documentation that appears. 5. Windows® auto-detects the CrossFire™ graphics cards and displays the Found New Hardware Wizard window. Place the CrossFire™ installation CD in with Service Pack 2 (SP2) • Windows® XP Professional 64-bit Edition. • ...
ASUS P5E64 WS Evolution 6-5 The ATI CrossFire™ technology supports only the following operating systems: • Windows® XP 32-bit (Home or Professional) with administrator rights. 2. Click Cancel. 3. Click Next...menu. 4. 6.3 Software information 6.3.1 Installing the device drivers Refer to the documentation that appears. 5. Windows® auto-detects the CrossFire™ graphics cards and displays the Found New Hardware Wizard window. Place the CrossFire™ installation CD in with Service Pack 2 (SP2) • Windows® XP Professional 64-bit Edition. • ...
Motherboard Installation Guide
Page 170
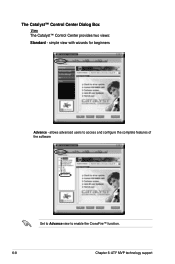
allows advanced users to access and configure the complete features of the software Set to Advance view to enable the CrossFire™ function. 6-8 Chapter 6: ATI® MVP technology support The Catalyst™ Control Center Dialog Box View The Catalyst™ Control Center provides two views: Standard - simple view with wizards for beginners Advance -
allows advanced users to access and configure the complete features of the software Set to Advance view to enable the CrossFire™ function. 6-8 Chapter 6: ATI® MVP technology support The Catalyst™ Control Center Dialog Box View The Catalyst™ Control Center provides two views: Standard - simple view with wizards for beginners Advance -
Motherboard Installation Guide
Page 171
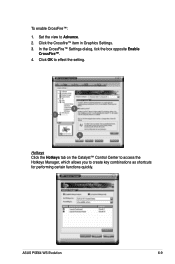
ASUS P5E64 WS Evolution 6-9 Click OK to effect the setting. 3 2 4 Hotkeys Click the Hotkeys tab on the Catalyst™ Control Center to access the Hotkeys Manager, which allows you to Advance. 2. To enable CrossFire™: 1. In the CrossFire™ Settings dialog, tick the box opposite Enable CrossFire™. 4. Set the view to create key combinations as shortcuts for performing certain functions quickly. Click the Crossfire™ item in Graphics Settings. 3.
ASUS P5E64 WS Evolution 6-9 Click OK to effect the setting. 3 2 4 Hotkeys Click the Hotkeys tab on the Catalyst™ Control Center to access the Hotkeys Manager, which allows you to Advance. 2. To enable CrossFire™: 1. In the CrossFire™ Settings dialog, tick the box opposite Enable CrossFire™. 4. Set the view to create key combinations as shortcuts for performing certain functions quickly. Click the Crossfire™ item in Graphics Settings. 3.

