Motherboard Installation Guide
Page 7
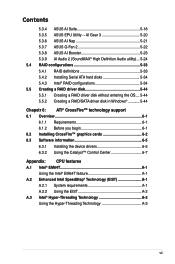
... Audio utility)... 5-24 5.4 RAID configurations 5-33 5.4.1 RAID definitions 5-33 5.4.2 Installing Serial ATA hard disks 5-34 5.4.3 Intel® RAID configurations 5-34 5.5 Creating a RAID driver disk 5-44 5.5.1 Creating a RAID driver disk without entering the OS.... 5-44 5.5.2 Creating a RAID/SATA driver disk in Windows 5-44 Chapetr 6: ATI® CrossFire™ technology support 6.1 Overview 6-1 6.1.1 Requirements 6-1 6.1.2 Before you begin 6-1 6.2 Installing CrossFire™ graphics cards 6-2 6.3 Software information 6-5 6.3.1 Installing the device drivers 6-5 6.3.2 Using...
... Audio utility)... 5-24 5.4 RAID configurations 5-33 5.4.1 RAID definitions 5-33 5.4.2 Installing Serial ATA hard disks 5-34 5.4.3 Intel® RAID configurations 5-34 5.5 Creating a RAID driver disk 5-44 5.5.1 Creating a RAID driver disk without entering the OS.... 5-44 5.5.2 Creating a RAID/SATA driver disk in Windows 5-44 Chapetr 6: ATI® CrossFire™ technology support 6.1 Overview 6-1 6.1.1 Requirements 6-1 6.1.2 Before you begin 6-1 6.2 Installing CrossFire™ graphics cards 6-2 6.3 Software information 6-5 6.3.1 Installing the device drivers 6-5 6.3.2 Using...
Motherboard Installation Guide
Page 21
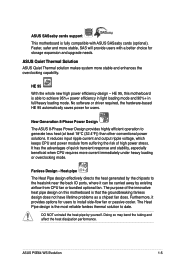
... users with ASUS SASsaby cards (optional). No software or driver required, the hardware-based HE 95 automatically saves power for storage expansion and upgrade needs. It reduces input ripple current and output ripple voltage, which keeps CPU and power module from CPU fan or bundled optional fan. Fanless Design - The Heat Pipe design is able to install side-flow fan or passive cooler. ASUS P5E64 WS Evolution 1-5 New Generation 8-Phase Power...
... users with ASUS SASsaby cards (optional). No software or driver required, the hardware-based HE 95 automatically saves power for storage expansion and upgrade needs. It reduces input ripple current and output ripple voltage, which keeps CPU and power module from CPU fan or bundled optional fan. Fanless Design - The Heat Pipe design is able to install side-flow fan or passive cooler. ASUS P5E64 WS Evolution 1-5 New Generation 8-Phase Power...
Motherboard Installation Guide
Page 23
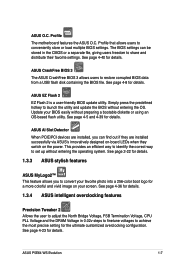
... stored in 0.02v steps to finetune voltages to set up without entering the OS. See page 4-36 for the ultimate customized overclocking configuration. See page 4-40 for details. ASUS AI Slot Detector When PCIE/PCI devices are installed successfully via ASUS's innovatively designed on-board LEDs when they switch on your BIOS easily without preparing a bootable diskette or using an OS-based flash utility. Simply press the predefined hotkey...
... stored in 0.02v steps to finetune voltages to set up without entering the OS. See page 4-36 for the ultimate customized overclocking configuration. See page 4-40 for details. ASUS AI Slot Detector When PCIE/PCI devices are installed successfully via ASUS's innovatively designed on-board LEDs when they switch on your BIOS easily without preparing a bootable diskette or using an OS-based flash utility. Simply press the predefined hotkey...
Motherboard Installation Guide
Page 45
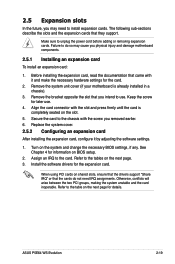
... necessary BIOS settings, if any. ASUS P5E64 WS Evolution 2-19 The following sub‑sections describe the slots and the expansion cards that you intend to install expansion cards. Turn on the slot. 5. 2.5 Expansion slots In the future, you may cause you physical injury and damage motherboard components. 2.5.1 Installing an expansion card To install an expansion card: 1. Failure to unplug the power cord before adding or removing expansion cards. Install the software drivers...
... necessary BIOS settings, if any. ASUS P5E64 WS Evolution 2-19 The following sub‑sections describe the slots and the expansion cards that you intend to install expansion cards. Turn on the slot. 5. 2.5 Expansion slots In the future, you may cause you physical injury and damage motherboard components. 2.5.1 Installing an expansion card To install an expansion card: 1. Failure to unplug the power cord before adding or removing expansion cards. Install the software drivers...

Motherboard Installation Guide
Page 51
... connecting USB 2.0 devices. otherwise, you cannot enter the Marvell RAID utility and SATA setup during POST. • If you have connected the Serial ATA signal cables and installed Serial ATA hard disk drives; Optical S/PDIF Out port. Audio 2, 4, 6, or 8-channel configuration Port Light Blue Lime Pink Orange Black Gray Headset 2-channel Line In Line Out Mic In - - - 4-channel Line In Front Speaker Out Mic In - External SATA ports. USB 2.0 ports 1 and 2 . 10. ASUS P5E64 WS Evolution 2-25 These ports connect to [RAID Mode]. To configure a RAID 0, 1, 5 or 10 set, install...
... connecting USB 2.0 devices. otherwise, you cannot enter the Marvell RAID utility and SATA setup during POST. • If you have connected the Serial ATA signal cables and installed Serial ATA hard disk drives; Optical S/PDIF Out port. Audio 2, 4, 6, or 8-channel configuration Port Light Blue Lime Pink Orange Black Gray Headset 2-channel Line In Line Out Mic In - - - 4-channel Line In Front Speaker Out Mic In - External SATA ports. USB 2.0 ports 1 and 2 . 10. ASUS P5E64 WS Evolution 2-25 These ports connect to [RAID Mode]. To configure a RAID 0, 1, 5 or 10 set, install...

Motherboard Installation Guide
Page 60
... boot up if the power is recommended when configuring a system with the following configuration: CPU: Intel® Pentium® Extreme 3.73GHz Memory: 512 MB DDR3 (x4) Graphics card: ASUS EAX1900XT Parallel ATA device: IDE hard disk drive Serial ATA device: SATA hard disk drive (x2) Optical drive: DVD-RW 2-34 Chapter 2: Hardware information ATX power connectors (24-pin EATXPWR, 8-pin EATX12V) These connectors are designed to support the motherboard power requirements with more power-consuming devices. The power supply plugs are for details. • The ATX 12 V Specification...
... boot up if the power is recommended when configuring a system with the following configuration: CPU: Intel® Pentium® Extreme 3.73GHz Memory: 512 MB DDR3 (x4) Graphics card: ASUS EAX1900XT Parallel ATA device: IDE hard disk drive Serial ATA device: SATA hard disk drive (x2) Optical drive: DVD-RW 2-34 Chapter 2: Hardware information ATX power connectors (24-pin EATXPWR, 8-pin EATX12V) These connectors are designed to support the motherboard power requirements with more power-consuming devices. The power supply plugs are for details. • The ATX 12 V Specification...
Motherboard Installation Guide
Page 71
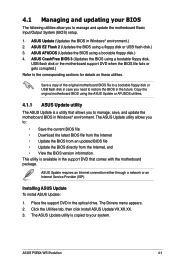
.../Output System (BIOS) setup. 1. Copy the original motherboard BIOS using a bootable floppy disk.) 4. The Drivers menu appears. 2. ASUS Update (Updates the BIOS in Windows® environment. ASUS CrashFree BIOS 3 (Updates the BIOS using a floppy disk or USB flash disk.) 3. The ASUS Update utility allows you to the corresponding sections for details on these utilities. This utility is available in the future. Save a copy of the original motherboard BIOS file to a bootable floppy disk or USB flash disk in case you need to restore the BIOS in the support DVD that allows...
.../Output System (BIOS) setup. 1. Copy the original motherboard BIOS using a bootable floppy disk.) 4. The Drivers menu appears. 2. ASUS Update (Updates the BIOS in Windows® environment. ASUS CrashFree BIOS 3 (Updates the BIOS using a floppy disk or USB flash disk.) 3. The ASUS Update utility allows you to the corresponding sections for details on these utilities. This utility is available in the future. Save a copy of the original motherboard BIOS file to a bootable floppy disk or USB flash disk in case you need to restore the BIOS in the support DVD that allows...
Motherboard Installation Guide
Page 78
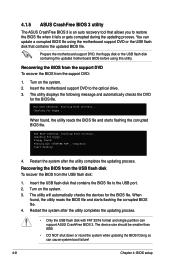
... ASUS CrashFree BIOS 3 utility The ASUS CrashFree BIOS 3 is an auto recovery tool that contains the BIOS file to the USB port. 2. Checking for floppy... When found, the utility reads the BIOS file and starts flashing the corrupted BIOS file. 4. Starting BIOS recovery... Start flashing... 4. Checking for floppy... Recovering the BIOS from the USB flash disk To recover the BIOS from the support DVD: 1. Prepare the motherboard support DVD, the floppy disk or the USB flash disk containing the updated motherboard BIOS before using the motherboard support DVD or the USB flash...
... ASUS CrashFree BIOS 3 utility The ASUS CrashFree BIOS 3 is an auto recovery tool that contains the BIOS file to the USB port. 2. Checking for floppy... When found, the utility reads the BIOS file and starts flashing the corrupted BIOS file. 4. Starting BIOS recovery... Start flashing... 4. Checking for floppy... Recovering the BIOS from the USB flash disk To recover the BIOS from the support DVD: 1. Prepare the motherboard support DVD, the floppy disk or the USB flash disk containing the updated motherboard BIOS before using the motherboard support DVD or the USB flash...

Motherboard Installation Guide
Page 83
... a separate sub-menu for each IDE device. Configuration options: [Not Installed] [Auto] [CDROM] [ARMD] LBA/Large Mode [Auto] Enables or disables the LBA mode. Main BIOS SETUP UTILITY SATA 1 Device : Hard Disk Vendor : HDT722516DLA380 Size : 164.7GB LBA Mode : Supported Block Mode : 16 Sectors PIO Mode : 4 Async DMA : MultiWord DMA-2 Ultra DMA : Ultra DMA-5 SMART Monitoring: Supported Select the type of IDE devices. Type [Auto] LBA/Large Mode [Auto] Block(Multi-sector Transfer) [Auto] PIO Mode [Auto] DMA Mode [Auto] SMART Monitoring [Auto] 32Bit Data Transfer...
... a separate sub-menu for each IDE device. Configuration options: [Not Installed] [Auto] [CDROM] [ARMD] LBA/Large Mode [Auto] Enables or disables the LBA mode. Main BIOS SETUP UTILITY SATA 1 Device : Hard Disk Vendor : HDT722516DLA380 Size : 164.7GB LBA Mode : Supported Block Mode : 16 Sectors PIO Mode : 4 Async DMA : MultiWord DMA-2 Ultra DMA : Ultra DMA-5 SMART Monitoring: Supported Select the type of IDE devices. Type [Auto] LBA/Large Mode [Auto] Block(Multi-sector Transfer) [Auto] PIO Mode [Auto] DMA Mode [Auto] SMART Monitoring [Auto] 32Bit Data Transfer...

Motherboard Installation Guide
Page 84
...] [UDMA4] [UDMA5] SMART Monitoring [Auto] Allows you want the Serial ATA hard disk drives to use the Advanced Host Controller Interface (AHCI), set this item to set the SATA configuration. Select an item then press if you to [RAID]. 4-14 Chapter 4: BIOS setup Configuration options: [Disabled] [Enabled] 4.3.6 SATA Configuration The items in this item to enable or disable the HDD Self-Monitoring Analysis and Reporting Technology (SMART) feature. Configuration options: [IDE] [RAID] [AHCI] • If you want to use the Serial ATA hard disk drives as [IDE] This sub-item...
...] [UDMA4] [UDMA5] SMART Monitoring [Auto] Allows you want the Serial ATA hard disk drives to use the Advanced Host Controller Interface (AHCI), set this item to set the SATA configuration. Select an item then press if you to [RAID]. 4-14 Chapter 4: BIOS setup Configuration options: [Disabled] [Enabled] 4.3.6 SATA Configuration The items in this item to enable or disable the HDD Self-Monitoring Analysis and Reporting Technology (SMART) feature. Configuration options: [IDE] [RAID] [AHCI] • If you want to use the Serial ATA hard disk drives as [IDE] This sub-item...
Motherboard Installation Guide
Page 87
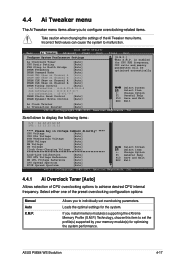
...(s) supported by your memory module(s) for the system. Main Ai Tweaker BIOS SETUP UTILITY Advanced Power Boot Tools Exit Configure System Performance Settings Ai Overclock Tuner [Auto] CPU Ratio Setting [Auto] FSB Strap to display the following items: C/P : A1 A2 A3 A4 A5 LVL : 11 11 11 11 11 **** Please key in voltage numbers directly! **** CPU Voltage [Auto] CPU PLL Voltage [Auto] FSB Termination Voltage [Auto] DRAM Voltage [Auto] NB Voltage [Auto] SB voltage [Auto] Clock Over-Charging Voltage [Auto Load-Line Calibration [Auto] CPU GTL Voltage Reference [Auto...
...(s) supported by your memory module(s) for the system. Main Ai Tweaker BIOS SETUP UTILITY Advanced Power Boot Tools Exit Configure System Performance Settings Ai Overclock Tuner [Auto] CPU Ratio Setting [Auto] FSB Strap to display the following items: C/P : A1 A2 A3 A4 A5 LVL : 11 11 11 11 11 **** Please key in voltage numbers directly! **** CPU Voltage [Auto] CPU PLL Voltage [Auto] FSB Termination Voltage [Auto] DRAM Voltage [Auto] NB Voltage [Auto] SB voltage [Auto] Clock Over-Charging Voltage [Auto Load-Line Calibration [Auto] CPU GTL Voltage Reference [Auto...

Motherboard Installation Guide
Page 95
... CPU Configuration The items in this menu show the CPU-related information that the BIOS automatically detects. ASUS P5E64 WS Evolution 4-25 Main Ai Tweaker BIOS SETUP UTILITY Advanced Power Boot CPU Configuration Chipset Onboard Devices Configuration USB Configuration PCIPnP Tools Exit Configure CPU. Change Option F1 General Help F10 Save and Exit ESC Exit v02.61 (C)Copyright 1985-2007, American Megatrends, Inc. BIOS SETUP UTILITY Advanced Configure advanced CPU settings Manufacturer:Intel Brand String:Intel(R) Core(TM)2 Duo CPU @ 3.00GHz Frequency :3.00GHz FSB Speed...
... CPU Configuration The items in this menu show the CPU-related information that the BIOS automatically detects. ASUS P5E64 WS Evolution 4-25 Main Ai Tweaker BIOS SETUP UTILITY Advanced Power Boot CPU Configuration Chipset Onboard Devices Configuration USB Configuration PCIPnP Tools Exit Configure CPU. Change Option F1 General Help F10 Save and Exit ESC Exit v02.61 (C)Copyright 1985-2007, American Megatrends, Inc. BIOS SETUP UTILITY Advanced Configure advanced CPU settings Manufacturer:Intel Brand String:Intel(R) Core(TM)2 Duo CPU @ 3.00GHz Frequency :3.00GHz FSB Speed...

Motherboard Installation Guide
Page 97
...Bridge Configuration BIOS SETUP UTILITY Advanced North Bridge Chipset Configuration Memory Remap Feature [Enabled] Initiate Graphic Adapter [PEG/PCI] PEG Port Control [Auto] PEG Port Force x1 [Disabled] ENABLE: Allow remapping of overlapped PCI memory above the total physical memory. Configuration options: [Disabled] [Enabled] Initiate Graphic Adapter [PEG/PCI] Allows you to decide which graphics controller to display the sub-menu. Configuration options: [Enabled] [Disabled] ASUS P5E64 WS Evolution 4-27 Select an item then press to use as the primary boot device. Memory Remap...
...Bridge Configuration BIOS SETUP UTILITY Advanced North Bridge Chipset Configuration Memory Remap Feature [Enabled] Initiate Graphic Adapter [PEG/PCI] PEG Port Control [Auto] PEG Port Force x1 [Disabled] ENABLE: Allow remapping of overlapped PCI memory above the total physical memory. Configuration options: [Disabled] [Enabled] Initiate Graphic Adapter [PEG/PCI] Allows you to decide which graphics controller to display the sub-menu. Configuration options: [Enabled] [Disabled] ASUS P5E64 WS Evolution 4-27 Select an item then press to use as the primary boot device. Memory Remap...

Motherboard Installation Guide
Page 98
...Audio Front Panel Type Marvell IDE/eSATA IDE/eSATA Boot ROM PCIE GigaBit LAN1 LAN Boot ROM PCI GigaBit LAN2 LAN Boot ROM Fireware 1394 BIOS SETUP UTILITY [Enabled] [HD Audio] [Legacy Mode] [Enabled] [Enabled] [Disabled] [Enabled] [Disabled] [Enabled] Enable or Disable High Definition Audio Controller Serial Port1 Address [3F8/IRQ4] Select Screen Select Item +- Refer to create a RAID set using the black Serial ATA connectors (EXT_SATA1-2). Configuration options: [AC97] [HD Audio] Marvell IDE/eSATA [Legacy Mode] Set this item to [RAID Mode] to 5.2.4 Make Disk menu...
...Audio Front Panel Type Marvell IDE/eSATA IDE/eSATA Boot ROM PCIE GigaBit LAN1 LAN Boot ROM PCI GigaBit LAN2 LAN Boot ROM Fireware 1394 BIOS SETUP UTILITY [Enabled] [HD Audio] [Legacy Mode] [Enabled] [Enabled] [Disabled] [Enabled] [Disabled] [Enabled] Enable or Disable High Definition Audio Controller Serial Port1 Address [3F8/IRQ4] Select Screen Select Item +- Refer to create a RAID set using the black Serial ATA connectors (EXT_SATA1-2). Configuration options: [AC97] [HD Audio] Marvell IDE/eSATA [Legacy Mode] Set this item to [RAID Mode] to 5.2.4 Make Disk menu...

Motherboard Installation Guide
Page 101
... (POS) Only] [S3 Only] [Auto] 4.6.2 Repost Video on S3 Resume [Disabled] Determines whether to display the configuration options. 4.6 Power menu The Power menu items allow you to change the settings for System Suspend. Main Ai Tweaker BIOS SETUP UTILITY Advanced Power Boot Tools Exit Suspend Mode Repost Video on S3/STR resume. Select an item then press to invoke VGA BIOS POST on S3 Resume ACPI 2.0 Support ACPI APIC Support [Auto] [Disabled] [Disabled] [Enabled] Select the ACPI state used for Advanced Configuration and Power Interface (ACPI) 2.0 specifications.
... (POS) Only] [S3 Only] [Auto] 4.6.2 Repost Video on S3 Resume [Disabled] Determines whether to display the configuration options. 4.6 Power menu The Power menu items allow you to change the settings for System Suspend. Main Ai Tweaker BIOS SETUP UTILITY Advanced Power Boot Tools Exit Suspend Mode Repost Video on S3/STR resume. Select an item then press to invoke VGA BIOS POST on S3 Resume ACPI 2.0 Support ACPI APIC Support [Auto] [Disabled] [Disabled] [Enabled] Select the ACPI state used for Advanced Configuration and Power Interface (ACPI) 2.0 specifications.
Motherboard Installation Guide
Page 107
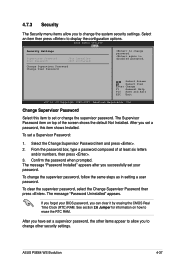
To set or change the supervisor password. The message "Password Installed" appears after you to change other security settings. ASUS P5E64 WS Evolution 4-37 4.7.3 Security The Security menu items allow you can clear it by erasing the CMOS Real Time Clock (RTC) RAM. Select an item then press to disabled password. From the password box, type a password composed of the screen shows the default Not Installed. Change Supervisor Password Change User Password Select Screen Select Item Enter Change F1 General Help...
To set or change the supervisor password. The message "Password Installed" appears after you to change other security settings. ASUS P5E64 WS Evolution 4-37 4.7.3 Security The Security menu items allow you can clear it by erasing the CMOS Real Time Clock (RTC) RAM. Select an item then press to disabled password. From the password box, type a password composed of the screen shows the default Not Installed. Change Supervisor Password Change User Password Select Screen Select Item Enter Change F1 General Help...
Motherboard Installation Guide
Page 115
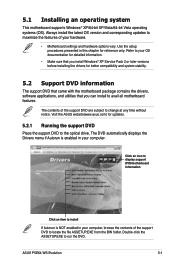
... optical drive. Use the setup procedures presented in your OS documentation for detailed information. • Make sure that you install Windows® XP Service Pack 2 or later versions before installing the drivers for better compatibility and system stability. 5.2 Support DVD information The support DVD that came with the motherboard package contains the drivers, software applications, and utilities that you can install to change at any time without notice. Visit the ASUS...
... optical drive. Use the setup procedures presented in your OS documentation for detailed information. • Make sure that you install Windows® XP Service Pack 2 or later versions before installing the drivers for better compatibility and system stability. 5.2 Support DVD information The support DVD that came with the motherboard package contains the drivers, software applications, and utilities that you can install to change at any time without notice. Visit the ASUS...

Motherboard Installation Guide
Page 116
... SATA RAID controller driver. Marvell Yukon Gigabit Ethernet Driver Installs the Marvell® Gigabit Ethernet LAN driver. Install the necessary drivers to activate the devices. USB 2.0 Driver Installs the Universal Serial Bus 2.0 (USB 2.0) driver. ASUS InstAll - Installation Wizard for Drivers Installs all of the drivers through the Installation Wizard. 5.2.2 Drivers menu The drivers menu shows the available device drivers if the system detects installed devices. SoundMAX ADI Audio Driver Installs the ADI 1988B audio driver and application. ASUS EPU Driver + AI Gear 3 Utility...
... SATA RAID controller driver. Marvell Yukon Gigabit Ethernet Driver Installs the Marvell® Gigabit Ethernet LAN driver. Install the necessary drivers to activate the devices. USB 2.0 Driver Installs the Universal Serial Bus 2.0 (USB 2.0) driver. ASUS InstAll - Installation Wizard for Drivers Installs all of the drivers through the Installation Wizard. 5.2.2 Drivers menu The drivers menu shows the available device drivers if the system detects installed devices. SoundMAX ADI Audio Driver Installs the ADI 1988B audio driver and application. ASUS EPU Driver + AI Gear 3 Utility...
Motherboard Installation Guide
Page 148
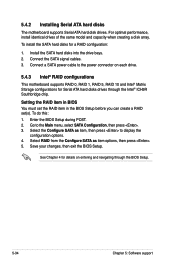
... SATA hard disks into the drive bays. 2. Connect a SATA power cable to the power connector on entering and navigating through the Intel® ICH9R Southbridge chip. Select the Configure SATA as item options, then press . 5. To install the SATA hard disks for Serial ATA hard disks drives through the BIOS Setup. 5-34 Chapter 5: Software support Go to display the configuration options. 4. For optimal performance, install identical drives of the same model and capacity when creating a disk array. Enter the BIOS Setup during POST. 2. Save your changes, then exit the BIOS Setup...
... SATA hard disks into the drive bays. 2. Connect a SATA power cable to the power connector on entering and navigating through the Intel® ICH9R Southbridge chip. Select the Configure SATA as item options, then press . 5. To install the SATA hard disks for Serial ATA hard disks drives through the BIOS Setup. 5-34 Chapter 5: Software support Go to display the configuration options. 4. For optimal performance, install identical drives of the same model and capacity when creating a disk array. Enter the BIOS Setup during POST. 2. Save your changes, then exit the BIOS Setup...
Motherboard Installation Guide
Page 167
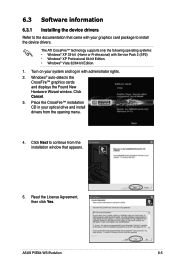
... in your optical drive and install drivers from the installation window that came with your graphics card package to the documentation that appears. 5. Place the CrossFire™ installation CD in with Service Pack 2 (SP2) • Windows® XP Professional 64-bit Edition. • Windows® Vista 32/64 bit Edition. 1. ASUS P5E64 WS Evolution 6-5 6.3 Software information 6.3.1 Installing the device drivers Refer to install the device drivers. The ATI CrossFire™ technology supports only the...
... in your optical drive and install drivers from the installation window that came with your graphics card package to the documentation that appears. 5. Place the CrossFire™ installation CD in with Service Pack 2 (SP2) • Windows® XP Professional 64-bit Edition. • Windows® Vista 32/64 bit Edition. 1. ASUS P5E64 WS Evolution 6-5 6.3 Software information 6.3.1 Installing the device drivers Refer to install the device drivers. The ATI CrossFire™ technology supports only the...


