
User Manual
Page 4
... 2.10.1 Using the OS shut down function 2-42 2.10.2 Using the dual function power switch 2-42 Chapter 3: BIOS setup 3.1 Managing and updating your BIOS 3-1 3.1.1 ASUS Update utility 3-1 3.1.2 ASUS EZ Flash 2 utility 3-4 3.1.3 AFUDOS utility 3-5 3.2 BIOS setup program 3-7 3.2.1 BIOS menu screen 3-8 3.2.2 Menu bar 3-8 3.2.3 Navigation keys 3-8 3.2.4 Menu items 3-9 3.2.5 Sub-menu items 3-9 3.2.6 Configuration fields 3-9 3.2.7 Pop-up...
... 2.10.1 Using the OS shut down function 2-42 2.10.2 Using the dual function power switch 2-42 Chapter 3: BIOS setup 3.1 Managing and updating your BIOS 3-1 3.1.1 ASUS Update utility 3-1 3.1.2 ASUS EZ Flash 2 utility 3-4 3.1.3 AFUDOS utility 3-5 3.2 BIOS setup program 3-7 3.2.1 BIOS menu screen 3-8 3.2.2 Menu bar 3-8 3.2.3 Navigation keys 3-8 3.2.4 Menu items 3-9 3.2.5 Sub-menu items 3-9 3.2.6 Configuration fields 3-9 3.2.7 Pop-up...
User Manual
Page 7
... Direct Link 4-28 4.3.10 AI Audio 2 (SoundMAX® High Definition Audio utility)... 4-30 4.3.11 ASUS Drive Xpert 4-39 4.3.12 ASUS Express Gate SSD 4-50 4.4 RAID configurations 4-60 4.4.1 RAID definitions 4-60 4.4.2 Installing Serial ATA hard disks 4-61 4.4.3 ...Intel® RAID configurations 4-61 4.5 Creating a RAID driver disk 4-69 4.5.1 Creating a RAID driver disk without entering the OS.... 4-69 4.5.2 Creating a RAID driver disk in Windows 4-...
... Direct Link 4-28 4.3.10 AI Audio 2 (SoundMAX® High Definition Audio utility)... 4-30 4.3.11 ASUS Drive Xpert 4-39 4.3.12 ASUS Express Gate SSD 4-50 4.4 RAID configurations 4-60 4.4.1 RAID definitions 4-60 4.4.2 Installing Serial ATA hard disks 4-61 4.4.3 ...Intel® RAID configurations 4-61 4.5 Creating a RAID driver disk 4-69 4.5.1 Creating a RAID driver disk without entering the OS.... 4-69 4.5.2 Creating a RAID driver disk in Windows 4-...
User Manual
Page 12
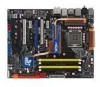
...Go) Silicon Image SIL5723 controller (Drive Xpert technology): - 2 x SATA 3.0 Gb/s ports - P5Q Deluxe specifications summary CPU Chipset System Bus Memory Expansion Slots Multi-GPU Support Storage LAN IEEE 1394 LGA775 ...1066 / 800 / 667 MHz, non-ECC, un-buffered memory Dual channel memory architecture * Refer to www.asus.com or this user manual for up to Quad CrossFireX™ Intel® ICH10R Southbridge: - 6 x... SATA 3.0 Gb/s ports - Hence, a total installed memory of 4GB capacity or more, Windows 32-bit operation system may onlyl recognize less than 3GB is recommended. 2 x PCI Express...
...Go) Silicon Image SIL5723 controller (Drive Xpert technology): - 2 x SATA 3.0 Gb/s ports - P5Q Deluxe specifications summary CPU Chipset System Bus Memory Expansion Slots Multi-GPU Support Storage LAN IEEE 1394 LGA775 ...1066 / 800 / 667 MHz, non-ECC, un-buffered memory Dual channel memory architecture * Refer to www.asus.com or this user manual for up to Quad CrossFireX™ Intel® ICH10R Southbridge: - 6 x... SATA 3.0 Gb/s ports - Hence, a total installed memory of 4GB capacity or more, Windows 32-bit operation system may onlyl recognize less than 3GB is recommended. 2 x PCI Express...

User Manual
Page 19
... high quality power components such as a network gateway for managing traffic between two separate networks. ASUS P5Q Deluxe 1-3 ASUS True 16-Phase Power Design The breakthrough technology of data from bootup, Express Gate is bringing to the ASUS motherboards. 16-phase power design can utilize the most appropriate power usage via intelligent acceleration and overclocking... VRM module effectively, and lower more , the user-friendly picture manager lets you view your house. What's more temperature compared to LAN without entering Windows at anytime! helping save power and money.
... high quality power components such as a network gateway for managing traffic between two separate networks. ASUS P5Q Deluxe 1-3 ASUS True 16-Phase Power Design The breakthrough technology of data from bootup, Express Gate is bringing to the ASUS motherboards. 16-phase power design can utilize the most appropriate power usage via intelligent acceleration and overclocking... VRM module effectively, and lower more , the user-friendly picture manager lets you view your house. What's more temperature compared to LAN without entering Windows at anytime! helping save power and money.
User Manual
Page 23
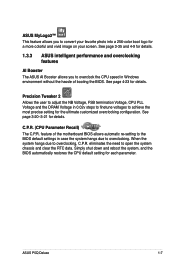
...BIOS. Simply shut down and reboot the system, and the BIOS automatically restores the CPU default setting for details. ASUS P5Q Deluxe 1-7 eliminates the need to overclocking. ASUS MyLogo3™ This feature allows you to convert your screen. C.P.R. (CPU Parameter Recall) The C.P.R. When the ...a 256-color boot logo for details. 1.3.3 ASUS intelligent performance and overclocking features AI Booster The ASUS AI Booster allows you to overclock the CPU speed in Windows environment without the hassle of the motherboard BIOS allows automatic re-setting to the BIOS default...
...BIOS. Simply shut down and reboot the system, and the BIOS automatically restores the CPU default setting for details. ASUS P5Q Deluxe 1-7 eliminates the need to overclocking. ASUS MyLogo3™ This feature allows you to convert your screen. C.P.R. (CPU Parameter Recall) The C.P.R. When the ...a 256-color boot logo for details. 1.3.3 ASUS intelligent performance and overclocking features AI Booster The ASUS AI Booster allows you to overclock the CPU speed in Windows environment without the hassle of the motherboard BIOS allows automatic re-setting to the BIOS default...
User Manual
Page 32
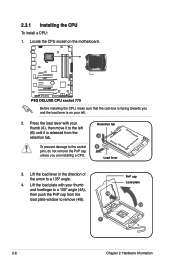
... in the direction of the arrow to the socket pins, do not remove the PnP cap unless you and the load lever is on the motherboard. 2.3.1 Installing the CPU To install a CPU: 1. Before installing the CPU, make sure that the cam box is released from the 4B load plate...
... in the direction of the arrow to the socket pins, do not remove the PnP cap unless you and the load lever is on the motherboard. 2.3.1 Installing the CPU To install a CPU: 1. Before installing the CPU, make sure that the cam box is released from the 4B load plate...

User Manual
Page 38
... which does not support Physical Address Extension (PAE). • If you install Windows® XP/Vista 32-bit operation system, a total memory of 128 Mb chips. • Due to chipset limitation, this motherboard can only support up to install the memory modules from the same vendor. •.... Any excess memory from the higher-sized channel is then mapped for single-channel operation. • It is recommended. • This motherboard does not support memory modules made up of less than the vendor-marked value. For optimum compatibility, it is recommended that you install four...
... which does not support Physical Address Extension (PAE). • If you install Windows® XP/Vista 32-bit operation system, a total memory of 128 Mb chips. • Due to chipset limitation, this motherboard can only support up to install the memory modules from the same vendor. •.... Any excess memory from the higher-sized channel is then mapped for single-channel operation. • It is recommended. • This motherboard does not support memory modules made up of less than the vendor-marked value. For optimum compatibility, it is recommended that you install four...
User Manual
Page 55
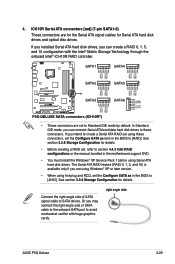
...-plug and NCQ, set , refer to section 4.4.3 Intel RAID configurations or the manual bundled in the motherboard support DVD. • You must install the Windows® XP Service Pack 1 before using these connectors. right angle side ASUS P5Q Deluxe 2-29 In Standard IDE mode, you intend to [RAID]. ICH10R Serial ATA connectors [red] (7-pin SATA1...
...-plug and NCQ, set , refer to section 4.4.3 Intel RAID configurations or the manual bundled in the motherboard support DVD. • You must install the Windows® XP Service Pack 1 before using these connectors. right angle side ASUS P5Q Deluxe 2-29 In Standard IDE mode, you intend to [RAID]. ICH10R Serial ATA connectors [red] (7-pin SATA1...
User Manual
Page 68
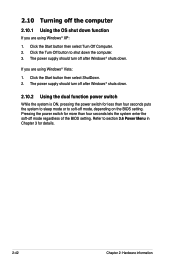
The power supply should turn off after Windows® shuts down. 2.10.2 Using the dual function power switch While the system is ON, ...BIOS setting. Pressing the power switch for details. 2-42 Chapter 2: Hardware information If you are using Windows® XP: 1. The power supply should turn off after Windows® shuts down. Refer to soft-off mode, depending on the BIOS setting. Click the Start... 3. 2.10 Turning off the computer 2.10.1 Using the OS shut down function If you are using Windows® Vista: 1. Click the Start button then select Turn Off Computer. 2.
The power supply should turn off after Windows® shuts down. 2.10.2 Using the dual function power switch While the system is ON, ...BIOS setting. Pressing the power switch for details. 2-42 Chapter 2: Hardware information If you are using Windows® XP: 1. The power supply should turn off after Windows® shuts down. Refer to soft-off mode, depending on the BIOS setting. Click the Start... 3. 2.10 Turning off the computer 2.10.1 Using the OS shut down function If you are using Windows® Vista: 1. Click the Start button then select Turn Off Computer. 2.

User Manual
Page 71
... version information. Copy the original motherboard BIOS using the ASUS Update or AFUDOS utilities. 3.1.1 ASUS Update utility The ASUS Update is available in case you to manage and update the motherboard Basic Input/Output System (BIOS) setup. 1. ASUS Update requires an Internet connection either through a network or an Internet Service Provider (ISP). ASUS P5Q Deluxe 3-1 This utility is a utility...
... version information. Copy the original motherboard BIOS using the ASUS Update or AFUDOS utilities. 3.1.1 ASUS Update utility The ASUS Update is available in case you to manage and update the motherboard Basic Input/Output System (BIOS) setup. 1. ASUS Update requires an Internet connection either through a network or an Internet Service Provider (ISP). ASUS P5Q Deluxe 3-1 This utility is a utility...

User Manual
Page 72
Select the ASUS FTP site nearest Internet option from the Windows® desktop by clicking Start > Programs > ASUS > ASUSUpdate > ASUSUpdate. Click Next. 3-2 Chapter 3: BIOS setup Launch the ASUS Update utility from the drop‑down you update the BIOS using this utility. click Auto Select. Select Update BIOS from the 3. The ASUS Update main window appears. 2. Quit all Windows® applications before you to avoid network traffic, or menu, then click Next. Updating the BIOS through the Internet To update the BIOS through the Internet: 1.
Select the ASUS FTP site nearest Internet option from the Windows® desktop by clicking Start > Programs > ASUS > ASUSUpdate > ASUSUpdate. Click Next. 3-2 Chapter 3: BIOS setup Launch the ASUS Update utility from the drop‑down you update the BIOS using this utility. click Auto Select. Select Update BIOS from the 3. The ASUS Update main window appears. 2. Quit all Windows® applications before you to avoid network traffic, or menu, then click Next. Updating the BIOS through the Internet To update the BIOS through the Internet: 1.
User Manual
Page 73
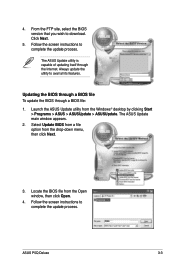
...the update process. Select Update BIOS from a file option from the Open window, then click Open. 4. Locate the BIOS file from the drop‑down menu, then click Next. 3. P5QD.ROM P5QD ASUS P5Q Deluxe 3-3 From the FTP site, select the BIOS version that you wish to... complete the update process. The ASUS Update utility is capable of updating itself through a BIOS file: 1. The ASUS Update main window appears. 2. Updating the BIOS through a BIOS...
...the update process. Select Update BIOS from a file option from the Open window, then click Open. 4. Locate the BIOS file from the drop‑down menu, then click Next. 3. P5QD.ROM P5QD ASUS P5Q Deluxe 3-3 From the FTP site, select the BIOS version that you wish to... complete the update process. The ASUS Update utility is capable of updating itself through a BIOS file: 1. The ASUS Update main window appears. 2. Updating the BIOS through a BIOS...

User Manual
Page 79
... select it then press to display a list of the field opposite the item. Refer to 3.2.7 Pop-up window. 3.2.7 Pop-up window Select a menu item then press to select a field. ASUS P5Q Deluxe 3-9 To display the sub-menu, select the item and press . 3.2.6 Configuration fields These fields show the values... [Not Detected] [Not Detected] [Not Detected] [Not Detected] [Not Detected] Use [ENTER], [TAB], or [SHIFT-TAB] to display a pop-up window Scroll bar 3.2.9 General help At the top right corner of the menu screen is not user-configurable. To change the value of options. 3.2.4 Menu items...
... select it then press to display a list of the field opposite the item. Refer to 3.2.7 Pop-up window. 3.2.7 Pop-up window Select a menu item then press to select a field. ASUS P5Q Deluxe 3-9 To display the sub-menu, select the item and press . 3.2.6 Configuration fields These fields show the values... [Not Detected] [Not Detected] [Not Detected] [Not Detected] [Not Detected] Use [ENTER], [TAB], or [SHIFT-TAB] to display a pop-up window Scroll bar 3.2.9 General help At the top right corner of the menu screen is not user-configurable. To change the value of options. 3.2.4 Menu items...

User Manual
Page 110
...When setting this item to [Reset], make sure to save the setting to stay at the Express Gate's first screen before starting Windows or other installed OS. Choose [Prompt User] to the BIOS so that the user data will run again when you enter the Express..., browsing history, etc.). Configuration options: [Enabled] [Disabled] Enter OS Timer [10 Seconds] Sets countdown duration that provides quick access to enable or disable the ASUS Express Gate feature. Configuration options: [Prompt User] [1 second] [3 seconds] [5 seconds] [10 seconds] [15 seconds] [20 seconds] [30 seconds] Reset...
...When setting this item to [Reset], make sure to save the setting to stay at the Express Gate's first screen before starting Windows or other installed OS. Choose [Prompt User] to the BIOS so that the user data will run again when you enter the Express..., browsing history, etc.). Configuration options: [Enabled] [Disabled] Enter OS Timer [10 Seconds] Sets countdown duration that provides quick access to enable or disable the ASUS Express Gate feature. Configuration options: [Prompt User] [1 second] [3 seconds] [5 seconds] [10 seconds] [15 seconds] [20 seconds] [30 seconds] Reset...

User Manual
Page 113
...not immediately exit this option, a confirmation appears. Select Ok to save the changes while exiting. If you select this option, a confirmation window appears. After selecting this menu. Load Setup Defaults This option allows you made to the Setup program. Select one of the parameters on ... Changes Load Setup Defaults Exit system setup after saving the changes. Select Ok to discard any changes and load the previously saved values. ASUS P5Q Deluxe 3-43 Exit & Save Changes Once you are saved to the CMOS RAM. Select Ok to load default values. 3.9 Exit menu The...
...not immediately exit this option, a confirmation appears. Select Ok to save the changes while exiting. If you select this option, a confirmation window appears. After selecting this menu. Load Setup Defaults This option allows you made to the Setup program. Select one of the parameters on ... Changes Load Setup Defaults Exit system setup after saving the changes. Select Ok to discard any changes and load the previously saved values. ASUS P5Q Deluxe 3-43 Exit & Save Changes Once you are saved to the CMOS RAM. Select Ok to load default values. 3.9 Exit menu The...

User Manual
Page 117
... Drivers menu if Autorun is NOT enabled in your hardware. • Motherboard settings and hardware options vary. Double-click the ASSETUP.EXE to the optical drive. Visit the ASUS website(www.asus.com) for reference only. ASUS P5Q Deluxe 4-1 4.1 Installing an operating system This motherboard supports Windows® XP/ 64-bit XP/ Vista™ operating systems (OS). The...
... Drivers menu if Autorun is NOT enabled in your hardware. • Motherboard settings and hardware options vary. Double-click the ASSETUP.EXE to the optical drive. Visit the ASUS website(www.asus.com) for reference only. ASUS P5Q Deluxe 4-1 4.1 Installing an operating system This motherboard supports Windows® XP/ 64-bit XP/ Vista™ operating systems (OS). The...

User Manual
Page 119
... you keep your computer in Windows® environment. Installation Wizard for Utilities Installs all of any detected problems. This utility helps you of the utilities through a network or an Internet Service Provider (ISP). ASUS P5Q Deluxe 4-3 4.2.3 Utilities menu The Utilities menu shows the applications and other software that the motherboard supports. This utility requires an...
... you keep your computer in Windows® environment. Installation Wizard for Utilities Installs all of any detected problems. This utility helps you of the utilities through a network or an Internet Service Provider (ISP). ASUS P5Q Deluxe 4-3 4.2.3 Utilities menu The Utilities menu shows the applications and other software that the motherboard supports. This utility requires an...

User Manual
Page 125
... file from the drop down menu, and then click Next. 5. ASUS P5Q Deluxe 4-9 The ASUS MyLogo3™ is the image that appears on screen during the Power‑On‑Self-Tests (POST). Launch the ASUS Update utility. See section 3.7.2 Boot Settings Configuration. • You can...or BMP file formats. See section 4.2.3 Utilities menu for more information. 4.3.1 ASUS MyLogo3™ The ASUS MyLogo3™ utility lets you install the ASUS Update utility from the ASUS website. From the left window pane, select the folder that came with the software application for details. ...
... file from the drop down menu, and then click Next. 5. ASUS P5Q Deluxe 4-9 The ASUS MyLogo3™ is the image that appears on screen during the Power‑On‑Self-Tests (POST). Launch the ASUS Update utility. See section 3.7.2 Boot Settings Configuration. • You can...or BMP file formats. See section 4.2.3 Utilities menu for more information. 4.3.1 ASUS MyLogo3™ The ASUS MyLogo3™ utility lets you install the ASUS Update utility from the ASUS website. From the left window pane, select the folder that came with the software application for details. ...

User Manual
Page 126
After flashing the BIOS, restart the computer to load the new boot logo. 10. When the screen returns to the ASUS Update utility, flash the original BIOS to display the new boot logo during POST. 4-10 Chapter 4: Software support When the logo images appear on the right window pane, select an image to your desired size by clicking on the Ratio box. 9. Adjust the boot image to enlarge by selecting a value on it. 8. 7.
After flashing the BIOS, restart the computer to load the new boot logo. 10. When the screen returns to the ASUS Update utility, flash the original BIOS to display the new boot logo during POST. 4-10 Chapter 4: Software support When the logo images appear on the right window pane, select an image to your desired size by clicking on the Ratio box. 9. Adjust the boot image to enlarge by selecting a value on it. 8. 7.

User Manual
Page 127
... the BIOS Setup. The VCT feature reduces networking and support costs through a highly manageable and controlled network system. Click Virtual Cable Tester from the Windows® desktop by clicking Start > All Programs > Marvell > Virtual Cable Tester. 2. Click the Run button to perform a cable test. &#...connected to the LAN port(s). • If you want the system to check the status of up to display the screen below. 3. ASUS P5Q Deluxe 4-11 The VCT detects and reports open and shorted cables, impedance mismatches, pair swaps, pair polarity problems, and pair skew problems of...
... the BIOS Setup. The VCT feature reduces networking and support costs through a highly manageable and controlled network system. Click Virtual Cable Tester from the Windows® desktop by clicking Start > All Programs > Marvell > Virtual Cable Tester. 2. Click the Run button to perform a cable test. &#...connected to the LAN port(s). • If you want the system to check the status of up to display the screen below. 3. ASUS P5Q Deluxe 4-11 The VCT detects and reports open and shorted cables, impedance mismatches, pair swaps, pair polarity problems, and pair skew problems of...


