User Manual
Page 10
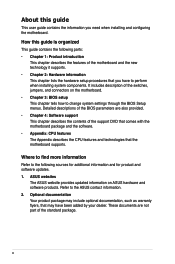
... flyers, that you need when installing and configuring the motherboard. ASUS websites The ASUS website provides updated information on the motherboard. • Chapter 3: BIOS setup This chapter tells how to perform when installing system components. Optional documentation Your product package may have to change system settings through the BIOS Setup menus. Refer to the following parts: •...
... flyers, that you need when installing and configuring the motherboard. ASUS websites The ASUS website provides updated information on the motherboard. • Chapter 3: BIOS setup This chapter tells how to perform when installing system components. Optional documentation Your product package may have to change system settings through the BIOS Setup menus. Refer to the following parts: •...
User Manual
Page 21
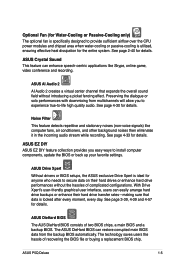
... details. See page 3-39, 4-39 and 4-57 for details. ASUS P5Q Deluxe 1-5 Preserving the dialogue or solo performances with downmixing from the backup BIOS automatically. ASUS EZ DIY ASUS EZ DIY feature collection provides you to experience true-to-life high quality...BIOS data from multichannels will allow you easy ways to secure data on their hard drive transfer rates-making sure that expands the overall sound field without the hassles of complicated configurations. See page 4-30 for anyone who needs to install computer components, update the BIOS or back up your favorite settings...
... details. See page 3-39, 4-39 and 4-57 for details. ASUS P5Q Deluxe 1-5 Preserving the dialogue or solo performances with downmixing from the backup BIOS automatically. ASUS EZ DIY ASUS EZ DIY feature collection provides you to experience true-to-life high quality...BIOS data from multichannels will allow you easy ways to secure data on their hard drive transfer rates-making sure that expands the overall sound field without the hassles of complicated configurations. See page 4-30 for anyone who needs to install computer components, update the BIOS or back up your favorite settings...
User Manual
Page 22
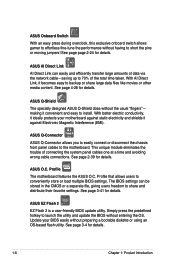
... connect or disconnect the chassis front panel cables to conveniently store or load multiple BIOS settings. Profile that allows users to the motherboard. ASUS O.C. See page 3-41 for details. Simply press the predefined hotkey to launch the utility and update the BIOS without the usual "fingers"- With AI Direct Link, it convenient and easy to...
... connect or disconnect the chassis front panel cables to conveniently store or load multiple BIOS settings. Profile that allows users to the motherboard. ASUS O.C. See page 3-41 for details. Simply press the predefined hotkey to launch the utility and update the BIOS without the usual "fingers"- With AI Direct Link, it convenient and easy to...
User Manual
Page 23
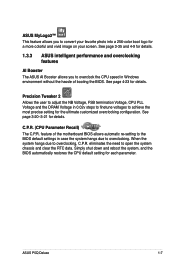
... motherboard BIOS allows automatic re-setting to the BIOS default settings in Windows environment without the hassle of booting the BIOS. eliminates the need to overclocking, C.P.R. Simply shut down and reboot the system, and the BIOS automatically restores the CPU default setting for details. ASUS... in 0.02v steps to finetune voltages to achieve the most precise setting for details. 1.3.3 ASUS intelligent performance and overclocking features AI Booster The ASUS AI Booster allows you to convert your screen. ASUS P5Q Deluxe 1-7 C.P.R. (CPU Parameter Recall) The C.P.R.
... motherboard BIOS allows automatic re-setting to the BIOS default settings in Windows environment without the hassle of booting the BIOS. eliminates the need to overclocking, C.P.R. Simply shut down and reboot the system, and the BIOS automatically restores the CPU default setting for details. ASUS... in 0.02v steps to finetune voltages to achieve the most precise setting for details. 1.3.3 ASUS intelligent performance and overclocking features AI Booster The ASUS AI Booster allows you to convert your screen. ASUS P5Q Deluxe 1-7 C.P.R. (CPU Parameter Recall) The C.P.R.
User Manual
Page 44
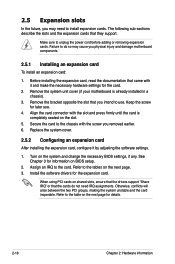
... that the cards do so may cause you physical injury and damage motherboard components. 2.5.1 Installing an expansion card To install an expansion card: 1. See Chapter 3 for information on the system and change the necessary BIOS settings, if any. Refer to the card. Otherwise, conflicts will arise... between the two PCI groups, making the system unstable and the card inoperable. Before installing the expansion card, read the documentation that they support. Turn on BIOS setup. 2. Assign an...
... that the cards do so may cause you physical injury and damage motherboard components. 2.5.1 Installing an expansion card To install an expansion card: 1. See Chapter 3 for information on the system and change the necessary BIOS settings, if any. Refer to the card. Otherwise, conflicts will arise... between the two PCI groups, making the system unstable and the card inoperable. Before installing the expansion card, read the documentation that they support. Turn on BIOS setup. 2. Assign an...
User Manual
Page 48
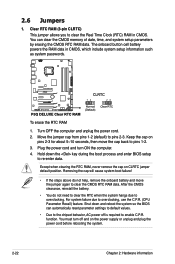
...the power cord. 2. For system failure due to clear the CMOS RTC RAM data. Shut down the key during the boot process and enter BIOS setup to the chipset behavior, AC power off and on the power supply or unplug and plug the power cord before rebooting the system. 2-22... Chapter 2: Hardware information 2.6 Jumpers 1. You can automatically reset parameter settings to default values. • Due to re-enter data. To erase the RTC RAM 1. Keep the cap on CLRTC jumper default position. Except when clearing...
...the power cord. 2. For system failure due to clear the CMOS RTC RAM data. Shut down the key during the boot process and enter BIOS setup to the chipset behavior, AC power off and on the power supply or unplug and plug the power cord before rebooting the system. 2-22... Chapter 2: Hardware information 2.6 Jumpers 1. You can automatically reset parameter settings to default values. • Due to re-enter data. To erase the RTC RAM 1. Keep the cap on CLRTC jumper default position. Except when clearing...
User Manual
Page 49
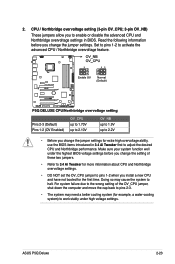
... about CPU and Northbridge overvoltage settings. • DO NOT set the OV_CPU jumper to work stably under the highest BIOS voltage settings before you to halt. CPU / Northbridge overvoltage setting (3-pin OV_CPU; 3-pin OV_NB) These jumpers allow you change the setting of the OV_CPU jumper, shut...8226; Before you install a new CPU and have not booted for extra-high overvoltage ability, use the BIOS items introduced in BIOS. ASUS P5Q Deluxe 2-23 Set to pins 1-2 to adjust the desired CPU and Northbridge performance. Read the following information before you change the jumper...
... about CPU and Northbridge overvoltage settings. • DO NOT set the OV_CPU jumper to work stably under the highest BIOS voltage settings before you to halt. CPU / Northbridge overvoltage setting (3-pin OV_CPU; 3-pin OV_NB) These jumpers allow you change the setting of the OV_CPU jumper, shut...8226; Before you install a new CPU and have not booted for extra-high overvoltage ability, use the BIOS items introduced in BIOS. ASUS P5Q Deluxe 2-23 Set to pins 1-2 to adjust the desired CPU and Northbridge performance. Read the following information before you change the jumper...
User Manual
Page 55
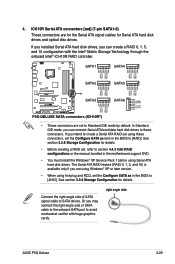
... Matrix Storage Technology through the onboard Intel® ICH10R RAID controller. • These connectors are set , refer to section 4.4.3 Intel RAID configurations or the manual bundled in the motherboard support DVD. • You must install the Windows® XP Service Pack 1 before using...ASUS P5Q Deluxe 2-29 Or you are for the Serial ATA signal cables for details. ICH10R Serial ATA connectors [red] (7-pin SATA1-6) These connectors are using Windows® XP or later version. • When using hot-plug and NCQ, set the Configure SATA as item in the BIOS to these connectors, set...
... Matrix Storage Technology through the onboard Intel® ICH10R RAID controller. • These connectors are set , refer to section 4.4.3 Intel RAID configurations or the manual bundled in the motherboard support DVD. • You must install the Windows® XP Service Pack 1 before using...ASUS P5Q Deluxe 2-29 Or you are for the Serial ATA signal cables for details. ICH10R Serial ATA connectors [red] (7-pin SATA1-6) These connectors are using Windows® XP or later version. • When using hot-plug and NCQ, set the Configure SATA as item in the BIOS to these connectors, set...

User Manual
Page 61
...the front panel audio I /O module that the Front Panel Type item in the BIOS is set to [HD Audio]. Front panel audio connector (10-1 pin AAFP) This connector is for details. Connect one end of the motherboard's high-definition audio capability. • If you want to connect an AC' ...97 front panel audio module to this connector, make sure that supports either HD Audio or legacy AC`97 audio standard. ASUS P5Q Deluxe 2-35 11.
...the front panel audio I /O module that the Front Panel Type item in the BIOS is set to [HD Audio]. Front panel audio connector (10-1 pin AAFP) This connector is for details. Connect one end of the motherboard's high-definition audio capability. • If you want to connect an AC' ...97 front panel audio module to this connector, make sure that supports either HD Audio or legacy AC`97 audio standard. ASUS P5Q Deluxe 2-35 11.
User Manual
Page 64
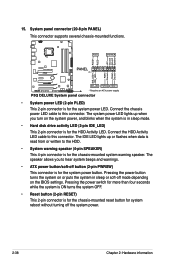
...-mounted functions. • System power LED (2-pin PLED) This 2-pin connector is for the system power LED. The speaker allows you turn on the BIOS settings. Pressing the power button turns the system on or puts the system in sleep mode. • Hard disk drive activity LED (2-pin IDE_LED) This 2-...HDD Activity LED. The system power LED lights up or flashes when data is read from or written to hear system beeps and warnings. • ATX power button/soft-off the system power. 2-38 Chapter 2: Hardware information The IDE LED lights up when you to the HDD. • System warning...
...-mounted functions. • System power LED (2-pin PLED) This 2-pin connector is for the system power LED. The speaker allows you turn on the BIOS settings. Pressing the power button turns the system on or puts the system in sleep mode. • Hard disk drive activity LED (2-pin IDE_LED) This 2-...HDD Activity LED. The system power LED lights up or flashes when data is read from or written to hear system beeps and warnings. • ATX power button/soft-off the system power. 2-38 Chapter 2: Hardware information The IDE LED lights up when you to the HDD. • System warning...
User Manual
Page 67
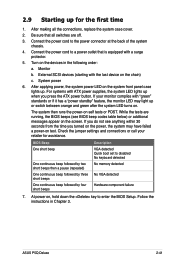
... by four short beeps Description VGA detected Quick boot set to enter the BIOS Setup. At power on the chain) c. Connect the power cord to the power connector at the back of the system chassis. 4. Turn on self tests or POST. ASUS P5Q Deluxe 2-41 For systems with a surge protector. 5. .... If your retailer for the first time 1. 2.9 Starting up . After making all switches are running, the BIOS beeps (see anything within 30 seconds from the time you press the ATX power button. Connect the power cord to a power outlet that all the connections, replace the system case cover....
... by four short beeps Description VGA detected Quick boot set to enter the BIOS Setup. At power on the chain) c. Connect the power cord to the power connector at the back of the system chassis. 4. Turn on self tests or POST. ASUS P5Q Deluxe 2-41 For systems with a surge protector. 5. .... If your retailer for the first time 1. 2.9 Starting up . After making all switches are running, the BIOS beeps (see anything within 30 seconds from the time you press the ATX power button. Connect the power cord to a power outlet that all the connections, replace the system case cover....
User Manual
Page 68
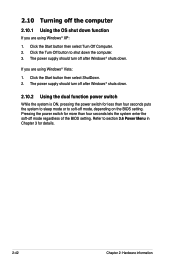
Pressing the power switch for less than four seconds lets the system enter the soft-off mode regardless of the BIOS setting. If you are using Windows® XP: 1. Click the Start button then select ShutDown. 2. The power supply should turn off after Windows® shuts... Windows® Vista: 1. The power supply should turn off after Windows® shuts down the computer. 3. Refer to soft-off mode, depending on the BIOS setting. 2.10 Turning off the computer 2.10.1 Using the OS shut down . Click the Start button then select Turn Off Computer. 2. Click the Turn Off ...
Pressing the power switch for less than four seconds lets the system enter the soft-off mode regardless of the BIOS setting. If you are using Windows® XP: 1. Click the Start button then select ShutDown. 2. The power supply should turn off after Windows® shuts... Windows® Vista: 1. The power supply should turn off after Windows® shuts down the computer. 3. Refer to soft-off mode, depending on the BIOS setting. 2.10 Turning off the computer 2.10.1 Using the OS shut down . Click the Start button then select Turn Off Computer. 2. Click the Turn Off ...

User Manual
Page 69
Detailed descriptions of the BIOS parameters are also provided. This chapter tells how to change the BIOS se3tup system settings through the BIOS Setup menus.
Detailed descriptions of the BIOS parameters are also provided. This chapter tells how to change the BIOS se3tup system settings through the BIOS Setup menus.
User Manual
Page 77
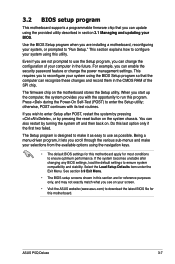
...of your computer in section 3.1 Managing and updating your BIOS. ASUS P5Q Deluxe 3-7 Even if you are not prompted to download the latest BIOS file for most conditions to enter Setup after changing any BIOS settings, load the default settings to configure your system using the provided utility described in ...exactly match what you see on your screen. • Visit the ASUS website (www.asus.com) to use as easy to reconfigure your system using the navigation keys. • The default BIOS settings for this motherboard apply for this last option only if the first two failed. ...
...of your computer in section 3.1 Managing and updating your BIOS. ASUS P5Q Deluxe 3-7 Even if you are not prompted to download the latest BIOS file for most conditions to enter Setup after changing any BIOS settings, load the default settings to configure your system using the provided utility described in ...exactly match what you see on your screen. • Visit the ASUS website (www.asus.com) to use as easy to reconfigure your system using the navigation keys. • The default BIOS settings for this motherboard apply for this last option only if the first two failed. ...
User Manual
Page 78
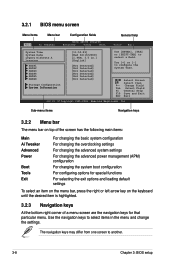
...Detected] [Not Detected] [Not Detected] [Not Detected] Use [ENTER], [TAB] or [SHIFT-TAB] to select a field. Use [+] or [-] to another. 3-8 Chapter 3: BIOS setup Change Field Tab Select Field F1 General Help F10 Save and Exit ESC Exit v02.61 (C)Copyright 1985-2008, American Megatrends, Inc. Sub-menu... (APM) configuration For changing the system boot configuration For configuring options for special functions For selecting the exit options and loading default settings To select an item on the menu bar, press the right or left arrow key on the keyboard until the desired item is...
...Detected] [Not Detected] [Not Detected] [Not Detected] Use [ENTER], [TAB] or [SHIFT-TAB] to select a field. Use [+] or [-] to another. 3-8 Chapter 3: BIOS setup Change Field Tab Select Field F1 General Help F10 Save and Exit ESC Exit v02.61 (C)Copyright 1985-2008, American Megatrends, Inc. Sub-menu... (APM) configuration For changing the system boot configuration For configuring options for special functions For selecting the exit options and loading default settings To select an item on the menu bar, press the right or left arrow key on the keyboard until the desired item is...

User Manual
Page 80
...how to configure System Time. Configuration options: [Chinese(BIG5)] [Chinese(GB)] [Japanese] [Français] [German] [English] 3-10 Chapter 3: BIOS setup Change Field Tab Select Field F1 General Help F10 Save and Exit ESC Exit v02.61 (C)Copyright 1985-2008, American Megatrends, Inc. 3.3.1 System Time... [xx:xx:xx] Allows you to set the system time. 3.3.2 System Date [Day xx/xx/xxxx] Allows you to select a field. 3.3 Main menu When you enter the BIOS Setup program, the Main menu screen appears, giving you an overview of floppy ...
...how to configure System Time. Configuration options: [Chinese(BIG5)] [Chinese(GB)] [Japanese] [Français] [German] [English] 3-10 Chapter 3: BIOS setup Change Field Tab Select Field F1 General Help F10 Save and Exit ESC Exit v02.61 (C)Copyright 1985-2008, American Megatrends, Inc. 3.3.1 System Time... [xx:xx:xx] Allows you to set the system time. 3.3.2 System Date [Day xx/xx/xxxx] Allows you to select a field. 3.3 Main menu When you enter the BIOS Setup program, the Main menu screen appears, giving you an overview of floppy ...
User Manual
Page 81
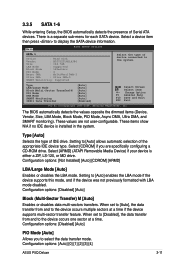
... supports multi-sector transfer feature. Configuration options: [Auto] [0] [1] [2] [3] [4] ASUS P5Q Deluxe 3-11 These items show N/A if no IDE device is either a ZIP, LS-120, or MO drive. The BIOS automatically detects the values opposite the dimmed items (Device, Vendor, Size, LBA Mode,...a time. Configuration options: [Disabled] [Auto] Block (Multi-Sector Transfer) M [Auto] Enables or disables data multi-sectors transfers. When set to [Disabled], the data transfer from and to the system. Configuration options: [Not Installed] [Auto] [CDROM] [ARMD] LBA/Large Mode...
... supports multi-sector transfer feature. Configuration options: [Auto] [0] [1] [2] [3] [4] ASUS P5Q Deluxe 3-11 These items show N/A if no IDE device is either a ZIP, LS-120, or MO drive. The BIOS automatically detects the values opposite the dimmed items (Device, Vendor, Size, LBA Mode,...a time. Configuration options: [Disabled] [Auto] Block (Multi-Sector Transfer) M [Auto] Enables or disables data multi-sectors transfers. When set to [Disabled], the data transfer from and to the system. Configuration options: [Not Installed] [Auto] [CDROM] [ARMD] LBA/Large Mode...

User Manual
Page 105
...the NumLock. Configuration options: [Disabled] [Enabled] ASUS P5Q Deluxe 3-35 Select Screen Select Item +- Configuration options: [Disabled] [Enabled] Set this item allows the BIOS to skip some power on state for option ROM. Configuration options: [Force BIOS] [Keep Current] Bootup Num-Lock [On] ...v02.61 (C)Copyright 1985-2008, American Megatrends, Inc. 3.7.2 Boot Settings Configuration BIOS SETUP UTILITY Boot Boot Settings Configuration Quick Boot [Enabled] Full Screen Logo [Enabled] AddOn ROM Display Mode [Force BIOS] Bootup Num-Lock [On] Wait for the key to be ...
...the NumLock. Configuration options: [Disabled] [Enabled] ASUS P5Q Deluxe 3-35 Select Screen Select Item +- Configuration options: [Disabled] [Enabled] Set this item allows the BIOS to skip some power on state for option ROM. Configuration options: [Force BIOS] [Keep Current] Bootup Num-Lock [On] ...v02.61 (C)Copyright 1985-2008, American Megatrends, Inc. 3.7.2 Boot Settings Configuration BIOS SETUP UTILITY Boot Boot Settings Configuration Quick Boot [Enabled] Full Screen Logo [Enabled] AddOn ROM Display Mode [Force BIOS] Bootup Num-Lock [On] Wait for the key to be ...

User Manual
Page 111
.... Press to run the utility to load the previous BIOS settings saved in the BIOS Flash. PROFILE Configuration O.C. Press to the BIOS Flash. ASUS P5Q Deluxe 3-41 BIOS SETUP UTILITY Tools O.C. Profile Utility V1.25 Current CMOS BOARD: P5Q Deluxe VER: 0306 DATE: 05/13/2008 PATH: A:\ ... O.C. Profile 1 Status : Not Installed O.C. Start O.C. ASUSTek O.C. Profile 2 Status : Not Installed Save BIOS settings to Profile 1 Save to Profile 1 Load from Profile 1 Save to Profile 2 Load from Profile 1/2 Allows you to store or load multiple BIOS settings. 3.8.5 ASUS O.C.
.... Press to run the utility to load the previous BIOS settings saved in the BIOS Flash. PROFILE Configuration O.C. Press to the BIOS Flash. ASUS P5Q Deluxe 3-41 BIOS SETUP UTILITY Tools O.C. Profile Utility V1.25 Current CMOS BOARD: P5Q Deluxe VER: 0306 DATE: 05/13/2008 PATH: A:\ ... O.C. Profile 1 Status : Not Installed O.C. Start O.C. ASUSTek O.C. Profile 2 Status : Not Installed Save BIOS settings to Profile 1 Save to Profile 1 Load from Profile 1 Save to Profile 2 Load from Profile 1/2 Allows you to store or load multiple BIOS settings. 3.8.5 ASUS O.C.

User Manual
Page 143
... Downclocking -1% to -50% Downclocking -1% to -50% Small/Medium/ Small/Medium/ High High On/Off On/Off Never/After 3 mins-After 5 hours Light/Medium/ Heavy Keep Bios Setting/Slow Never/After 3 mins-After 5 hours Never/After 3 mins-After 5 hours Light/Medium/ Heavy Keep Bios Setting/Quiet Never/After 3 mins-After 5 hours ASUS P5Q Deluxe 4-27
... Downclocking -1% to -50% Downclocking -1% to -50% Small/Medium/ Small/Medium/ High High On/Off On/Off Never/After 3 mins-After 5 hours Light/Medium/ Heavy Keep Bios Setting/Slow Never/After 3 mins-After 5 hours Never/After 3 mins-After 5 hours Light/Medium/ Heavy Keep Bios Setting/Quiet Never/After 3 mins-After 5 hours ASUS P5Q Deluxe 4-27


