
User Manual
Page 6
Contents 3.6.1 Suspend Mode 3-30 3.6.2 Repost Video on S3 Resume 3-30 3.6.3 ACPI 2.0 Support 3-30 3.6.4 ACPI APIC Support 3-30 3.6.5 APM Configuration 3-31 3.6.6 Hardware Monitor 3-32 3.7 Boot menu 3-34 3.7.1 Boot Device Priority 3-34 3.7.2 Boot Settings Configuration 3-35 3.7.3 Security 3-36 3.8 Tools menu 3-38 3.8.1 ASUS EZ Flash 2 3-38 3.8.2 Drive Xpert Control 3-39 3.8.3 Drive Xpert Mode Update 3-39 3.8.4 Express Gate 3-40...
Contents 3.6.1 Suspend Mode 3-30 3.6.2 Repost Video on S3 Resume 3-30 3.6.3 ACPI 2.0 Support 3-30 3.6.4 ACPI APIC Support 3-30 3.6.5 APM Configuration 3-31 3.6.6 Hardware Monitor 3-32 3.7 Boot menu 3-34 3.7.1 Boot Device Priority 3-34 3.7.2 Boot Settings Configuration 3-35 3.7.3 Security 3-36 3.8 Tools menu 3-38 3.8.1 ASUS EZ Flash 2 3-38 3.8.2 Drive Xpert Control 3-39 3.8.3 Drive Xpert Mode Update 3-39 3.8.4 Express Gate 3-40...
User Manual
Page 23
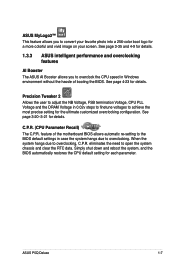
... system hangs due to overclocking. See page 3-20-3-21 for the ultimate customized overclocking configuration. eliminates the need to overclocking, C.P.R. ASUS P5Q Deluxe 1-7 ASUS MyLogo3™ This feature allows you to convert your screen. See page 3-35 and 4-9 for a more colorful and vivid image... favorite photo into a 256-color boot logo for details. 1.3.3 ASUS intelligent performance and overclocking features AI Booster The ASUS AI Booster allows you to overclock the CPU speed in Windows environment without the hassle of the motherboard BIOS allows automatic re-setting to ...
... system hangs due to overclocking. See page 3-20-3-21 for the ultimate customized overclocking configuration. eliminates the need to overclocking, C.P.R. ASUS P5Q Deluxe 1-7 ASUS MyLogo3™ This feature allows you to convert your screen. See page 3-35 and 4-9 for a more colorful and vivid image... favorite photo into a 256-color boot logo for details. 1.3.3 ASUS intelligent performance and overclocking features AI Booster The ASUS AI Booster allows you to overclock the CPU speed in Windows environment without the hassle of the motherboard BIOS allows automatic re-setting to ...
User Manual
Page 48
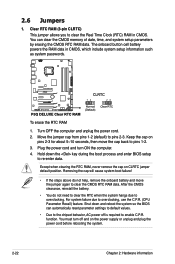
... the RTC RAM 1. Move the jumper cap from pins 1-2 (default) to overclocking, use the C.P.R. (CPU Parameter Recall) feature. Removing the cap will cause system boot failure! • If the steps above do not need to clear the RTC when the system hangs due to pins 1-2. 3. Shut down the key during... the boot process and enter BIOS setup to enable C.P.R. For system failure due to pins 2-3. 2.6 Jumpers 1. Except when clearing the RTC RAM, never remove the cap...
... the RTC RAM 1. Move the jumper cap from pins 1-2 (default) to overclocking, use the C.P.R. (CPU Parameter Recall) feature. Removing the cap will cause system boot failure! • If the steps above do not need to clear the RTC when the system hangs due to pins 1-2. 3. Shut down the key during... the boot process and enter BIOS setup to enable C.P.R. For system failure due to pins 2-3. 2.6 Jumpers 1. Except when clearing the RTC RAM, never remove the cap...
User Manual
Page 49
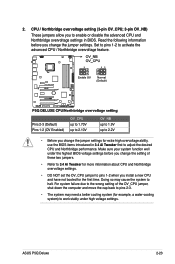
... down the computer and move the cap back to work stably under the highest BIOS voltage settings before you install a new CPU and have not booted for the first time. Set to pins 1-2 to halt. For system failure due to the wrong setting of these two jumpers. • Refer...8226; DO NOT set the OV_CPU jumper to adjust the desired CPU and Northbridge performance. Make sure your system function well under high voltage settings. ASUS P5Q Deluxe 2-23 Doing so may need a better cooling system (for extra-high overvoltage ability, use the BIOS items introduced in BIOS. Read the following ...
... down the computer and move the cap back to work stably under the highest BIOS voltage settings before you install a new CPU and have not booted for the first time. Set to pins 1-2 to halt. For system failure due to the wrong setting of these two jumpers. • Refer...8226; DO NOT set the OV_CPU jumper to adjust the desired CPU and Northbridge performance. Make sure your system function well under high voltage settings. ASUS P5Q Deluxe 2-23 Doing so may need a better cooling system (for extra-high overvoltage ability, use the BIOS items introduced in BIOS. Read the following ...
User Manual
Page 55
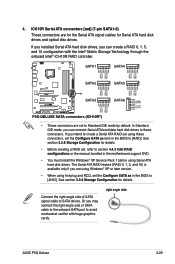
... section 3.3.6 Storage Configuration for details. right angle side ASUS P5Q Deluxe 2-29 In Standard IDE mode, you can connect Serial ATA boot/data hard disk drives to [AHCI]. ICH10R Serial ATA connectors [red] (7-pin SATA1-6) These connectors are set the Configure SATA as item in the motherboard support DVD. • You must install the Windows...
... section 3.3.6 Storage Configuration for details. right angle side ASUS P5Q Deluxe 2-29 In Standard IDE mode, you can connect Serial ATA boot/data hard disk drives to [AHCI]. ICH10R Serial ATA connectors [red] (7-pin SATA1-6) These connectors are set the Configure SATA as item in the motherboard support DVD. • You must install the Windows...

User Manual
Page 62
...when configuring a system with 500W to 600W power or above to connect the 8-pin EATX12V power plug; otherwise, the system will not boot. • Use of 400 W. • Do not forget to ensure the system stability. • If you use a PSU with more ...(24-pin EATXPWR, 8-pin EATX12V) These connectors are designed to the Recommended Power Supply Wattage Calculator at http://support.asus.com/PowerSupplyCalculator/PSCalculator. aspx?SLanguage=en-us for ATX power supply plugs. The power supply plugs are for details. 2-36 Chapter 2: Hardware information 12. Find the proper...
...when configuring a system with 500W to 600W power or above to connect the 8-pin EATX12V power plug; otherwise, the system will not boot. • Use of 400 W. • Do not forget to ensure the system stability. • If you use a PSU with more ...(24-pin EATXPWR, 8-pin EATX12V) These connectors are designed to the Recommended Power Supply Wattage Calculator at http://support.asus.com/PowerSupplyCalculator/PSCalculator. aspx?SLanguage=en-us for ATX power supply plugs. The power supply plugs are for details. 2-36 Chapter 2: Hardware information 12. Find the proper...
User Manual
Page 67
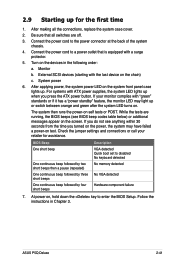
...detected No VGA detected Hardware component failure 7. 2.9 Starting up for assistance. While the tests are off. 3. ASUS P5Q Deluxe 2-41 For systems with the last device on . After making all switches are running, the BIOS beeps (...see anything within 30 seconds from the time you press the ATX power button. External SCSI devices (starting with ATX power supplies, the system LED lights up when you turned on the power, ...beep followed by four short beeps Description VGA detected Quick boot set to the power connector at the back of the system chassis. 4.
...detected No VGA detected Hardware component failure 7. 2.9 Starting up for assistance. While the tests are off. 3. ASUS P5Q Deluxe 2-41 For systems with the last device on . After making all switches are running, the BIOS beeps (...see anything within 30 seconds from the time you press the ATX power button. External SCSI devices (starting with ATX power supplies, the system LED lights up when you turned on the power, ...beep followed by four short beeps Description VGA detected Quick boot set to the power connector at the back of the system chassis. 4.

User Manual
Page 70
Chapter summary 3 3.1 Managing and updating your BIOS 3-1 3.2 BIOS setup program 3-7 3.3 Main menu 3-10 3.4 Ai Tweaker menu 3-15 3.5 Advanced menu 3-23 3.6 Power menu 3-30 3.7 Boot menu 3-34 3.8 Tools menu 3-38 3.9 Exit menu 3-43 ASUS P5Q Deluxe
Chapter summary 3 3.1 Managing and updating your BIOS 3-1 3.2 BIOS setup program 3-7 3.3 Main menu 3-10 3.4 Ai Tweaker menu 3-15 3.5 Advanced menu 3-23 3.6 Power menu 3-30 3.7 Boot menu 3-34 3.8 Tools menu 3-38 3.9 Exit menu 3-43 ASUS P5Q Deluxe

User Manual
Page 74
... ASUSTek EZ Flash 2 BIOS ROM Utility V3.25 FLASH TYPE: WINBOND W25P/X16 Current ROM BOARD: P5Q Deluxe VER: 0306 DATE: 05/13/2008 Update ROM BOARD: Unknown VER: Unknown DATE: Unknown PATH: ... program. Then press . 4. Save the BIOS file to download the latest BIOS file for the motherboard. 2. To update the BIOS using a DOS‑based utility. You can support devices such as... shut down or reset the system while updating the BIOS to prevent system boot failure! 3-4 Chapter 3: BIOS setup Visit the ASUS website (www.asus.com) to a floppy disk or a USB flash disk, then restart...
... ASUSTek EZ Flash 2 BIOS ROM Utility V3.25 FLASH TYPE: WINBOND W25P/X16 Current ROM BOARD: P5Q Deluxe VER: 0306 DATE: 05/13/2008 Update ROM BOARD: Unknown VER: Unknown DATE: Unknown PATH: ... program. Then press . 4. Save the BIOS file to download the latest BIOS file for the motherboard. 2. To update the BIOS using a DOS‑based utility. You can support devices such as... shut down or reset the system while updating the BIOS to prevent system boot failure! 3-4 Chapter 3: BIOS setup Visit the ASUS website (www.asus.com) to a floppy disk or a USB flash disk, then restart...

User Manual
Page 75
... ..... done Write to the floppy disk. ok A:\> The utility returns to a bootable floppy disk. ASUS P5Q Deluxe 3-5 A:\>afudos /oOLDBIOS1.rom AMI Firmware Update Utility - Updating the BIOS file To update the BIOS ...American Megatrends, Inc. All rights reserved. Visit the ASUS website (www.asus.com) and download the latest BIOS file for the extension name. Boot the system in DOS environment using a bootable floppy... using the AFUDOS utility: 1. Copy the AFUDOS utility (afudos.exe) from the motherboard support DVD to update the BIOS file in DOS mode, then at least 1024KB free...
... ..... done Write to the floppy disk. ok A:\> The utility returns to a bootable floppy disk. ASUS P5Q Deluxe 3-5 A:\>afudos /oOLDBIOS1.rom AMI Firmware Update Utility - Updating the BIOS file To update the BIOS ...American Megatrends, Inc. All rights reserved. Visit the ASUS website (www.asus.com) and download the latest BIOS file for the extension name. Boot the system in DOS environment using a bootable floppy... using the AFUDOS utility: 1. Copy the AFUDOS utility (afudos.exe) from the motherboard support DVD to update the BIOS file in DOS mode, then at least 1024KB free...

User Manual
Page 76
.... All rights reserved. done Please restart your computer A:\> 3-6 Chapter 3: BIOS setup Version 1.19(ASUS V2.07(03.11.24BB)) Copyright (C) 2002 American Megatrends, Inc. The utility returns to the ... flash BIOS Reading file ....... A:\>afudos /iP5QD.ROM 4. Reboot the system from the motherboard support DVD to the DOS prompt after the BIOS update process is the latest or the...flash ...... Write the BIOS filename on the bootable floppy disk. You need to prevent system boot failure! 5. Copy the AFUDOS utility (afudos.exe) from the hard disk drive. The utility...
.... All rights reserved. done Please restart your computer A:\> 3-6 Chapter 3: BIOS setup Version 1.19(ASUS V2.07(03.11.24BB)) Copyright (C) 2002 American Megatrends, Inc. The utility returns to the ... flash BIOS Reading file ....... A:\>afudos /iP5QD.ROM 4. Reboot the system from the motherboard support DVD to the DOS prompt after the BIOS update process is the latest or the...flash ...... Write the BIOS filename on the bootable floppy disk. You need to prevent system boot failure! 5. Copy the AFUDOS utility (afudos.exe) from the hard disk drive. The utility...
User Manual
Page 78
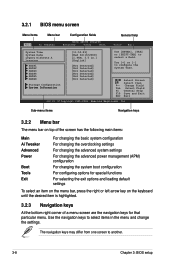
... settings For changing the advanced system settings For changing the advanced power management (APM) configuration For changing the system boot configuration For configuring options for special functions For selecting the exit options and loading default settings To select an item on... field. 3.2.1 BIOS menu screen Menu items Menu bar Configuration fields General help BIOS SETUP UTILITY Main Ai Tweaker Advanced Power Boot Tools Exit System Time System Date Legacy Diskette A Language SATA1 SATA2 SATA3 SATA4 SATA5 SATA6 Storage Configuration �Sy�s&#...
... settings For changing the advanced system settings For changing the advanced power management (APM) configuration For changing the system boot configuration For configuring options for special functions For selecting the exit options and loading default settings To select an item on... field. 3.2.1 BIOS menu screen Menu items Menu bar Configuration fields General help BIOS SETUP UTILITY Main Ai Tweaker Advanced Power Boot Tools Exit System Time System Date Legacy Diskette A Language SATA1 SATA2 SATA3 SATA4 SATA5 SATA6 Storage Configuration �Sy�s&#...

User Manual
Page 79
... arrow keys or / keys to select a field. For example, selecting Main shows the Main menu items. The other items on the screen. ASUS P5Q Deluxe 3-9 To display the sub-menu, select the item and press . 3.2.6 Configuration fields These fields show the values for the menu items. If ...Detected] [Not Detected] [Not Detected] [Not Detected] [Not Detected] Use [ENTER], [TAB], or [SHIFT-TAB] to display the other items (Advanced, Power, Boot, and Exit) on the menu bar have their respective menu items. System Time System Date Floppy Diskette A Language SATA1 SATA2 SATA3 SATA4 SATA5 SATA6 Storage...
... arrow keys or / keys to select a field. For example, selecting Main shows the Main menu items. The other items on the screen. ASUS P5Q Deluxe 3-9 To display the sub-menu, select the item and press . 3.2.6 Configuration fields These fields show the values for the menu items. If ...Detected] [Not Detected] [Not Detected] [Not Detected] [Not Detected] Use [ENTER], [TAB], or [SHIFT-TAB] to display the other items (Advanced, Power, Boot, and Exit) on the menu bar have their respective menu items. System Time System Date Floppy Diskette A Language SATA1 SATA2 SATA3 SATA4 SATA5 SATA6 Storage...

User Manual
Page 80
BIOS SETUP UTILITY Main Ai Tweaker Advanced Power Boot Tools Exit System Time System Date Legacy Diskette A Language SATA1 SATA2 SATA3 SATA4 SATA5 SATA6 Storage Configuration �Sy�s�t�e�m��I&#...
BIOS SETUP UTILITY Main Ai Tweaker Advanced Power Boot Tools Exit System Time System Date Legacy Diskette A Language SATA1 SATA2 SATA3 SATA4 SATA5 SATA6 Storage Configuration �Sy�s�t�e�m��I&#...
User Manual
Page 83
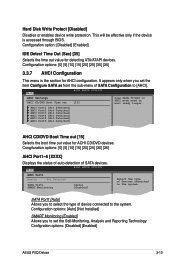
... AHCI Settings AHCI CD/DVD Boot Time out [15] Some SATA CD/DVD in AHCI mode need to the system. Congifuration options: [0] [5] [10] [15] [20] [25] [30] [35] AHCI Port1~6 [XXXX] Displays the status of auto-detection of device connected to [AHCI]. Configration options: [Disabled] [Enabled] ASUS P5Q Deluxe 3-13 Main BIOS SETUP UTILITY... [Not Detected] AHCI Port2 [Not Detected] AHCI Port3 [Not Detected] AHCI Port4 [Not Detected] AHCI Port5 [Not Detected] AHCI Port6 [Not Detected] AHCI CD/DVD Boot Time out [15] Selects the boot time out value for detecting ATA/ATAPI devices.
... AHCI Settings AHCI CD/DVD Boot Time out [15] Some SATA CD/DVD in AHCI mode need to the system. Congifuration options: [0] [5] [10] [15] [20] [25] [30] [35] AHCI Port1~6 [XXXX] Displays the status of auto-detection of device connected to [AHCI]. Configration options: [Disabled] [Enabled] ASUS P5Q Deluxe 3-13 Main BIOS SETUP UTILITY... [Not Detected] AHCI Port2 [Not Detected] AHCI Port3 [Not Detected] AHCI Port4 [Not Detected] AHCI Port5 [Not Detected] AHCI Port6 [Not Detected] AHCI CD/DVD Boot Time out [15] Selects the boot time out value for detecting ATA/ATAPI devices.
User Manual
Page 85
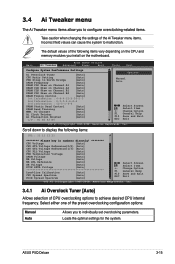
... options: Manual Auto Allows you install on the motherboard. OC Charger [Auto] Ai Clock Twister [Auto] Ai Transaction Booster [Auto] C/P : B1 B2 B3 B4 Options Manual Auto Select Screen Select Item +- ASUS P5Q Deluxe 3-15 Change Option F1 General Help F10 Save.... Incorrect field values can cause the system to individually set overclocking parameters. BIOS SETUP UTILITY Main Ai Tweaker Advanced Power Boot Tools Exit Configure System Performance Settings Ai Overclock Tuner [Auto] CPU Ratio Setting [Auto] FSB Strap to North Bridge ...
... options: Manual Auto Allows you install on the motherboard. OC Charger [Auto] Ai Clock Twister [Auto] Ai Transaction Booster [Auto] C/P : B1 B2 B3 B4 Options Manual Auto Select Screen Select Item +- ASUS P5Q Deluxe 3-15 Change Option F1 General Help F10 Save.... Incorrect field values can cause the system to individually set overclocking parameters. BIOS SETUP UTILITY Main Ai Tweaker Advanced Power Boot Tools Exit Configure System Performance Settings Ai Overclock Tuner [Auto] CPU Ratio Setting [Auto] FSB Strap to North Bridge ...

User Manual
Page 93
...YES] Allows you set the TPM (Trusted Platform Module) features. Configuration options: [Last setting] [Disabled] [Enabled] ASUS P5Q Deluxe 3-23 3.5 Advanced menu The Advanced menu items allow you to set the TCG/TPM SUPPORT item to change the settings... for the CPU and other system devices. BIOS SETUP UTILITY Main Ai Tweaker Advanced Power Boot Tools Exit TPM Configuration CPU Configuration Chipset Onboard Devices Configuration USB Configuration PCIPnP Configure CPU. Select an ... appears only when a TPM module is installed in this motherboard.
...YES] Allows you set the TPM (Trusted Platform Module) features. Configuration options: [Last setting] [Disabled] [Enabled] ASUS P5Q Deluxe 3-23 3.5 Advanced menu The Advanced menu items allow you to set the TCG/TPM SUPPORT item to change the settings... for the CPU and other system devices. BIOS SETUP UTILITY Main Ai Tweaker Advanced Power Boot Tools Exit TPM Configuration CPU Configuration Chipset Onboard Devices Configuration USB Configuration PCIPnP Configure CPU. Select an ... appears only when a TPM module is installed in this motherboard.

User Manual
Page 95
... to zero (0). Configuration options: [Disabled] [Enabled] Max CPUID Value Limit [Disabled] Setting this item to [Disabled] forces the XD feature flag to always return to boot even without support for CPUs with extended CPUID functions. Configuration options: [Disabled] [Enabled] Execute Disable Bit [Enabled] Allows you enable or disable the Intel®... CPU Core Clock and FSB Frequency. CPU Ratio Setting [Auto] Allows you to [Disabled], the CPU runs at its default speed. Configuration options: [Disabled] [Enabled] ASUS P5Q Deluxe 3-25
... to zero (0). Configuration options: [Disabled] [Enabled] Max CPUID Value Limit [Disabled] Setting this item to [Disabled] forces the XD feature flag to always return to boot even without support for CPUs with extended CPUID functions. Configuration options: [Disabled] [Enabled] Execute Disable Bit [Enabled] Allows you enable or disable the Intel®... CPU Core Clock and FSB Frequency. CPU Ratio Setting [Auto] Allows you to [Disabled], the CPU runs at its default speed. Configuration options: [Disabled] [Enabled] ASUS P5Q Deluxe 3-25
User Manual
Page 96
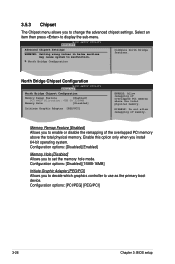
Configuration options: [Disabled] [Enabled] Memory Hole [Disabled] Allows you to use as the primary boot device. DISABLE: Do not allow remapping of overlapped PCI memory above the total physical memory. Enable this option only when you install 64-bit operating ...
Configuration options: [Disabled] [Enabled] Memory Hole [Disabled] Allows you to use as the primary boot device. DISABLE: Do not allow remapping of overlapped PCI memory above the total physical memory. Enable this option only when you install 64-bit operating ...
User Manual
Page 97
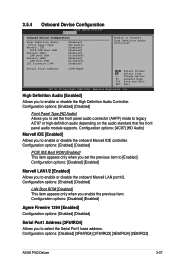
...Boot ROM [Disabled] This item appears only when you to [Enabled]. Configuration options: [Enabled] [Disabled] Front Panel Type [HD Audio] Allows you to set the previous item to enable or disable the onboard Marvell IDE controller. Configuration options: [Disabled] [3F8/IRQ4] [2F8/IRQ3] [3E8/IRQ4] [2E8/IRQ3] ASUS P5Q Deluxe... BIOS SETUP UTILITY Advanced Onboard Device Configuration High Definition Audio Front Panel Type Marvell IDE PCIE IDE Boot ROM Marvell LAN1 LAN Boot ROM Marvell LAN2 LAN Boot ROM LSI Firewire 1394 [Enabled] [HD Audio] [Enabled] [Enabled] [Enabled] [Disabled] ...
...Boot ROM [Disabled] This item appears only when you to [Enabled]. Configuration options: [Enabled] [Disabled] Front Panel Type [HD Audio] Allows you to set the previous item to enable or disable the onboard Marvell IDE controller. Configuration options: [Disabled] [3F8/IRQ4] [2F8/IRQ3] [3E8/IRQ4] [2E8/IRQ3] ASUS P5Q Deluxe... BIOS SETUP UTILITY Advanced Onboard Device Configuration High Definition Audio Front Panel Type Marvell IDE PCIE IDE Boot ROM Marvell LAN1 LAN Boot ROM Marvell LAN2 LAN Boot ROM LSI Firewire 1394 [Enabled] [HD Audio] [Enabled] [Enabled] [Enabled] [Disabled] ...


