
User Manual
Page 2
..., stored in a retrieval system, or translated into any language in any form or by any means, except documentation kept by ASUS; ASUS PROVIDES THIS MANUAL "AS IS" WITHOUT WARRANTY OF ANY KIND, EITHER EXPRESS OR IMPLIED, INCLUDING BUT NOT LIMITED TO THE IMPLIED WARRANTIES OR CONDITIONS...for backup purposes, without intent to the owners' benefit, without the express written permission of ASUSTeK COMPUTER INC. ("ASUS"). SPECIFICATIONS AND INFORMATION CONTAINED IN THIS MANUAL ARE FURNISHED FOR INFORMATIONAL USE ONLY, AND ARE SUBJECT TO CHANGE AT ANY TIME WITHOUT NOTICE, AND SHOULD NOT...
..., stored in a retrieval system, or translated into any language in any form or by any means, except documentation kept by ASUS; ASUS PROVIDES THIS MANUAL "AS IS" WITHOUT WARRANTY OF ANY KIND, EITHER EXPRESS OR IMPLIED, INCLUDING BUT NOT LIMITED TO THE IMPLIED WARRANTIES OR CONDITIONS...for backup purposes, without intent to the owners' benefit, without the express written permission of ASUSTeK COMPUTER INC. ("ASUS"). SPECIFICATIONS AND INFORMATION CONTAINED IN THIS MANUAL ARE FURNISHED FOR INFORMATIONAL USE ONLY, AND ARE SUBJECT TO CHANGE AT ANY TIME WITHOUT NOTICE, AND SHOULD NOT...
User Manual
Page 8
..., disconnect the power cable from the electrical outlet before relocating the system. • When adding or removing devices to fix it , carefully read all the manuals that came with the product, contact a qualified service technician or your retailer.
..., disconnect the power cable from the electrical outlet before relocating the system. • When adding or removing devices to fix it , carefully read all the manuals that came with the product, contact a qualified service technician or your retailer.
User Manual
Page 9
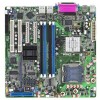
...this motherboard. • Chapter 6: Driver installation This chapter provides information on RAID configurations for this guide is organized This manual contains the following sources for additional information and for this guide This user guide contains the information you have been added...through the BIOS Setup menus. Refer to perform when installing system components. Optional documentation Your product package may have to the ASUS contact information. 2. It includes description of the motherboard and the new technology it supports. • Chapter 2: Hardware ...
...this motherboard. • Chapter 6: Driver installation This chapter provides information on RAID configurations for this guide is organized This manual contains the following sources for additional information and for this guide This user guide contains the information you have been added...through the BIOS Setup menus. Refer to perform when installing system components. Optional documentation Your product package may have to the ASUS contact information. 2. It includes description of the motherboard and the new technology it supports. • Chapter 2: Hardware ...

User Manual
Page 10
... yourself when trying to emphasize a word or a phrase. Example: + + Means that you perform certain tasks properly, take note of the following symbols used in this manual. Conventions used throughout this guide To make sure that you must type the command exactly as shown, then supply the required item or value enclosed...
... yourself when trying to emphasize a word or a phrase. Example: + + Means that you perform certain tasks properly, take note of the following symbols used in this manual. Conventions used throughout this guide To make sure that you must type the command exactly as shown, then supply the required item or value enclosed...
User Manual
Page 89
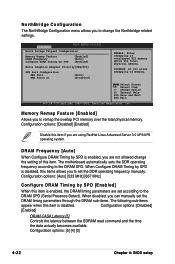
...-items. The following sub-items appear when this item if you are not allowed change the Northbridge related settings. When disabled, you can manually set the DDR operating frequency manually. Configuration options: [5] [4] [3] 4-22 Chapter 4: BIOS setup Configuration options: [Auto] [533 MHz] [667 MHz] Configure DRAM Timing by SPD is disabled. NorthBridge Configuration...
...-items. The following sub-items appear when this item if you are not allowed change the Northbridge related settings. When disabled, you can manually set the DDR operating frequency manually. Configuration options: [5] [4] [3] 4-22 Chapter 4: BIOS setup Configuration options: [Auto] [533 MHz] [667 MHz] Configure DRAM Timing by SPD is disabled. NorthBridge Configuration...
User Manual
Page 115
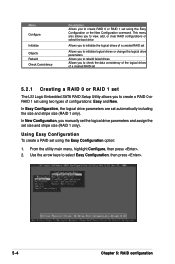
... 0 or RAID 1 set using two types of a created RAID set 5.2.1 Creating a RAID 0 or RAID 1 set The LSI Logic Embedded SATA RAID Setup Utility allows you manually set the logical drive parameters and assign the set using the Easy Configuration option: 1. Using Easy Configuration To create a RAID set automatically including the size...
... 0 or RAID 1 set using two types of a created RAID set 5.2.1 Creating a RAID 0 or RAID 1 set The LSI Logic Embedded SATA RAID Setup Utility allows you manually set the logical drive parameters and assign the set using the Easy Configuration option: 1. Using Easy Configuration To create a RAID set automatically including the size...

User Manual
Page 133
Select the drive you want to the SATA ports. The PHYSICAL DRIVES SELECTION MENU displays the available drives connected to rebuild, then press . 5-22 Chapter 5: RAID configuration To rebuild a failed hard disk drive: 1. 5.2.5 Rebuilding failed drives You can manually rebuild failed hard disk drives using the Rebuild command in the Management Menu. From the Management Menu, highlight Rebuild, then press . 2.
Select the drive you want to the SATA ports. The PHYSICAL DRIVES SELECTION MENU displays the available drives connected to rebuild, then press . 5-22 Chapter 5: RAID configuration To rebuild a failed hard disk drive: 1. 5.2.5 Rebuilding failed drives You can manually rebuild failed hard disk drives using the Rebuild command in the Management Menu. From the Management Menu, highlight Rebuild, then press . 2.
User Manual
Page 155
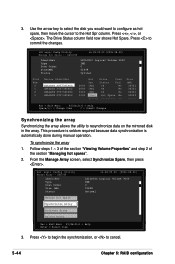
... the section "Viewing Volume Properties" and step 2 of the section "Managing hot spares". 2. This procedure is seldom required because data synchronization is automatically done during manual operation. From the Manage Array screen, select Synchronize Spare, then press . 3. The Drive Status column field now shows Hot Spare. Press to begin the synchronization...
... the section "Viewing Volume Properties" and step 2 of the section "Managing hot spares". 2. This procedure is seldom required because data synchronization is automatically done during manual operation. From the Manage Array screen, select Synchronize Spare, then press . 3. The Drive Status column field now shows Hot Spare. Press to begin the synchronization...

User Manual
Page 179
... the optical drive. The support CD automatically displays the Drivers menu if Autorun is enabled in your computer. 3. Insert the motherboard/system support CD to manually install the ATI® ES1000 VGA driver on with Administrator privileges. 2. To install the ATI® ES1000 VGA driver: 1. Restart the computer, then log on...
... the optical drive. The support CD automatically displays the Drivers menu if Autorun is enabled in your computer. 3. Insert the motherboard/system support CD to manually install the ATI® ES1000 VGA driver on with Administrator privileges. 2. To install the ATI® ES1000 VGA driver: 1. Restart the computer, then log on...


