
P5LD2 English Edition User's Manual
Page 26
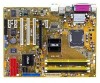
... Speaker Out port (black) 5. Center/Subwoofer port (yellow orange) 6. Keyboard power (3-pin KBPWR) Rear panel connectors 1. LAN (RJ-45) port 4. Microphone port (pink) 9. Clear RTC RAM (3-pin CLRTC) 2. PS/2 mouse port (green) 2. USB 2.0 ports 1 and 2 12. Coaxial S/PDIF Out port 15. PCI Express slot Jumpers 1. Optical S/PDIF Out port 14. Line...
... Speaker Out port (black) 5. Center/Subwoofer port (yellow orange) 6. Keyboard power (3-pin KBPWR) Rear panel connectors 1. LAN (RJ-45) port 4. Microphone port (pink) 9. Clear RTC RAM (3-pin CLRTC) 2. PS/2 mouse port (green) 2. USB 2.0 ports 1 and 2 12. Coaxial S/PDIF Out port 15. PCI Express slot Jumpers 1. Optical S/PDIF Out port 14. Line...
P5LD2 English Edition User's Manual
Page 42
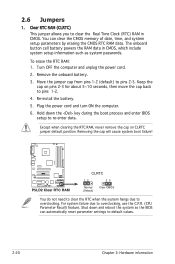
... allows you to pins 1-2. 4. Keep the cap on CLRTC jumper default position. P5LD2 ® P5LD2 Clear RTC RAM CLRTC 12 23 Normal (Default) Clear CMOS You do not need to clear the...the BIOS can clear the CMOS memory of date, time, and system setup parameters by erasing the CMOS RTC RAM data. Remove the onboard battery. 3. Plug the power cord and turn ON the computer. 6. Removing the...parameter settings to default values. 2-20 Chapter 2: Hardware information Except when clearing the RTC RAM, never remove the cap on pins 2-3 for about 5~10 seconds, then move the cap back to clear the...
... allows you to pins 1-2. 4. Keep the cap on CLRTC jumper default position. P5LD2 ® P5LD2 Clear RTC RAM CLRTC 12 23 Normal (Default) Clear CMOS You do not need to clear the...the BIOS can clear the CMOS memory of date, time, and system setup parameters by erasing the CMOS RTC RAM data. Remove the onboard battery. 3. Plug the power cord and turn ON the computer. 6. Removing the...parameter settings to default values. 2-20 Chapter 2: Hardware information Except when clearing the RTC RAM, never remove the cap on pins 2-3 for about 5~10 seconds, then move the cap back to clear the...
P5LD2 English Edition User's Manual
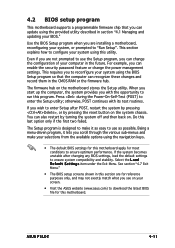
Page 71
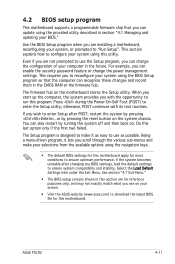
...scroll through the various sub-menus and make it as easy to use the Setup program, you are not prompted to ensure optimum performance. ASUS P5LD2 4-11 4.2 BIOS setup program This motherboard supports a programmable firmware chip that the computer can recognize these changes and record them in section ... any BIOS settings, load the default settings to make your selections from the available options using the provided utility described in the CMOS RAM or the firmware hub. If you can update using the navigation keys. • The default BIOS settings for this motherboard apply for...
...scroll through the various sub-menus and make it as easy to use the Setup program, you are not prompted to ensure optimum performance. ASUS P5LD2 4-11 4.2 BIOS setup program This motherboard supports a programmable firmware chip that the computer can recognize these changes and record them in section ... any BIOS settings, load the default settings to make your selections from the available options using the provided utility described in the CMOS RAM or the firmware hub. If you can update using the navigation keys. • The default BIOS settings for this motherboard apply for...

P5LD2 English Edition User's Manual
Page 100
... options: [Disabled] [Enabled] 4.6.3 Security The Security menu items allow you can clear clear it by erasing the CMOS Real Time Clock (RTC) RAM. again to display the configuration options. Confirm the password when prompted. To clear the supervisor password, select the Change Supervisor Password then press . Security... security settings. Interrupt 19 Capture [Disabled] When set to [Enabled], this function allows the option ROMs to erase the RTC RAM. 4-40 Chapter 4: BIOS setup From the password box, type a password composed of the screen shows the default Not Installed.
... options: [Disabled] [Enabled] 4.6.3 Security The Security menu items allow you can clear clear it by erasing the CMOS Real Time Clock (RTC) RAM. again to display the configuration options. Confirm the password when prompted. To clear the supervisor password, select the Change Supervisor Password then press . Security... security settings. Interrupt 19 Capture [Disabled] When set to [Enabled], this function allows the option ROMs to erase the RTC RAM. 4-40 Chapter 4: BIOS setup From the password box, type a password composed of the screen shows the default Not Installed.

P5LD2 English Edition User's Manual
Page 103
... onboard backup battery sustains the CMOS RAM so it stays on even when the computer is turned off. Discard Changes Allows you to the BIOS items. Exit Options Exit & Save Changes Exit & Discard Changes Discard Changes Load Setup Defaults Exit system setup after saving the changes. ASUS P5LD2 4-43 4.7 Exit menu The Exit... the selections you made and restore the previously saved values. Exit & Discard Changes Select this option only if you do not want to the CMOS RAM. When you made to the Setup program. F10 key can be used for this option, a confirmation appears.
... onboard backup battery sustains the CMOS RAM so it stays on even when the computer is turned off. Discard Changes Allows you to the BIOS items. Exit Options Exit & Save Changes Exit & Discard Changes Discard Changes Load Setup Defaults Exit system setup after saving the changes. ASUS P5LD2 4-43 4.7 Exit menu The Exit... the selections you made and restore the previously saved values. Exit & Discard Changes Select this option only if you do not want to the CMOS RAM. When you made to the Setup program. F10 key can be used for this option, a confirmation appears.

P5LD2 English Edition User's Manual
Page 104
Select Exit & Save Changes or make other changes before saving the values to load the default values. Select to the non-volatile RAM.‑ 4-44 Chapter 4: BIOS setup When you select this option or if you to load the default values for each of the parameters on the Setup menus. Load Setup Defaults Allows you press , a confirmation window appears.
Select Exit & Save Changes or make other changes before saving the values to load the default values. Select to the non-volatile RAM.‑ 4-44 Chapter 4: BIOS setup When you select this option or if you to load the default values for each of the parameters on the Setup menus. Load Setup Defaults Allows you press , a confirmation window appears.

P5LD2 User's Manual for English Edition
Page 26
PS/2 mouse port (green) 2. Line In port (light blue) 7. Microphone port (pink) 9. 2.2.4 Layout contents Slots 1. Clear RTC RAM (3-pin CLRTC) 2. Center/Subwoofer port (yellow orange) 6. Serial port (COM1) 13. Rear Speaker Out (gray) 10. Line Out port (lime) 8. Optical S/PDIF Out port 14. ...
PS/2 mouse port (green) 2. Line In port (light blue) 7. Microphone port (pink) 9. 2.2.4 Layout contents Slots 1. Clear RTC RAM (3-pin CLRTC) 2. Center/Subwoofer port (yellow orange) 6. Serial port (COM1) 13. Rear Speaker Out (gray) 10. Line Out port (lime) 8. Optical S/PDIF Out port 14. ...
P5LD2 User's Manual for English Edition
Page 42
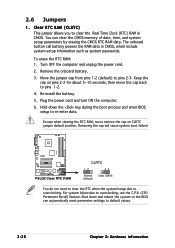
...time, and system setup parameters by erasing the CMOS RTC RAM data. P5LD2 ® P5LD2 Clear RTC RAM CLRTC 12 23 Normal (Default) Clear CMOS You do ...not need to clear the RTC when the system hangs due to re-enter data. To erase the RTC RAM: 1. Move the jumper cap from pins 1-2 (default) to clear the Real Time Clock (RTC) RAM... information Plug the power cord and turn ON the computer. 6. Except when clearing the RTC RAM, never remove the cap on pins 2-3 for about 5~10 seconds, then move the cap...
...time, and system setup parameters by erasing the CMOS RTC RAM data. P5LD2 ® P5LD2 Clear RTC RAM CLRTC 12 23 Normal (Default) Clear CMOS You do ...not need to clear the RTC when the system hangs due to re-enter data. To erase the RTC RAM: 1. Move the jumper cap from pins 1-2 (default) to clear the Real Time Clock (RTC) RAM... information Plug the power cord and turn ON the computer. 6. Except when clearing the RTC RAM, never remove the cap on pins 2-3 for about 5~10 seconds, then move the cap...
P5LD2 User's Manual for English Edition
Page 71
... See section "4.7 Exit Menu." • The BIOS setup screens shown in this section are for this utility. ASUS P5LD2 4-11 The firmware hub on your computer in the future. Press during the Power-On-Self-Test (POST) to...you can enable the security password feature or change the configuration of your screen. • Visit the ASUS website (www.asus.com) to use the Setup program, you can update using the provided utility described in section "4.1... the computer can recognize these changes and record them in the CMOS RAM or the firmware hub. Being a menu-driven program, it as possible.
... See section "4.7 Exit Menu." • The BIOS setup screens shown in this section are for this utility. ASUS P5LD2 4-11 The firmware hub on your computer in the future. Press during the Power-On-Self-Test (POST) to...you can enable the security password feature or change the configuration of your screen. • Visit the ASUS website (www.asus.com) to use the Setup program, you can update using the provided utility described in section "4.1... the computer can recognize these changes and record them in the CMOS RAM or the firmware hub. Being a menu-driven program, it as possible.

P5LD2 User's Manual for English Edition
Page 100
... to [Enabled], this item to set or change the supervisor password. After you can clear clear it by erasing the CMOS Real Time Clock (RTC) RAM. To clear the supervisor password, select the Change Supervisor Password then press . Select an item then press to disabled password. If you forget your password...
... to [Enabled], this item to set or change the supervisor password. After you can clear clear it by erasing the CMOS Real Time Clock (RTC) RAM. To clear the supervisor password, select the Change Supervisor Password then press . Select an item then press to disabled password. If you forget your password...

P5LD2 User's Manual for English Edition
Page 103
Select one of the options from this option, a confirmation window appears. Press to save the changes and exit. ASUS P5LD2 4-43 When you select this menu or from the legend bar to exit. Select < O K > to save the changes while exiting. 4.7 Exit menu The Exit menu ... to save your changes before exiting. Exit & Save Changes Once you made and restore the previously saved values. An onboard backup battery sustains the CMOS RAM so it stays on even when the computer is turned off. Select < O K > to fields other than System Date, System Time, and Password, the BIOS asks...
Select one of the options from this option, a confirmation window appears. Press to save the changes and exit. ASUS P5LD2 4-43 When you select this menu or from the legend bar to exit. Select < O K > to save the changes while exiting. 4.7 Exit menu The Exit menu ... to save your changes before exiting. Exit & Save Changes Once you made and restore the previously saved values. An onboard backup battery sustains the CMOS RAM so it stays on even when the computer is turned off. Select < O K > to fields other than System Date, System Time, and Password, the BIOS asks...

P5LD2 User's Manual for English Edition
Page 104
Select E x i t & S a v e C h a n g e s or make other changes before saving the values to load the default values. Select < O K > to the non-volatile RAM.- 4-44 Chapter 4: BIOS setup When you select this option or if you to load the default values for each of the parameters on the Setup menus. Load Setup Defaults Allows you press , a confirmation window appears.
Select E x i t & S a v e C h a n g e s or make other changes before saving the values to load the default values. Select < O K > to the non-volatile RAM.- 4-44 Chapter 4: BIOS setup When you select this option or if you to load the default values for each of the parameters on the Setup menus. Load Setup Defaults Allows you press , a confirmation window appears.


