
User Manual
Page 1
Motherboard P5KPL-AM IN/GB
Motherboard P5KPL-AM IN/GB
User Manual
Page 3
Contents Notices...v Safety information vi About this guide vi P5KPL-AM IN/GB specifications summary viii Chapter 1: Product introduction 1.1 Before you proceed 1-1 1.2 Motherboard overview 1-2 1.2.1 Motherboard layout 1-2 1.2.2 Layout contents 1-2 1.3 Central Processing Unit (CPU 1-3 1.4 System ... 1-15 1.8.2 Support CD information 1-15 Chapter 2: BIOS information 2.1 Managing and updating your BIOS 2-1 2.1.1 ASUS Update utility 2-1 2.1.2 ASUS EZ Flash 2 utility 2-2 2.1.3 ASUS CrashFree BIOS 3 utility 2-3 2.2 BIOS setup program 2-4 2.3 Main menu 2-4 2.3.1 System Time 2-4 2.3.2 ...
Contents Notices...v Safety information vi About this guide vi P5KPL-AM IN/GB specifications summary viii Chapter 1: Product introduction 1.1 Before you proceed 1-1 1.2 Motherboard overview 1-2 1.2.1 Motherboard layout 1-2 1.2.2 Layout contents 1-2 1.3 Central Processing Unit (CPU 1-3 1.4 System ... 1-15 1.8.2 Support CD information 1-15 Chapter 2: BIOS information 2.1 Managing and updating your BIOS 2-1 2.1.1 ASUS Update utility 2-1 2.1.2 ASUS EZ Flash 2 utility 2-2 2.1.3 ASUS CrashFree BIOS 3 utility 2-3 2.2 BIOS setup program 2-4 2.3 Main menu 2-4 2.3.1 System Time 2-4 2.3.2 ...

User Manual
Page 5
... to correct the interference by the party responsible for disposal of electronic products. DO NOT throw the motherboard in our products at ASUS REACH website at http://green.asus.com/ english/REACH.htm. This product has been designed to which can radiate radio frequency energy and...8226; This device must accept any interference received including interference that interference will not occur in accordance with Canadian ICES-003. Notices ASUS REACH Complying with Part 15 of the FCC Rules. Changes or modifications to this equipment does cause harmful interference to comply with...
... to correct the interference by the party responsible for disposal of electronic products. DO NOT throw the motherboard in our products at ASUS REACH website at http://green.asus.com/ english/REACH.htm. This product has been designed to which can radiate radio frequency energy and...8226; This device must accept any interference received including interference that interference will not occur in accordance with Canadian ICES-003. Notices ASUS REACH Complying with Part 15 of the FCC Rules. Changes or modifications to this equipment does cause harmful interference to comply with...
User Manual
Page 6
... parts: • Chapter 1: Product introduction This chapter describes the features of the electrical outlet you need when installing and configuring the motherboard. How this guide This user guide contains the information you are unplugged. • Seek professional assistance before using the product, ensure that...not damaged. If you are also provided. Detailed descriptions of the BIOS parameters are not sure about the voltage of the motherboard and the new technology it supports. • Chapter 2: BIOS information This chapter tells how to the correct voltage in any damage...
... parts: • Chapter 1: Product introduction This chapter describes the features of the electrical outlet you need when installing and configuring the motherboard. How this guide This user guide contains the information you are unplugged. • Seek professional assistance before using the product, ensure that...not damaged. If you are also provided. Detailed descriptions of the BIOS parameters are not sure about the voltage of the motherboard and the new technology it supports. • Chapter 2: BIOS information This chapter tells how to the correct voltage in any damage...
User Manual
Page 10
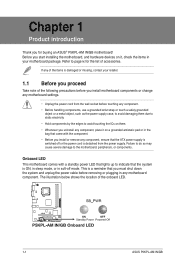
... mode. This is a reminder that the ATX power supply is detached from the power supply. The illustration below shows the location of the onboard LED. 1-1 ASUS P5KPL-AM IN/GB Chapter 1 Product introduction Thank you for the list of accessories. Refer to the motherboard, peripherals, or components.
... mode. This is a reminder that the ATX power supply is detached from the power supply. The illustration below shows the location of the onboard LED. 1-1 ASUS P5KPL-AM IN/GB Chapter 1 Product introduction Thank you for the list of accessories. Refer to the motherboard, peripherals, or components.
User Manual
Page 11
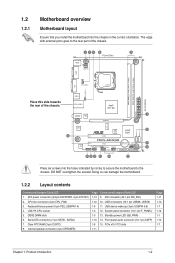
... chassis. Place six screws into the chassis in the correct orientation. 1.2 1.2.1 Motherboard overview Motherboard layout Ensure that you install the motherboard into the holes indicated by circles to secure the motherboard to the rear part of the chassis. Doing so can damage the motherboard. 1.2.2 Layout contents Connectors/Jumpers/Slots/LED 1. Keyboard/mouse power (3-pin PS2_USBPW1...
... chassis. Place six screws into the chassis in the correct orientation. 1.2 1.2.1 Motherboard overview Motherboard layout Ensure that you install the motherboard into the holes indicated by circles to secure the motherboard to the rear part of the chassis. Doing so can damage the motherboard. 1.2.2 Layout contents Connectors/Jumpers/Slots/LED 1. Keyboard/mouse power (3-pin PS2_USBPW1...
User Manual
Page 12
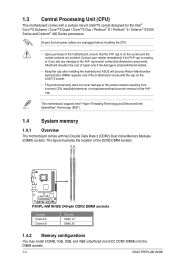
... B Sockets DIMM_A1 DIMM_B1 1.4.2 Memory configurations You may install 512MB, 1GB, 2GB, and 4GB unbuffered non-ECC DDR2 DIMMs into the DIMM sockets. 1-3 ASUS P5KPL-AM IN/GB 1.3 Central Processing Unit (CPU) This motherboard comes with a surface mount LGA775 socket designed for the Intel® Core™2 Extreme / Core™2 Quad / Core™2 Duo / Pentium...
... B Sockets DIMM_A1 DIMM_B1 1.4.2 Memory configurations You may install 512MB, 1GB, 2GB, and 4GB unbuffered non-ECC DDR2 DIMMs into the DIMM sockets. 1-3 ASUS P5KPL-AM IN/GB 1.3 Central Processing Unit (CPU) This motherboard comes with a surface mount LGA775 socket designed for the Intel® Core™2 Extreme / Core™2 Quad / Core™2 Duo / Pentium...
User Manual
Page 13
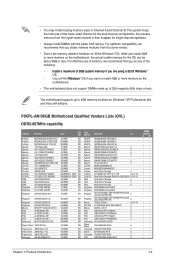
...Always install DIMMs with the same CAS latency. For optimum compatibility, we recommend that you install 4GB or more memory on the motherboard, the actual usable memory for the dual-channel configuration. Use a 64-bit �W�i�nd�o�w��...;s® OS if you do any of 256 megabits (Mb) chips or less. P5KPL-AM IN/GB Motherboard Qualified Vendors Lists (QVL) DDR2-667MHz capability Vendor Part No. A-Data A-Data A-Data Apacer Apacer Apacer Apacer Apacer Apacer Apacer...
...Always install DIMMs with the same CAS latency. For optimum compatibility, we recommend that you install 4GB or more memory on the motherboard, the actual usable memory for the dual-channel configuration. Use a 64-bit �W�i�nd�o�w��...;s® OS if you do any of 256 megabits (Mb) chips or less. P5KPL-AM IN/GB Motherboard Qualified Vendors Lists (QVL) DDR2-667MHz capability Vendor Part No. A-Data A-Data A-Data Apacer Apacer Apacer Apacer Apacer Apacer Apacer...
User Manual
Page 16
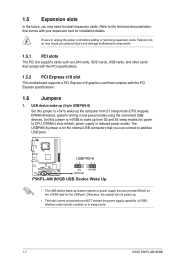
... 1-7 ASUS P5KPL-AM IN/GB Otherwise, the system will not power up feature requires a power supply that comes with the PCI Express specifications. 1.6 Jumpers 1. Refer to wake up the computer from S3 and S4 sleep modes (no power to do so may cause you physical injury and damage motherboard components....such as LAN cards, SCSI cards, USB cards, and other cards that comply with the PCI specifications. 1.5.2 PCI Express x16 slot This motherboard supports a PCI Express x16 graphics card that you may need to unplug the power cord before adding or removing expansion cards. 1.5 Expansion ...
... 1-7 ASUS P5KPL-AM IN/GB Otherwise, the system will not power up feature requires a power supply that comes with the PCI Express specifications. 1.6 Jumpers 1. Refer to wake up the computer from S3 and S4 sleep modes (no power to do so may cause you physical injury and damage motherboard components....such as LAN cards, SCSI cards, USB cards, and other cards that comply with the PCI specifications. 1.5.2 PCI Express x16 slot This motherboard supports a PCI Express x16 graphics card that you may need to unplug the power cord before adding or removing expansion cards. 1.5 Expansion ...
User Manual
Page 20
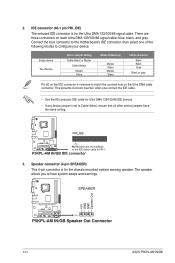
..., and gray. Single device Two devices Driver Jumper setting Cable-Select or Master Cable-Select Master Slave Mode of the following modes to the motherboard's IDE connector, then select one of device(s) Master Slave Master Slave Cable connector Black Black Gray Black or gray Pin 20 on the IDE...the Ultra DMA cable connector. IDE connector (40-1 pin PRI_IDE) The onboard IDE connector is removed to hear system beeps and warnings. 1-11 ASUS P5KPL-AM IN/GB The speaker allows you connect the IDE cable. • Use the 80-conductor IDE cable for Ultra DMA 133/100/66 IDE devices. &#...
..., and gray. Single device Two devices Driver Jumper setting Cable-Select or Master Cable-Select Master Slave Mode of the following modes to the motherboard's IDE connector, then select one of device(s) Master Slave Master Slave Cable connector Black Black Gray Black or gray Pin 20 on the IDE...the Ultra DMA cable connector. IDE connector (40-1 pin PRI_IDE) The onboard IDE connector is removed to hear system beeps and warnings. 1-11 ASUS P5KPL-AM IN/GB The speaker allows you connect the IDE cable. • Use the 80-conductor IDE cable for Ultra DMA 133/100/66 IDE devices. &#...
User Manual
Page 21
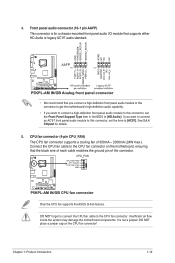
... [HD Audio]. DO NOT forget to connect the CPU fan cable to [AC97]. Insufficient air flow inside the system may damage the motherboard components. CPU fan connector (4-pin CPU_FAN) The CPU fan connector supports a cooling fan of the connector. Only the CPU fan supports the... ASUS Q-Fan feature. It is for details. 5. DO NOT place a jumper cap on the motherboard, ensuring that you connect a high-definition front panel audio module to this connector to get the...
... [HD Audio]. DO NOT forget to connect the CPU fan cable to [AC97]. Insufficient air flow inside the system may damage the motherboard components. CPU fan connector (4-pin CPU_FAN) The CPU fan connector supports a cooling fan of the connector. Only the CPU fan supports the... ASUS Q-Fan feature. It is for details. 5. DO NOT place a jumper cap on the motherboard, ensuring that you connect a high-definition front panel audio module to this connector to get the...
User Manual
Page 22
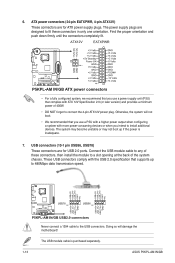
... back of 400W. • DO NOT forget to any of these connectors in only one orientation. Otherwise, the system will damage the motherboard! The system may become unstable or may not boot up to the USB connectors. Find the proper orientation and push down firmly until the... For a fully configured system, we recommend that you use a power supply unit (PSU) that supports up if the power is purchased separately. 1-13 ASUS P5KPL-AM IN/GB Doing so will not boot. • We recommended that you use a PSU with a higher power output when configuring a system with the USB 2.0 ...
... back of 400W. • DO NOT forget to any of these connectors in only one orientation. Otherwise, the system will damage the motherboard! The system may become unstable or may not boot up to the USB connectors. Find the proper orientation and push down firmly until the... For a fully configured system, we recommend that you use a power supply unit (PSU) that supports up if the power is purchased separately. 1-13 ASUS P5KPL-AM IN/GB Doing so will not boot. • We recommended that you use a PSU with a higher power output when configuring a system with the USB 2.0 ...
User Manual
Page 24
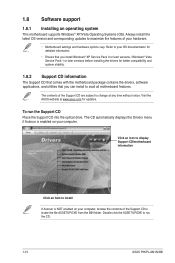
... of the Support CD are subject to change at www.asus.com for better compatibility and system stability. 1.8.2 Support CD information The Support CD that comes with the motherboard package contains the drivers, software applications, and utilities that ...Motherboard settings and hardware options vary. The contents of your OS documentation for detailed information. • Ensure that you install Windows® XP Service Pack 3 or later versions / Windows® Vista Service Pack 1 or later versions before installing the drivers for updates. To run the CD. 1-15 ASUS P5KPL-AM IN/GB...
... of the Support CD are subject to change at www.asus.com for better compatibility and system stability. 1.8.2 Support CD information The Support CD that comes with the motherboard package contains the drivers, software applications, and utilities that ...Motherboard settings and hardware options vary. The contents of your OS documentation for detailed information. • Ensure that you install Windows® XP Service Pack 3 or later versions / Windows® Vista Service Pack 1 or later versions before installing the drivers for updates. To run the CD. 1-15 ASUS P5KPL-AM IN/GB...
User Manual
Page 25
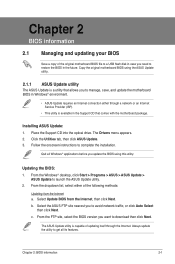
...Quit all its features. From the Windows® desktop, click Start > Programs > ASUS > ASUS Update > ASUS Update to manage, save, and update the motherboard BIOS in Windows® environment. • ASUS Update requires an Internet connection either of the following methods: Updating from the Internet, ...BIOS information 2.1 Managing and updating your BIOS Save a copy of the original motherboard BIOS file to a USB flash disk in case you update the BIOS using the ASUS Update utility.. 2.1.1 ASUS Update utility The ASUS Update is a utility that allows you want to get all Windows®...
...Quit all its features. From the Windows® desktop, click Start > Programs > ASUS > ASUS Update > ASUS Update to manage, save, and update the motherboard BIOS in Windows® environment. • ASUS Update requires an Internet connection either of the following methods: Updating from the Internet, ...BIOS information 2.1 Managing and updating your BIOS Save a copy of the original motherboard BIOS file to a USB flash disk in case you update the BIOS using the ASUS Update utility.. 2.1.1 ASUS Update utility The ASUS Update is a utility that allows you want to get all Windows®...
User Manual
Page 27
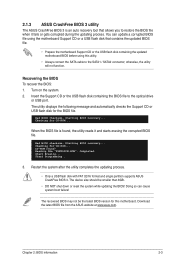
... or the USB flash disk containing the updated motherboard BIOS before using this motherboard. Chapter 2: BIOS information 2-3 Starting BIOS recovery... Restart the system after the utility completes the updating process. • Only a USB flash disk with FAT 32/16 format and single partition supports ASUS CrashFree BIOS 3. The device size should be the...
... or the USB flash disk containing the updated motherboard BIOS before using this motherboard. Chapter 2: BIOS information 2-3 Starting BIOS recovery... Restart the system after the utility completes the updating process. • Only a USB flash disk with FAT 32/16 format and single partition supports ASUS CrashFree BIOS 3. The device size should be the...
User Manual
Page 28
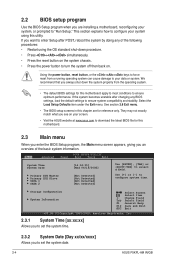
...ESC Exit v02.58 (C)Copyright 1985-2009, American Megatrends, Inc. 2.3.1 System Time [xx:xx:xx] Allows you to set the system date. 2-4 ASUS P5KPL-AM IN/GB We recommend that you always shut down procedure. • Press ++ simultaneously. • Press the reset button on the system chassis. • ... System Date [Day xx/xx/xxxx] Allows you want to enter Setup after changing any of the following procedures: • Restart using this motherboard. 2.3 Main menu When you enter the BIOS Setup program, the Main menu screen appears, giving you an overview of the basic system information....
...ESC Exit v02.58 (C)Copyright 1985-2009, American Megatrends, Inc. 2.3.1 System Time [xx:xx:xx] Allows you to set the system date. 2-4 ASUS P5KPL-AM IN/GB We recommend that you always shut down procedure. • Press ++ simultaneously. • Press the reset button on the system chassis. • ... System Date [Day xx/xx/xxxx] Allows you want to enter Setup after changing any of the following procedures: • Restart using this motherboard. 2.3 Main menu When you enter the BIOS Setup program, the Main menu screen appears, giving you an overview of the basic system information....
User Manual
Page 36
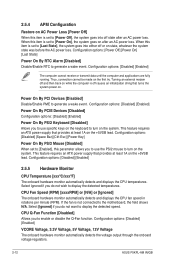
... By RTC Alarm [Disabled] Disable/Enable RTC to the motherboard, the field shows N/A. Configuration options: [Disabled] [Enabled] VCORE Voltage, 3.3V Voltage, 5V Voltage, 12V Voltage The onboard hardware monitor automatically detects the voltage output through the onboard voltage regulators. 2-12 ASUS P5KPL-AM IN/GB When this item is set to [Last State], the...
... By RTC Alarm [Disabled] Disable/Enable RTC to the motherboard, the field shows N/A. Configuration options: [Disabled] [Enabled] VCORE Voltage, 3.3V Voltage, 5V Voltage, 12V Voltage The onboard hardware monitor automatically detects the voltage output through the onboard voltage regulators. 2-12 ASUS P5KPL-AM IN/GB When this item is set to [Last State], the...


