User Manual
Page 4
... BIOS setup 4.1 Managing and updating your BIOS 4-1 4.1.1 Creating a bootable floppy disk 4-1 4.1.2 ASUS EZ Flash utility 4-2 4.1.3 AFUDOS utility 4-3 4.1.4 ASUS CrashFree BIOS 2 utility 4-5 4.1.5 ASUS Update utility 4-7 4.2 BIOS setup program 4-10 4.2.1 BIOS menu screen 4-11 4.2.2 Menu bar 4-...11 4.2.3 Navigation keys 4-11 4.2.4 Menu items 4-12 4.2.5 Sub-menu items 4-12 4.2.6 Configuration fields 4-12 4.2.7 Pop-up window 4-12 4.2.8...
... BIOS setup 4.1 Managing and updating your BIOS 4-1 4.1.1 Creating a bootable floppy disk 4-1 4.1.2 ASUS EZ Flash utility 4-2 4.1.3 AFUDOS utility 4-3 4.1.4 ASUS CrashFree BIOS 2 utility 4-5 4.1.5 ASUS Update utility 4-7 4.2 BIOS setup program 4-10 4.2.1 BIOS menu screen 4-11 4.2.2 Menu bar 4-...11 4.2.3 Navigation keys 4-11 4.2.4 Menu items 4-12 4.2.5 Sub-menu items 4-12 4.2.6 Configuration fields 4-12 4.2.7 Pop-up window 4-12 4.2.8...

User Manual
Page 28
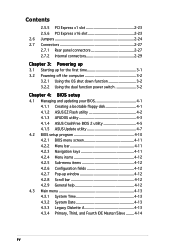
Retention tab Load lever A B PnP Cap This side of the arrow to the socket pins, do not remove the PnP cap unless you . B A Load plate 2-8 Chapter 2: Hardware information Press the load lever with your thumb and move it is released from the load plate window to the left until it to remove (B). Lift the load plate with your thumb and forefinger to a 100º angle (A), then push the PnP cap from the retention tab. To prevent damage to a 135º angle. 4. Lift the load lever in the direction of the socket box should face you are installing a CPU. 3. 2.
Retention tab Load lever A B PnP Cap This side of the arrow to the socket pins, do not remove the PnP cap unless you . B A Load plate 2-8 Chapter 2: Hardware information Press the load lever with your thumb and move it is released from the load plate window to the left until it to remove (B). Lift the load plate with your thumb and forefinger to a 100º angle (A), then push the PnP cap from the retention tab. To prevent damage to a 135º angle. 4. Lift the load lever in the direction of the socket box should face you are installing a CPU. 3. 2.
User Manual
Page 29
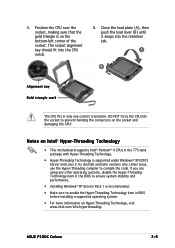
... compiler to enable the Hyper-Threading Technology item in the BIOS to ensure system stability and performance. • Installing Windows® XP Service Pack 1 is recommended. • Make sure to compile the code. ASUS P5GDC Deluxe 2-9 If you are using any other operating systems, disable the Hyper-Threading Technology item in BIOS before installing...
... compiler to enable the Hyper-Threading Technology item in the BIOS to ensure system stability and performance. • Installing Windows® XP Service Pack 1 is recommended. • Make sure to compile the code. ASUS P5GDC Deluxe 2-9 If you are using any other operating systems, disable the Hyper-Threading Technology item in BIOS before installing...

User Manual
Page 51
.... Serial ATA Master/Slave connectors Connector Color Setting SATA1, SATA2 Red Master SATA3, SATA4 Black Slave Use Boot Disk Data Disk ASUS P5GDC Deluxe 2-31 In Standard IDE mode, you can create a RAID 0 or RAID 1 configuration with the Intel® Matrix Storage Technology...f i g u r e S A T A A s item in the BIOS to support S3 function. 4. If you installed Serial ATA hard disk drives, you are using Windows® 2000/XP. • Install the Windows® 2000 Service Pack 4 or the Windows® XP Service Pack1 before using these connectors, set to these connectors.
.... Serial ATA Master/Slave connectors Connector Color Setting SATA1, SATA2 Red Master SATA3, SATA4 Black Slave Use Boot Disk Data Disk ASUS P5GDC Deluxe 2-31 In Standard IDE mode, you can create a RAID 0 or RAID 1 configuration with the Intel® Matrix Storage Technology...f i g u r e S A T A A s item in the BIOS to support S3 function. 4. If you installed Serial ATA hard disk drives, you are using Windows® 2000/XP. • Install the Windows® 2000 Service Pack 4 or the Windows® XP Service Pack1 before using these connectors, set to these connectors.
User Manual
Page 62
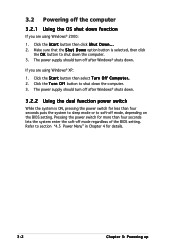
...the power switch for more than four seconds puts the system to sleep mode or to shut down function If you are using Windows® XP: 1. Make sure that the S h u t D o w n option button is ON, pressing the power switch ... then select T u r n O f f C o m p u t e r . 2. Click the T u r n O f f button to soft-off mode, depending on the BIOS setting. The power supply should turn off after Windows® shuts down the computer. 3. Refer to shut down . Click the S t a r t button then click S h u t D o w n . . . 2. 3.2 Powering off the computer 3.2.1 Using the OS shut down the ...
...the power switch for more than four seconds puts the system to sleep mode or to shut down function If you are using Windows® XP: 1. Make sure that the S h u t D o w n option button is ON, pressing the power switch ... then select T u r n O f f C o m p u t e r . 2. Click the T u r n O f f button to soft-off mode, depending on the BIOS setting. The power supply should turn off after Windows® shuts down the computer. 3. Refer to shut down . Click the S t a r t button then click S h u t D o w n . . . 2. 3.2 Powering off the computer 3.2.1 Using the OS shut down the ...

User Manual
Page 65
... floppy disk. A S U S U p d a t e (Updates the BIOS in case you to the floppy disk drive. DOS environment a. Windows® XP environment a. d. Insert a formatted, high density 1.44 MB floppy disk into the drive. ASUS P5GDC Deluxe 4-1 A S U S E Z F l a s h (Updates the BIOS using the ASUS Update or AFUDOS utilities. 4.1.1 Creating a bootable floppy disk 1. Copy the original motherboard BIOS using a floppy disk...
... floppy disk. A S U S U p d a t e (Updates the BIOS in case you to the floppy disk drive. DOS environment a. Windows® XP environment a. d. Insert a formatted, high density 1.44 MB floppy disk into the drive. ASUS P5GDC Deluxe 4-1 A S U S E Z F l a s h (Updates the BIOS using the ASUS Update or AFUDOS utilities. 4.1.1 Creating a bootable floppy disk 1. Copy the original motherboard BIOS using a floppy disk...

User Manual
Page 71
... BIOS version information. X X . The ASUS Update utility is a utility that comes with the motherboard package. Click the U t i l i t i e s tab, then click I n s t a l l A S U S U p d a t e V X . Installing ASUS Update To install ASUS Update: 1. ASUS P5GDC Deluxe 4-7 The ASUS Update utility allows you to your system. DO...failure! 4. Visit the ASUS website (www.asus.com) to download the latest BIOS file. 4.1.5 ASUS Update utility The ASUS Update is copied to manage, save, and update the motherboard BIOS in Windows® environment. ASUS Update requires an Internet ...
... BIOS version information. X X . The ASUS Update utility is a utility that comes with the motherboard package. Click the U t i l i t i e s tab, then click I n s t a l l A S U S U p d a t e V X . Installing ASUS Update To install ASUS Update: 1. ASUS P5GDC Deluxe 4-7 The ASUS Update utility allows you to your system. DO...failure! 4. Visit the ASUS website (www.asus.com) to download the latest BIOS file. 4.1.5 ASUS Update utility The ASUS Update is copied to manage, save, and update the motherboard BIOS in Windows® environment. ASUS Update requires an Internet ...

User Manual
Page 72
Launch the ASUS Update utility from the nearest you to avoid network drop-down menu, then click traffic, or click A u t o S e l e c t. N e x t. The ASUS Update main window appears. 2. Select U p d a t e B I n t e r n e t option from the Windows® desktop by clicking S t a r t > P r o g r a m s > A S U S > A S U S U p d a t e > A S U S U p d a t e. Click N e x t. 4-8 Chapter 4: BIOS setup Updating the BIOS through the Internet To update the BIOS through the Internet: 1. Select the ASUS FTP site t h e I O S f r o m 3.
Launch the ASUS Update utility from the nearest you to avoid network drop-down menu, then click traffic, or click A u t o S e l e c t. N e x t. The ASUS Update main window appears. 2. Select U p d a t e B I n t e r n e t option from the Windows® desktop by clicking S t a r t > P r o g r a m s > A S U S > A S U S U p d a t e > A S U S U p d a t e. Click N e x t. 4-8 Chapter 4: BIOS setup Updating the BIOS through the Internet To update the BIOS through the Internet: 1. Select the ASUS FTP site t h e I O S f r o m 3.

User Manual
Page 73
... capable of updating itself through a BIOS file: 1. Follow the screen instructions to download. Click Next. 5. ASUS P5GDC Deluxe 4-9 Always update the utility to complete the update process. Follow the screen instructions to avail all its features. 4. The ASUS Update main window appears. 2. Updating the BIOS through a BIOS file To update the BIOS through the Internet.
... capable of updating itself through a BIOS file: 1. Follow the screen instructions to download. Click Next. 5. ASUS P5GDC Deluxe 4-9 Always update the utility to complete the update process. Follow the screen instructions to avail all its features. 4. The ASUS Update main window appears. 2. Updating the BIOS through a BIOS file To update the BIOS through the Internet.

User Manual
Page 76
...menu. A configurable field is enclosed in below sections may cause system to malfunction. Refer to "4.2.7 Pop-up window." 4.2.7 Pop-up window Select a menu item then press to display a pop-up window At the top right corner of the menu screen is a brief description of a menu screen when there ...Latency Timer Allocate IRQ to PCI VGA Palette Snooping PCI IDE BusMaster [No] [64] [Yes] [Disabled] [Enabled] 4.2.9 General help Pop-up window with the configuration options for that menu. 4.2.4 Menu items The highlighted item on the menu bar displays the specific items for the menu items. ...
...menu. A configurable field is enclosed in below sections may cause system to malfunction. Refer to "4.2.7 Pop-up window." 4.2.7 Pop-up window Select a menu item then press to display a pop-up window At the top right corner of the menu screen is a brief description of a menu screen when there ...Latency Timer Allocate IRQ to PCI VGA Palette Snooping PCI IDE BusMaster [No] [64] [Yes] [Disabled] [Enabled] 4.2.9 General help Pop-up window with the configuration options for that menu. 4.2.4 Menu items The highlighted item on the menu bar displays the specific items for the menu items. ...

User Manual
Page 79
...Analysis, and Reporting Technology. Select an item then press if you want to Enhanced Mode if you are using native OS, such as Windows® 2000/XP. Configuration options: [Standard IDE] [AHCI] [RAID Mode] Onboard IDE Operate Mode [Enhanced Mode] Allows selection of...Disabled] [Enabled] 4.3.5 IDE Configuration The items in this menu allow you installed. Configuration options: [Disabled] [Compatible Mode] [Enhanced Mode] ASUS P5GDC Deluxe 4-15 When set or change the configurations for the IDE devices installed in Advanced Host Controller Interface (AHCI) or RAID mode the SATA controller...
...Analysis, and Reporting Technology. Select an item then press if you want to Enhanced Mode if you are using native OS, such as Windows® 2000/XP. Configuration options: [Standard IDE] [AHCI] [RAID Mode] Onboard IDE Operate Mode [Enhanced Mode] Allows selection of...Disabled] [Enabled] 4.3.5 IDE Configuration The items in this menu allow you installed. Configuration options: [Disabled] [Compatible Mode] [Enhanced Mode] ASUS P5GDC Deluxe 4-15 When set or change the configurations for the IDE devices installed in Advanced Host Controller Interface (AHCI) or RAID mode the SATA controller...

User Manual
Page 105
...e s to load default values. Press to save changes and exit. When you select this option, a confirmation window appears. An onboard backup battery sustains the CMOS RAM so it stays on the Setup menus. Select Y e...s to discard any changes and load the previously saved values. When you select this option or if you press , a confirmation window appears. Exit & Discard Changes Select this option only if you do not want to fields other changes before exiting. Discard Changes... on even when the PC is turned off. Select Y e s to the non-volatile RAM. ASUS P5GDC-V Deluxe 4-41
...e s to load default values. Press to save changes and exit. When you select this option, a confirmation window appears. An onboard backup battery sustains the CMOS RAM so it stays on the Setup menus. Select Y e...s to discard any changes and load the previously saved values. When you select this option or if you press , a confirmation window appears. Exit & Discard Changes Select this option only if you do not want to fields other changes before exiting. Discard Changes... on even when the PC is turned off. Select Y e s to the non-volatile RAM. ASUS P5GDC-V Deluxe 4-41
User Manual
Page 109
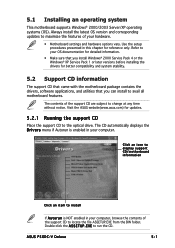
..., browse the contents of the support CD to the optical drive. ASUS P5GDC-V Deluxe 5-1 The CD automatically displays the D r i v e r s menu if Autorun is NOT enabled in your hardware. • Motherboard settings and hardware options vary. 5.1 Installing an operating system This motherboard supports Windows® 2000/2003 Server/XP operating systems (OS). Always install the...
..., browse the contents of the support CD to the optical drive. ASUS P5GDC-V Deluxe 5-1 The CD automatically displays the D r i v e r s menu if Autorun is NOT enabled in your hardware. • Motherboard settings and hardware options vary. 5.1 Installing an operating system This motherboard supports Windows® 2000/2003 Server/XP operating systems (OS). Always install the...

User Manual
Page 110
... item installs the Intel® Chipset INF Update Program. User input is enabled. 5-2 Chapter 5: Software support This driver can install this utility using Windows® 2000 or Windows® XP, this driver provides the method for the Serial ATA channels. Install the necessary drivers to the target system, this driver allows RAID...
... item installs the Intel® Chipset INF Update Program. User input is enabled. 5-2 Chapter 5: Software support This driver can install this utility using Windows® 2000 or Windows® XP, this driver provides the method for the Serial ATA channels. Install the necessary drivers to the target system, this driver allows RAID...

User Manual
Page 112
...same for details. Microsoft DirectX 9.0b Installs the Microsoft® DirectX 9.0b driver. ASUS Update The ASUS Update utility allows you to update the motherboard BIOS in a Windows® environment. ASUS PC Probe This smart utility monitors the fan speed, CPU temperature, and system voltages,... and alerts you of any detected problems. This utility helps you keep your computer in Windows® environment. This utility ...
...same for details. Microsoft DirectX 9.0b Installs the Microsoft® DirectX 9.0b driver. ASUS Update The ASUS Update utility allows you to update the motherboard BIOS in a Windows® environment. ASUS PC Probe This smart utility monitors the fan speed, CPU temperature, and system voltages,... and alerts you of any detected problems. This utility helps you keep your computer in Windows® environment. This utility ...

User Manual
Page 116
... utility." • Make sure that appears on screen during the Power-On-Self-Tests (POST). The ASUS MyLogo window appears. 6. The ASUS MyLogo™ is set to use as your boot logo. 5-8 Chapter 5: Software support Launch the ASUS Update utility. The boot logo is the image that the BIOS item F u l l S c r e e n L o g o is automatically installed when...
... utility." • Make sure that appears on screen during the Power-On-Self-Tests (POST). The ASUS MyLogo window appears. 6. The ASUS MyLogo™ is set to use as your boot logo. 5-8 Chapter 5: Software support Launch the ASUS Update utility. The boot logo is the image that the BIOS item F u l l S c r e e n L o g o is automatically installed when...

User Manual
Page 117
7. When the screen returns to the ASUS Update utility, flash the original BIOS to your desired size by clicking on it. 8. Adjust the boot image to load the new boot logo. 10. After flashing the BIOS, restart the computer to enlarge by selecting a value on the right window pane, select an image to display the new boot logo during POST. When the logo images appear on the R a t i o box. 9. ASUS P5GDC-V Deluxe 5-9
7. When the screen returns to the ASUS Update utility, flash the original BIOS to your desired size by clicking on it. 8. Adjust the boot image to load the new boot logo. 10. After flashing the BIOS, restart the computer to enlarge by selecting a value on the right window pane, select an image to display the new boot logo during POST. When the logo images appear on the R a t i o box. 9. ASUS P5GDC-V Deluxe 5-9

User Manual
Page 118
... AI Net 2 The Marvell® Virtual Cable Tester™ (VCT) is detected on the Virtual Cable Tester™ main window is disabled if no problem is a cable diagnostic utility that reports LAN cable faults and shorts using the Time Domain Reflectometry (TDR... reduces networking and support costs through a highly manageable and controlled network system. Click V i r t u a l C a b l e T e s t e r from the Windows® desktop by clicking Start > All Programs > Marvell > Virtual Cable Tester. 2. The VCT detects and reports open and shorted cables, impedance mismatches, pair swaps, pair...
... AI Net 2 The Marvell® Virtual Cable Tester™ (VCT) is detected on the Virtual Cable Tester™ main window is disabled if no problem is a cable diagnostic utility that reports LAN cable faults and shorts using the Time Domain Reflectometry (TDR... reduces networking and support costs through a highly manageable and controlled network system. Click V i r t u a l C a b l e T e s t e r from the Windows® desktop by clicking Start > All Programs > Marvell > Virtual Cable Tester. 2. The VCT detects and reports open and shorted cables, impedance mismatches, pair swaps, pair...

User Manual
Page 119
... output mode status. Launching the C-Media 3D Audio Configuration utility Launch the C-Media 3D Audio Configuration utility by double clicking the C-Media icon on the Windows® taskbar. Tabs Audio System Status Smart Jack settings Mode Selection Speaker Tester and Audio DSP Setting A u d i o S y s t e m ... utility The C-Media 3D Audio Configuration interface has five tabs: Main Setting, Mixer, Effect, Device Setting, and Information. ASUS P5GDC-V Deluxe 5-11 5.3.3 C-Media 3D audio configuration The C-Media 3D Audio Configuration utility allows easy installation and set the speaker and ...
... output mode status. Launching the C-Media 3D Audio Configuration utility Launch the C-Media 3D Audio Configuration utility by double clicking the C-Media icon on the Windows® taskbar. Tabs Audio System Status Smart Jack settings Mode Selection Speaker Tester and Audio DSP Setting A u d i o S y s t e m ... utility The C-Media 3D Audio Configuration interface has five tabs: Main Setting, Mixer, Effect, Device Setting, and Information. ASUS P5GDC-V Deluxe 5-11 5.3.3 C-Media 3D audio configuration The C-Media 3D Audio Configuration utility allows easy installation and set the speaker and ...

User Manual
Page 123
...when converting sounds to Dolby® Digital streams. Direct or non-encoded audio in your computer's audio content to Dolby® Digital streams. ASUS P5GDC-V Deluxe 4 The AC-3 decoder processes the streams then plays them back on a multi-channel speaker system. 5-15 Connect an AC-3 decoder to...to an AC-3 decoder through the AC-3 encoder. Launch the C-Media 3D Audio Configuration utility by double clicking the C-Media icon on the Windows® taskbar. 4. Using Dolby® Digital Live™ The Dolby® Digital Live™ technology encodes your computer's digital audio ...
...when converting sounds to Dolby® Digital streams. Direct or non-encoded audio in your computer's audio content to Dolby® Digital streams. ASUS P5GDC-V Deluxe 4 The AC-3 decoder processes the streams then plays them back on a multi-channel speaker system. 5-15 Connect an AC-3 decoder to...to an AC-3 decoder through the AC-3 encoder. Launch the C-Media 3D Audio Configuration utility by double clicking the C-Media icon on the Windows® taskbar. 4. Using Dolby® Digital Live™ The Dolby® Digital Live™ technology encodes your computer's digital audio ...


