P5GD2 Premium user's manual
Page 19
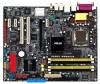
...; ICH6R allows RAID 0 and RAID 1 configuration for details. This CODEC is fully-compliant with existing PCI specifications. ASUS P5GD2 Premium 1-3 See pages 2-27 and 5-22 for four SATA connectors and supports the Intel® Matrix Storage Technology. With the CODEC, 8-channel audio ports, and S/PDIF interfaces, you can connect your computer's digital audio contents into real-time Dolby® Digital stream. This high speed interface is the C-Media CMI9880 7.1-channel audio CODEC...
...; ICH6R allows RAID 0 and RAID 1 configuration for details. This CODEC is fully-compliant with existing PCI specifications. ASUS P5GD2 Premium 1-3 See pages 2-27 and 5-22 for four SATA connectors and supports the Intel® Matrix Storage Technology. With the CODEC, 8-channel audio ports, and S/PDIF interfaces, you can connect your computer's digital audio contents into real-time Dolby® Digital stream. This high speed interface is the C-Media CMI9880 7.1-channel audio CODEC...

P5GD2 Premium user's manual
Page 22
... current processors supporting 800 MHz FSB, DDR2-600 provides the fastest solution for details. 1-6 Chapter 1: Product introduction See page 3-3 for details. See details on page 4-5. ASUS Q-Fan 2 technology The ASUS Q-Fan 2 technology smartly adjusts the fan speeds according to the system loading to ensure superior system performance. See page 4-14 for details. The bundled Winbond Voice Editor software lets you to buy a replacement ROM chip. This...
... current processors supporting 800 MHz FSB, DDR2-600 provides the fastest solution for details. 1-6 Chapter 1: Product introduction See page 3-3 for details. See details on page 4-5. ASUS Q-Fan 2 technology The ASUS Q-Fan 2 technology smartly adjusts the fan speeds according to the system loading to ensure superior system performance. See page 4-14 for details. The bundled Winbond Voice Editor software lets you to buy a replacement ROM chip. This...

P5GD2 Premium user's manual
Page 40
... they support. Refer to install expansion cards. Replace the system cover. 2.5.2 Configuring an expansion card After installing the expansion card, configure the it and make the necessary hardware settings for information on BIOS setup. 2. 2.5 Expansion slots In the future, you may cause you removed earlier. 6. Align the card connector with the screw you physical injury and damage motherboard components. 2.5.1 Installing an expansion card To install an expansion card: 1. Install the software drivers for later use...
... they support. Refer to install expansion cards. Replace the system cover. 2.5.2 Configuring an expansion card After installing the expansion card, configure the it and make the necessary hardware settings for information on BIOS setup. 2. 2.5 Expansion slots In the future, you may cause you removed earlier. 6. Align the card connector with the screw you physical injury and damage motherboard components. 2.5.1 Installing an expansion card To install an expansion card: 1. Install the software drivers for later use...

P5GD2 Premium user's manual
Page 49
These connectors support up RAID configurations. Refer to Chapter 5 for details on the IDE ribbon cable to set both drives in the BIOS to the hard disk drive documentation for Master/Slave jumper settings. See section "4.4.6 Onboard Devices Configuration" for Ultra ATA 133/100/66 signal cables. Make sure to PIN 1. P5GD2 Premium 3 . IDE RAID connectors (40-1 pin PRI_RAID1 [red], SEC_RAID1 [red]) These connectors are set using Ultra ATA hard disks, make sure that can connect IDE devices to these connectors, set up to four IDE hard disk drives that...
These connectors support up RAID configurations. Refer to Chapter 5 for details on the IDE ribbon cable to set both drives in the BIOS to the hard disk drive documentation for Master/Slave jumper settings. See section "4.4.6 Onboard Devices Configuration" for Ultra ATA 133/100/66 signal cables. Make sure to PIN 1. P5GD2 Premium 3 . IDE RAID connectors (40-1 pin PRI_RAID1 [red], SEC_RAID1 [red]) These connectors are set using Ultra ATA hard disks, make sure that can connect IDE devices to these connectors, set up to four IDE hard disk drives that...

P5GD2 Premium user's manual
Page 63
... keyboard is not defective. • Check your CPU overclocking settings in the BIOS setup and restore the default CPU parameters. • Check if your package. In case of a boot failure, you have connected an IDE hard disk drive to one of this user guide. • Install supported DDR2 DIMMs into the memory sockets. • Check if the DIMMs on the DIMM sockets are customizable using the Winbond Voice Editor software that your graphics card is properly connected to support...
... keyboard is not defective. • Check your CPU overclocking settings in the BIOS setup and restore the default CPU parameters. • Check if your package. In case of a boot failure, you have connected an IDE hard disk drive to one of this user guide. • Install supported DDR2 DIMMs into the memory sockets. • Check if the DIMMs on the DIMM sockets are customizable using the Winbond Voice Editor software that your graphics card is properly connected to support...

P5GD2 Premium user's manual
Page 72
... for the extension name. A:\>afudos /oOLDBIOS1.ROM Main filename Extension name 4-2 Chapter 4: BIOS setup Copy the original or the latest motherboard BIOS file to the bootable floppy disk. 4.1.2 AFUDOS utility The AFUDOS utility allows you to the bootable floppy disk you to save the file. • The succeeding BIOS screens are for Windows® 2000: a. Windows® 2000 environment To create a set of boot disks for reference only. Click S t a r t, then select...
... for the extension name. A:\>afudos /oOLDBIOS1.ROM Main filename Extension name 4-2 Chapter 4: BIOS setup Copy the original or the latest motherboard BIOS file to the bootable floppy disk. 4.1.2 AFUDOS utility The AFUDOS utility allows you to the bootable floppy disk you to save the file. • The succeeding BIOS screens are for Windows® 2000: a. Windows® 2000 environment To create a set of boot disks for reference only. Click S t a r t, then select...

P5GD2 Premium user's manual
Page 78
... the BIOS using this utility. 4-8 Chapter 4: BIOS setup This utility is available in the support CD that allows you to your system. See page 5-3 for the U t i l i t i e s screen menu. 3. ASUS Update requires an Internet connection either through a network or an Internet Service Provider (ISP). The D r i v e r s menu appears. 2. Click the U t i l i t i e s tab, then click I n s t a l l A S U S U p d a t e V X . The ASUS Update utility is copied to manage, save, and update the motherboard BIOS in the optical drive. X X . 4.1.5 ASUS Update utility The ASUS Update is a utility that...
... the BIOS using this utility. 4-8 Chapter 4: BIOS setup This utility is available in the support CD that allows you to your system. See page 5-3 for the U t i l i t i e s screen menu. 3. ASUS Update requires an Internet connection either through a network or an Internet Service Provider (ISP). The D r i v e r s menu appears. 2. Click the U t i l i t i e s tab, then click I n s t a l l A S U S U p d a t e V X . The ASUS Update utility is copied to manage, save, and update the motherboard BIOS in the optical drive. X X . 4.1.5 ASUS Update utility The ASUS Update is a utility that...
P5GD2 Premium user's manual
Page 83
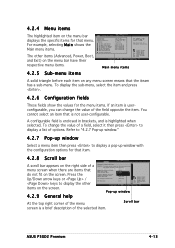
Change Field Tab Select Field F1 General Help F10 Save and Exit ESC Exit A solid triangle before each item on any menu screen means that is not user-configurable. Configure DRAM Timing by SPD Memory Acceleration Mode DRAM Idle Timer DRAm Refresh Rate [Enabled] [Auto] [Auto] [Auto] Graphic Adapter Priority Graphics Aperture Size Spread Spectrum [AGP/PCI] [ 64 MB] [Enabled] ICH Delayed Transaction [Enabled] MPS Revision [1.4] Pop-up window with the configuration options for that...
Change Field Tab Select Field F1 General Help F10 Save and Exit ESC Exit A solid triangle before each item on any menu screen means that is not user-configurable. Configure DRAM Timing by SPD Memory Acceleration Mode DRAM Idle Timer DRAm Refresh Rate [Enabled] [Auto] [Auto] [Auto] Graphic Adapter Priority Graphics Aperture Size Spread Spectrum [AGP/PCI] [ 64 MB] [Enabled] ICH Delayed Transaction [Enabled] MPS Revision [1.4] Pop-up window with the configuration options for that...

P5GD2 Premium user's manual
Page 85
...] Enables or disables the LBA mode. These values are specifically configuring a CD-ROM drive. Configuration options: [Disabled] [Auto] Block (Multi-sector Transfer) [Auto] Enables or disables data multi-sectors transfers. When set to Auto, the data transfer from and to Auto allows automatic selection of IDE devices. Setting to display the IDE device information. Setting to the device occurs one sector at a time if the device supports multi-sector transfer feature. Type [Auto] Selects the type of IDE drive. Configuration options: [Disabled] [Auto] ASUS P5GD2 Premium...
...] Enables or disables the LBA mode. These values are specifically configuring a CD-ROM drive. Configuration options: [Disabled] [Auto] Block (Multi-sector Transfer) [Auto] Enables or disables data multi-sectors transfers. When set to Auto, the data transfer from and to Auto allows automatic selection of IDE devices. Setting to display the IDE device information. Setting to the device occurs one sector at a time if the device supports multi-sector transfer feature. Type [Auto] Selects the type of IDE drive. Configuration options: [Disabled] [Auto] ASUS P5GD2 Premium...
P5GD2 Premium user's manual
Page 86
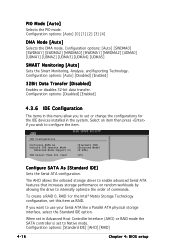
... [UDMA4] [UDMA5] SMART Monitoring [Auto] Sets the Smart Monitoring, Analysis, and Reporting Technology. The AHCI allows the onboard storage driver to enable advanced Serial ATA features that increases storage performance on random workloads by allowing the drive to Native mode. To create a RAID 0, RAID 1or the Intel® Matrix Storage Technology configuration, set or change the configurations for the IDE devices installed in Advanced Host Controller Interface (AHCI) or RAID mode the SATA controller is set to internally optimize the order of commands. Configuration options: [Auto...
... [UDMA4] [UDMA5] SMART Monitoring [Auto] Sets the Smart Monitoring, Analysis, and Reporting Technology. The AHCI allows the onboard storage driver to enable advanced Serial ATA features that increases storage performance on random workloads by allowing the drive to Native mode. To create a RAID 0, RAID 1or the Intel® Matrix Storage Technology configuration, set or change the configurations for the IDE devices installed in Advanced Host Controller Interface (AHCI) or RAID mode the SATA controller is set to internally optimize the order of commands. Configuration options: [Auto...

P5GD2 Premium user's manual
Page 87
... boot ROM. This item appears only when the Configure SATA As item is set to the default setting S - Configuration options: [Disabled] [Enabled] AHCI Port 3 Interlock Switch [Disabled] Enables or disables the Advanced Host Controller Interface (AHCI) Port 3 interlock switch. Onboard IDE Operate Mode [Enhanced Mode] Allows selection of these options and encounter problems, revert to Standard IDE. ASUS P5GD2 Premium 4-17 Set to Enhanced Mode if you did not install any of the IDE operation mode depending on the operating system (OS) that you do not change...
... boot ROM. This item appears only when the Configure SATA As item is set to the default setting S - Configuration options: [Disabled] [Enabled] AHCI Port 3 Interlock Switch [Disabled] Enables or disables the Advanced Host Controller Interface (AHCI) Port 3 interlock switch. Onboard IDE Operate Mode [Enhanced Mode] Allows selection of these options and encounter problems, revert to Standard IDE. ASUS P5GD2 Premium 4-17 Set to Enhanced Mode if you did not install any of the IDE operation mode depending on the operating system (OS) that you do not change...
P5GD2 Premium user's manual
Page 93
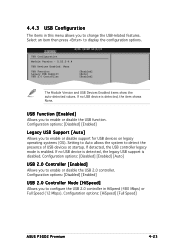
...2.0 controller in this menu allows you to enable or disable support for USB devices on legacy operating systems (OS). If detected, the USB controller legacy mode is disabled. Configuration options: [Disabled] [Enabled] USB 2.0 Controller Mode [HiSpeed] Allows you to change the USB-related features. 4.4.3 USB Configuration The items in HiSpeed (480 Mbps) or Full Speed (12 Mbps). Setting to Auto allows the system to display the configuration options. If no USB device is detected, the legacy USB support is enabled. Configuration options: [HiSpeed] [Full Speed] ASUS P5GD2 Premium...
...2.0 controller in this menu allows you to enable or disable support for USB devices on legacy operating systems (OS). If detected, the USB controller legacy mode is disabled. Configuration options: [Disabled] [Enabled] USB 2.0 Controller Mode [HiSpeed] Allows you to change the USB-related features. 4.4.3 USB Configuration The items in HiSpeed (480 Mbps) or Full Speed (12 Mbps). Setting to Auto allows the system to display the configuration options. If no USB device is detected, the legacy USB support is enabled. Configuration options: [HiSpeed] [Full Speed] ASUS P5GD2 Premium...

P5GD2 Premium user's manual
Page 94
... Updation [Enabled] Disables or enables the microcode updation function. Configuration options: [Auto] [Disabled] 4-24 Chapter 4: BIOS setup Select Screen Select Item +- Use the or keys to boot legacy operating systems that the BIOS automatically detects. The default value of this item is to set the VID CMOS setting at which the processor is auto-detected by BIOS. NOTE: If an invalid ratio is auto-detected by BIOS. The default value of this item is set to [Auto], the BIOS will...
... Updation [Enabled] Disables or enables the microcode updation function. Configuration options: [Auto] [Disabled] 4-24 Chapter 4: BIOS setup Select Screen Select Item +- Use the or keys to boot legacy operating systems that the BIOS automatically detects. The default value of this item is to set the VID CMOS setting at which the processor is auto-detected by BIOS. NOTE: If an invalid ratio is auto-detected by BIOS. The default value of this item is set to [Auto], the BIOS will...

P5GD2 Premium user's manual
Page 95
...Hyper Path 2 [Enabled] [Auto] Booting Graphic Adapter Priori [PCI Express/PCI] PEG Buffer Length Link Latency PEG Link Mode PEG Root Control Slot Power [Auto] [Auto] [Auto] [Auto] [Auto] Select Screen Select Item + Ch O ti Advanced Chipset Settings Configure DRAM Timing by SPD [Enabled] When this item is enabled, the DRAM timing parameters are set according to the DRAM SPD (Serial Presence Detect). CPU Internal Thermal Control [Auto] Disables or sets the CPU internal thermal control. Configuration options: [2 Clocks] [3 Clocks] [4 Clocks] [5 Clocks] ASUS P5GD2 Premium 4-25
...Hyper Path 2 [Enabled] [Auto] Booting Graphic Adapter Priori [PCI Express/PCI] PEG Buffer Length Link Latency PEG Link Mode PEG Root Control Slot Power [Auto] [Auto] [Auto] [Auto] [Auto] Select Screen Select Item + Ch O ti Advanced Chipset Settings Configure DRAM Timing by SPD [Enabled] When this item is enabled, the DRAM timing parameters are set according to the DRAM SPD (Serial Presence Detect). CPU Internal Thermal Control [Auto] Disables or sets the CPU internal thermal control. Configuration options: [2 Clocks] [3 Clocks] [4 Clocks] [5 Clocks] ASUS P5GD2 Premium 4-25
P5GD2 Premium user's manual
Page 97
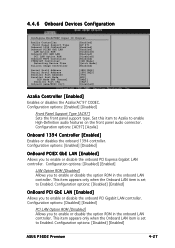
... enable or disable the option ROM in the onboard LAN controller. Configuration options: [Disabled] [Enabled] ASUS P5GD2 Premium 4-27 Configuration options: [Disabled] [Enabled] PCI LAN Option ROM [Disabled] Allows you to enable or disable the option ROM in the onboard LAN controller. This item appears only when the Onboard LAN item is set to Enabled. 4.4.6 Onboard Devices Configuration Configure Win627EHF Super IO Chipset Azalia Controller Front Panel Support Type Onboard 1394 Controller Onboard PCIEX GbE LAN LAN Option ROM Onboard PCI GbE LAN PCI LAN Option ROM Onboard...
... enable or disable the option ROM in the onboard LAN controller. Configuration options: [Disabled] [Enabled] ASUS P5GD2 Premium 4-27 Configuration options: [Disabled] [Enabled] PCI LAN Option ROM [Disabled] Allows you to enable or disable the option ROM in the onboard LAN controller. This item appears only when the Onboard LAN item is set to Enabled. 4.4.6 Onboard Devices Configuration Configure Win627EHF Super IO Chipset Azalia Controller Front Panel Support Type Onboard 1394 Controller Onboard PCIEX GbE LAN LAN Option ROM Onboard PCI GbE LAN PCI LAN Option ROM Onboard...

P5GD2 Premium user's manual
Page 102
... [Power Off] Power On By RTC Alarm [Disabled] Power On By External Modems [Disabled] Power On By PCI Devices [Disabled] Power On By PS/2 Keyboard [Disabled] Keyboard Wakeup Password : Not Installed Power On By PS/2 Mouse [Disabled] Enabled or disable APM. Configuration options: [On/Off] [Suspend] Restore on AC Power Loss [Power Off] When set to Power On, the system goes on . 4-32 Chapter 4: BIOS setup Power Button Mode [On/Off] Allows the system to generate a wake event. When set values. Configuration options: [Power Off] [Power...
... [Power Off] Power On By RTC Alarm [Disabled] Power On By External Modems [Disabled] Power On By PCI Devices [Disabled] Power On By PS/2 Keyboard [Disabled] Keyboard Wakeup Password : Not Installed Power On By PS/2 Mouse [Disabled] Enabled or disable APM. Configuration options: [On/Off] [Suspend] Restore on AC Power Loss [Power Off] When set to Power On, the system goes on . 4-32 Chapter 4: BIOS setup Power Button Mode [On/Off] Allows the system to generate a wake event. When set values. Configuration options: [Power Off] [Power...

P5GD2 Premium user's manual
Page 108
... "Password Installed" appears after you to change the system security settings. Configuration options: [Disabled] [Enabled] 4.6.3 Security The Security menu items allow you successfully set or change the supervisor password, follow the same steps as in setting a user password. Change Supervisor Password Select this item to set your BIOS password, you set a password, this function allows the option ROMs to erase the RTC RAM. 4-38 Chapter 4: BIOS setup To clear the supervisor password, select the Change Supervisor Password then press . See section "2.6 Jumpers...
... "Password Installed" appears after you to change the system security settings. Configuration options: [Disabled] [Enabled] 4.6.3 Security The Security menu items allow you successfully set or change the supervisor password, follow the same steps as in setting a user password. Change Supervisor Password Select this item to set your BIOS password, you set a password, this function allows the option ROMs to erase the RTC RAM. 4-38 Chapter 4: BIOS setup To clear the supervisor password, select the Change Supervisor Password then press . See section "2.6 Jumpers...

P5GD2 Premium user's manual
Page 115
... support CD Place the support CD to change at any time without notice. Click an icon to display support CD/motherboard information Click an item to install Click to view and install additional drivers If A u t o r u n is enabled in your hardware. • Motherboard settings and hardware options vary. Refer to your computer, browse the contents of the support CD are subject to the optical drive. Use the setup...
... support CD Place the support CD to change at any time without notice. Click an icon to display support CD/motherboard information Click an item to install Click to view and install additional drivers If A u t o r u n is enabled in your hardware. • Motherboard settings and hardware options vary. Refer to your computer, browse the contents of the support CD are subject to the optical drive. Use the setup...

P5GD2 Premium user's manual
Page 135
... Storage technology, visit http://support.intel.com/support/chipsets/imst/ If you want to boot the system from a hard disk drive included in the motherboard support CD for a RAID configuration: 1. ASUS P5GD2 Premium 5-21 For optimal performance, install identical drives of each hard disk drive to the RAID controllers user manual in a RAID set using two identical hard disk drives. Set the jumpers of the same model and capacity when creating a disk array. Connect the SATA signal cables. 3. Refer to create a virtual RAID 0 and RAID 1 sets. See section "5.2.4 Manuals menu...
... Storage technology, visit http://support.intel.com/support/chipsets/imst/ If you want to boot the system from a hard disk drive included in the motherboard support CD for a RAID configuration: 1. ASUS P5GD2 Premium 5-21 For optimal performance, install identical drives of each hard disk drive to the RAID controllers user manual in a RAID set using two identical hard disk drives. Set the jumpers of the same model and capacity when creating a disk array. Connect the SATA signal cables. 3. Refer to create a virtual RAID 0 and RAID 1 sets. See section "5.2.4 Manuals menu...
P5GD2 Premium user's manual
Page 156
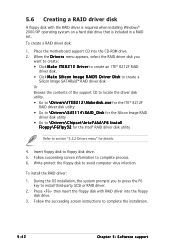
When the D r i v e r s menu appears, select the RAID driver disk you to press the F6 key to install third-party SCSI or RAID driver. 2. Follow succeeding screen information to complete the installation. 5-42 Chapter 5: Software support Press then insert the floppy disk with the RAID driver is required when installing Windows® 2000/XP operating system on a hard disk drive that is included in a RAID set. Follow the succeeding screen instructions to complete process. 6. Insert floppy disk to avoid...
When the D r i v e r s menu appears, select the RAID driver disk you to press the F6 key to install third-party SCSI or RAID driver. 2. Follow succeeding screen information to complete the installation. 5-42 Chapter 5: Software support Press then insert the floppy disk with the RAID driver is required when installing Windows® 2000/XP operating system on a hard disk drive that is included in a RAID set. Follow the succeeding screen instructions to complete process. 6. Insert floppy disk to avoid...


