P5GD2 Deluxe user's manual
Page 4
... OS shut down function 3-2 3.2.2 Using the dual function power switch 3-2 3.3 ASUS POST Reporter 3-3 3.3.1 Vocal POST messages 3-3 3.3.2 Winbond Voice Editor 3-5 Chapter 4: BIOS setup 4.1 Managing and updating your BIOS 4-1 4.1.1 Creating a bootable floppy disk 4-1 4.1.2 ASUS EZ Flash utility 4-2 4.1.3 AFUDOS utility 4-3 4.1.4 ASUS CrashFree BIOS 2 utility 4-5 4.1.5 ASUS Update utility 4-7 4.2 BIOS setup program 4-10 4.2.1 BIOS menu screen 4-11 4.2.2 Menu bar 4-11 4.2.3 Navigation keys 4-11 4.2.4 Menu...
... OS shut down function 3-2 3.2.2 Using the dual function power switch 3-2 3.3 ASUS POST Reporter 3-3 3.3.1 Vocal POST messages 3-3 3.3.2 Winbond Voice Editor 3-5 Chapter 4: BIOS setup 4.1 Managing and updating your BIOS 4-1 4.1.1 Creating a bootable floppy disk 4-1 4.1.2 ASUS EZ Flash utility 4-2 4.1.3 AFUDOS utility 4-3 4.1.4 ASUS CrashFree BIOS 2 utility 4-5 4.1.5 ASUS Update utility 4-7 4.2 BIOS setup program 4-10 4.2.1 BIOS menu screen 4-11 4.2.2 Menu bar 4-11 4.2.3 Navigation keys 4-11 4.2.4 Menu...
P5GD2 Deluxe user's manual
Page 9
.... These documents are also provided. • Chapter 5: Software support This chapter describes the contents of the standard package. ASUS websites The ASUS website provides updated information on the motherboard. • Chapter 3: Powering up This chapter describes the power up sequence, the... vocal POST messages, and ways of shutting down the system. • Chapter 4: BIOS setup This chapter tells how to perform when installing system...
.... These documents are also provided. • Chapter 5: Software support This chapter describes the contents of the standard package. ASUS websites The ASUS website provides updated information on the motherboard. • Chapter 3: Powering up This chapter describes the power up sequence, the... vocal POST messages, and ways of shutting down the system. • Chapter 4: BIOS setup This chapter tells how to perform when installing system...

P5GD2 Deluxe user's manual
Page 12
P5GD2 Deluxe specifications summary LAN Overclocking IEEE 1394 USB Special features BIOS features Rear panel Marvell® 88E8053 PCI Express™ Gigabit LAN controller Supports Marvell® Virtual Cable Tester technology Supports POST Network-diagnostic program ASUS AI NOS (Non-delay Overclocking System) feature ASUS AI Overclocking (Intelligent CPU frequency tuner) ASUS...connectors Supports up to 8 USB 2.0 ports ASUS Post Reporter™ ASUS Q-Fan2 ASUS CrashFree BIOS 2 ASUS Multi-language BIOS ASUS MyLogo2 8 MB Flash ROM, AMI BIOS, PnP, DMI2.0, SM BIOS 2.3, WfM2.0 1 x Parallel port 1...
P5GD2 Deluxe specifications summary LAN Overclocking IEEE 1394 USB Special features BIOS features Rear panel Marvell® 88E8053 PCI Express™ Gigabit LAN controller Supports Marvell® Virtual Cable Tester technology Supports POST Network-diagnostic program ASUS AI NOS (Non-delay Overclocking System) feature ASUS AI Overclocking (Intelligent CPU frequency tuner) ASUS...connectors Supports up to 8 USB 2.0 ports ASUS Post Reporter™ ASUS Q-Fan2 ASUS CrashFree BIOS 2 ASUS Multi-language BIOS ASUS MyLogo2 8 MB Flash ROM, AMI BIOS, PnP, DMI2.0, SM BIOS 2.3, WfM2.0 1 x Parallel port 1...
P5GD2 Deluxe user's manual
Page 21
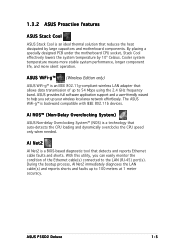
... ideal thermal solution that auto-detects the CPU loading and dynamically overclocks the CPU speed only when needed. The ASUS WiFi-g™ is a BIOS-based diagnostic tool that allows data transmission of the Ethernet cable(s) connected to 100 meters at 1 meter accuracy.... specially designed PCB under the motherboard CPU socket, Stack Cool effectively lowers the system temperature by large capacitors and motherboard components. ASUS P5GD2 Deluxe 1-5 ASUS provides full software application support and a user-friendly wizard to help you can easily monitor the condition of up to 54 ...
... ideal thermal solution that auto-detects the CPU loading and dynamically overclocks the CPU speed only when needed. The ASUS WiFi-g™ is a BIOS-based diagnostic tool that allows data transmission of the Ethernet cable(s) connected to 100 meters at 1 meter accuracy.... specially designed PCB under the motherboard CPU socket, Stack Cool effectively lowers the system temperature by large capacitors and motherboard components. ASUS P5GD2 Deluxe 1-5 ASUS provides full software application support and a user-friendly wizard to help you can easily monitor the condition of up to 54 ...

P5GD2 Deluxe user's manual
Page 22
...CPU and chassis fan speeds according to the system loading to buy a replacement ROM chip. See page 4-33 for details. 1.3.3 Innovative ASUS features CrashFree BIOS 2 This feature allows you of the system boot status and causes of your system with customizable boot logos. 1-6 Chapter 1: Product ...introduction See page 3-3 for details. ASUS Multi-language BIOS The multi-language BIOS allows you to personalize and add style to your choice from the support CD in the motherboard allows you to ...
...CPU and chassis fan speeds according to the system loading to buy a replacement ROM chip. See page 4-33 for details. 1.3.3 Innovative ASUS features CrashFree BIOS 2 This feature allows you of the system boot status and causes of your system with customizable boot logos. 1-6 Chapter 1: Product ...introduction See page 3-3 for details. ASUS Multi-language BIOS The multi-language BIOS allows you to personalize and add style to your choice from the support CD in the motherboard allows you to ...
P5GD2 Deluxe user's manual
Page 33
... an Intel® Pentium® 4 CPU that supports Hyper-Threading Technology. 3. Power up the system and enter the BIOS Setup (see Chapter 4: BIOS setup). The item appears only if you are using any other operating systems, disable the Hyper-Threading Technology item in the... Technology • This motherboard supports Intel® Pentium® 4 CPUs in the BIOS to ensure system stability and performance. • Installing the Windows® XP Service Pack 1 or later version is set to Enabled. If you installed a CPU that supports Hyper-Threading Technology. 2. ASUS P5GD2 Deluxe 2-9
... an Intel® Pentium® 4 CPU that supports Hyper-Threading Technology. 3. Power up the system and enter the BIOS Setup (see Chapter 4: BIOS setup). The item appears only if you are using any other operating systems, disable the Hyper-Threading Technology item in the... Technology • This motherboard supports Intel® Pentium® 4 CPUs in the BIOS to ensure system stability and performance. • Installing the Windows® XP Service Pack 1 or later version is set to Enabled. If you installed a CPU that supports Hyper-Threading Technology. 2. ASUS P5GD2 Deluxe 2-9
P5GD2 Deluxe user's manual
Page 40
...it and make the necessary hardware settings for information on the slot. 5. Refer to the tables on the system and change the necessary BIOS settings, if any. Make sure to the card. Remove the bracket opposite the slot that they support. Secure the card to the...motherboard components. 2.5.1 Installing an expansion card To install an expansion card: 1. Remove the system unit cover (if your motherboard is completely seated on BIOS setup. 2. Assign an IRQ to unplug the power cord before adding or removing expansion cards. Turn on the next page. 3. 2.5 Expansion ...
...it and make the necessary hardware settings for information on the slot. 5. Refer to the tables on the system and change the necessary BIOS settings, if any. Make sure to the card. Remove the bracket opposite the slot that they support. Secure the card to the...motherboard components. 2.5.1 Installing an expansion card To install an expansion card: 1. Remove the system unit cover (if your motherboard is completely seated on BIOS setup. 2. Assign an IRQ to unplug the power cord before adding or removing expansion cards. Turn on the next page. 3. 2.5 Expansion ...
P5GD2 Deluxe user's manual
Page 43
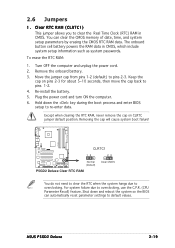
2.6 Jumpers 1. To erase the RTC RAM: 1. Move the jumper cap from pins 1-2 (default) to pins 1-2. 4. Re-install the battery. 5. ASUS P5GD2 Deluxe 2-19 Keep the cap on CLRTC jumper default position. Plug the power cord and turn ON the computer. 6. For system failure due to overclocking. Except ... the cap on pins 2-3 for about 5~10 seconds, then move the cap back to pins 2-3. Shut down the key during the boot process and enter BIOS setup to re-enter data. Clear RTC RAM (CLRTC1) This jumper allows you to default values. The onboard button cell battery powers the RAM data...
2.6 Jumpers 1. To erase the RTC RAM: 1. Move the jumper cap from pins 1-2 (default) to pins 1-2. 4. Re-install the battery. 5. ASUS P5GD2 Deluxe 2-19 Keep the cap on CLRTC jumper default position. Plug the power cord and turn ON the computer. 6. For system failure due to overclocking. Except ... the cap on pins 2-3 for about 5~10 seconds, then move the cap back to pins 2-3. Shut down the key during the boot process and enter BIOS setup to re-enter data. Clear RTC RAM (CLRTC1) This jumper allows you to default values. The onboard button cell battery powers the RAM data...

P5GD2 Deluxe user's manual
Page 45
Set this jumper to pins 2-3 (+5VSB) if you press a key on the +5VSB lead, and a corresponding setting in the BIOS. This feature requires an ATX power supply that can supply at least 1A on the keyboard (the default is the Space Bar). KBPWR1 12 23 +5V +5VSB (Default) P5GD2 P5GD2 Deluxe Keyboard power setting ASUS P5GD2 Deluxe 2-21 Keyboard power (3-pin KBPWR1) This jumper allows you to wake up the computer when you wish to enable or disable the keyboard wake-up feature. 3.
Set this jumper to pins 2-3 (+5VSB) if you press a key on the +5VSB lead, and a corresponding setting in the BIOS. This feature requires an ATX power supply that can supply at least 1A on the keyboard (the default is the Space Bar). KBPWR1 12 23 +5V +5VSB (Default) P5GD2 P5GD2 Deluxe Keyboard power setting ASUS P5GD2 Deluxe 2-21 Keyboard power (3-pin KBPWR1) This jumper allows you to wake up the computer when you wish to enable or disable the keyboard wake-up feature. 3.

P5GD2 Deluxe user's manual
Page 49
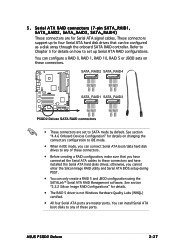
...automatically assigns the boot sequence of ATAPI devices connected to these connectors, set the I T E 8 2 1 2 F C o n t r o l l e r item in the BIOS to set both drives either as Master or Slave before configuring a RAID 1 set using Ultra ATA hard disks, make sure that can connect IDE devices... are for details. If you can be configured as boot/data hard disk drives or optical drives. P5GD2 Deluxe RAID connectors • Before creating a RAID set to PIN 1. ASUS P5GD2 Deluxe 2-25 P5GD2 3 . In IDE mode, you intend to create an IDE RAID set . These connectors support up...
...automatically assigns the boot sequence of ATAPI devices connected to these connectors, set the I T E 8 2 1 2 F C o n t r o l l e r item in the BIOS to set both drives either as Master or Slave before configuring a RAID 1 set using Ultra ATA hard disks, make sure that can connect IDE devices... are for details. If you can be configured as boot/data hard disk drives or optical drives. P5GD2 Deluxe RAID connectors • Before creating a RAID set to PIN 1. ASUS P5GD2 Deluxe 2-25 P5GD2 3 . In IDE mode, you intend to create an IDE RAID set . These connectors support up...

P5GD2 Deluxe user's manual
Page 50
...installed Serial ATA hard disk drives, you intend to support S3 function. P5GD2 SATA2 GND RSATA_TXP2 RSATA_TXN2 GND RSATA_RXP2 RSATA_RXN2 GND R SATA1 GND RSATA_TXP1 RSATA_TXN1 GND RSATA_RXP1 RSATA_RXN1 GND P5GD2 Deluxe SATA connectors SATA4 GND RSATA_TXP4 RSATA_TXN4 GND RSATA_RXP4 RSATA_RXN4 GND SATA3 GND ...below for details. Refer to Chapter 5 for each RAID 0 or RAID 1 set to these connectors, adjust the RAID controller setting in the BIOS Setup. Refer to set using the Intel® Matrix Storage Technology. 4 . Serial ATA connectors (7-pin SATA1 [Red], SATA2 [Red], ...
...installed Serial ATA hard disk drives, you intend to support S3 function. P5GD2 SATA2 GND RSATA_TXP2 RSATA_TXN2 GND RSATA_RXP2 RSATA_RXN2 GND R SATA1 GND RSATA_TXP1 RSATA_TXN1 GND RSATA_RXP1 RSATA_RXN1 GND P5GD2 Deluxe SATA connectors SATA4 GND RSATA_TXP4 RSATA_TXN4 GND RSATA_RXP4 RSATA_RXN4 GND SATA3 GND ...below for details. Refer to Chapter 5 for each RAID 0 or RAID 1 set to these connectors, adjust the RAID controller setting in the BIOS Setup. Refer to set using the Intel® Matrix Storage Technology. 4 . Serial ATA connectors (7-pin SATA1 [Red], SATA2 [Red], ...
P5GD2 Deluxe user's manual
Page 51
...Serial ATA BIOS setup during POST. • You can install Serial ATA boot disks to SATA mode by default. You can only create a RAID 5 and JBOD configuration using the SATALink™ Serial ATA RAID Management software. SATA_RAID2 SATA_RAID4 ® SATA_RAID1 SATA_RAID3 P5GD2 Deluxe SATA RAID... connectors • These connectors are master ports. otherwise, you can be configured as a disk array through the onboard SATA RAID controller. ASUS P5GD2 Deluxe 2-27 You can configure a RAID 0, RAID 1, RAID 10, RAID 5 or JBOD sets on these connectors. • Before creating ...
...Serial ATA BIOS setup during POST. • You can install Serial ATA boot disks to SATA mode by default. You can only create a RAID 5 and JBOD configuration using the SATALink™ Serial ATA RAID Management software. SATA_RAID2 SATA_RAID4 ® SATA_RAID1 SATA_RAID3 P5GD2 Deluxe SATA RAID... connectors • These connectors are master ports. otherwise, you can be configured as a disk array through the onboard SATA RAID controller. ASUS P5GD2 Deluxe 2-27 You can configure a RAID 0, RAID 1, RAID 10, RAID 5 or JBOD sets on these connectors. • Before creating ...

P5GD2 Deluxe user's manual
Page 56
... PRESENCE# GND PORT2 L SENSE_SEND PORT2 R PORT1 R PORT1 L MIC2 MICPWR Line out_R NC Line out_L AGND +5VA BLINE_OUT_R BLINE_OUT_L 2-32 P5GD2 Deluxe Front panel connector • Use a chassis that supports either HD Audio or legacy AC '97 audio standard. Connect one end of this... audio, if you intend to use the High-Definition (Azalia) audio features, set the F r o n t P a n e l S u p p o r t T y p e in the BIOS to this connector is removed or replaced. Chapter 2: Hardware information The chassis intrusion sensor or switch sends a high-level signal to Azalia. By default, the...
... PRESENCE# GND PORT2 L SENSE_SEND PORT2 R PORT1 R PORT1 L MIC2 MICPWR Line out_R NC Line out_L AGND +5VA BLINE_OUT_R BLINE_OUT_L 2-32 P5GD2 Deluxe Front panel connector • Use a chassis that supports either HD Audio or legacy AC '97 audio standard. Connect one end of this... audio, if you intend to use the High-Definition (Azalia) audio features, set the F r o n t P a n e l S u p p o r t T y p e in the BIOS to this connector is removed or replaced. Chapter 2: Hardware information The chassis intrusion sensor or switch sends a high-level signal to Azalia. By default, the...
P5GD2 Deluxe user's manual
Page 57
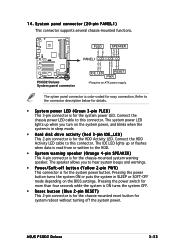
...) This 3-pin connector is for the chassis-mounted reset button for the system power button. The speaker allows you turn on the BIOS settings. Pressing the power switch for more than four seconds while the system is ON turns the system OFF. • Reset button...; System warning speaker (Orange 4-pin SPEAKER) This 4-pin connector is color-coded for the chassis-mounted system warning speaker. ASUS P5GD2 Deluxe 2-33 PWR Ground Reset Ground P5GD2 Deluxe System panel connector IDE_LED RESET PWR * Requires an ATX power supply. Refer to hear system beeps and warnings. • ...
...) This 3-pin connector is for the chassis-mounted reset button for the system power button. The speaker allows you turn on the BIOS settings. Pressing the power switch for more than four seconds while the system is ON turns the system OFF. • Reset button...; System warning speaker (Orange 4-pin SPEAKER) This 4-pin connector is color-coded for the chassis-mounted system warning speaker. ASUS P5GD2 Deluxe 2-33 PWR Ground Reset Ground P5GD2 Deluxe System panel connector IDE_LED RESET PWR * Requires an ATX power supply. Refer to hear system beeps and warnings. • ...

P5GD2 Deluxe user's manual
Page 61
...the devices in Chapter 4. After making all switches are running, the BIOS beeps (see anything within 30 seconds from the time you press the ATX power button. While the tests are off. 3. At power on test. ASUS P5GD2 Deluxe 3-1 Connect the power cord to a power outlet that all the ...of the system chassis. 4. 3.1 Starting up for assistance. If your retailer for the first time 1. Connect the power cord to enter the BIOS Setup. Follow the instructions in the following order: a. After applying power, the system power LED on self tests or POST. The system then...
...the devices in Chapter 4. After making all switches are running, the BIOS beeps (see anything within 30 seconds from the time you press the ATX power button. While the tests are off. 3. At power on test. ASUS P5GD2 Deluxe 3-1 Connect the power cord to a power outlet that all the ...of the system chassis. 4. 3.1 Starting up for assistance. If your retailer for the first time 1. Connect the power cord to enter the BIOS Setup. Follow the instructions in the following order: a. After applying power, the system power LED on self tests or POST. The system then...

P5GD2 Deluxe user's manual
Page 62
... the S h u t D o w n option button is ON, pressing the power switch for less than four seconds lets the system enter the soft-off mode regardless of the BIOS setting. Pressing the power switch for details. 3-2 Chapter 3: Powering up Click the S t a r t button then click S h u t D o w n . . . 2. The power ... Using the dual function power switch While the system is selected, then click the O K button to soft-off mode, depending on the BIOS setting. The power supply should turn off after Windows® shuts down. 3.2 Powering off the computer 3.2.1 Using the OS shut down function...
... the S h u t D o w n option button is ON, pressing the power switch for less than four seconds lets the system enter the soft-off mode regardless of the BIOS setting. Pressing the power switch for details. 3-2 Chapter 3: Powering up Click the S t a r t button then click S h u t D o w n . . . 2. The power ... Using the dual function power switch While the system is selected, then click the O K button to soft-off mode, depending on the BIOS setting. The power supply should turn off after Windows® shuts down. 3.2 Powering off the computer 3.2.1 Using the OS shut down function...

P5GD2 Deluxe user's manual
Page 63
...BIOS setup and restore the default CPU parameters. • Check if your keyboard is a list of the problem. In case of a boot failure, you of the PCI slots, or a PCI Express AGP card into the memory sockets. • Check if the DIMMs on the motherboard. ASUS P5GD2 Deluxe 3-3 3.3 ASUS... POST Reporter™ This motherboard includes the Winbond speech controller to support a special feature called the ASUS POST Reporter™. These POST messages are not defective. • Refer to ...
...BIOS setup and restore the default CPU parameters. • Check if your keyboard is a list of the problem. In case of a boot failure, you of the PCI slots, or a PCI Express AGP card into the memory sockets. • Check if the DIMMs on the motherboard. ASUS P5GD2 Deluxe 3-3 3.3 ASUS... POST Reporter™ This motherboard includes the Winbond speech controller to support a special feature called the ASUS POST Reporter™. These POST messages are not defective. • Refer to ...

P5GD2 Deluxe user's manual
Page 64
... Computer now booting from operating system Action • Check if the CPU fan is not defective. • Call ASUS technical support for details. 3-4 Chapter 3: Powering up See section 4.4.8 for assistance. See the "ASUS contact information" on after you apply power to the system. • Make sure that your CPU fan supports the... fan and make sure it turns on the inside front cover of this user guide. • No action required You can enable or disable the ASUS POST Reporter™ in the S p e e c h C o n f i g u r a t i o n option in the...
... Computer now booting from operating system Action • Check if the CPU fan is not defective. • Call ASUS technical support for details. 3-4 Chapter 3: Powering up See section 4.4.8 for assistance. See the "ASUS contact information" on after you apply power to the system. • Make sure that your CPU fan supports the... fan and make sure it turns on the inside front cover of this user guide. • No action required You can enable or disable the ASUS POST Reporter™ in the S p e e c h C o n f i g u r a t i o n option in the...

P5GD2 Deluxe user's manual
Page 69
Detailed descriptions of the BIOS parameters are also provided. 4 BIOS setup This chapter tells how to change the system settings through the BIOS Setup menus.
Detailed descriptions of the BIOS parameters are also provided. 4 BIOS setup This chapter tells how to change the system settings through the BIOS Setup menus.

P5GD2 Deluxe user's manual
Page 70
Chapter summary 4.1 Managing and updating your BIOS 4-1 4.2 BIOS setup program 4-10 4.3 Main menu 4-13 4.4 Advanced menu 4-18 4.5 Power menu 4-30 4.6 Boot menu 4-35 4.7 Exit menu 4-39 ASUS P5GD2 Deluxe
Chapter summary 4.1 Managing and updating your BIOS 4-1 4.2 BIOS setup program 4-10 4.3 Main menu 4-13 4.4 Advanced menu 4-18 4.5 Power menu 4-30 4.6 Boot menu 4-35 4.7 Exit menu 4-39 ASUS P5GD2 Deluxe


