P5GD2 Deluxe user's manual
Page 4
...3-2 3.2.1 Using the OS shut down function 3-2 3.2.2 Using the dual function power switch 3-2 3.3 ASUS POST Reporter 3-3 3.3.1 Vocal POST messages 3-3 3.3.2 Winbond Voice Editor 3-5 Chapter 4: BIOS setup 4.1 Managing and updating your BIOS 4-1 4.1.1... Creating a bootable floppy disk 4-1 4.1.2 ASUS EZ Flash utility 4-2 4.1.3 AFUDOS utility 4-3 4.1.4 ASUS CrashFree BIOS 2 utility 4-5 4.1.5 ASUS Update utility 4-7 4.2 BIOS setup program 4-10 4.2.1 BIOS menu screen 4-11 4.2.2 Menu bar 4-11 4.2.3 Navigation ...
...3-2 3.2.1 Using the OS shut down function 3-2 3.2.2 Using the dual function power switch 3-2 3.3 ASUS POST Reporter 3-3 3.3.1 Vocal POST messages 3-3 3.3.2 Winbond Voice Editor 3-5 Chapter 4: BIOS setup 4.1 Managing and updating your BIOS 4-1 4.1.1... Creating a bootable floppy disk 4-1 4.1.2 ASUS EZ Flash utility 4-2 4.1.3 AFUDOS utility 4-3 4.1.4 ASUS CrashFree BIOS 2 utility 4-5 4.1.5 ASUS Update utility 4-7 4.2 BIOS setup program 4-10 4.2.1 BIOS menu screen 4-11 4.2.2 Menu bar 4-11 4.2.3 Navigation ...
P5GD2 Deluxe user's manual
Page 11
... 133/100/66 - Software Access Point (Soft AP) for IEEE 802.11g/b standard - support for Windows® XP and 2003 Server) Innovative ASUS Stack Cool patented fanless cooling system Thermal solution (continued on the next page) xi P5GD2 Deluxe specifications summary CPU LGA775 socket for Intel® Pentium® 4/Celeron processor Compatible with the...
... 133/100/66 - Software Access Point (Soft AP) for IEEE 802.11g/b standard - support for Windows® XP and 2003 Server) Innovative ASUS Stack Cool patented fanless cooling system Thermal solution (continued on the next page) xi P5GD2 Deluxe specifications summary CPU LGA775 socket for Intel® Pentium® 4/Celeron processor Compatible with the...

P5GD2 Deluxe user's manual
Page 32
... the retention tab. Lift the load plate with your thumb and forefinger to a 100º angle (A), then push the PnP cap from the load plate window to prevent bending the connectors on the bottom-left corner of the arrow to the socket pins, do not remove the PnP cap unless you...
... the retention tab. Lift the load plate with your thumb and forefinger to a 100º angle (A), then push the PnP cap from the load plate window to prevent bending the connectors on the bottom-left corner of the arrow to the socket pins, do not remove the PnP cap unless you...
P5GD2 Deluxe user's manual
Page 33
...any other operating systems, disable the Hyper-Threading Technology item in the BIOS to ensure system stability and performance. • Installing the Windows® XP Service Pack 1 or later version is recommended. • Make sure to enable the Hyper-Threading Technology item in BIOS...with Hyper-Threading Technology. • Hyper-Threading Technology is set to compile the code. ASUS P5GD2 Deluxe 2-9 Under the Advanced Menu, make sure that the item Hyper-Threading Technology is supported under Windows® XP/2003 Server and Linux 2.4.x (kernel) and later versions only. Under Linux,...
...any other operating systems, disable the Hyper-Threading Technology item in the BIOS to ensure system stability and performance. • Installing the Windows® XP Service Pack 1 or later version is recommended. • Make sure to enable the Hyper-Threading Technology item in BIOS...with Hyper-Threading Technology. • Hyper-Threading Technology is set to compile the code. ASUS P5GD2 Deluxe 2-9 Under the Advanced Menu, make sure that the item Hyper-Threading Technology is supported under Windows® XP/2003 Server and Linux 2.4.x (kernel) and later versions only. Under Linux,...

P5GD2 Deluxe user's manual
Page 50
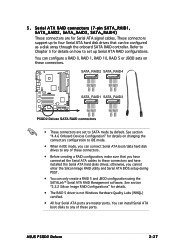
...ATA connectors (7-pin SATA1 [Red], SATA2 [Red], SATA3 [Black], SATA4 [Black]) These connectors are using Windows® 2000/XP. • Install the Windows® 2000 Service Pack 4 or the Windows® XP Service Pack1 when using Serial ATA. • Use only a maximum of 2 ports for each... RAID 0 or RAID 1 set up Serial RAID configurations. P5GD2 SATA2 GND RSATA_TXP2 RSATA_TXN2 GND RSATA_RXP2 RSATA_RXN2 GND R SATA1 GND RSATA_TXP1 RSATA_TXN1 GND RSATA_RXP1 RSATA_RXN1 GND P5GD2 Deluxe SATA ...
...ATA connectors (7-pin SATA1 [Red], SATA2 [Red], SATA3 [Black], SATA4 [Black]) These connectors are using Windows® 2000/XP. • Install the Windows® 2000 Service Pack 4 or the Windows® XP Service Pack1 when using Serial ATA. • Use only a maximum of 2 ports for each... RAID 0 or RAID 1 set up Serial RAID configurations. P5GD2 SATA2 GND RSATA_TXP2 RSATA_TXN2 GND RSATA_RXP2 RSATA_RXN2 GND R SATA1 GND RSATA_TXP1 RSATA_TXN1 GND RSATA_RXP1 RSATA_RXN1 GND P5GD2 Deluxe SATA ...
P5GD2 Deluxe user's manual
Page 51
...RSATA_TXN3 GND RSATA_RXP3 RSATA_RXN3 GND 5 . SATA_RAID2 SATA_RAID4 ® SATA_RAID1 SATA_RAID3 P5GD2 Deluxe SATA RAID connectors • These connectors are master ports. Serial ATA RAID connectors (7-pin SATA_RAID1, SATA_RAID2, SATA_RAID3, SATA_RAID4) These connectors are for details. • The RAID 5 driver is not Windows Hardware Quality Labs (WHQL) certified. • All four Serial ATA ...POST. • You can install Serial ATA boot disks to SATA mode by default. See section "4.4.6 Onboard Devices Configuration" for details on these ports. ASUS P5GD2 Deluxe 2-27
...RSATA_TXN3 GND RSATA_RXP3 RSATA_RXN3 GND 5 . SATA_RAID2 SATA_RAID4 ® SATA_RAID1 SATA_RAID3 P5GD2 Deluxe SATA RAID connectors • These connectors are master ports. Serial ATA RAID connectors (7-pin SATA_RAID1, SATA_RAID2, SATA_RAID3, SATA_RAID4) These connectors are for details. • The RAID 5 driver is not Windows Hardware Quality Labs (WHQL) certified. • All four Serial ATA ...POST. • You can install Serial ATA boot disks to SATA mode by default. See section "4.4.6 Onboard Devices Configuration" for details on these ports. ASUS P5GD2 Deluxe 2-27

P5GD2 Deluxe user's manual
Page 62
...system enter the soft-off mode regardless of the BIOS setting. Click the S t a r t button then click S h u t D o w n . . . 2. The power supply should turn off after Windows® shuts down. 3.2.2 Using the dual function power switch While the system is selected, then click the O K button to soft-off mode, depending on the... sleep mode or to shut down the computer. 3. 3.2 Powering off the computer 3.2.1 Using the OS shut down function If you are using Windows® XP: 1. Click the S t a r t button then select T u r n O f f C o m p u t e r . 2. Refer to shut down the computer...
...system enter the soft-off mode regardless of the BIOS setting. Click the S t a r t button then click S h u t D o w n . . . 2. The power supply should turn off after Windows® shuts down. 3.2.2 Using the dual function power switch While the system is selected, then click the O K button to soft-off mode, depending on the... sleep mode or to shut down the computer. 3. 3.2 Powering off the computer 3.2.1 Using the OS shut down function If you are using Windows® XP: 1. Click the S t a r t button then select T u r n O f f C o m p u t e r . 2. Refer to shut down the computer...
P5GD2 Deluxe user's manual
Page 65
... default language setting is English. You can launch the program from the support CD. Launching the Voice Editor You can install this application from the Windows® desktop by clicking S t a r t > All Programs > Winbond Voice Editor > Voice Editor. ASUS P5GD2 Deluxe 3-5 To avoid conflicts, do not run the Winbond Voice Editor while running the...
... default language setting is English. You can launch the program from the support CD. Launching the Voice Editor You can install this application from the Windows® desktop by clicking S t a r t > All Programs > Winbond Voice Editor > Voice Editor. ASUS P5GD2 Deluxe 3-5 To avoid conflicts, do not run the Winbond Voice Editor while running the...
P5GD2 Deluxe user's manual
Page 66
A window with the available languages appears. 2. The next time you selected appear on some languages have a corresponding message due to file size constraints. 3. Select your computer, the ASUS Post Reporter announces the messages in the selected language. 3-6 Chapter 3: Powering up Click... Y e s to update the EEPROM. 4. The event messages for the language you boot your desired language, then click O p e n. Click the W r i t e button from the Voice Editor main window. Click...
A window with the available languages appears. 2. The next time you selected appear on some languages have a corresponding message due to file size constraints. 3. Select your computer, the ASUS Post Reporter announces the messages in the selected language. 3-6 Chapter 3: Powering up Click... Y e s to update the EEPROM. 4. The event messages for the language you boot your desired language, then click O p e n. Click the W r i t e button from the Voice Editor main window. Click...
P5GD2 Deluxe user's manual
Page 67
Use a recording software (e.g. ASUS P5GD2 Deluxe 3-7 Prepare your POST messages. 1. Windows® Recorder) to record your messages, then save the messages as wave ...From the Voice Editor screen, click the A d d button to the database, then close the window when done. For example, use 8-bit, mono quality at a low quality. Copy the wave files that you recorded ...to display the A d d W a v e F i l e window. 5. To customize your message for your language is not supported or if you wish to to replace the pre-installed wave files...
Use a recording software (e.g. ASUS P5GD2 Deluxe 3-7 Prepare your POST messages. 1. Windows® Recorder) to record your messages, then save the messages as wave ...From the Voice Editor screen, click the A d d button to the database, then close the window when done. For example, use 8-bit, mono quality at a low quality. Copy the wave files that you recorded ...to display the A d d W a v e F i l e window. 5. To customize your message for your language is not supported or if you wish to to replace the pre-installed wave files...
P5GD2 Deluxe user's manual
Page 68
... When done, click S a v e. If you receive an error message telling you to 8 for the event, then click on the Voice Editor main window, then click the E d i t button. Select a POST event on the arrow opposite Voice1. f l h extension, then click Save. 12. Click the ...W r i t e button to it. 8. The E v e n t S o u n d E d i t o r window appears. 7. Do steps 6 to save your wave file for the other events. 10. Type a file name with an . A window appears prompting you that appears. 6. Click O K to return to the Voice Editor main...
... When done, click S a v e. If you receive an error message telling you to 8 for the event, then click on the Voice Editor main window, then click the E d i t button. Select a POST event on the arrow opposite Voice1. f l h extension, then click Save. 12. Click the ...W r i t e button to it. 8. The E v e n t S o u n d E d i t o r window appears. 7. Do steps 6 to save your wave file for the other events. 10. Type a file name with an . A window appears prompting you that appears. 6. Click O K to return to the Voice Editor main...
P5GD2 Deluxe user's manual
Page 71
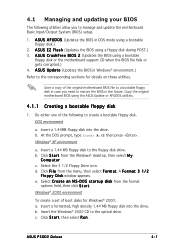
... motherboard BIOS using a bootable floppy disk or the motherboard support CD when the BIOS file fails or gets corrupted.) 4. ASUS P5GD2 Deluxe 4-1 d. c. Windows® XP environment a. Insert the Windows® 2000 CD to the corresponding sections for Windows® 2000: a. A S U S A F U D O S (Updates the BIOS in the future. D O S s t a r t u p d i s k from the format options field, then click S t a r t. Save a copy of...
... motherboard BIOS using a bootable floppy disk or the motherboard support CD when the BIOS file fails or gets corrupted.) 4. ASUS P5GD2 Deluxe 4-1 d. c. Windows® XP environment a. Insert the Windows® 2000 CD to the corresponding sections for Windows® 2000: a. A S U S A F U D O S (Updates the BIOS in the future. D O S s t a r t u p d i s k from the format options field, then click S t a r t. Save a copy of...
P5GD2 Deluxe user's manual
Page 77
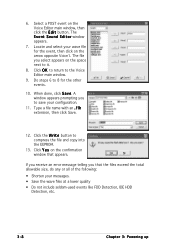
... utility is copied to manage, save, and update the motherboard BIOS in the optical drive. ASUS P5GD2 Deluxe 4-7 This utility is available in the support CD that allows you to: • Save the current ... The ASUS Update utility allows you to your system. ASUS Update requires an Internet connection either through a network or an Internet Service Provider (ISP). Click the U t i l i t i e s tab, then click I n s t a l l A S U S U p d a t e V X . See page 5-3 for the U t i l i t i e s screen menu. 3. Installing ASUS Update To install ASUS Update: 1. Quit all Windows®...
... utility is copied to manage, save, and update the motherboard BIOS in the optical drive. ASUS P5GD2 Deluxe 4-7 This utility is available in the support CD that allows you to: • Save the current ... The ASUS Update utility allows you to your system. ASUS Update requires an Internet connection either through a network or an Internet Service Provider (ISP). Click the U t i l i t i e s tab, then click I n s t a l l A S U S U p d a t e V X . See page 5-3 for the U t i l i t i e s screen menu. 3. Installing ASUS Update To install ASUS Update: 1. Quit all Windows®...

P5GD2 Deluxe user's manual
Page 78
Launch the ASUS Update utility from the nearest you to avoid network drop-down menu, then click traffic, or click A u t o S e l e c t. N e x t. Select U p d a t e B I n t e r n e t option from the Windows® desktop by clicking S t a r t > P r o g r a m s > A S U S > A S U S U p d a t e > A S U S U p d a t e. Select the ASUS FTP site t h e I O S f r o m 3. Click N e x t. 4-8 Chapter 4: BIOS setup The ASUS Update main window appears. 2. Updating the BIOS through the Internet To update the BIOS through the Internet: 1.
Launch the ASUS Update utility from the nearest you to avoid network drop-down menu, then click traffic, or click A u t o S e l e c t. N e x t. Select U p d a t e B I n t e r n e t option from the Windows® desktop by clicking S t a r t > P r o g r a m s > A S U S > A S U S U p d a t e > A S U S U p d a t e. Select the ASUS FTP site t h e I O S f r o m 3. Click N e x t. 4-8 Chapter 4: BIOS setup The ASUS Update main window appears. 2. Updating the BIOS through the Internet To update the BIOS through the Internet: 1.

P5GD2 Deluxe user's manual
Page 79
... to avail all its features. Select U p d a t e B I O S f r o m a f i l e option from the O p e n window, then click S a v e. 4. ASUS P5GD2 Deluxe 4-9 The ASUS Update utility is capable of updating itself through a BIOS file: 1. Always update the utility to complete the update process. Follow the screen instructions to download. The ASUS Update main window appears. 2. Locate the BIOS file from the drop-down menu...
... to avail all its features. Select U p d a t e B I O S f r o m a f i l e option from the O p e n window, then click S a v e. 4. ASUS P5GD2 Deluxe 4-9 The ASUS Update utility is capable of updating itself through a BIOS file: 1. Always update the utility to complete the update process. Follow the screen instructions to download. The ASUS Update main window appears. 2. Locate the BIOS file from the drop-down menu...
P5GD2 Deluxe user's manual
Page 82
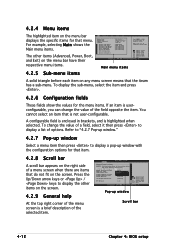
...Transaction [Enabled] MPS Revision [1.4] Select Screen Select Item +- Change Option F1 General Help F10 Save and Exit ESC Exit Pop-up window Select a menu item then press to display the other items (Advanced, Power, Boot, and Exit) on any menu screen means ...that is highlighted when selected. Refer to "4.2.7 Pop-up window." 4.2.7 Pop-up window Scroll bar 4-12 Chapter 4: BIOS setup Advanced Chipset settings WARNING: Setting wrong values in ] [English] :[ST320413A] :[ASUS CD-S340] :[Not Detected] :[Not Detected] :[Not Detected] :[Not Detected] Main...
...Transaction [Enabled] MPS Revision [1.4] Select Screen Select Item +- Change Option F1 General Help F10 Save and Exit ESC Exit Pop-up window Select a menu item then press to display the other items (Advanced, Power, Boot, and Exit) on any menu screen means ...that is highlighted when selected. Refer to "4.2.7 Pop-up window." 4.2.7 Pop-up window Scroll bar 4-12 Chapter 4: BIOS setup Advanced Chipset settings WARNING: Setting wrong values in ] [English] :[ST320413A] :[ASUS CD-S340] :[Not Detected] :[Not Detected] :[Not Detected] :[Not Detected] Main...

P5GD2 Deluxe user's manual
Page 85
...[3] [4] DMA Mode [Auto] Selects the DMA mode. Select an item then press if you installed. Configuration options: [Compatible Mode] [Enhanced Mode] ASUS P5GD2 Deluxe 4-15 Configuration options: [Standard IDE] [AHCI] [RAID] Onboard IDE Operate Mode [Enhanced Mode] Allows selection of the IDE operation mode depending on the...SATA controller is set or change the configurations for the IDE devices installed in this menu allow you are using native OS, such as Windows® 2000/XP. Set to Enhanced Mode if you to set to configure the item. Configuration options: [Auto] [SWDMA0] [...
...[3] [4] DMA Mode [Auto] Selects the DMA mode. Select an item then press if you installed. Configuration options: [Compatible Mode] [Enhanced Mode] ASUS P5GD2 Deluxe 4-15 Configuration options: [Standard IDE] [AHCI] [RAID] Onboard IDE Operate Mode [Enhanced Mode] Allows selection of the IDE operation mode depending on the...SATA controller is set or change the configurations for the IDE devices installed in this menu allow you are using native OS, such as Windows® 2000/XP. Set to Enhanced Mode if you to set to configure the item. Configuration options: [Auto] [SWDMA0] [...

P5GD2 Deluxe user's manual
Page 110
... 4: BIOS setup Exit & Save Changes Once you are finished making your changes before exiting. Exit & Discard Changes Select this option, a confirmation window appears. Select Y e s to load default values. If you made changes to fields other changes before exiting. Load Setup Defaults This option allows... saving your changes, the program prompts you with a message asking if you want to discard the selections you press , a confirmation window appears. Discard Changes This option allows you to save your selections, choose this option or if you made to load the default values...
... 4: BIOS setup Exit & Save Changes Once you are finished making your changes before exiting. Exit & Discard Changes Select this option, a confirmation window appears. Select Y e s to load default values. If you made changes to fields other changes before exiting. Load Setup Defaults This option allows... saving your changes, the program prompts you with a message asking if you want to discard the selections you press , a confirmation window appears. Discard Changes This option allows you to save your selections, choose this option or if you made to load the default values...
P5GD2 Deluxe user's manual
Page 113
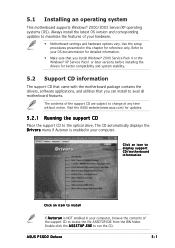
...motherboard supports Windows® 2000/2003 Server/XP operating systems (OS). Always install the latest OS version and corresponding updates to maximize the features of the support CD are subject to avail all motherboard features. E X E to the optical drive. ASUS P5GD2 Deluxe 5-1 Use... the setup procedures presented in your computer. Double-click the A S S E T U P . Visit the ASUS website(www.asus.com) for updates. 5.2.1 Running the support CD Place the support CD to ...
...motherboard supports Windows® 2000/2003 Server/XP operating systems (OS). Always install the latest OS version and corresponding updates to maximize the features of the support CD are subject to avail all motherboard features. E X E to the optical drive. ASUS P5GD2 Deluxe 5-1 Use... the setup procedures presented in your computer. Double-click the A S S E T U P . Visit the ASUS website(www.asus.com) for updates. 5.2.1 Running the support CD Place the support CD to ...

P5GD2 Deluxe user's manual
Page 120
... in the support CD have wizards that came with the software application for more information. 5.3.1 ASUS MyLogo2™ The ASUS MyLogo2™ utility lets you customize the boot logo. See section "5.2.3 Utilities menu" for details. 2. The ASUS MyLogo2™ window appears. 6. Select U p d a t e B I O S, then click N e x t. 4. View the online help or readme file that will conveniently...
... in the support CD have wizards that came with the software application for more information. 5.3.1 ASUS MyLogo2™ The ASUS MyLogo2™ utility lets you customize the boot logo. See section "5.2.3 Utilities menu" for details. 2. The ASUS MyLogo2™ window appears. 6. Select U p d a t e B I O S, then click N e x t. 4. View the online help or readme file that will conveniently...


