
User Manual
Page 11
... motherboard also supports Intel® CPUs in the long line of the above items is damaged or missing, contact your motherboard package for buying an ASUS® P5G41T-M motherboard! Thank you start installing the motherboard, and hardware devices on it another standout in the 45nm manufacturing process. Before you for the following...
... motherboard also supports Intel® CPUs in the long line of the above items is damaged or missing, contact your motherboard package for buying an ASUS® P5G41T-M motherboard! Thank you start installing the motherboard, and hardware devices on it another standout in the 45nm manufacturing process. Before you for the following...

User Manual
Page 13
... BIOS 3 is an auto-recovery tool that allows you to their default settings. C.P.R. ASUS P5G41T-M 1-3 C.P.R. (CPU Parameter Recall) The BIOS C.P.R. Simply shut down and reboot the system, and the BIOS automatically restores the CPU parameters to restore a corrupted BIOS...USB drives only. When installing it on USB HDDs or flash drives, connect the drives to 100 meters at least 1.2GB free disk space. ASUS EZ Flash 2 ASUS EZ Flash 2 is in line with the European Union's Restriction on the environment. eliminates the need to safeguard consumers' health while minimizing the...
... BIOS 3 is an auto-recovery tool that allows you to their default settings. C.P.R. ASUS P5G41T-M 1-3 C.P.R. (CPU Parameter Recall) The BIOS C.P.R. Simply shut down and reboot the system, and the BIOS automatically restores the CPU parameters to restore a corrupted BIOS...USB drives only. When installing it on USB HDDs or flash drives, connect the drives to 100 meters at least 1.2GB free disk space. ASUS EZ Flash 2 ASUS EZ Flash 2 is in line with the European Union's Restriction on the environment. eliminates the need to safeguard consumers' health while minimizing the...

User Manual
Page 15
... install the motherboard, study the configuration of your chassis to the chassis. The edge with external ports goes to the rear part of the chassis ASUS P5G41T-M 1-5 Doing so can cause you physical injury and damage motherboard components. 1.5.1 Placement direction When installing the motherboard, ensure that the motherboard fits into it into...
... install the motherboard, study the configuration of your chassis to the chassis. The edge with external ports goes to the rear part of the chassis ASUS P5G41T-M 1-5 Doing so can cause you physical injury and damage motherboard components. 1.5.1 Placement direction When installing the motherboard, ensure that the motherboard fits into it into...

User Manual
Page 17
...installing the motherboard. Before installing the CPU, ensure that the PnP cap is on the socket and the socket contacts are not bent. ASUS P5G41T-M 1-7 The motherboard supports Intel® LGA775 processors with the cap on the motherboard. 1.6 Central Processing Unit (CPU) The motherboard ...see any damage to the socket contacts resulting from incorrect CPU installation/removal, or misplacement/loss/incorrect removal of the PnP cap. ASUS will process Return Merchandise Authorization (RMA) requests only if the motherboard comes with the Intel® Enhanced Intel SpeedStep® ...
...installing the motherboard. Before installing the CPU, ensure that the PnP cap is on the socket and the socket contacts are not bent. ASUS P5G41T-M 1-7 The motherboard supports Intel® LGA775 processors with the cap on the motherboard. 1.6 Central Processing Unit (CPU) The motherboard ...see any damage to the socket contacts resulting from incorrect CPU installation/removal, or misplacement/loss/incorrect removal of the PnP cap. ASUS will process Return Merchandise Authorization (RMA) requests only if the motherboard comes with the Intel® Enhanced Intel SpeedStep® ...

User Manual
Page 19
.... If it gets into your eyes or touches your finger directly. 7. Some heatsinks come with your skin, ensure that it snaps into the A retention tab. B ASUS P5G41T-M 1-9
.... If it gets into your eyes or touches your finger directly. 7. Some heatsinks come with your skin, ensure that it snaps into the A retention tab. B ASUS P5G41T-M 1-9

User Manual
Page 21
Rotate each fastener counterclockwise. 3. A A B B B A B A ASUS P5G41T-M 1-11 3. Pull up two fasteners at a time in a diagonal sequence to the connector on the motherboard. 2. Do not forget to plug this connector. 1.6.3 Uninstalling the CPU heatsink and fan To uninstall the CPU heatsink and fan: 1. Connect the CPU fan cable to disengage the heatsink and fan assembly from the connector on the motherboard labeled CPU_FAN. Disconnect the CPU fan cable from the motherboard. Hardware monitoring errors can occur if you fail to connect the CPU fan connector!
Rotate each fastener counterclockwise. 3. A A B B B A B A ASUS P5G41T-M 1-11 3. Pull up two fasteners at a time in a diagonal sequence to the connector on the motherboard. 2. Do not forget to plug this connector. 1.6.3 Uninstalling the CPU heatsink and fan To uninstall the CPU heatsink and fan: 1. Connect the CPU fan cable to disengage the heatsink and fan assembly from the connector on the motherboard labeled CPU_FAN. Disconnect the CPU fan cable from the motherboard. Hardware monitoring errors can occur if you fail to connect the CPU fan connector!
User Manual
Page 23
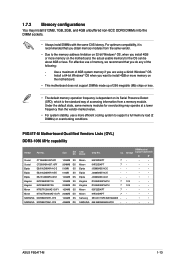
... 32-bit Windows® OS. - Under the default state, some memory modules for the OS can be about 3GB or less. P5G41T-M Motherboard Qualified Vendors Lists (QVL) DDR3-1066 MHz capability Vendor Part No. DIMM socket CL Voltage support (Optional) A* B* Micron 9GF22D9KPT...8226; Micron 9HF22D9KPT 7- • • Samsung SEC 901 HCF8 K4B1G0846E - - • • SAMSUNG 846 K4B2G0846B-HCF8 -- • • ASUS P5G41T-M 1-13 For effective use a more memory on 32-bit Windows® OS, when you do any of the following: - Size SS/ DS Crucial CT12864BA1067...
... 32-bit Windows® OS. - Under the default state, some memory modules for the OS can be about 3GB or less. P5G41T-M Motherboard Qualified Vendors Lists (QVL) DDR3-1066 MHz capability Vendor Part No. DIMM socket CL Voltage support (Optional) A* B* Micron 9GF22D9KPT...8226; Micron 9HF22D9KPT 7- • • Samsung SEC 901 HCF8 K4B1G0846E - - • • SAMSUNG 846 K4B2G0846B-HCF8 -- • • ASUS P5G41T-M 1-13 For effective use a more memory on 32-bit Windows® OS, when you do any of the following: - Size SS/ DS Crucial CT12864BA1067...

User Manual
Page 25
... back in only one direction. Simultaneously press the retaining clips outward to unlock a DDR3 DIMM socket. 2. Remove the DIMM from the socket. 2 1 DDR3 DIMM notch ASUS P5G41T-M 1-15 Align a DIMM on the socket such that the notch on the DIMM matches the break on the socket. 1 2 DDR3 DIMM notch 1 Unlocked retaining clip...
... back in only one direction. Simultaneously press the retaining clips outward to unlock a DDR3 DIMM socket. 2. Remove the DIMM from the socket. 2 1 DDR3 DIMM notch ASUS P5G41T-M 1-15 Align a DIMM on the socket such that the notch on the DIMM matches the break on the socket. 1 2 DDR3 DIMM notch 1 Unlocked retaining clip...

User Manual
Page 27
... in CMOS, which include system setup information such as system passwords. To erase the RTC RAM: 1. Plug the power cord and turn ON the computer. 4. ASUS P5G41T-M 1-17 1.9 Jumpers 1. Turn OFF the computer and unplug the power cord. 2. Except when clearing the RTC RAM, never remove the cap on pins 2-3 for about...
... in CMOS, which include system setup information such as system passwords. To erase the RTC RAM: 1. Plug the power cord and turn ON the computer. 4. ASUS P5G41T-M 1-17 1.9 Jumpers 1. Turn OFF the computer and unplug the power cord. 2. Except when clearing the RTC RAM, never remove the cap on pins 2-3 for about...

User Manual
Page 29
... or legacy AC`97 audio standard. This port connects to [AC97]. USB 2.0 ports 1 and 2. This port is for a VGA monitor or other protected content. 11. ASUS P5G41T-M 1-19 See section 2.4.3 Chipset for connecting USB 2.0 devices. 9. Optical S/PDIF_OUT port. These two 4-pin Universal Serial Bus (USB) ports are available for a PS/2 keyboard. 1.10...
... or legacy AC`97 audio standard. This port connects to [AC97]. USB 2.0 ports 1 and 2. This port is for a VGA monitor or other protected content. 11. ASUS P5G41T-M 1-19 See section 2.4.3 Chipset for connecting USB 2.0 devices. 9. Optical S/PDIF_OUT port. These two 4-pin Universal Serial Bus (USB) ports are available for a PS/2 keyboard. 1.10...

User Manual
Page 31
This PSU type has 24-pin and 4-pin power plugs. • If you are uncertain about the minimum power supply requirement for details. ASUS P5G41T-M 1-21 The system may become unstable or may not boot up if the power is inadequate. • DO NOT forget to use an ATX 12V ... 2.0‑compliant power supply unit (PSU) with 20-pin and 4-pin power plugs, ensure that the 20-pin power plug can provide at http://support.asus. Otherwise, the system will not boot up. • We recommend that you use a PSU with higher power output when configuring a system with more power-consuming...
This PSU type has 24-pin and 4-pin power plugs. • If you are uncertain about the minimum power supply requirement for details. ASUS P5G41T-M 1-21 The system may become unstable or may not boot up if the power is inadequate. • DO NOT forget to use an ATX 12V ... 2.0‑compliant power supply unit (PSU) with 20-pin and 4-pin power plugs, ensure that the 20-pin power plug can provide at http://support.asus. Otherwise, the system will not boot up. • We recommend that you use a PSU with higher power output when configuring a system with more power-consuming...

User Manual
Page 33
...; Pin 20 on the IDE connector is removed to configure your device. If any device jumper is for Ultra DMA 100/66/33 IDE devices. ASUS P5G41T-M 1-23 Single device Two devices Drive jumper setting Cable-Select or Master Cable-Select Master Slave Mode of the following modes to match the covered...
...; Pin 20 on the IDE connector is removed to configure your device. If any device jumper is for Ultra DMA 100/66/33 IDE devices. ASUS P5G41T-M 1-23 Single device Two devices Drive jumper setting Cable-Select or Master Cable-Select Master Slave Mode of the following modes to match the covered...

User Manual
Page 35
... connection speed. Connect the serial port module cable to the connector, then install the module to a slot opening at the back of the system chassis. ASUS P5G41T-M 1-25 Doing so will damage the motherboard! USB connectors (10-1 pin USB56, USB78) These connectors are for a serial (COM) port. Connect the USB module cable...
... connection speed. Connect the serial port module cable to the connector, then install the module to a slot opening at the back of the system chassis. ASUS P5G41T-M 1-25 Doing so will damage the motherboard! USB connectors (10-1 pin USB56, USB78) These connectors are for a serial (COM) port. Connect the USB module cable...

User Manual
Page 37
...b. From the FTP site, select the BIOS version that you to download then click Next. ASUS P5G41T-M 2-1 Place the support DVD in the future. Select Update BIOS from the Internet a. Select the ASUS FTP site nearest you wish to avoid network traffic, or click Auto Select then click Next.... from the Internet, then click Next. Copy the original motherboard BIOS using this utility. Click the Utilities tab, then click ASUS Update. 3. Installing ASUS Update To install ASUS Update: 1. From the dropdown list, select any of the original motherboard BIOS file to a USB flash disk in case ...
...b. From the FTP site, select the BIOS version that you to download then click Next. ASUS P5G41T-M 2-1 Place the support DVD in the future. Select Update BIOS from the Internet a. Select the ASUS FTP site nearest you wish to avoid network traffic, or click Auto Select then click Next.... from the Internet, then click Next. Copy the original motherboard BIOS using this utility. Click the Utilities tab, then click ASUS Update. 3. Installing ASUS Update To install ASUS Update: 1. From the dropdown list, select any of the original motherboard BIOS file to a USB flash disk in case ...

User Manual
Page 39
... the BIOS file in the removable device into P5G41TM.ROM. • The BIOS file in the support DVD may not be the latest version. ASUS P5G41T-M 2-3 For motherboards without the floppy connector, prepare a USB flash disk before using this utility. DO NOT shut down or reset the system while... updating the BIOS! Select the Load Setup Defaults item under the Exit menu. 2.1.3 ASUS CrashFree BIOS The ASUS CrashFree BIOS is an auto recovery tool that allows you to the floppy disk drive, if supported. 3. Turn on again. Insert the...
... the BIOS file in the removable device into P5G41TM.ROM. • The BIOS file in the support DVD may not be the latest version. ASUS P5G41T-M 2-3 For motherboards without the floppy connector, prepare a USB flash disk before using this utility. DO NOT shut down or reset the system while... updating the BIOS! Select the Load Setup Defaults item under the Exit menu. 2.1.3 ASUS CrashFree BIOS The ASUS CrashFree BIOS is an auto recovery tool that allows you to the floppy disk drive, if supported. 3. Turn on again. Insert the...

User Manual
Page 41
... the exit options and loading default settings. Submenu items Navigation keys 2.2.2 Menu bar The menu bar on the keyboard until the desired item is highlighted. ASUS P5G41T-M 2-5 Power For changing the advanced power management (APM) configuration. Advanced For changing the advanced system settings.
... the exit options and loading default settings. Submenu items Navigation keys 2.2.2 Menu bar The menu bar on the keyboard until the desired item is highlighted. ASUS P5G41T-M 2-5 Power For changing the advanced power management (APM) configuration. Advanced For changing the advanced system settings.

User Manual
Page 43
... to set the system date. 2.3.3 Primary IDE Master/Slave, SATA1~4 While entering Setup, the BIOS automatically detects the presence of the appropriate IDE device type. ASUS P5G41T-M 2-7 The BIOS automatically detects the values opposite the dimmed items (Device, Vendor, Size, LBA Mode, Block Mode, PIO Mode, Async DMA, Ultra DMA, and SMART...
... to set the system date. 2.3.3 Primary IDE Master/Slave, SATA1~4 While entering Setup, the BIOS automatically detects the presence of the appropriate IDE device type. ASUS P5G41T-M 2-7 The BIOS automatically detects the values opposite the dimmed items (Device, Vendor, Size, LBA Mode, Block Mode, PIO Mode, Async DMA, Ultra DMA, and SMART...

User Manual
Page 45
... Configuration USB Configuration PCIPnP Adjust System frequency/voltage. 2.4.1 JumperFree Configuration The items in this menu allows you to adjust the system frequency/voltage. Overclock Profile - ASUS P5G41T-M 2-9 Ai Overclocking [Auto] Allows selection of the Advanced menu items. Incorrect field values can cause the system to achieve desired CPU internal frequency. Auto - Take...
... Configuration USB Configuration PCIPnP Adjust System frequency/voltage. 2.4.1 JumperFree Configuration The items in this menu allows you to adjust the system frequency/voltage. Overclock Profile - ASUS P5G41T-M 2-9 Ai Overclocking [Auto] Allows selection of the Advanced menu items. Incorrect field values can cause the system to achieve desired CPU internal frequency. Auto - Take...
User Manual
Page 47
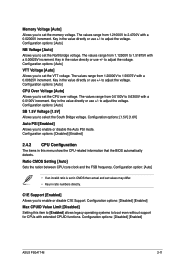
... CMOS Setting [Auto] Sets the ration between CPU core clock and the FSB frequency. Key in the value directly or use +/- Configuration options: [Disabled] [Enabled] ASUS P5G41T-M 2-11 Key in the value directly or use +/- Configuration option: [Auto] • If an invalid ratio is set in CMOS then actual and set values...
... CMOS Setting [Auto] Sets the ration between CPU core clock and the FSB frequency. Key in the value directly or use +/- Configuration options: [Disabled] [Enabled] ASUS P5G41T-M 2-11 Key in the value directly or use +/- Configuration option: [Auto] • If an invalid ratio is set in CMOS then actual and set values...

User Manual
Page 49
.... configurable. Configuration options: [Enabled] [Disabled] Onboard LAN Boot ROM [Disabled] Allows you to enable or disable the onboard Gigabit LAN controller. Configuration options: [IRQ5] [IRQ7] ASUS P5G41T-M 2-13 Configuration options: [Disabled] [378] [278] [3BC] Parallel Port Mode [ECP] Allows you to set the audio controller. This item allows you to select the...
.... configurable. Configuration options: [Enabled] [Disabled] Onboard LAN Boot ROM [Disabled] Allows you to enable or disable the onboard Gigabit LAN controller. Configuration options: [IRQ5] [IRQ7] ASUS P5G41T-M 2-13 Configuration options: [Disabled] [378] [278] [3BC] Parallel Port Mode [ECP] Allows you to set the audio controller. This item allows you to select the...


