
User Manual
Page 1
P5E3 PRO Motherboard
P5E3 PRO Motherboard

User Manual
Page 3
Contents Notices...vi Safety information vii About this guide viii P5E3 PRO specifications summary ix Chapter 1 Product introduction 1.1 Welcome 1-1 1.2 Package contents 1-1 1.3 Special features 1-1 1.3.1 Product highlights 1-1 1.3.2 Innovative ASUS features 1-3 1.4 Before you proceed 1-6 1.5 Motherboard overview 1-7 1.5.1 Placement direction 1-7 1.5.2 Screw holes 1-7 1.5.3 Motherboard layout 1-8 1.5.4 Layout contents 1-8 1.6 Central Processing Unit (CPU 1-9 1.6.1 Installing the CPU 1-9 1.6.2 Installing the CPU heatsink and fan 1-12 1.6.3 Uninstalling...
Contents Notices...vi Safety information vii About this guide viii P5E3 PRO specifications summary ix Chapter 1 Product introduction 1.1 Welcome 1-1 1.2 Package contents 1-1 1.3 Special features 1-1 1.3.1 Product highlights 1-1 1.3.2 Innovative ASUS features 1-3 1.4 Before you proceed 1-6 1.5 Motherboard overview 1-7 1.5.1 Placement direction 1-7 1.5.2 Screw holes 1-7 1.5.3 Motherboard layout 1-8 1.5.4 Layout contents 1-8 1.6 Central Processing Unit (CPU 1-9 1.6.1 Installing the CPU 1-9 1.6.2 Installing the CPU heatsink and fan 1-12 1.6.3 Uninstalling...

User Manual
Page 6
... interference to radio communications. This symbol of electronic products. These limits are designed to operate this equipment. DO NOT throw the motherboard in municipal waste. Operation is encouraged to try to correct the interference by one or more of the following two conditions: •... to enable proper reuse of the crossed out wheeled bin indicates that interference will not occur in our products at ASUS REACH website at http://green.asus.com/english/REACH.htm. Notices Federal Communications Commission Statement This device complies with the limits for a Class B digital...
... interference to radio communications. This symbol of electronic products. These limits are designed to operate this equipment. DO NOT throw the motherboard in municipal waste. Operation is encouraged to try to correct the interference by one or more of the following two conditions: •... to enable proper reuse of the crossed out wheeled bin indicates that interference will not occur in our products at ASUS REACH website at http://green.asus.com/english/REACH.htm. Notices Federal Communications Commission Statement This device complies with the limits for a Class B digital...

User Manual
Page 7
... not sure about the voltage of the electrical outlet you add a device. • Before connecting or removing signal cables from the motherboard, ensure that all cables are correctly connected and the power cables are unplugged. • Seek professional assistance before using an adpater or... extension cord. Operation safety • Before installing the motherboard and adding devices on a stable surface. • If you detect any area where it , carefully read all the manuals that came ...
... not sure about the voltage of the electrical outlet you add a device. • Before connecting or removing signal cables from the motherboard, ensure that all cables are correctly connected and the power cables are unplugged. • Seek professional assistance before using an adpater or... extension cord. Operation safety • Before installing the motherboard and adding devices on a stable surface. • If you detect any area where it , carefully read all the manuals that came ...

User Manual
Page 8
... Setup menus. Optional documentation Your product package may have been added by your dealer. These documents are not part of the motherboard and the new technology it supports. • Chapter 2: BIOS information This chapter tells how to find more keys simultaneously, ... key. ASUS websites The ASUS website provides updated information on ASUS hardware and software products. IMPORTANT: Instructions that you MUST follow to the following symbols used in the less-than and greater-than sign means that you need when installing and configuring the motherboard. Used to...
... Setup menus. Optional documentation Your product package may have been added by your dealer. These documents are not part of the motherboard and the new technology it supports. • Chapter 2: BIOS information This chapter tells how to find more keys simultaneously, ... key. ASUS websites The ASUS website provides updated information on ASUS hardware and software products. IMPORTANT: Instructions that you MUST follow to the following symbols used in the less-than and greater-than sign means that you need when installing and configuring the motherboard. Used to...

User Manual
Page 11
... the list below. 1.2 Package contents Check your motherboard package for buying an ASUS® P5E3 PRO motherboard! Before you for the following items. Motherboard Cables Accessories Application DVD Documentation ASUS P5E3 PRO motherboard 2 x Serial ATA cables 1 x Ultra DMA 133/100/66 cable 1 x I/O shield ASUS motherboard support DVD User Manual 1.3 1.3.1 If any of ASUS quality motherboards! ASUS P5E3 PRO 1-1 The motherboard delivers a host of new features and latest technologies...
... the list below. 1.2 Package contents Check your motherboard package for buying an ASUS® P5E3 PRO motherboard! Before you for the following items. Motherboard Cables Accessories Application DVD Documentation ASUS P5E3 PRO motherboard 2 x Serial ATA cables 1 x Ultra DMA 133/100/66 cable 1 x I/O shield ASUS motherboard support DVD User Manual 1.3 1.3.1 If any of ASUS quality motherboards! ASUS P5E3 PRO 1-1 The motherboard delivers a host of new features and latest technologies...

User Manual
Page 12
... the current speed and bandwidth. Serial ATA 3Gb/s technology This motherboard supports hard drives based on the headphones while playing multi-channel network games. 1-2 Chapter 1: Product introduction PCIe 2.0 This motherboard supports the latest PCIe 2.0 device for high-speed data saving ... designed to get high quality images. S/PDIF digital sound ready This motherboard provides convenient connectivity to PCIe 1.0 devices. Dual channel DDR3 1600/1333/1066/800 support This motherboard supports DDR3 memory that simultaneously sends different audio streams to your PC!...
... the current speed and bandwidth. Serial ATA 3Gb/s technology This motherboard supports hard drives based on the headphones while playing multi-channel network games. 1-2 Chapter 1: Product introduction PCIe 2.0 This motherboard supports the latest PCIe 2.0 device for high-speed data saving ... designed to get high quality images. S/PDIF digital sound ready This motherboard provides convenient connectivity to PCIe 1.0 devices. Dual channel DDR3 1600/1333/1066/800 support This motherboard supports DDR3 memory that simultaneously sends different audio streams to your PC!...

User Manual
Page 13
...motherboard is an auto-recovery tool that the groundbreaking fanless design does not have lifetime problems as a chipset fan does. The purpose of quick transient response and stability, especially beneficial when CPU requires more current immediately under heavy loading or overclocking mode. ASUS P5E3 PRO 1-3 ASUS CrashFree BIOS 3 ASUS... 18°C (32.4°F)) than other conventional power solutions. 1.3.2 Innovative ASUS features ASUS MyLogo2™ Turn your system. ASUS Q-FAN ASUS Q-FAN technology intelligently and automatically adjusts CPU/ Chassis fan speed according to ...
...motherboard is an auto-recovery tool that the groundbreaking fanless design does not have lifetime problems as a chipset fan does. The purpose of quick transient response and stability, especially beneficial when CPU requires more current immediately under heavy loading or overclocking mode. ASUS P5E3 PRO 1-3 ASUS CrashFree BIOS 3 ASUS... 18°C (32.4°F)) than other conventional power solutions. 1.3.2 Innovative ASUS features ASUS MyLogo2™ Turn your system. ASUS Q-FAN ASUS Q-FAN technology intelligently and automatically adjusts CPU/ Chassis fan speed according to ...

User Manual
Page 14
... BIOS The multi-language BIOS allows you configure your choice from SATA HDDs, ODDs, and USB drives. Profile The motherboard features the ASUS O.C. With AI Direct Link, it becomes easy to conveniently store or load multiple BIOS settings. Profile that allows users..., FSB termination Voltage, CPU PLL Voltage and the DRAM Voltage in the CMOS or a separate file, giving users freedom to http://support.asus.com for the ultimate customized overclocking configuration. 1-4 Chapter 1: Product introduction It supports file downloading to USB devices only. • The actual...
... BIOS The multi-language BIOS allows you configure your choice from SATA HDDs, ODDs, and USB drives. Profile The motherboard features the ASUS O.C. With AI Direct Link, it becomes easy to conveniently store or load multiple BIOS settings. Profile that allows users..., FSB termination Voltage, CPU PLL Voltage and the DRAM Voltage in the CMOS or a separate file, giving users freedom to http://support.asus.com for the ultimate customized overclocking configuration. 1-4 Chapter 1: Product introduction It supports file downloading to USB devices only. • The actual...

User Manual
Page 15
... in the incoming audio stream while recording. ASUS P5E3 PRO 1-5 eliminates the need to overclocking failure. feature automatically restores the CPU default settings when the system hangs due to open the system chassis and clear the RTC data. Green ASUS This motherboard and its packaging comply with the ASUS vision of Hazardous Substances (RoHS). Simply shut...
... in the incoming audio stream while recording. ASUS P5E3 PRO 1-5 eliminates the need to overclocking failure. feature automatically restores the CPU default settings when the system hangs due to open the system chassis and clear the RTC data. Green ASUS This motherboard and its packaging comply with the ASUS vision of Hazardous Substances (RoHS). Simply shut...

User Manual
Page 16
... or the power cord is a reminder that the system is ON, in sleep mode, or in any motherboard settings. • Unplug the power cord from the power supply. P5E3 PRO SB_PWR ON OFF Standy Power Powered Off P5E3 PRO Onboard LED 1-6 Chapter 1: Product introduction 1.4 Before you proceed Take note of the onboard LED. Onboard LED...
... or the power cord is a reminder that the system is ON, in sleep mode, or in any motherboard settings. • Unplug the power cord from the power supply. P5E3 PRO SB_PWR ON OFF Standy Power Powered Off P5E3 PRO Onboard LED 1-6 Chapter 1: Product introduction 1.4 Before you proceed Take note of the onboard LED. Onboard LED...

User Manual
Page 17
... you unplug the power cord before installing or removing the motherboard. Place this side towards the rear of the chassis P5E3 PRO ASUS P5E3 PRO 1-7 Failure to do so can damage the motherboard. 1.5 Motherboard overview Before you install the motherboard, study the configuration of your chassis to ensure that the motherboard fits into it into the holes indicated by circles...
... you unplug the power cord before installing or removing the motherboard. Place this side towards the rear of the chassis P5E3 PRO ASUS P5E3 PRO 1-7 Failure to do so can damage the motherboard. 1.5 Motherboard overview Before you install the motherboard, study the configuration of your chassis to ensure that the motherboard fits into it into the holes indicated by circles...

User Manual
Page 18
...27 USB1112) 1-23 12. Onboard LED Page 1-5 1-22 9. Optical drive audio connector (4-pin CD) 1-24 1-25 13. DDR3 DIMM slots 5. 1.5.3 Motherboard layout 1 2 3 24.4cm(9.6in) 2 4 KB_USB56 SPDIF_ O12 USB34 ATX12V 5 CPU_FAN Super I/O COM1 EPU DDR3 DIMM_A1 (64bit, 240-pin module) DDR3.... Front panel audio connector (10-1 pin AAFP) 1-27 1-24 1-8 Chapter 1: Product introduction Serial ATA connectors [red] (7-pin SATA1-6) P5E3 PRO 6 ® Marvell 88SE6111 Intel® ICH9R SATA1 SATA2 Lithium Cell CMOS Power 8Mb BIOS USB910 USB78 SATA3 SATA4 7 SATA6 SATA5 PWR_FAN 8...
...27 USB1112) 1-23 12. Onboard LED Page 1-5 1-22 9. Optical drive audio connector (4-pin CD) 1-24 1-25 13. DDR3 DIMM slots 5. 1.5.3 Motherboard layout 1 2 3 24.4cm(9.6in) 2 4 KB_USB56 SPDIF_ O12 USB34 ATX12V 5 CPU_FAN Super I/O COM1 EPU DDR3 DIMM_A1 (64bit, 240-pin module) DDR3.... Front panel audio connector (10-1 pin AAFP) 1-27 1-24 1-8 Chapter 1: Product introduction Serial ATA connectors [red] (7-pin SATA1-6) P5E3 PRO 6 ® Marvell 88SE6111 Intel® ICH9R SATA1 SATA2 Lithium Cell CMOS Power 8Mb BIOS USB910 USB78 SATA3 SATA4 7 SATA6 SATA5 PWR_FAN 8...
User Manual
Page 19
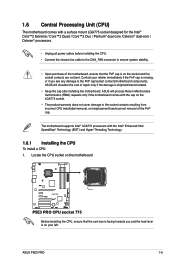
...only if the damage is shipment/transit-related. • Keep the cap after installing the motherboard. ASUS will process Return Merchandise Authorization (RMA) requests only if the motherboard comes with the Intel® Enhanced Intel SpeedStep® Technology (EIST) and Hyper-Threading Technology... to the PnP cap/socket contacts/motherboard components. Contact your left. ASUS P5E3 PRO 1-9 P5E3 PRO P5E3 PRO CPU socket 775 Before installing the CPU, ensure that the PnP cap is on the motherboard. ASUS will shoulder the cost of the motherboard, ensure that the cam box is...
...only if the damage is shipment/transit-related. • Keep the cap after installing the motherboard. ASUS will process Return Merchandise Authorization (RMA) requests only if the motherboard comes with the Intel® Enhanced Intel SpeedStep® Technology (EIST) and Hyper-Threading Technology... to the PnP cap/socket contacts/motherboard components. Contact your left. ASUS P5E3 PRO 1-9 P5E3 PRO P5E3 PRO CPU socket 775 Before installing the CPU, ensure that the PnP cap is on the motherboard. ASUS will shoulder the cost of the motherboard, ensure that the cam box is...

User Manual
Page 22
... cable is for reference only. 1-12 Chapter 1: Product introduction Orient the heatsink and fan assembly such that the four fasteners match the holes on the motherboard. The illustration above is closest to secure the heatsink and fan assembly in a push-pin design and requires no tool to install. • If you... have properly applied Thermal Interface Material to ensure optimum thermal condition and performance. • When you buy a CPU separately, ensure that you have installed the motherboard to the chassis before you install the heatsink and fan assembly.
... cable is for reference only. 1-12 Chapter 1: Product introduction Orient the heatsink and fan assembly such that the four fasteners match the holes on the motherboard. The illustration above is closest to secure the heatsink and fan assembly in a push-pin design and requires no tool to install. • If you... have properly applied Thermal Interface Material to ensure optimum thermal condition and performance. • When you buy a CPU separately, ensure that you have installed the motherboard to the chassis before you install the heatsink and fan assembly.

User Manual
Page 23
... can occur if you fail to connect the CPU fan connector! Disconnect the CPU fan cable from the motherboard. Pull up two fasteners at a time in a diagonal sequence to the connector on the motherboard. 2. A B A B B A B A ASUS P5E3 PRO 1-13 Connect the CPU fan cable to disengage the heatsink and fan assembly from the connector on the...
... can occur if you fail to connect the CPU fan connector! Disconnect the CPU fan cable from the motherboard. Pull up two fasteners at a time in a diagonal sequence to the connector on the motherboard. 2. A B A B B A B A ASUS P5E3 PRO 1-13 Connect the CPU fan cable to disengage the heatsink and fan assembly from the connector on the...

User Manual
Page 24
The figure illustrates the location of the DDR3 DIMM sockets: DIMM_A1 DIMM_A2 DIMM_B1 DIMM_B2 Channel Channel A Channel B Sockets DIMM_A1 and DIMM_A2 DIMM_B1 and DIMM_B2 P5E3 PRO P5E3 PRO 240-pin DDR3 DIMM sockets 1-14 Chapter 1: Product introduction Rotate each fastener clockwise to ensure correct orientation when reinstalling. 1.7 System memory 1.7.1 Overview The motherboard comes with four Double Data Rate 3 (DDR3) Dual Inline Memory Modules (DIMM) sockets. Carefully remove the heatsink and fan assembly from the motherboard. 5. 4.
The figure illustrates the location of the DDR3 DIMM sockets: DIMM_A1 DIMM_A2 DIMM_B1 DIMM_B2 Channel Channel A Channel B Sockets DIMM_A1 and DIMM_A2 DIMM_B1 and DIMM_B2 P5E3 PRO P5E3 PRO 240-pin DDR3 DIMM sockets 1-14 Chapter 1: Product introduction Rotate each fastener clockwise to ensure correct orientation when reinstalling. 1.7 System memory 1.7.1 Overview The motherboard comes with four Double Data Rate 3 (DDR3) Dual Inline Memory Modules (DIMM) sockets. Carefully remove the heatsink and fan assembly from the motherboard. 5. 4.
User Manual
Page 25
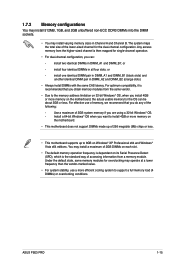
...in DIMM_A2 and DIMM_B2 (orange slots). • Always install DIMMs with the same CAS latency. install two identical DIMMs in all four slots; ASUS P5E3 PRO 1-15 You may install a maximum of 2GB DIMMs on each slot. • The default memory operation frequency is dependent on its Serial Presence...same vendor. • Due to the memory address limitation on 32-bit Windows® OS, when you install 4GB or more memory on the motherboard, the actual usable memory for single-channel operation. • For dual-channel configuration, you can be about 3GB or less. or - Install...
...in DIMM_A2 and DIMM_B2 (orange slots). • Always install DIMMs with the same CAS latency. install two identical DIMMs in all four slots; ASUS P5E3 PRO 1-15 You may install a maximum of 2GB DIMMs on each slot. • The default memory operation frequency is dependent on its Serial Presence...same vendor. • Due to the memory address limitation on 32-bit Windows® OS, when you install 4GB or more memory on the motherboard, the actual usable memory for single-channel operation. • For dual-channel configuration, you can be about 3GB or less. or - Install...
User Manual
Page 26
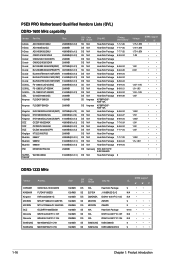
...; • • • • • • • • • • • • • • 1-16 Chapter 1: Product introduction WA160UX6G9 TALENT 6144MB(Kit of 3) 2048MB SUPER- P5E3 PRO Motherboard Qualified Vendors Lists (QVL) DDR3-1600 MHz capability Vendor Part No. Size A-Data A-Data A-Data Corsair Corsair Corsair Crucial Crucial Crucial Crucial Crucial G.SKILL G.SKILL...
...; • • • • • • • • • • • • • • 1-16 Chapter 1: Product introduction WA160UX6G9 TALENT 6144MB(Kit of 3) 2048MB SUPER- P5E3 PRO Motherboard Qualified Vendors Lists (QVL) DDR3-1600 MHz capability Vendor Part No. Size A-Data A-Data A-Data Corsair Corsair Corsair Crucial Crucial Crucial Crucial Crucial G.SKILL G.SKILL...

User Manual
Page 28
... on the socket such that it flips out with your fingers when pressing the retaining clips. Firmly insert the DIMM into a socket to both the motherboard and the components. The DIMM might get damaged when it fits in only one direction. Locked Retaining Clip 1.7.4 Removing a DIMM To remove a DIMM: 1. Align a DIMM...
... on the socket such that it flips out with your fingers when pressing the retaining clips. Firmly insert the DIMM into a socket to both the motherboard and the components. The DIMM might get damaged when it fits in only one direction. Locked Retaining Clip 1.7.4 Removing a DIMM To remove a DIMM: 1. Align a DIMM...


