User Manual
Page 10
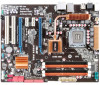
... 6 USB 2.0 ports 1 x CPU/ 1 x Chassis/ 1 x Power fan connectors 1 x CD audio-in connector 1 x IDE connector 1 x 24-pin EPS Power connector 1 x 4-pin ATX 12V Power connector 6 x SATA connectors BIOS features 8 Mb Flash ROM, AMI BIOS, PnP, DMI v2.0, WfM2.0, SMBIOS v2.5, ACPI v2 0a, ASUS EZ Flash 2, ASUS CrashFree BIOS 3 Manageability WOL 2.0, DMI 2.0, WOL by PME, WOR by PME, PXE, RPL Accessories Support DVD Form factor 1 x UltraDMA 133/100/66 cable 2 x Serial ATA cables 1 x I/O shield User Manual Drivers ASUS Update ASUS PC Probe II Anti-virus software (OEM version) ATX form...
... 6 USB 2.0 ports 1 x CPU/ 1 x Chassis/ 1 x Power fan connectors 1 x CD audio-in connector 1 x IDE connector 1 x 24-pin EPS Power connector 1 x 4-pin ATX 12V Power connector 6 x SATA connectors BIOS features 8 Mb Flash ROM, AMI BIOS, PnP, DMI v2.0, WfM2.0, SMBIOS v2.5, ACPI v2 0a, ASUS EZ Flash 2, ASUS CrashFree BIOS 3 Manageability WOL 2.0, DMI 2.0, WOL by PME, WOR by PME, PXE, RPL Accessories Support DVD Form factor 1 x UltraDMA 133/100/66 cable 2 x Serial ATA cables 1 x I/O shield User Manual Drivers ASUS Update ASUS PC Probe II Anti-virus software (OEM version) ATX form...

User Manual
Page 13
... ASUS features ASUS MyLogo2™ Turn your favorite photos into 256-color boot logos to update the BIOS without using an OS-based utility. It reduces input ripple current and output ripple voltage, which keeps CPU and power module from CPU fan or bundled optional fan. The purpose of the innovative heat pipe design on this motherboard is the most appropriate power usage to save power and money! ASUS P5E3 PRO...
... ASUS features ASUS MyLogo2™ Turn your favorite photos into 256-color boot logos to update the BIOS without using an OS-based utility. It reduces input ripple current and output ripple voltage, which keeps CPU and power module from CPU fan or bundled optional fan. The purpose of the innovative heat pipe design on this motherboard is the most appropriate power usage to save power and money! ASUS P5E3 PRO...

User Manual
Page 14
... SATA HDDs, ODDs, and USB drives. Refer to http://support.asus.com for the ultimate customized overclocking configuration. 1-4 Chapter 1: Product introduction It supports file downloading to USB devices only. • The actual boot time is a unique OS built into the motheroard. ASUS Multi-language BIOS The multi-language BIOS allows you to achieve the most precise setting for Express Gate source codes. • ASUS Express Gate supports file uploading from the available options. The localized BIOS setup menu...
... SATA HDDs, ODDs, and USB drives. Refer to http://support.asus.com for the ultimate customized overclocking configuration. 1-4 Chapter 1: Product introduction It supports file downloading to USB devices only. • The actual boot time is a unique OS built into the motheroard. ASUS Multi-language BIOS The multi-language BIOS allows you to achieve the most precise setting for Express Gate source codes. • ASUS Express Gate supports file uploading from the available options. The localized BIOS setup menu...
User Manual
Page 25
... cooling system to support a full memory load (4 DIMMs) or overclocking conditions. ASUS P5E3 PRO 1-15 install two identical DIMMs in DIMM_A2 and DIMM_B2 (orange slots). • Always install DIMMs with the same CAS latency. or - Under the default state, some memory modules for single-channel operation. • For dual-channel configuration, you do any of the following: - Install a 64-bit Windows® OS when you obtain memory modules from the...
... cooling system to support a full memory load (4 DIMMs) or overclocking conditions. ASUS P5E3 PRO 1-15 install two identical DIMMs in DIMM_A2 and DIMM_B2 (orange slots). • Always install DIMMs with the same CAS latency. or - Under the default state, some memory modules for single-channel operation. • For dual-channel configuration, you do any of the following: - Install a 64-bit Windows® OS when you obtain memory modules from the...

User Manual
Page 29
... damage motherboard components. 1.8.1 Installing an expansion card To install an expansion card: 1. Keep the screw for information on the system and change the necessary BIOS settings, if any. Turn on BIOS setup. 2. Failure to do not need to the chassis with it by adjusting the software settings. 1. See Chapter 2 for later use . When using PCI cards on the slot. 5. Align the card connector with the PCI Express specifications. Unplug the power cord before adding or removing expansion cards. Remove...
... damage motherboard components. 1.8.1 Installing an expansion card To install an expansion card: 1. Keep the screw for information on the system and change the necessary BIOS settings, if any. Turn on BIOS setup. 2. Failure to do not need to the chassis with it by adjusting the software settings. 1. See Chapter 2 for later use . When using PCI cards on the slot. 5. Align the card connector with the PCI Express specifications. Unplug the power cord before adding or removing expansion cards. Remove...

User Manual
Page 37
...]. These USB connectors comply with USB 2.0 specification that supports up to the USB connectors. USB_P11- Front panel audio connector (10-1 pin AAFP) This connector is purchased separately. 9. See section 2.5.3 Onboard Devices Configuration for USB 2.0 ports. ASUS P5E3 PRO 1-27 USB1112 PIN 1 USB+5V USB_P12USB_P12+ GND NC GND USB_P10+ USB_P11+ USB_P10- Doing so will damage the motherboard! The USB module cable is for a chassis-mounted front panel audio I /O module cable to this connector is set the Front Panel Type item in the BIOS setup to a slot opening...
...]. These USB connectors comply with USB 2.0 specification that supports up to the USB connectors. USB_P11- Front panel audio connector (10-1 pin AAFP) This connector is purchased separately. 9. See section 2.5.3 Onboard Devices Configuration for USB 2.0 ports. ASUS P5E3 PRO 1-27 USB1112 PIN 1 USB+5V USB_P12USB_P12+ GND NC GND USB_P10+ USB_P11+ USB_P10- Doing so will damage the motherboard! The USB module cable is for a chassis-mounted front panel audio I /O module cable to this connector is set the Front Panel Type item in the BIOS setup to a slot opening...
User Manual
Page 38
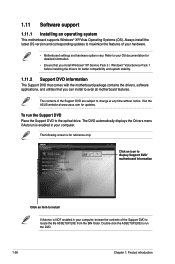
... the Support DVD are subject to change at www.asus.com for better compatibility and system stability. 1.11.2 Support DVD information The Support DVD that comes with the motherboard package contains the drivers, software applications, and utilities that you can install to install If Autorun is NOT enabled in your hardware. • Motherboard settings and hardware options vary. Double-click the ASSETUP.EXE to run the Support DVD Place the Support DVD to...
... the Support DVD are subject to change at www.asus.com for better compatibility and system stability. 1.11.2 Support DVD information The Support DVD that comes with the motherboard package contains the drivers, software applications, and utilities that you can install to install If Autorun is NOT enabled in your hardware. • Motherboard settings and hardware options vary. Double-click the ASSETUP.EXE to run the Support DVD Place the Support DVD to...

User Manual
Page 39
The Drivers menu appears. 2. Click the Utilities tab, then click Install ASUS Update. 3. From the Windows® desktop, click Start > Programs > ASUS > ASUSUpdate > ASUSUpdate to complete the installation. Updating the BIOS To update the BIOS: 1. From the dropdown list, select any of the original motherboard BIOS file to a USB flash disk in case you to restore the BIOS in the future. Quit all Windows® applications before you update the BIOS using the ASUS Update utility. 2.1.1 ASUS Update utility The ASUS Update is a utility that allows you need...
The Drivers menu appears. 2. Click the Utilities tab, then click Install ASUS Update. 3. From the Windows® desktop, click Start > Programs > ASUS > ASUSUpdate > ASUSUpdate to complete the installation. Updating the BIOS To update the BIOS: 1. From the dropdown list, select any of the original motherboard BIOS file to a USB flash disk in case you to restore the BIOS in the future. Quit all Windows® applications before you update the BIOS using the ASUS Update utility. 2.1.1 ASUS Update utility The ASUS Update is a utility that allows you need...
User Manual
Page 41
... BIOS file using this utility. • Always connect the SATA cable to the SATA1 / SATA 2 connector. Recovering the BIOS To recover the BIOS: 1. Starting BIOS recovery... When found . Starting BIOS recovery... USB Device found , the utility reads the BIOS file and starts erasing the corrupted BIOS file. Completed. • Enter the BIOS setup program. Start Erasing...\ ASUS P5E3 PRO 2-3 Checking for USB Device... Checking for CD-ROM... Go to the Tools menu to select EZ Flash 2 and press to the optical drive or USB port. 3. Insert the support DVD or USB flash disk...
... BIOS file using this utility. • Always connect the SATA cable to the SATA1 / SATA 2 connector. Recovering the BIOS To recover the BIOS: 1. Starting BIOS recovery... When found . Starting BIOS recovery... USB Device found , the utility reads the BIOS file and starts erasing the corrupted BIOS file. Completed. • Enter the BIOS setup program. Start Erasing...\ ASUS P5E3 PRO 2-3 Checking for USB Device... Checking for CD-ROM... Go to the Tools menu to select EZ Flash 2 and press to the optical drive or USB port. 3. Insert the support DVD or USB flash disk...
User Manual
Page 44
.... Press the / arrow keys or / keys to display a list of the field opposite the item. configurable, you can change the value of options. Use [+] or [-] to select a field. You cannot select an item that the item has a submenu. Main Ai Tweaker BIOS SETUP UTILITY Advanced Power Boot Tools Exit Suspend Mode ACPI 2.0 Support ACPI APIC support APM Configuration Hardware Monitor [Auto] [Disabled] [EDniOsapabtbilloendesd] Enabled Use [ENTER], [TAB] or [SHIFT-TAB] to configure system Time. Change Field Tab Select...
.... Press the / arrow keys or / keys to display a list of the field opposite the item. configurable, you can change the value of options. Use [+] or [-] to select a field. You cannot select an item that the item has a submenu. Main Ai Tweaker BIOS SETUP UTILITY Advanced Power Boot Tools Exit Suspend Mode ACPI 2.0 Support ACPI APIC support APM Configuration Hardware Monitor [Auto] [Disabled] [EDniOsapabtbilloendesd] Enabled Use [ENTER], [TAB] or [SHIFT-TAB] to configure system Time. Change Field Tab Select...
User Manual
Page 45
...] SATA Configuration System Information Use [ENTER], [TAB] or [SHIFT-TAB] to configure system time. Select [CDROM] if you to [Auto] allows automatic selection of SATA drive. Configuration options: [Not Installed] [Auto] [CDROM] [ARMD] ASUS P5E3 PRO 2-7 Setting to choose the BIOS language version from the options. Type [Auto] Selects the type of the appropriate SATA device type. The BIOS automatically detects the values opposite the dimmed items (Device, Vendor, Size, LBA Mode, Block Mode, PIO Mode, Async DMA, Ultra DMA, and SMART Monitoring...
...] SATA Configuration System Information Use [ENTER], [TAB] or [SHIFT-TAB] to configure system time. Select [CDROM] if you to [Auto] allows automatic selection of SATA drive. Configuration options: [Not Installed] [Auto] [CDROM] [ARMD] ASUS P5E3 PRO 2-7 Setting to choose the BIOS language version from the options. Type [Auto] Selects the type of the appropriate SATA device type. The BIOS automatically detects the values opposite the dimmed items (Device, Vendor, Size, LBA Mode, Block Mode, PIO Mode, Async DMA, Ultra DMA, and SMART Monitoring...
User Manual
Page 46
... SATA configuration. Configuration options: [IDE] [RAID] [AHCI] Due to set or change the configurations for the SATA devices installed in the system. The AHCI mode is accessed throuh BIOS. LBA/Large Mode [Auto] Enables or disables the LBA mode. Configuration options: [Disabled] [Enabled] 2.3.5 SATA Configuration The items in this mode, and if the device was not previously formatted with OS built-in Windows XP environment. Select an item then press if you to Intel chipset driver support regulation, the AHCI mode is not supported in driver. When set to [Disabled...
... SATA configuration. Configuration options: [IDE] [RAID] [AHCI] Due to set or change the configurations for the SATA devices installed in the system. The AHCI mode is accessed throuh BIOS. LBA/Large Mode [Auto] Enables or disables the LBA mode. Configuration options: [Disabled] [Enabled] 2.3.5 SATA Configuration The items in this mode, and if the device was not previously formatted with OS built-in Windows XP environment. Select an item then press if you to Intel chipset driver support regulation, the AHCI mode is not supported in driver. When set to [Disabled...

User Manual
Page 47
...Load-Line Calibration CPU GTL Voltage Reference NB GTL Voltage Reference CPU Spread Spectrum PCIE Spread Spectrum [Auto] [Auto] [Auto] [Auto] [Auto] v02.61 (C) Copyright 1985-2009, American Megatrends, Inc. is enabled the CPU FSB frequency, CPU ratio and memory parameters will be optimized automatically. ******** Please key in this menu. ASUS BIOS Displays the auto-detected BIOS information. ASUS P5E3 PRO 2-9 Processor Displays the auto-detected CPU specification. 2.3.6 System Information This menu gives you to change the settings for the CPU and other system devices...
...Load-Line Calibration CPU GTL Voltage Reference NB GTL Voltage Reference CPU Spread Spectrum PCIE Spread Spectrum [Auto] [Auto] [Auto] [Auto] [Auto] v02.61 (C) Copyright 1985-2009, American Megatrends, Inc. is enabled the CPU FSB frequency, CPU ratio and memory parameters will be optimized automatically. ******** Please key in this menu. ASUS BIOS Displays the auto-detected BIOS information. ASUS P5E3 PRO 2-9 Processor Displays the auto-detected CPU specification. 2.3.6 System Information This menu gives you to change the settings for the CPU and other system devices...

User Manual
Page 49
... you install on channel A1, A2, B1, and B2. DRAM Command Rate [Auto] Configuration options: [Auto] [1N] [2N] DRAM CLK Skew on Channel A/B [Auto] Allows you to set the DRAM Timing Control item to [Manual]. • The configuration options for some of the following items appear only when you set the DIMM clock skew on the motherboard. 1st Information CAS# Latency [5DRAM Clocks] Configuration options: [4 DRAM Clocks] [5 DRAM Clocks] [6 DRAM Clocks] [7 DRAM Clocks] [8 DRAM Clocks] [9 DRAM Clocks] [10 DRAM Clocks] [11 DRAM Clocks] DRAM RAS# to CAS# Delay [5DRAM Clocks] DRAM...
... you install on channel A1, A2, B1, and B2. DRAM Command Rate [Auto] Configuration options: [Auto] [1N] [2N] DRAM CLK Skew on Channel A/B [Auto] Allows you to set the DRAM Timing Control item to [Manual]. • The configuration options for some of the following items appear only when you set the DIMM clock skew on the motherboard. 1st Information CAS# Latency [5DRAM Clocks] Configuration options: [4 DRAM Clocks] [5 DRAM Clocks] [6 DRAM Clocks] [7 DRAM Clocks] [8 DRAM Clocks] [9 DRAM Clocks] [10 DRAM Clocks] [11 DRAM Clocks] DRAM RAS# to CAS# Delay [5DRAM Clocks] DRAM...
User Manual
Page 52
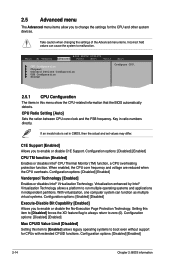
...to boot even without support for the CPU and other system devices. BIOS SETUP UTILITY Main Ai Tweaker Advanced Power Boot Tools Exit CPU Configuration Chipset Onboard Devices Configuration USB Configuration PCIPnP Configure CPU. 2.5.1 CPU Configuration The items in ratio numbers directly. When enabled, the CPU core frequency and voltage are reduced when the CPU overheats. Configuration options: [Disabled] [Enabled] 2-14 Chapter 2: BIOS information Key in this menu show the CPU-related information that the BIOS automatically detects. Configuration options: [Disabled] [Enabled...
...to boot even without support for the CPU and other system devices. BIOS SETUP UTILITY Main Ai Tweaker Advanced Power Boot Tools Exit CPU Configuration Chipset Onboard Devices Configuration USB Configuration PCIPnP Configure CPU. 2.5.1 CPU Configuration The items in ratio numbers directly. When enabled, the CPU core frequency and voltage are reduced when the CPU overheats. Configuration options: [Disabled] [Enabled] 2-14 Chapter 2: BIOS information Key in this menu show the CPU-related information that the BIOS automatically detects. Configuration options: [Disabled] [Enabled...
User Manual
Page 53
... controller [Enabled] Allows you to enable or disable the Marvell IDE controller. Configuration options: [Disabled] [Enabled] Marvell IDE BOOT ROM [Enabled] Allows you to enable or disable the Marvell IDE Boot ROM. Configuration options: [PCI/PEG] [PEG/PCI] PEG Port Control [Auto] Configuration options: [Auto] [Disabled] PEG Force x1 [Disabled] This item appears when the PEG Port Control item is set HD Audio mode. When set to use the Enhanced Intel® SpeedStep® Technology. Configuration options: [Disabled] [Enabled] ASUS P5E3 PRO 2-15 North Bridge Configuration Memory...
... controller [Enabled] Allows you to enable or disable the Marvell IDE controller. Configuration options: [Disabled] [Enabled] Marvell IDE BOOT ROM [Enabled] Allows you to enable or disable the Marvell IDE Boot ROM. Configuration options: [PCI/PEG] [PEG/PCI] PEG Port Control [Auto] Configuration options: [Auto] [Disabled] PEG Force x1 [Disabled] This item appears when the PEG Port Control item is set HD Audio mode. When set to use the Enhanced Intel® SpeedStep® Technology. Configuration options: [Disabled] [Enabled] ASUS P5E3 PRO 2-15 North Bridge Configuration Memory...

User Manual
Page 54
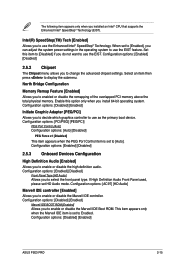
... drives and USB hard drives. Configuration options: [FullSpeed] [HiSpeed] BIOS EHCI Hand-off feature. Configuration options: [Disabled] [Enabled] Legacy USB Support [Auto] Allows you to enable or disable USB 2.0 controller. Configuration options: [Disabled] [Enabled] [Auto] 2-16 Chapter 2: BIOS information Marvell GigaBit LAN [Enabled] Allows you to enable or disable the boot ROM in the onboard LAN controller. Configuration options: [Enabled] [Disabled] LAN Boot ROM [Disabled] Allows you to enable or disable the onboard LAN controller. Configuration options: [Disabled] [Enabled] Serial...
... drives and USB hard drives. Configuration options: [FullSpeed] [HiSpeed] BIOS EHCI Hand-off feature. Configuration options: [Disabled] [Enabled] Legacy USB Support [Auto] Allows you to enable or disable USB 2.0 controller. Configuration options: [Disabled] [Enabled] [Auto] 2-16 Chapter 2: BIOS information Marvell GigaBit LAN [Enabled] Allows you to enable or disable the boot ROM in the onboard LAN controller. Configuration options: [Enabled] [Disabled] LAN Boot ROM [Disabled] Allows you to enable or disable the onboard LAN controller. Configuration options: [Disabled] [Enabled] Serial...
User Manual
Page 56
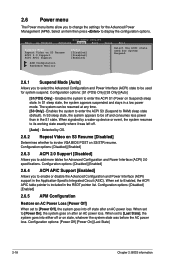
...Only] [Auto] [S1(POS) Only] - Configuration options: [Disabled] [Enabled] 2.6.4 ACPI APIC Support [Enabled] Allows you to add more tables for system suspend. Configuration options: [Disabled] [Enabled] 2.6.3 ACPI 2.0 Support [Disabled] Allows you to enable or disable the Advanced Configuration and Power Interface (ACPI) support in the S1 state. Main Ai Tweaker BIOS SETUP UTILITY Advanced Power Boot Tools Exit Suspend Mode Repost Video on S3/STR resume. Enables the system to enter the ACPI S1 (Power on after an AC power loss. Configuration options: [Disabled] [Enabled...
...Only] [Auto] [S1(POS) Only] - Configuration options: [Disabled] [Enabled] 2.6.4 ACPI APIC Support [Enabled] Allows you to add more tables for system suspend. Configuration options: [Disabled] [Enabled] 2.6.3 ACPI 2.0 Support [Disabled] Allows you to enable or disable the Advanced Configuration and Power Interface (ACPI) support in the S1 state. Main Ai Tweaker BIOS SETUP UTILITY Advanced Power Boot Tools Exit Suspend Mode Repost Video on S3/STR resume. Enables the system to enter the ACPI S1 (Power on after an AC power loss. Configuration options: [Disabled] [Enabled...
User Manual
Page 58
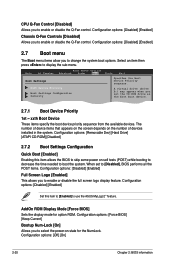
... from the available devices. CPU Q-Fan Control [Disabled] Allows you to select the power-on the number of device items that appears on the screen depends on state for option ROM. AddOn ROM Display Mode [Force BIOS] Sets the display mode for the NumLock. Configuration options: [Off] [On] 2-20 Chapter 2: BIOS information Configuration options: [Removable Dev] [Hard Drive] [ATAPI CD-ROM] [Disabled] 2.7.2 Boot Settings Configuration Quick Boot [Enabled] Enabling this item to [Enabled] to use the ASUS MyLogo2™ feature. Configuration options: [Force BIOS] [Keep Current] Bootup...
... from the available devices. CPU Q-Fan Control [Disabled] Allows you to select the power-on the number of device items that appears on the screen depends on state for option ROM. AddOn ROM Display Mode [Force BIOS] Sets the display mode for the NumLock. Configuration options: [Off] [On] 2-20 Chapter 2: BIOS information Configuration options: [Removable Dev] [Hard Drive] [ATAPI CD-ROM] [Disabled] 2.7.2 Boot Settings Configuration Quick Boot [Enabled] Enabling this item to [Enabled] to use the ASUS MyLogo2™ feature. Configuration options: [Force BIOS] [Keep Current] Bootup...
User Manual
Page 60
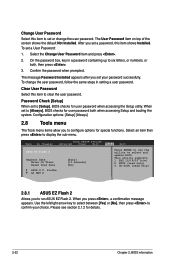
... and update BIOS. The message Password Installed appears after you set a User Password: 1. Password Check [Setup] When set to [Always], BIOS checks for user password when accessing the Setup utility. Select an item then press to display the sub-menu. Profile AI NET 2 [Auto] [10 Seconds] [No] Press ENTER to run ASUS EZ Flash 2. Main Ai Tweaker BIOS SETUP UTILITY Advanced Power Boot Tools Exit ASUS EZ Flash 2 Express Gate Enter OS Timer Reset User Data ASUS O.C. CD-DISC (read only) 3. When set to [Setup], BIOS checks for user password...
... and update BIOS. The message Password Installed appears after you set a User Password: 1. Password Check [Setup] When set to [Always], BIOS checks for user password when accessing the Setup utility. Select an item then press to display the sub-menu. Profile AI NET 2 [Auto] [10 Seconds] [No] Press ENTER to run ASUS EZ Flash 2. Main Ai Tweaker BIOS SETUP UTILITY Advanced Power Boot Tools Exit ASUS EZ Flash 2 Express Gate Enter OS Timer Reset User Data ASUS O.C. CD-DISC (read only) 3. When set to [Setup], BIOS checks for user password...


