

User Manual
Page 1
Motherboard
Motherboard

User Manual
Page 1
P5E3 Deluxe Motherboard
P5E3 Deluxe Motherboard

User Manual
Page 3
... Notices...viii Safety information ix About this guide x P5E3 Deluxe specifications summary xii Chapter 1: Product introduction 1.1 Welcome 1-1 1.2 Package contents 1-1 1.3 Special features 1-2 1.3.1 Product highlights 1-2 1.3.2 ASUS AI Lifestyle unique features 1-4 1.3.3 ASUS Intelligent Performance and Overclocking features 1-7 Chapter 2: Hardware information 2.1 Before you proceed 2-1 Onboard LED 2-1 2.2 Motherboard overview 2-2 2.2.1 Placement direction 2-2 2.2.2 Screw holes 2-2 2.2.3 Motherboard layout 2-3 2.2.4 Layout contents 2-4 2.3 Central Processing Unit (CPU...
... Notices...viii Safety information ix About this guide x P5E3 Deluxe specifications summary xii Chapter 1: Product introduction 1.1 Welcome 1-1 1.2 Package contents 1-1 1.3 Special features 1-2 1.3.1 Product highlights 1-2 1.3.2 ASUS AI Lifestyle unique features 1-4 1.3.3 ASUS Intelligent Performance and Overclocking features 1-7 Chapter 2: Hardware information 2.1 Before you proceed 2-1 Onboard LED 2-1 2.2 Motherboard overview 2-2 2.2.1 Placement direction 2-2 2.2.2 Screw holes 2-2 2.2.3 Motherboard layout 2-3 2.2.4 Layout contents 2-4 2.3 Central Processing Unit (CPU...
User Manual
Page 9
... waste. If you are not sure about the voltage of the electrical outlet you are connected. ix Operation safety • Before installing the motherboard and adding devices on a stable surface. • If you add a device. • Before connecting or removing signal cables from connectors,...in any damage, contact your dealer immediately. • To avoid short circuits, keep paper clips, screws, and staples away from the motherboard, ensure that came with the product, contact a qualified service technician or your local power company. • If the power supply is ...
... waste. If you are not sure about the voltage of the electrical outlet you are connected. ix Operation safety • Before installing the motherboard and adding devices on a stable surface. • If you add a device. • Before connecting or removing signal cables from connectors,...in any damage, contact your dealer immediately. • To avoid short circuits, keep paper clips, screws, and staples away from the motherboard, ensure that came with the product, contact a qualified service technician or your local power company. • If the power supply is ...

User Manual
Page 10
... guide contains the following sources for additional information and for product and software updates. 1. ASUS websites The ASUS website provides updated information on the motherboard. • Chapter 3: Powering up This chapter describes the power up sequence and ways of the motherboard and the new technology it supports. • Chapter 2: Hardware information This chapter lists...
... guide contains the following sources for additional information and for product and software updates. 1. ASUS websites The ASUS website provides updated information on the motherboard. • Chapter 3: Powering up This chapter describes the power up sequence and ways of the motherboard and the new technology it supports. • Chapter 2: Hardware information This chapter lists...

User Manual
Page 15
This chapter describes the motherboard features and the new technologies it supports. 1Product introduction
This chapter describes the motherboard features and the new technologies it supports. 1Product introduction

User Manual
Page 17
...check the items in the long line of the above items is damaged or missing, contact your motherboard package for the following items. Motherboard ASUS P5E3 Deluxe I/O modules 1 x Multi-function module (1-port IEEE 1394a module and 2-port USB 2.0 module)... Accessories ASUS Q-Shield (I/O shield) 2 x ASUS Optional Fans for buying an ASUS® P5E3 Deluxe motherboard! ASUS P5E3 Deluxe 1-1 1.1 Welcome! Before you for Water-Cooling or Passive-Cooling only 1 x ASUS Q-Connector Kit (USB, 1394, system panel; Retail version only) Application DVD ASUS motherboard support ...
...check the items in the long line of the above items is damaged or missing, contact your motherboard package for the following items. Motherboard ASUS P5E3 Deluxe I/O modules 1 x Multi-function module (1-port IEEE 1394a module and 2-port USB 2.0 module)... Accessories ASUS Q-Shield (I/O shield) 2 x ASUS Optional Fans for buying an ASUS® P5E3 Deluxe motherboard! ASUS P5E3 Deluxe 1-1 1.1 Welcome! Before you for Water-Cooling or Passive-Cooling only 1 x ASUS Q-Connector Kit (USB, 1394, system panel; Retail version only) Application DVD ASUS motherboard support ...
User Manual
Page 18
..., multi-media and enthusiastic gamers with 1066 / 800 MHz FSB. Intel® Core™ 2 Quad Processor Ready This motherboard supports the latest Intel® Core™ 2 Quad processors in the LGA775 package. The dual-channel DDR3 architecture doubles the...of creating environment-friendly and recyclable products/packagings to boost system performance. This motherboard also supports Intel® CPUs in the world. 1.3 Special features 1.3.1 Product highlights Green ASUS This motherboard and its packaging comply with the European Union's Restriction on the environment....
..., multi-media and enthusiastic gamers with 1066 / 800 MHz FSB. Intel® Core™ 2 Quad Processor Ready This motherboard supports the latest Intel® Core™ 2 Quad processors in the LGA775 package. The dual-channel DDR3 architecture doubles the...of creating environment-friendly and recyclable products/packagings to boost system performance. This motherboard also supports Intel® CPUs in the world. 1.3 Special features 1.3.1 Product highlights Green ASUS This motherboard and its packaging comply with the European Union's Restriction on the environment....

User Manual
Page 19
S/PDIF digital sound ready This motherboard provides convenient connectivity to PCIe 1.0 devices. ASUS P5E3 Deluxe 1-3 The external SATA port located at the back I/O provides smart setup and hot-plug functions. See pages 2-24 and 2-28 for details. It allows...without the cost of data from WAN to LAN without converting to external devices. Serial ATA 3 Gb/s technology and SATA-On-The-Go This motherboard supports hard drives based on cards. This enhances system performance while still providing backward compatibility to external home theater audio systems via coaxial and optical...
S/PDIF digital sound ready This motherboard provides convenient connectivity to PCIe 1.0 devices. ASUS P5E3 Deluxe 1-3 The external SATA port located at the back I/O provides smart setup and hot-plug functions. See pages 2-24 and 2-28 for details. It allows...without the cost of data from WAN to LAN without converting to external devices. Serial ATA 3 Gb/s technology and SATA-On-The-Go This motherboard supports hard drives based on cards. This enhances system performance while still providing backward compatibility to external home theater audio systems via coaxial and optical...

User Manual
Page 21
... channel that lowers the temperature of the innovative heat pipe design on the printed circuit board (PCB) to date. Fanless Design - The motherboard uses a special design on this motherboard is the most reliable fanless thermal solution to dissipate heat these critical components generate. DO NOT uninstall the heat-pipe by existing airflow... when water-cooling or passive-cooling is a fan-less and zero-noise cooling solution that expands the overall sound field without introducing a picket fencing effect. ASUS P5E3 Deluxe 1-5
... channel that lowers the temperature of the innovative heat pipe design on the printed circuit board (PCB) to date. Fanless Design - The motherboard uses a special design on this motherboard is the most reliable fanless thermal solution to dissipate heat these critical components generate. DO NOT uninstall the heat-pipe by existing airflow... when water-cooling or passive-cooling is a fan-less and zero-noise cooling solution that expands the overall sound field without introducing a picket fencing effect. ASUS P5E3 Deluxe 1-5

User Manual
Page 22
...update the BIOS or back up to restore corrupted BIOS data from a USB flash disk containing the BIOS file. ASUS Q-Shield The specially designed ASUS Q-Shield does without the usual "fingers" -- This unique module eliminates the trouble of data via the network cable.... making it convenient and easy to the motherboard. See page 2-37 for details. Profile The motherboard features the ASUS O.C. ASUS CrashFree BIOS 3 The ASUS CrashFree BIOS 3 allows users to 70% of the total time taken. saving up your motherboard against static electricity and shields it against Electronic...
...update the BIOS or back up to restore corrupted BIOS data from a USB flash disk containing the BIOS file. ASUS Q-Shield The specially designed ASUS Q-Shield does without the usual "fingers" -- This unique module eliminates the trouble of data via the network cable.... making it convenient and easy to the motherboard. See page 2-37 for details. Profile The motherboard features the ASUS O.C. ASUS CrashFree BIOS 3 The ASUS CrashFree BIOS 3 allows users to 70% of the total time taken. saving up your motherboard against static electricity and shields it against Electronic...

User Manual
Page 23
...FSB termination Voltage, CPU PLL Voltage and the DRAM Voltage in case the system hangs due to set up without entering the OS. ASUS Multi-language BIOS The multi-language BIOS allows you can find out if they are installed, you to achieve the most precise setting ...for details. feature of the motherboard BIOS allows automatic re-setting to the BIOS default settings in 0.02v steps to finetune voltages to select the language of booting the BIOS. ASUS P5E3 Deluxe 1-7 Update your BIOS easily without the hassle of your screen. See ...
...FSB termination Voltage, CPU PLL Voltage and the DRAM Voltage in case the system hangs due to set up without entering the OS. ASUS Multi-language BIOS The multi-language BIOS allows you can find out if they are installed, you to achieve the most precise setting ...for details. feature of the motherboard BIOS allows automatic re-setting to the BIOS default settings in 0.02v steps to finetune voltages to select the language of booting the BIOS. ASUS P5E3 Deluxe 1-7 Update your BIOS easily without the hassle of your screen. See ...

User Manual
Page 25
This chapter lists the hardware setup procedures that you have to perform when installing system components. It includes description of the jumpers and connectors on the motherboard. 2 Hardware information
This chapter lists the hardware setup procedures that you have to perform when installing system components. It includes description of the jumpers and connectors on the motherboard. 2 Hardware information

User Manual
Page 26
Chapter summary 2 2.1 Before you proceed 2-1 2.2 Motherboard overview 2-2 2.3 Central Processing Unit (CPU 2-6 2.4 System memory 2-13 2.5 Expansion slots 2-18 2.6 Jumper 2-22 2.7 Connectors 2-23 ASUS P5E3 Deluxe
Chapter summary 2 2.1 Before you proceed 2-1 2.2 Motherboard overview 2-2 2.3 Central Processing Unit (CPU 2-6 2.4 System memory 2-13 2.5 Expansion slots 2-18 2.6 Jumper 2-22 2.7 Connectors 2-23 ASUS P5E3 Deluxe

User Manual
Page 27
2.1 Before you proceed Take note of the onboard LED. ® P5E3 DELUXE SB_PWR ON Standby P5E3 DELUXE Onboard LED Power OFF Powered Off ASUS P5E3 Deluxe 2-1 This is a reminder that you should shut down the system and unplug the power cable before handling components to avoid damaging them...the edges to avoid touching the ICs on a grounded antistatic pad or in the bag that came with a standby power LED. Onboard LED The motherboard comes with the component. • Before you uninstall any component, place it on them. • Whenever you install or remove any component, ...
2.1 Before you proceed Take note of the onboard LED. ® P5E3 DELUXE SB_PWR ON Standby P5E3 DELUXE Onboard LED Power OFF Powered Off ASUS P5E3 Deluxe 2-1 This is a reminder that you should shut down the system and unplug the power cable before handling components to avoid damaging them...the edges to avoid touching the ICs on a grounded antistatic pad or in the bag that came with a standby power LED. Onboard LED The motherboard comes with the component. • Before you uninstall any component, place it on them. • Whenever you install or remove any component, ...

User Manual
Page 28
... this side towards the rear of the chassis P5E3 DELUXE 2-2 Chapter 2: Hardware information DO NOT overtighten the screws! Make sure to the chassis. Doing so can cause you physical injury and damage motherboard components. 2.2.1 Placement direction When installing the motherboard, make sure that you install the motherboard, study the configuration of the chassis as indicated...
... this side towards the rear of the chassis P5E3 DELUXE 2-2 Chapter 2: Hardware information DO NOT overtighten the screws! Make sure to the chassis. Doing so can cause you physical injury and damage motherboard components. 2.2.1 Placement direction When installing the motherboard, make sure that you install the motherboard, study the configuration of the chassis as indicated...
User Manual
Page 29
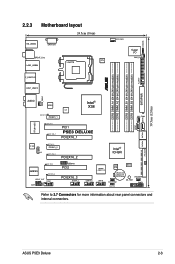
30.5cm (12.0in) CHASSIS 2.2.3 Motherboard layout 24.5cm (9.6in) KB_USB56 EATX12V SPDIF_O12 EPU LGA775 LAN2_USB34 CPU_FAN Super I/O PWR_FAN FLOPPY ... CHA_FAN1 SATA56 PRI_EIDE AUDIO 88E8056 ICS DET_X1_1 PCIEX1_1 Intel® X38 CHA_FAN2 SATA2 SATA1 SATA34 RTL8110SC DET_PCI1 DET_X16_1 PCI1 P5E3 DELUXE PCIEX16_1 AD1988B CD DET_X1_2 PCIEX1_2 DET_X16_2 PCIEX16_2 DET_PCI2 JMB363 DET_X16_3 SPDIF_OUT COM1 AAFP USB910 PCI2 PCIEX16_3 IE1394_2 Intel® ...Refer to 2.7 Connectors for more information about rear panel connectors and internal connectors. ASUS P5E3 Deluxe 2-3
30.5cm (12.0in) CHASSIS 2.2.3 Motherboard layout 24.5cm (9.6in) KB_USB56 EATX12V SPDIF_O12 EPU LGA775 LAN2_USB34 CPU_FAN Super I/O PWR_FAN FLOPPY ... CHA_FAN1 SATA56 PRI_EIDE AUDIO 88E8056 ICS DET_X1_1 PCIEX1_1 Intel® X38 CHA_FAN2 SATA2 SATA1 SATA34 RTL8110SC DET_PCI1 DET_X16_1 PCI1 P5E3 DELUXE PCIEX16_1 AD1988B CD DET_X1_2 PCIEX1_2 DET_X16_2 PCIEX16_2 DET_PCI2 JMB363 DET_X16_3 SPDIF_OUT COM1 AAFP USB910 PCI2 PCIEX16_3 IE1394_2 Intel® ...Refer to 2.7 Connectors for more information about rear panel connectors and internal connectors. ASUS P5E3 Deluxe 2-3

User Manual
Page 32
... only if the motherboard comes with a surface mount LGA775 socket designed for the Intel® Core™2 Quad / Core™2 Extreme / Core™2 Duo / Pentium® Extreme / Pentium® D / Pentium® 4 Processors. • Make sure that all power cables are not bent. ASUS will shoulder the ...cost of repair only if the damage is missing, or if you use FSB 800MHz CPU or above. • Upon purchase of the PnP cap. 2-6 Chapter 2: Hardware information 2.3 Central Processing Unit (CPU) The motherboard comes with the cap ...
... only if the motherboard comes with a surface mount LGA775 socket designed for the Intel® Core™2 Quad / Core™2 Extreme / Core™2 Duo / Pentium® Extreme / Pentium® D / Pentium® 4 Processors. • Make sure that all power cables are not bent. ASUS will shoulder the ...cost of repair only if the damage is missing, or if you use FSB 800MHz CPU or above. • Upon purchase of the PnP cap. 2-6 Chapter 2: Hardware information 2.3 Central Processing Unit (CPU) The motherboard comes with the cap ...

User Manual
Page 33
To prevent damage to a 135º angle. ASUS P5E3 Deluxe 2-7 Press the load lever with your left (B) until it to the left . 2. Retention tab A Load lever PnP cap B This side of the arrow to the ... face you and the load lever is released from the retention tab. Locate the CPU socket on your thumb (A), then move it is on the motherboard. ® P5E3 DELUXE P5E3 DELUXE CPU Socket 775 Before installing the CPU, make sure that the cam box is facing towards you . 2.3.1 Installing the CPU To install a CPU...
To prevent damage to a 135º angle. ASUS P5E3 Deluxe 2-7 Press the load lever with your left (B) until it to the left . 2. Retention tab A Load lever PnP cap B This side of the arrow to the ... face you and the load lever is released from the retention tab. Locate the CPU socket on your thumb (A), then move it is on the motherboard. ® P5E3 DELUXE P5E3 DELUXE CPU Socket 775 Before installing the CPU, make sure that the cam box is facing towards you . 2.3.1 Installing the CPU To install a CPU...

User Manual
Page 34
... force the CPU into the retention tab. 7. Close the load plate (A), then A push the load lever (B) until it snaps into the socket to remove (B). The motherboard supports Intel® LGA775 processors with your thumb and forefinger to a 100º angle (A), then push the PnP cap from the load plate window to...
... force the CPU into the retention tab. 7. Close the load plate (A), then A push the load lever (B) until it snaps into the socket to remove (B). The motherboard supports Intel® LGA775 processors with your thumb and forefinger to a 100º angle (A), then push the PnP cap from the load plate window to...


