User Manual
Page 4
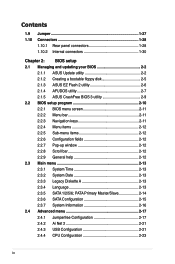
... 1-30 Chapter 2: BIOS setup 2.1 Managing and updating your BIOS 2-2 2.1.1 ASUS Update utility 2-2 2.1.2 Creating a bootable floppy disk 2-5 2.1.3 ASUS EZ Flash 2 utility 2-6 2.1.4 AFUDOS utility 2-7 2.1.5 ASUS CrashFree BIOS 3 utility 2-9 2.2 BIOS setup program 2-10 2.2.1 BIOS menu ...screen 2-11 2.2.2 Menu bar 2-11 2.2.3 Navigation keys 2-11 2.2.4 Menu items 2-12 2.2.5 Sub-menu items 2-12 2.2.6 Configuration fields 2-12 2.2.7 Pop-up window...
... 1-30 Chapter 2: BIOS setup 2.1 Managing and updating your BIOS 2-2 2.1.1 ASUS Update utility 2-2 2.1.2 Creating a bootable floppy disk 2-5 2.1.3 ASUS EZ Flash 2 utility 2-6 2.1.4 AFUDOS utility 2-7 2.1.5 ASUS CrashFree BIOS 3 utility 2-9 2.2 BIOS setup program 2-10 2.2.1 BIOS menu ...screen 2-11 2.2.2 Menu bar 2-11 2.2.3 Navigation keys 2-11 2.2.4 Menu items 2-12 2.2.5 Sub-menu items 2-12 2.2.6 Configuration fields 2-12 2.2.7 Pop-up window...
User Manual
Page 18
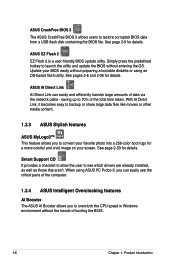
... to allow the user to see the critical parts of the computer. 1.3.4 ASUS Intelligent Overclocking features AI Booster The ASUS AI Booster allows you to overclock the CPU speed in Windows environment without preparing a bootable diskette or using ASUS PC Probe II, you to 70% of data via the network cable -...and vivid image on your BIOS easily without the hassle of booting the BIOS. 1-6 Chapter 1: Product Introduction When using an OS-based flash utility. ASUS EZ Flash 2 EZ Flash 2 is a user-friendly BIOS update utility. With AI Direct Link, it becomes easy to backup or share large ...
... to allow the user to see the critical parts of the computer. 1.3.4 ASUS Intelligent Overclocking features AI Booster The ASUS AI Booster allows you to overclock the CPU speed in Windows environment without preparing a bootable diskette or using ASUS PC Probe II, you to 70% of data via the network cable -...and vivid image on your BIOS easily without the hassle of booting the BIOS. 1-6 Chapter 1: Product Introduction When using an OS-based flash utility. ASUS EZ Flash 2 EZ Flash 2 is a user-friendly BIOS update utility. With AI Direct Link, it becomes easy to backup or share large ...
User Manual
Page 25
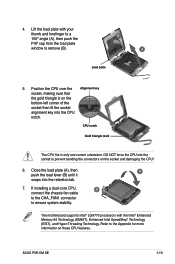
... (EIST), and Hyper-Threading Technology. ASUS P5E-VM SE 1-13 CPU notch Gold triangle mark The CPU fits in only one correct orientation. The motherboard supports Intel® LGA775 processors with your thumb and forefinger to a 100º angle (A), then push the PnP cap from the load plate window to prevent bending the connectors on...
... (EIST), and Hyper-Threading Technology. ASUS P5E-VM SE 1-13 CPU notch Gold triangle mark The CPU fits in only one correct orientation. The motherboard supports Intel® LGA775 processors with your thumb and forefinger to a 100º angle (A), then push the PnP cap from the load plate window to prevent bending the connectors on...
User Manual
Page 31
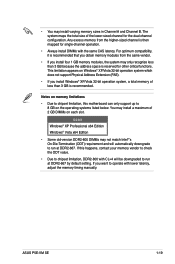
...; XP/Vista 32-bit operation system which does not support Physical Address Extension (PAE). • If you install Windows® XP/Vista 32-bit operation system, a total memory of the lower-sized channel for the dual-channel configuration. You may not match ...is recommended. For optimum compatibility, it is recommended that you obtain memory modules from the higher-sized channel is then mapped for other critical functions. ASUS P5E-VM SE 1-19 If you install four 1 GB memory modules, the system may install varying memory sizes in Channel A and Channel B. Any excess memory from...
...; XP/Vista 32-bit operation system which does not support Physical Address Extension (PAE). • If you install Windows® XP/Vista 32-bit operation system, a total memory of the lower-sized channel for the dual-channel configuration. You may not match ...is recommended. For optimum compatibility, it is recommended that you obtain memory modules from the higher-sized channel is then mapped for other critical functions. ASUS P5E-VM SE 1-19 If you install four 1 GB memory modules, the system may install varying memory sizes in Channel A and Channel B. Any excess memory from...
User Manual
Page 52
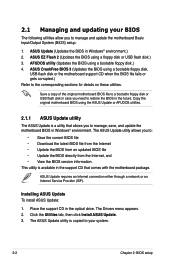
... support CD when the BIOS file fails or gets corrupted.) Refer to manage, save, and update the motherboard BIOS in Windows® environment. The ASUS Update utility is available in the support CD that allows you need to manage and update the motherboard Basic Input/Output System... bootable floppy disk or USB flash disk in case you to the corresponding sections for details on these utilities. Installing ASUS Update To install ASUS Update: 1. Place the support CD in Windows® environment.) 2. This utility is copied to : • Save the current BIOS file • Download the...
... support CD when the BIOS file fails or gets corrupted.) Refer to manage, save, and update the motherboard BIOS in Windows® environment. The ASUS Update utility is available in the support CD that allows you need to manage and update the motherboard Basic Input/Output System... bootable floppy disk or USB flash disk in case you to the corresponding sections for details on these utilities. Installing ASUS Update To install ASUS Update: 1. Place the support CD in Windows® environment.) 2. This utility is copied to : • Save the current BIOS file • Download the...
User Manual
Page 53
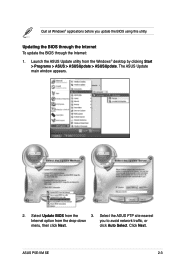
Click Next. ASUS P5E-VM SE 2-3 Select Update BIOS from the Windows® desktop by clicking Start > Programs > ASUS > ASUSUpdate > ASUSUpdate. Updating the BIOS through the Internet To update the BIOS through the Internet: 1. Launch the ASUS Update utility from the 3. The ASUS Update main window appears. 2. Select the ASUS FTP site nearest Internet option from the drop‑down you update the BIOS using this utility. Quit all Windows® applications before you to avoid network traffic, or menu, then click Next. click Auto Select.
Click Next. ASUS P5E-VM SE 2-3 Select Update BIOS from the Windows® desktop by clicking Start > Programs > ASUS > ASUSUpdate > ASUSUpdate. Updating the BIOS through the Internet To update the BIOS through the Internet: 1. Launch the ASUS Update utility from the 3. The ASUS Update main window appears. 2. Select the ASUS FTP site nearest Internet option from the drop‑down you update the BIOS using this utility. Quit all Windows® applications before you to avoid network traffic, or menu, then click Next. click Auto Select.
User Manual
Page 54
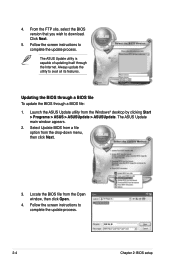
... file: 1. Updating the BIOS through a BIOS file To update the BIOS through the Internet. Locate the BIOS file from the Windows® desktop by clicking Start > Programs > ASUS > ASUSUpdate > ASUSUpdate. P5E-VM SE.rom P5E-VM SE 2-4 Chapter 2: BIOS setup From the FTP site, select the BIOS version that you wish to complete the update process. Select Update...
... file: 1. Updating the BIOS through a BIOS file To update the BIOS through the Internet. Locate the BIOS file from the Windows® desktop by clicking Start > Programs > ASUS > ASUSUpdate > ASUSUpdate. P5E-VM SE.rom P5E-VM SE 2-4 Chapter 2: BIOS setup From the FTP site, select the BIOS version that you wish to complete the update process. Select Update...

User Manual
Page 55
Insert a 1.44MB floppy disk into the drive. Select the 3 1/2 Floppy Drive icon. A Format 3 1/2 Floppy Disk window appears. Click File from the format options field, then click Start. 2. e. ASUS P5E-VM SE 2-5 Insert a 1.44 MB floppy disk to the bootable floppy disk. b. d. Copy the original or the latest motherboard BIOS file ... Format. 2.1.2 Creating a bootable floppy disk 1. DOS environment a. Do either one of the following to create a bootable floppy disk. Windows® XP environment a. Click Start from the Windows® desktop, then select My Computer.
Insert a 1.44MB floppy disk into the drive. Select the 3 1/2 Floppy Drive icon. A Format 3 1/2 Floppy Disk window appears. Click File from the format options field, then click Start. 2. e. ASUS P5E-VM SE 2-5 Insert a 1.44 MB floppy disk to the bootable floppy disk. b. d. Copy the original or the latest motherboard BIOS file ... Format. 2.1.2 Creating a bootable floppy disk 1. DOS environment a. Do either one of the following to create a bootable floppy disk. Windows® XP environment a. Click Start from the Windows® desktop, then select My Computer.
User Manual
Page 62
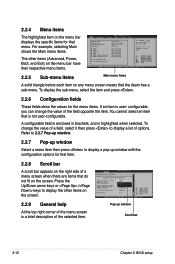
...fields show the values for the menu items. If an item is user- Press the Up/Down arrow keys or / keys to display a pop-up window with the configuration options for that item. 2.2.8 Scroll bar A scroll bar appears on the right side of a menu screen when there are items that the... iteam has a sub-menu. Refer to 2.2.7 Pop-up window. 2.2.7 Pop-up window Scroll bar 2-12 Chapter 2: BIOS setup Pop-up window Select a menu item then press to display the other items (Advanced, Power, Boot, and Exit) on any menu screen ...
...fields show the values for the menu items. If an item is user- Press the Up/Down arrow keys or / keys to display a pop-up window with the configuration options for that item. 2.2.8 Scroll bar A scroll bar appears on the right side of a menu screen when there are items that the... iteam has a sub-menu. Refer to 2.2.7 Pop-up window. 2.2.7 Pop-up window Scroll bar 2-12 Chapter 2: BIOS setup Pop-up window Select a menu item then press to display the other items (Advanced, Power, Boot, and Exit) on any menu screen ...

User Manual
Page 89
... the values to the Setup program. Discard Changes This option allows you to discard the selections you made to the non-volatile RAM. ASUS P5E-VM SE 2-39 If you to load the default values for each of the options from this option from the legend bar to save changes and... you made and restore the previously saved values. Select Screen Select Item Enter Go to load default values. After selecting this option, a confirmation window appears. When you want to exit the Setup program without saving your changes, the program prompts you with a message asking if you select this...
... the values to the Setup program. Discard Changes This option allows you to discard the selections you made to the non-volatile RAM. ASUS P5E-VM SE 2-39 If you to load the default values for each of the options from this option from the legend bar to save changes and... you made and restore the previously saved values. Select Screen Select Item Enter Go to load default values. After selecting this option, a confirmation window appears. When you want to exit the Setup program without saving your changes, the program prompts you with a message asking if you select this...
User Manual
Page 92
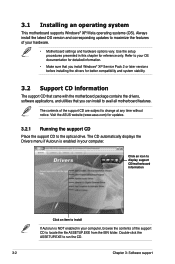
...the drivers for reference only. Double-click the ASSETUP.EXE to the optical drive. 3.1 Installing an operating system This motherboard supports Windows® XP/Vista operating systems (OS). Always install the latest OS version and corresponding updates to maximize the features of the ... contents of your computer. Use the setup procedures presented in your hardware. • Motherboard settings and hardware options vary. Visit the ASUS website (www.asus.com) for updates. 3.2.1 Running the support CD Place the support CD to run the CD. 3-2 Chapter 3: Software support Click ...
...the drivers for reference only. Double-click the ASSETUP.EXE to the optical drive. 3.1 Installing an operating system This motherboard supports Windows® XP/Vista operating systems (OS). Always install the latest OS version and corresponding updates to maximize the features of the ... contents of your computer. Use the setup procedures presented in your hardware. • Motherboard settings and hardware options vary. Visit the ASUS website (www.asus.com) for updates. 3.2.1 Running the support CD Place the support CD to run the CD. 3-2 Chapter 3: Software support Click ...

User Manual
Page 100
...; Vista 64-bit Edition or Windows® XP Professional x64 Edition). 3. Refer to the expansion card or add-on device(s) documentation, or visit the related website, to update the BIOS. You can download the latest BIOS file from the ASUS website (www.asus.com/ support/download/) if you ...need to update the BIOS file. A-2 Appendix: CPU features Install the 64-bit drivers for more information on Windows® 64-bit OS. A.1 Intel® EM64T • The ...
...; Vista 64-bit Edition or Windows® XP Professional x64 Edition). 3. Refer to the expansion card or add-on device(s) documentation, or visit the related website, to update the BIOS. You can download the latest BIOS file from the ASUS website (www.asus.com/ support/download/) if you ...need to update the BIOS file. A-2 Appendix: CPU features Install the 64-bit drivers for more information on Windows® 64-bit OS. A.1 Intel® EM64T • The ...

User Manual
Page 101
When the Display Properties window appears, click the Screen Saver tab. 7. Click Apply, then click OK. 10. item to save your changes and exit the BIOS setup. 5. After you adjust ... , then select any option except Home/Office Desktop or Always On. 9. ASUS P5E-VM SE A-3 After the computer restarts, right click on a blank space on the computer, then enter the BIOS Setup. 2. Close the Display Properties window. Go to open the Power Options Properties window. 8. Turn on the desktop, then select Properties from the pop-up...
When the Display Properties window appears, click the Screen Saver tab. 7. Click Apply, then click OK. 10. item to save your changes and exit the BIOS setup. 5. After you adjust ... , then select any option except Home/Office Desktop or Always On. 9. ASUS P5E-VM SE A-3 After the computer restarts, right click on a blank space on the computer, then enter the BIOS Setup. 2. Close the Display Properties window. Go to open the Power Options Properties window. 8. Turn on the desktop, then select Properties from the pop-up...

User Manual
Page 102
...using any other operating systems, disable the Hyper-Threading Technology item in the BIOS to ensure system stability and performance. • Installing Windows® XP Service Pack 1 or later version is recommended. • Make sure to enable the Hyper-Threading Technology item in BIOS... Technology, visit www.intel.com/info/hyperthreading. Under the Advanced Menu, make sure that the item Hyper‑Threading Technology is supported under Windows® Vista/XP and Linux 2.4.x (kernel) and later versions only. Using the Hyper-Threading Technology To use the HyperThreading compiler to ...
...using any other operating systems, disable the Hyper-Threading Technology item in the BIOS to ensure system stability and performance. • Installing Windows® XP Service Pack 1 or later version is recommended. • Make sure to enable the Hyper-Threading Technology item in BIOS... Technology, visit www.intel.com/info/hyperthreading. Under the Advanced Menu, make sure that the item Hyper‑Threading Technology is supported under Windows® Vista/XP and Linux 2.4.x (kernel) and later versions only. Using the Hyper-Threading Technology To use the HyperThreading compiler to ...


