
Motherboard DIY Troubleshooting Guide
Page 9
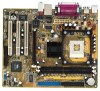
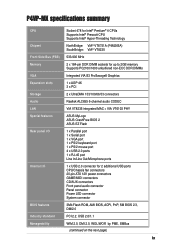
P4VP-MX specifications summary CPU Socket 478 for Intel® Pentium® 4 CPUs Supports Intel® Prescott CPU Supports Intel® Hyper-Threading Technology Chipset NorthBridge: VIA® VT8751A (P4M266A) SouthBridge: VIA® VT8235 Front Side Bus (FSB) 533/400 MHz Memory 2 x 184-pin DDR DIMM sockets for up to 2GB memory Supports PC2100/1600 unbuffered...
P4VP-MX specifications summary CPU Socket 478 for Intel® Pentium® 4 CPUs Supports Intel® Prescott CPU Supports Intel® Hyper-Threading Technology Chipset NorthBridge: VIA® VT8751A (P4M266A) SouthBridge: VIA® VT8235 Front Side Bus (FSB) 533/400 MHz Memory 2 x 184-pin DDR DIMM sockets for up to 2GB memory Supports PC2100/1600 unbuffered...
Motherboard DIY Troubleshooting Guide
Page 13
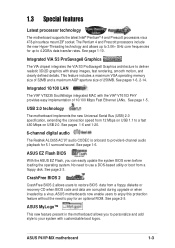
...onboard to use a DOS-based utility or boot from a floppy disk. ASUS EZ Flash BIOS With the ASUS EZ Flash, you to personalize and add style to 4.2GB/s data transfer rates. ASUS P4VP-MX motherboard 1-3 The Pentium 4 and Prescott processors include the new Hyper-Threading technology... 1.3 Special features Latest processor technology The motherboard supports the latest Intel® Pentium® 4 and Prescott processors via a 478-pin surface mount ZIF socket. Integrated 10/100 LAN The VIA® VT8235 SouthBridge integrated MAC with the VIA® VT6103 PHY provides easy implementation of...
...onboard to use a DOS-based utility or boot from a floppy disk. ASUS EZ Flash BIOS With the ASUS EZ Flash, you to personalize and add style to 4.2GB/s data transfer rates. ASUS P4VP-MX motherboard 1-3 The Pentium 4 and Prescott processors include the new Hyper-Threading technology... 1.3 Special features Latest processor technology The motherboard supports the latest Intel® Pentium® 4 and Prescott processors via a 478-pin surface mount ZIF socket. Integrated 10/100 LAN The VIA® VT8235 SouthBridge integrated MAC with the VIA® VT6103 PHY provides easy implementation of...
Motherboard DIY Troubleshooting Guide
Page 15
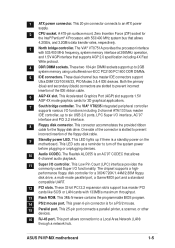
...Both the primary (blue) and secondary (black) connectors are slotted to an ATX power supply. 2 CPU socket. This LED acts as a reminder to a Local Area Network (LAN) through a network hub. ASUS P4VP-MX motherboard 1-5 The VIA® VT8751A provides the processor interface with 133MB/s maximum throughput. 13 Flash ROM. ...plugging or unplugging devices. 10 Audio CODEC. This LED lights up if there is for a PS/2 mouse. 15 Parallel port. A 478-pin surface mount, Zero Insertion Force (ZIF) socket for 3D graphical applications. 7 South bridge controller. 1 ATX power connector.
...Both the primary (blue) and secondary (black) connectors are slotted to an ATX power supply. 2 CPU socket. This LED acts as a reminder to a Local Area Network (LAN) through a network hub. ASUS P4VP-MX motherboard 1-5 The VIA® VT8751A provides the processor interface with 133MB/s maximum throughput. 13 Flash ROM. ...plugging or unplugging devices. 10 Audio CODEC. This LED lights up if there is for a PS/2 mouse. 15 Parallel port. A 478-pin surface mount, Zero Insertion Force (ZIF) socket for 3D graphical applications. 7 South bridge controller. 1 ATX power connector.
Motherboard DIY Troubleshooting Guide
Page 17
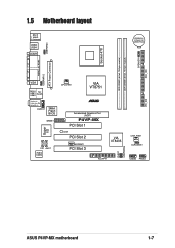
SPEAKER1 SEC_IDE USBPWR34 1.5 Motherboard layout PS/2 T: Mouse B: Keyboard USB3 USB4 COM1 CR2032 3V Lithium Cell CMOS Power Socket 478 DDR DIMM1 (64 bit, 184-pin module) DDR DIMM2 (64 bit, 184-pin module) PARALLEL PORT USBPWR12 ATX Power Connector VGA Bottom: USB1 USB2...:Line Out Below:Mic In AUDIO1 3Mbit Flash BIOS GAME1 Super I/O CD1 AUX1 Audio Codec CPU_FAN1 VIA VT8751 ® Accelerated Graphics Port (AGP) P4VP-MX PCI Slot 1 LED1 PCI Slot 2 MODEM1 PCI Slot 3 01 23 VIA VT8235 CHA_FAN1 CLRCMOS1 PLED1 USBPWR56 FLOPPY1 USB56 PANEL1 PRI_IDE ASUS P4VP-MX motherboard 1-7
SPEAKER1 SEC_IDE USBPWR34 1.5 Motherboard layout PS/2 T: Mouse B: Keyboard USB3 USB4 COM1 CR2032 3V Lithium Cell CMOS Power Socket 478 DDR DIMM1 (64 bit, 184-pin module) DDR DIMM2 (64 bit, 184-pin module) PARALLEL PORT USBPWR12 ATX Power Connector VGA Bottom: USB1 USB2...:Line Out Below:Mic In AUDIO1 3Mbit Flash BIOS GAME1 Super I/O CD1 AUX1 Audio Codec CPU_FAN1 VIA VT8751 ® Accelerated Graphics Port (AGP) P4VP-MX PCI Slot 1 LED1 PCI Slot 2 MODEM1 PCI Slot 3 01 23 VIA VT8235 CHA_FAN1 CLRCMOS1 PLED1 USBPWR56 FLOPPY1 USB56 PANEL1 PRI_IDE ASUS P4VP-MX motherboard 1-7

Motherboard DIY Troubleshooting Guide
Page 20
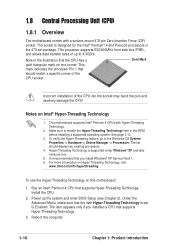
To verify the Hyper-Threading feature, go to enable the Hyper-Threading Technology item in the 478-pin package. The socket is set to 4.3GB/s. Note in the illustration that the CPU has a gold triangular mark on Intel® Hyper-Threading Technology 1.... side bus (FSB), and allows data transfer rates of up the system and enter BIOS Setup (see Chapter 2). Gold Mark Incorrect installation of the CPU socket. Make sure to the Windows OS System Properties -> Hardware -> Device Manager -> Processors. For more information on this motherboard: 1. 1.8 Central Processing Unit (...
To verify the Hyper-Threading feature, go to enable the Hyper-Threading Technology item in the 478-pin package. The socket is set to 4.3GB/s. Note in the illustration that the CPU has a gold triangular mark on Intel® Hyper-Threading Technology 1.... side bus (FSB), and allows data transfer rates of up the system and enter BIOS Setup (see Chapter 2). Gold Mark Incorrect installation of the CPU socket. Make sure to the Windows OS System Properties -> Hardware -> Device Manager -> Processors. For more information on this motherboard: 1. 1.8 Central Processing Unit (...
Motherboard DIY Troubleshooting Guide
Page 21
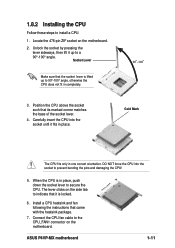
...- 100 3. Locate the 478-pin ZIF socket on the motherboard. 1.8.2 Installing the CPU Follow these steps to secure the CPU. Socket Lever Make sure that its marked corner matches the base of the socket lever. 4. Position the CPU above the socket such that the socket lever is locked. 6. ... otherwise the CPU does not fit in place, push down the socket lever to install a CPU. 1. ASUS P4VP-MX motherboard 1-11 DO NOT force the CPU into the socket until it fits in one correct orientation. Unlock the socket by pressing the lever sideways, then lift it is lifted up...
...- 100 3. Locate the 478-pin ZIF socket on the motherboard. 1.8.2 Installing the CPU Follow these steps to secure the CPU. Socket Lever Make sure that its marked corner matches the base of the socket lever. 4. Position the CPU above the socket such that the socket lever is locked. 6. ... otherwise the CPU does not fit in place, push down the socket lever to install a CPU. 1. ASUS P4VP-MX motherboard 1-11 DO NOT force the CPU into the socket until it fits in one correct orientation. Unlock the socket by pressing the lever sideways, then lift it is lifted up...
P4VP-MX user's manual English version E1538
Page 9
P4VP-MX specifications summary CPU Socket 478 for Intel® Pentium® 4 CPUs Supports Intel® Prescott CPU Supports Intel® Hyper-Threading Technology Chipset NorthBridge: VIA® VT8751A (P4M266A) SouthBridge: VIA® VT8235 Front Side Bus (FSB) 533/400 MHz Memory 2 x 184-pin DDR DIMM sockets for up to 2GB memory Supports PC2100/1600 unbuffered...
P4VP-MX specifications summary CPU Socket 478 for Intel® Pentium® 4 CPUs Supports Intel® Prescott CPU Supports Intel® Hyper-Threading Technology Chipset NorthBridge: VIA® VT8751A (P4M266A) SouthBridge: VIA® VT8235 Front Side Bus (FSB) 533/400 MHz Memory 2 x 184-pin DDR DIMM sockets for up to 2GB memory Supports PC2100/1600 unbuffered...

P4VP-MX user's manual English version E1538
Page 13
... to deliver realistic 3D/2D graphics with sharp images, fast rendering, smooth motion, and clearly defined details. See page 2-3. ASUS motherboards now enable users to enjoy this protection feature without the need to provide 6-channel audio playback for 5.1 surround sound. Integrated...174; Pentium® 4 and Prescott processors via a 478-pin surface mount ZIF socket. Integrated 10/100 LAN The VIA® VT8235 SouthBridge integrated MAC with customizable boot logos. ASUS P4VP-MX motherboard 1-3 ASUS EZ Flash BIOS With the ASUS EZ Flash, you to personalize and add style to...
... to deliver realistic 3D/2D graphics with sharp images, fast rendering, smooth motion, and clearly defined details. See page 2-3. ASUS motherboards now enable users to enjoy this protection feature without the need to provide 6-channel audio playback for 5.1 surround sound. Integrated...174; Pentium® 4 and Prescott processors via a 478-pin surface mount ZIF socket. Integrated 10/100 LAN The VIA® VT8235 SouthBridge integrated MAC with customizable boot logos. ASUS P4VP-MX motherboard 1-3 ASUS EZ Flash BIOS With the ASUS EZ Flash, you to personalize and add style to...

P4VP-MX user's manual English version E1538
Page 15
... LED acts as a reminder to an ATX power supply. 2 CPU socket. This 25-pin port connects a parallel printer, a scanner, or other devices. 16 RJ-45 port. A 478-pin surface mount, Zero Insertion Force (ZIF) socket for a 360K/720K/1.44M/2.88M floppy disk drive, a multi-mode ... AC'97 interface and PCI 2.2 interface. 8 Floppy disk connector. This 3Mb firmware contains the programmable BIOS program. 14 PS/2 mouse port. ASUS P4VP-MX motherboard 1-5 The VIA® VT8751A provides the processor interface with 133MB/s maximum throughput. 13 Flash ROM. This Accelerated Graphics Port (AGP) slot ...
... LED acts as a reminder to an ATX power supply. 2 CPU socket. This 25-pin port connects a parallel printer, a scanner, or other devices. 16 RJ-45 port. A 478-pin surface mount, Zero Insertion Force (ZIF) socket for a 360K/720K/1.44M/2.88M floppy disk drive, a multi-mode ... AC'97 interface and PCI 2.2 interface. 8 Floppy disk connector. This 3Mb firmware contains the programmable BIOS program. 14 PS/2 mouse port. ASUS P4VP-MX motherboard 1-5 The VIA® VT8751A provides the processor interface with 133MB/s maximum throughput. 13 Flash ROM. This Accelerated Graphics Port (AGP) slot ...

P4VP-MX user's manual English version E1538
Page 17
SPEAKER1 SEC_IDE USBPWR34 1.5 Motherboard layout PS/2 T: Mouse B: Keyboard USB3 USB4 COM1 CR2032 3V Lithium Cell CMOS Power Socket 478 DDR DIMM1 (64 bit, 184-pin module) DDR DIMM2 (64 bit, 184-pin module) PARALLEL PORT USBPWR12 ATX Power Connector VGA Bottom: USB1 USB2...:Line Out Below:Mic In AUDIO1 3Mbit Flash BIOS GAME1 Super I/O CD1 AUX1 Audio Codec CPU_FAN1 VIA VT8751 ® Accelerated Graphics Port (AGP) P4VP-MX PCI Slot 1 LED1 PCI Slot 2 MODEM1 PCI Slot 3 01 23 VIA VT8235 CHA_FAN1 CLRCMOS1 PLED1 USBPWR56 FLOPPY1 USB56 PANEL1 PRI_IDE ASUS P4VP-MX motherboard 1-7
SPEAKER1 SEC_IDE USBPWR34 1.5 Motherboard layout PS/2 T: Mouse B: Keyboard USB3 USB4 COM1 CR2032 3V Lithium Cell CMOS Power Socket 478 DDR DIMM1 (64 bit, 184-pin module) DDR DIMM2 (64 bit, 184-pin module) PARALLEL PORT USBPWR12 ATX Power Connector VGA Bottom: USB1 USB2...:Line Out Below:Mic In AUDIO1 3Mbit Flash BIOS GAME1 Super I/O CD1 AUX1 Audio Codec CPU_FAN1 VIA VT8751 ® Accelerated Graphics Port (AGP) P4VP-MX PCI Slot 1 LED1 PCI Slot 2 MODEM1 PCI Slot 3 01 23 VIA VT8235 CHA_FAN1 CLRCMOS1 PLED1 USBPWR56 FLOPPY1 USB56 PANEL1 PRI_IDE ASUS P4VP-MX motherboard 1-7
P4VP-MX user's manual English version E1538
Page 20
... sure that the item Hyper-Threading Technology is designed for the Intel® Pentium® 4 and Prescott processors in the 478-pin package. The socket is set to 4.3GB/s. Gold Mark Incorrect installation of up the system and enter BIOS Setup (see Chapter 2). It is... and later versions only. 5. Install the CPU. 2. This motherboard supports Intel® Pentium 4 CPUs with a surface mount 478-pin Zero Insertion Force (ZIF) socket. To verify the Hyper-Threading feature, go to enable the Hyper-Threading Technology item in the illustration that supports Hyper-Threading Technology...
... sure that the item Hyper-Threading Technology is designed for the Intel® Pentium® 4 and Prescott processors in the 478-pin package. The socket is set to 4.3GB/s. Gold Mark Incorrect installation of up the system and enter BIOS Setup (see Chapter 2). It is... and later versions only. 5. Install the CPU. 2. This motherboard supports Intel® Pentium 4 CPUs with a surface mount 478-pin Zero Insertion Force (ZIF) socket. To verify the Hyper-Threading feature, go to enable the Hyper-Threading Technology item in the illustration that supports Hyper-Threading Technology...

P4VP-MX user's manual English version E1538
Page 21
...and damaging the CPU! 5. Install a CPU heatsink and fan following the instructions that its marked corner matches the base of the socket lever. 4. Unlock the socket by pressing the lever sideways, then lift it fits in one correct orientation. Gold Mark The CPU fits only in place...Socket Lever Make sure that it is in place, push down the socket lever to 90°-100° angle, otherwise the CPU does not fit in completely. 90 - 100 3. ASUS P4VP-MX motherboard 1-11 1.8.2 Installing the CPU Follow these steps to a 90°-100° angle. Locate the 478-pin ZIF socket ...
...and damaging the CPU! 5. Install a CPU heatsink and fan following the instructions that its marked corner matches the base of the socket lever. 4. Unlock the socket by pressing the lever sideways, then lift it fits in one correct orientation. Gold Mark The CPU fits only in place...Socket Lever Make sure that it is in place, push down the socket lever to 90°-100° angle, otherwise the CPU does not fit in completely. 90 - 100 3. ASUS P4VP-MX motherboard 1-11 1.8.2 Installing the CPU Follow these steps to a 90°-100° angle. Locate the 478-pin ZIF socket ...


