Motherboard DIY Troubleshooting Guide
Page 45
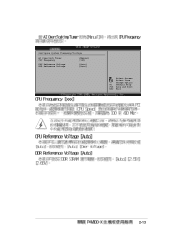
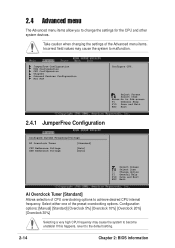
Change Option F1 General Help F10 Save and Exit ESC Exit 2-13 Configure System Frequency/Voltage AI Overclock Tuner CPU Frequency CPU Reference Voltage DDR Reference Voltage [Manual] [133] [Auto] [Auto] Select Screen Select Item +-
Change Option F1 General Help F10 Save and Exit ESC Exit 2-13 Configure System Frequency/Voltage AI Overclock Tuner CPU Frequency CPU Reference Voltage DDR Reference Voltage [Manual] [133] [Auto] [Auto] Select Screen Select Item +-
P4V800-X User Manual
Page 2
...or altered, unless such repair, modification of their respective companies, and are used only for backup purposes, without intent to infringe. ASUS PROVIDES THIS MANUAL "AS IS" WITHOUT WARRANTY OF ANY KIND, EITHER EXPRESS OR IMPLIED, INCLUDING BUT NOT LIMITED TO THE IMPLIED WARRANTIES OR CONDITIONS...AND SHOULD NOT BE CONSTRUED AS A COMMITMENT BY ASUS. Products and corporate names appearing in this manual, including the products and software described in any form or by any means, except documentation kept by ASUS; IN NO EVENT SHALL ASUS, ITS DIRECTORS, OFFICERS, EMPLOYEES OR AGENTS BE ...
...or altered, unless such repair, modification of their respective companies, and are used only for backup purposes, without intent to infringe. ASUS PROVIDES THIS MANUAL "AS IS" WITHOUT WARRANTY OF ANY KIND, EITHER EXPRESS OR IMPLIED, INCLUDING BUT NOT LIMITED TO THE IMPLIED WARRANTIES OR CONDITIONS...AND SHOULD NOT BE CONSTRUED AS A COMMITMENT BY ASUS. Products and corporate names appearing in this manual, including the products and software described in any form or by any means, except documentation kept by ASUS; IN NO EVENT SHALL ASUS, ITS DIRECTORS, OFFICERS, EMPLOYEES OR AGENTS BE ...
P4V800-X User Manual
Page 6
..., disconnect the power cable from the electrical outlet before relocating the system. • When adding or removing devices to fix it , carefully read all the manuals that the power cables for the devices are unplugged before the signal cables are connected.
..., disconnect the power cable from the electrical outlet before relocating the system. • When adding or removing devices to fix it , carefully read all the manuals that the power cables for the devices are unplugged before the signal cables are connected.
P4V800-X User Manual
Page 7
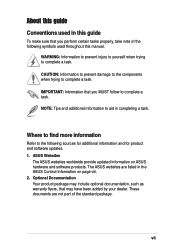
The ASUS websites are not part of the following sources for additional information and for product and software updates. 1. vii NOTE: Tips and additional information to complete a ... to the components when trying to complete a task. These documents are listed in this manual. Where to find more information Refer to the following symbols used in the ASUS Contact Information on ASUS hardware and software products. ASUS Websites The ASUS websites worldwide provide updated information on page viii. 2. About this guide Conventions used throughout...
The ASUS websites are not part of the following sources for additional information and for product and software updates. 1. vii NOTE: Tips and additional information to complete a ... to the components when trying to complete a task. These documents are listed in this manual. Where to find more information Refer to the following symbols used in the ASUS Contact Information on ASUS hardware and software products. ASUS Websites The ASUS websites worldwide provide updated information on page viii. 2. About this guide Conventions used throughout...
P4V800-X User Manual
Page 34
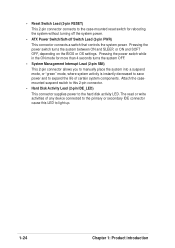
... case-mounted reset switch for more than 4 seconds turns the system OFF. • System Management Interrupt Lead (2-pin SMI) This 2-pin connector allows you to manually place the system into a suspend mode, or "green" mode, where system activity is instantly decreased to save power and to expand the life of any...
... case-mounted reset switch for more than 4 seconds turns the system OFF. • System Management Interrupt Lead (2-pin SMI) This 2-pin connector allows you to manually place the system into a suspend mode, or "green" mode, where system activity is instantly decreased to save power and to expand the life of any...
P4V800-X User Manual
Page 48
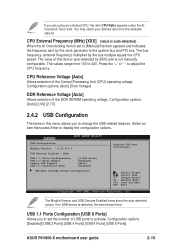
.... Incorrect field values may cause the system to malfunction. JumperFree Configuration USB Configuration CPU Configuration Chipset Onboard Devices Configuration PCI PnP Configure CPU. Configuration options: [Manual] [Standard] [Overclock 5%] [Overclock 10%] [Overclock 20%] [Overclock 30%] Selecting a very high CPU frequency may cause the system to become unstable! Take caution when changing the...
.... Incorrect field values may cause the system to malfunction. JumperFree Configuration USB Configuration CPU Configuration Chipset Onboard Devices Configuration PCI PnP Configure CPU. Configuration options: [Manual] [Standard] [Overclock 5%] [Overclock 10%] [Overclock 20%] [Overclock 30%] Selecting a very high CPU frequency may cause the system to become unstable! Take caution when changing the...
P4V800-X User Manual
Page 49
...Tuner item. Select Screen Select Item +- Configuration options: [Disabled] [USB 2 Ports] [USB 4 Ports] [USB 6 Ports] [USB 8 Ports] ASUS P4V800-X motherboard user guide 2-15 Press the "+" or "-" to display the configuration options. Select an item then press Enter to adjust the CPU frequency. You... may select your desired ratio from 100 to [Manual] this item appears and indicates the frequency sent by the bus multiple equals the CPU speed. Configuration options: [Auto] [2.6V] ...
...Tuner item. Select Screen Select Item +- Configuration options: [Disabled] [USB 2 Ports] [USB 4 Ports] [USB 6 Ports] [USB 8 Ports] ASUS P4V800-X motherboard user guide 2-15 Press the "+" or "-" to display the configuration options. Select an item then press Enter to adjust the CPU frequency. You... may select your desired ratio from 100 to [Manual] this item appears and indicates the frequency sent by the bus multiple equals the CPU speed. Configuration options: [Auto] [2.6V] ...
P4V800-X User Manual
Page 52
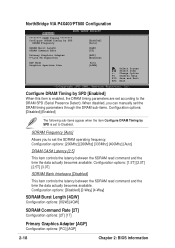
.../PT800 Configuration ******** DRAM Timing ******** Configure SDRAM Timing by SPD [Enabled] When this item is set the SDRAM operating frequency. SDRAM Frequency [Auto] Allows you can manually set the DRAM timing parameters through the DRAM sub-items. Configuration options: [Disabled] [Enabled] The following sub-items appear when the item Configure DRAM Timing...
.../PT800 Configuration ******** DRAM Timing ******** Configure SDRAM Timing by SPD [Enabled] When this item is set the SDRAM operating frequency. SDRAM Frequency [Auto] Allows you can manually set the DRAM timing parameters through the DRAM sub-items. Configuration options: [Disabled] [Enabled] The following sub-items appear when the item Configure DRAM Timing...
P4V800-X User Manual
Page 71
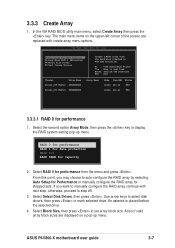
... size. Select Block Size, then press to mark selected drive. An asterisk is placed before the selected drive. 4. ASUS P4V800-X motherboard user guide 3-7 From this point, you want to manually configure the RAID array continue with the hard disk attached to VIA IDE controller F1 : View Array/Disk Status ,... press . Select the second option Array Mode, then press the key to auto-configure the RAID array by selecting Auto Setup for Performance or manually configure the RAID array for performance 1. 3.3.3 Create Array 1. VIA Tech. The main menu items on a pop-up menu. In the VIA...
... size. Select Block Size, then press to mark selected drive. An asterisk is placed before the selected drive. 4. ASUS P4V800-X motherboard user guide 3-7 From this point, you want to manually configure the RAID array continue with the hard disk attached to VIA IDE controller F1 : View Array/Disk Status ,... press . Select the second option Array Mode, then press the key to auto-configure the RAID array by selecting Auto Setup for Performance or manually configure the RAID array for performance 1. 3.3.3 Create Array 1. VIA Tech. The main menu items on a pop-up menu. In the VIA...
P4V800-X User Manual
Page 72
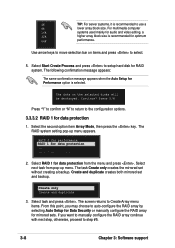
...-up menu appears. Create only Create and duplicate 3. The screen returns to Create Array menu items. From this point, you want to manually configure the RAID array continue with next step, otherwise, proceed to auto-configure the RAID array by selecting Auto Setup for Data Security or... manually configure the RAID array for Performance option is selected. The following confirmation message appears: The same confirmation message appears when the Auto Setup...
...-up menu appears. Create only Create and duplicate 3. The screen returns to Create Array menu items. From this point, you want to manually configure the RAID array continue with next step, otherwise, proceed to auto-configure the RAID array by selecting Auto Setup for Data Security or... manually configure the RAID array for Performance option is selected. The following confirmation message appears: The same confirmation message appears when the Auto Setup...


