Motherboard DIY Troubleshooting Guide
Page 4
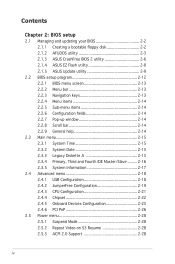
... a bootable floppy disk 2-2 2.1.2 AFUDOS utility 2-3 2.1.3 ASUS CrashFree BIOS 2 utility 2-6 2.1.4 ASUS EZ Flash utility 2-8 2.1.5 ASUS Update utility 2-9 2.2 BIOS setup program 2-12 2.2.1 BIOS menu screen 2-13 2.2.2 Menu bar 2-13 2.2.3 Navigation keys 2-13 2.2.4 Menu items 2-14 2.2.5 Sub-menu items 2-14 2.2.6 Configuration fields 2-14 2.2.7 Pop-up window 2-...
... a bootable floppy disk 2-2 2.1.2 AFUDOS utility 2-3 2.1.3 ASUS CrashFree BIOS 2 utility 2-6 2.1.4 ASUS EZ Flash utility 2-8 2.1.5 ASUS Update utility 2-9 2.2 BIOS setup program 2-12 2.2.1 BIOS menu screen 2-13 2.2.2 Menu bar 2-13 2.2.3 Navigation keys 2-13 2.2.4 Menu items 2-14 2.2.5 Sub-menu items 2-14 2.2.6 Configuration fields 2-14 2.2.7 Pop-up window 2-...
Motherboard DIY Troubleshooting Guide
Page 8
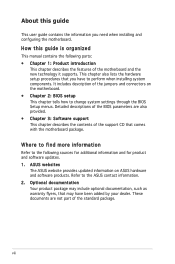
Detailed descriptions of the BIOS parameters are not part of the jumpers and connectors on ASUS hardware and software products. Optional documentation Your product package may include optional documentation, such as warranty flyers, that comes...hardware setup procedures that you need when installing and configuring the motherboard. viii ASUS websites The ASUS website provides updated information on the motherboard. • Chapter 2: BIOS setup This chapter tells how to the ASUS contact information. 2. These documents are also provided. • Chapter 3: Software support ...
Detailed descriptions of the BIOS parameters are not part of the jumpers and connectors on ASUS hardware and software products. Optional documentation Your product package may include optional documentation, such as warranty flyers, that comes...hardware setup procedures that you need when installing and configuring the motherboard. viii ASUS websites The ASUS website provides updated information on the motherboard. • Chapter 2: BIOS setup This chapter tells how to the ASUS contact information. 2. These documents are also provided. • Chapter 3: Software support ...

Motherboard DIY Troubleshooting Guide
Page 10
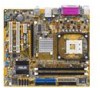
P4RD1-MX specifications summary CPU Chipset Socket 478 for Intel® Pentium® 4/Celeron® processor Supports Intel® Hyper-Threading Technology Northbridge: ATi® ... Jack-sensing and enumeration technology Supports S/PDIF out LAN RLC8201CL 10/100 Mbps PCI LAN controller Overclocking features ASUS C.P.R. (CPU Parameter Recall) Stepless Frequency Selection(SFS) from 100 MHz up to 8 USB 2.0 ports ASUS special features ASUS CrashFree BIOS 2 ASUS MyLogo BIOS features 4 MB Flash ROM, AMI BIOS, PnP, DMI2.0, SM BIOS 2.3, WfM2.0 (continued on the next page) x
P4RD1-MX specifications summary CPU Chipset Socket 478 for Intel® Pentium® 4/Celeron® processor Supports Intel® Hyper-Threading Technology Northbridge: ATi® ... Jack-sensing and enumeration technology Supports S/PDIF out LAN RLC8201CL 10/100 Mbps PCI LAN controller Overclocking features ASUS C.P.R. (CPU Parameter Recall) Stepless Frequency Selection(SFS) from 100 MHz up to 8 USB 2.0 ports ASUS special features ASUS CrashFree BIOS 2 ASUS MyLogo BIOS features 4 MB Flash ROM, AMI BIOS, PnP, DMI2.0, SM BIOS 2.3, WfM2.0 (continued on the next page) x

Motherboard DIY Troubleshooting Guide
Page 17
...(CPU Parameter Recall) The C.P.R. Simply shut down and reboot the system, and the BIOS automatically restores the CPU previous setting for each parameter. ASUS MyLogo™ This new feature present in case the system hangs due to overclocking. ...BIOS default settings in the motherboard allows you to restore the original BIOS data from the support CD in case when the BIOS codes and data are corrupted. See page 2-32. 1.3.2 Innovative ASUS features CrashFree BIOS 2 This feature allows you to personalize and add style to your system with customizable boot logos. ASUS P4RD1-MX...
...(CPU Parameter Recall) The C.P.R. Simply shut down and reboot the system, and the BIOS automatically restores the CPU previous setting for each parameter. ASUS MyLogo™ This new feature present in case the system hangs due to overclocking. ...BIOS default settings in the motherboard allows you to restore the original BIOS data from the support CD in case when the BIOS codes and data are corrupted. See page 2-32. 1.3.2 Innovative ASUS features CrashFree BIOS 2 This feature allows you to personalize and add style to your system with customizable boot logos. ASUS P4RD1-MX...

Motherboard DIY Troubleshooting Guide
Page 20
... PORT VGA USB12 USBPW12 USBPW34 LAN_USB34 Top:Line In Center:Line Out Below:Mic In ATX12V TV_C ATI RADEON XPRESS 200 PWR_FAN RTL8201CL PCIEX1_1 PCIEX16 P4RD1-MX ® CR2032 3V Lithium Cell CMOS Power PCI1 SPDIF_OUT AD1986A AAFP CD SB_PWR PCI2 USBPW78 USBPW56 USB78 ULI M1573 SATA4 SATA3 SATA2 SATA1 USB56 CLRTC...
... PORT VGA USB12 USBPW12 USBPW34 LAN_USB34 Top:Line In Center:Line Out Below:Mic In ATX12V TV_C ATI RADEON XPRESS 200 PWR_FAN RTL8201CL PCIEX1_1 PCIEX16 P4RD1-MX ® CR2032 3V Lithium Cell CMOS Power PCI1 SPDIF_OUT AD1986A AAFP CD SB_PWR PCI2 USBPW78 USBPW56 USB78 ULI M1573 SATA4 SATA3 SATA2 SATA1 USB56 CLRTC...

Motherboard DIY Troubleshooting Guide
Page 22
... recommended. • Make sure to secure the CPU. 3. Carefully insert the CPU into the socket to indicate that it fits in BIOS before installing a supported operating system. • For more information on Intel® Hyper-Threading Technology • This motherboard supports Intel® Pentium... the pins and damaging the CPU! If you are using any other operating systems, disable the Hyper-Threading Technology item in the BIOS to compile the code. Notes on Hyper-Threading Technology, visit www.intel.com/info/hyperthreading. 1-10 Chapter 1: Product introduction Position ...
... recommended. • Make sure to secure the CPU. 3. Carefully insert the CPU into the socket to indicate that it fits in BIOS before installing a supported operating system. • For more information on Intel® Hyper-Threading Technology • This motherboard supports Intel® Pentium... the pins and damaging the CPU! If you are using any other operating systems, disable the Hyper-Threading Technology item in the BIOS to compile the code. Notes on Hyper-Threading Technology, visit www.intel.com/info/hyperthreading. 1-10 Chapter 1: Product introduction Position ...

Motherboard DIY Troubleshooting Guide
Page 23
... dual channel memory architechture. The following figure illustrates the location of the sockets: P4RD1-MX ® P4RD1-MX 184-pin DDR DIMM sockets DIMM_A1 DIMM_B1 104 Pins 80 Pins ASUS P4RD1-MX 1-11 Power up the system and enter the BIOS Setup (see Chapter 2: BIOS setup). Reboot the computer. 1.7 System memory 1.7.1 Overview The motherboard comes with two 184...
... dual channel memory architechture. The following figure illustrates the location of the sockets: P4RD1-MX ® P4RD1-MX 184-pin DDR DIMM sockets DIMM_A1 DIMM_B1 104 Pins 80 Pins ASUS P4RD1-MX 1-11 Power up the system and enter the BIOS Setup (see Chapter 2: BIOS setup). Reboot the computer. 1.7 System memory 1.7.1 Overview The motherboard comes with two 184...
Motherboard DIY Troubleshooting Guide
Page 26
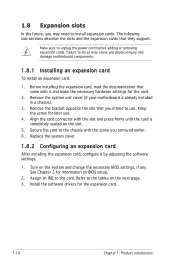
... the next page. 3. Turn on the slot. 5. Refer to unplug the power cord before adding or removing expansion cards. Make sure to the tables on BIOS setup. 2. Align the card connector with the slot and press firmly until the card is already installed in a chassis). 3. The following sub-sections describe... later use . See Chapter 2 for the card. 2. Remove the system unit cover (if your motherboard is completely seated on the system and change the necessary BIOS settings, if any.
... the next page. 3. Turn on the slot. 5. Refer to unplug the power cord before adding or removing expansion cards. Make sure to the tables on BIOS setup. 2. Align the card connector with the slot and press firmly until the card is already installed in a chassis). 3. The following sub-sections describe... later use . See Chapter 2 for the card. 2. Remove the system unit cover (if your motherboard is completely seated on the system and change the necessary BIOS settings, if any.

Motherboard DIY Troubleshooting Guide
Page 29
... the cap will cause system boot failure! ASUS P4RD1-MX 1-17 1.9 Jumpers 1. Plug the power cord and turn ON the computer. 6. Remove the onboard battery. 3. Keep the cap on CLRTC jumper default position. Hold down and reboot the system so the BIOS can clear the CMOS memory of date, ...; P4RD1-MX Clear RTC RAM CLRTC 2 1 Normal (Default) 3 2 Clear CMOS You do not need to clear the RTC when the system hangs due to pins 2-3. Shut down the key during the boot process and enter BIOS setup to overclocking, use the C.P.R. (CPU Parameter Recall) feature. Except when clearing...
... the cap will cause system boot failure! ASUS P4RD1-MX 1-17 1.9 Jumpers 1. Plug the power cord and turn ON the computer. 6. Remove the onboard battery. 3. Keep the cap on CLRTC jumper default position. Hold down and reboot the system so the BIOS can clear the CMOS memory of date, ...; P4RD1-MX Clear RTC RAM CLRTC 2 1 Normal (Default) 3 2 Clear CMOS You do not need to clear the RTC when the system hangs due to pins 2-3. Shut down the key during the boot process and enter BIOS setup to overclocking, use the C.P.R. (CPU Parameter Recall) feature. Except when clearing...

Motherboard DIY Troubleshooting Guide
Page 31
Keyboard power (3-pin KBPWR) This jumper allows you to wake up feature. Set this jumper to pins 2-3 (+5VSB) to enable or disable the keyboard wake-up the computer when you press a key on the +5VSB lead, and a corresponding setting in the BIOS. This feature requires an ATX power supply that can supply at least 1A on the keyboard (the default is the Space Bar). P4RD1-MX ® KBPWR 12 23 +5V (Default) +5VSB P4RD1-MX Keyboard power setting ASUS P4RD1-MX 1-19 3.
Keyboard power (3-pin KBPWR) This jumper allows you to wake up feature. Set this jumper to pins 2-3 (+5VSB) to enable or disable the keyboard wake-up the computer when you press a key on the +5VSB lead, and a corresponding setting in the BIOS. This feature requires an ATX power supply that can supply at least 1A on the keyboard (the default is the Space Bar). P4RD1-MX ® KBPWR 12 23 +5V (Default) +5VSB P4RD1-MX Keyboard power setting ASUS P4RD1-MX 1-19 3.

Motherboard DIY Troubleshooting Guide
Page 39
..., and MIDI devices for playing or editing audio files. +5V J2B1 J2CX MIDI_OUT J2CY J2B2 MIDI_IN P5RD1-V ® P4RD1-MX GAME connector GAME The USB/GAME module is for a GAME/MIDI port. Front panel audio connector (10-1 pin AAFP) This...module to this connector is for a chassis-mounted front panel audio I /O module cable to legacy ACʼ97 audio. ASUS P4RD1-MX 1-27 Connect one end of the motherboard. • By default, this connector to avail the high-definition audio...) This connector is set to this connector, enable the HD Audio Controller item in the BIOS.
..., and MIDI devices for playing or editing audio files. +5V J2B1 J2CX MIDI_OUT J2CY J2B2 MIDI_IN P5RD1-V ® P4RD1-MX GAME connector GAME The USB/GAME module is for a GAME/MIDI port. Front panel audio connector (10-1 pin AAFP) This...module to this connector is for a chassis-mounted front panel audio I /O module cable to legacy ACʼ97 audio. ASUS P4RD1-MX 1-27 Connect one end of the motherboard. • By default, this connector to avail the high-definition audio...) This connector is set to this connector, enable the HD Audio Controller item in the BIOS.

Motherboard DIY Troubleshooting Guide
Page 41
Detailed descriptions of the BIOS parameters are also provided. 2 BIOS setup ASUS P4RD1-MX 2-1 This chapter tells how to change the system settings through the BIOS Setup menus.
Detailed descriptions of the BIOS parameters are also provided. 2 BIOS setup ASUS P4RD1-MX 2-1 This chapter tells how to change the system settings through the BIOS Setup menus.
Motherboard DIY Troubleshooting Guide
Page 42
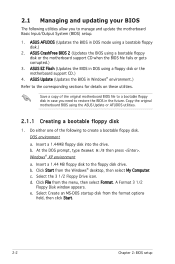
...; environment.) Refer to the floppy disk drive. At the DOS prompt, type format A:/S then press . ASUS AFUDOS (Updates the BIOS in the future. ASUS CrashFree BIOS 2 (Updates the BIOS using a bootable floppy disk.) 2. Copy the original motherboard BIOS using a floppy disk or the motherboard support CD.) 4. Do either one of the original motherboard...
...; environment.) Refer to the floppy disk drive. At the DOS prompt, type format A:/S then press . ASUS AFUDOS (Updates the BIOS in the future. ASUS CrashFree BIOS 2 (Updates the BIOS using a bootable floppy disk.) 2. Copy the original motherboard BIOS using a floppy disk or the motherboard support CD.) 4. Do either one of the original motherboard...

Motherboard DIY Troubleshooting Guide
Page 43
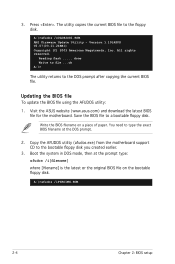
... 2. Copying the current BIOS To copy the current BIOS file using a bootable floppy disk with the updated BIOS file. A:\>afudos /oOLDBIOS1.ROM Main filename Extension name ASUS P4RD1-MX 2-3 Press , then follow screen instructions to copy the current BIOS file that you ...to continue. 2. The actual BIOS screen displays may not be exactly the same as backup when the BIOS fails or gets corrupted during the ...
... 2. Copying the current BIOS To copy the current BIOS file using a bootable floppy disk with the updated BIOS file. A:\>afudos /oOLDBIOS1.ROM Main filename Extension name ASUS P4RD1-MX 2-3 Press , then follow screen instructions to copy the current BIOS file that you ...to continue. 2. The actual BIOS screen displays may not be exactly the same as backup when the BIOS fails or gets corrupted during the ...
Motherboard DIY Troubleshooting Guide
Page 44
... to a bootable floppy disk. Updating the BIOS file To update the BIOS file using the AFUDOS utility: 1. Write the BIOS filename on the bootable floppy disk. A:\>afudos /iP4RD1MX.ROM 2-4 Chapter 2: BIOS setup Save the BIOS file to the DOS prompt after copying the...[filename] is the latest or the original BIOS file on a piece of paper. Reading flash ..... All rights reserved. Visit the ASUS website (www.asus.com) and download the latest BIOS file for the motherboard. Version 1.19(ASUS V2.07(03.11.24BB)) Copyright (C) 2003 ...
... to a bootable floppy disk. Updating the BIOS file To update the BIOS file using the AFUDOS utility: 1. Write the BIOS filename on the bootable floppy disk. A:\>afudos /iP4RD1MX.ROM 2-4 Chapter 2: BIOS setup Save the BIOS file to the DOS prompt after copying the...[filename] is the latest or the original BIOS file on a piece of paper. Reading flash ..... All rights reserved. Visit the ASUS website (www.asus.com) and download the latest BIOS file for the motherboard. Version 1.19(ASUS V2.07(03.11.24BB)) Copyright (C) 2003 ...

Motherboard DIY Troubleshooting Guide
Page 45
... Reading flash .... All rights reserved. Do not turn off power during flash BIOS Reading file ..... The utility returns to prevent system boot failure! 5. done Verifying flash ... done Please restart your computer A:\> ASUS P4RD1-MX 2-5 Version 1.19(ASUS V2.07(03.11.24BB)) Copyright (C) 2003 American Megatrends, Inc. done Advance Check......... done...
... Reading flash .... All rights reserved. Do not turn off power during flash BIOS Reading file ..... The utility returns to prevent system boot failure! 5. done Verifying flash ... done Please restart your computer A:\> ASUS P4RD1-MX 2-5 Version 1.19(ASUS V2.07(03.11.24BB)) Copyright (C) 2003 American Megatrends, Inc. done Advance Check......... done...
Motherboard DIY Troubleshooting Guide
Page 46
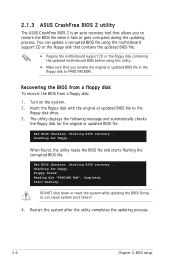
... a floppy disk To recover the BIOS from a floppy disk: 1. Starting BIOS recovery... Completed. You can cause system boot failure! 4. Bad BIOS checksum. DO NOT shut down or reset the system while updating the BIOS! 2.1.3 ASUS CrashFree BIOS 2 utility The ASUS CrashFree BIOS 2 is an auto recovery tool that you to P4RD1MX.ROM. The utility displays the following...
... a floppy disk To recover the BIOS from a floppy disk: 1. Starting BIOS recovery... Completed. You can cause system boot failure! 4. Bad BIOS checksum. DO NOT shut down or reset the system while updating the BIOS! 2.1.3 ASUS CrashFree BIOS 2 utility The ASUS CrashFree BIOS 2 is an auto recovery tool that you to P4RD1MX.ROM. The utility displays the following...

Motherboard DIY Troubleshooting Guide
Page 47
... found, the utility automatically checks the optical drive for CD-ROM... Bad BIOS checksum. Start flashing... ASUS P4RD1-MX 2-7 The utility then updates the corrupted BIOS file. Floppy not found ! DO NOT shut down or reset the system while updating the BIOS! Doing so can cause system boot failure! 4. Restart the system after the...
... found, the utility automatically checks the optical drive for CD-ROM... Bad BIOS checksum. Start flashing... ASUS P4RD1-MX 2-7 The utility then updates the corrupted BIOS file. Floppy not found ! DO NOT shut down or reset the system while updating the BIOS! Doing so can cause system boot failure! 4. Restart the system after the...
Motherboard DIY Troubleshooting Guide
Page 48
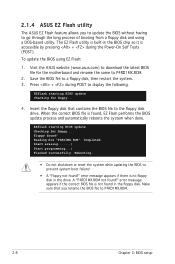
... ! error message appears if the correct BIOS file is found, EZ Flash performs the BIOS update process and automatically reboots the system when done. 2.1.4 ASUS EZ Flash utility The ASUS EZ Flash feature allows you rename the BIOS file to P4RD1MX.ROM. 2-8 Chapter 2: BIOS setup Save the BIOS file to display the following. When...
... ! error message appears if the correct BIOS file is found, EZ Flash performs the BIOS update process and automatically reboots the system when done. 2.1.4 ASUS EZ Flash utility The ASUS EZ Flash feature allows you rename the BIOS file to P4RD1MX.ROM. 2-8 Chapter 2: BIOS setup Save the BIOS file to display the following. When...

Motherboard DIY Troubleshooting Guide
Page 49
Installing ASUS Update To install ASUS Update: 1. ASUS P4RD1-MX 2-9 This utility is copied to your system. Place the support CD in Windows® environment. Click the Utilities tab, then click Install ASUS Update VX.XX.XX. The ASUS Update utility is available in the support CD that allows you update the BIOS using this utility. The Drivers menu...
Installing ASUS Update To install ASUS Update: 1. ASUS P4RD1-MX 2-9 This utility is copied to your system. Place the support CD in Windows® environment. Click the Utilities tab, then click Install ASUS Update VX.XX.XX. The ASUS Update utility is available in the support CD that allows you update the BIOS using this utility. The Drivers menu...


