

Motherboard DIY Troubleshooting Guide
Page 5
... also ideal for the office environment: a brokerage can move different views to three, independent monitors. page 9. Using SURROUNDVIEW, ATI's RADEON™ 9100 IGP in the BIOS - Multi-monitor capability increases productivity -
... also ideal for the office environment: a brokerage can move different views to three, independent monitors. page 9. Using SURROUNDVIEW, ATI's RADEON™ 9100 IGP in the BIOS - Multi-monitor capability increases productivity -

Motherboard DIY Troubleshooting Guide
Page 6
... System Requirements Supported ATI Products Expansion Slot Operating System CPU System Memory AGP Aperture UMA Frame Buffer • RADEON™ 9100 IGP (enabled by system BIOS) External ATI AGP graphics cards: • RADEON™ 9800 SE / PRO / XT • RADEON™ 9600 Series • RADEON™ 9500 / PRO • RADEON™...
... System Requirements Supported ATI Products Expansion Slot Operating System CPU System Memory AGP Aperture UMA Frame Buffer • RADEON™ 9100 IGP (enabled by system BIOS) External ATI AGP graphics cards: • RADEON™ 9800 SE / PRO / XT • RADEON™ 9600 Series • RADEON™ 9500 / PRO • RADEON™...

Motherboard DIY Troubleshooting Guide
Page 13
... your system, and then enter CMOS setup (see System Requirements on the following page). Enabling SURROUNDVIEW™ 9 Enabling SURROUNDVIEW™ Enable SURROUNDVIEW using the system BIOS settings. • The motherboard manufacturer must have at least 256MB of 128 (see the illustration on page 2). 4 Use the arrow keys to navigate to UMA...
... your system, and then enter CMOS setup (see System Requirements on the following page). Enabling SURROUNDVIEW™ 9 Enabling SURROUNDVIEW™ Enable SURROUNDVIEW using the system BIOS settings. • The motherboard manufacturer must have at least 256MB of 128 (see the illustration on page 2). 4 Use the arrow keys to navigate to UMA...

Motherboard DIY Troubleshooting Guide
Page 14
... Screen Integrated Peripherals Feature [Status] Feature [Status] Init Display First [AGP] SURROUNDVIEW [Enabled] Feature [Status] Feature [Status] Feature [Status] Feature [Status] Feature [Status] Item Help BIOS Settings - 10 Enabling SURROUNDVIEW™ 7 Use the arrow keys to navigate to SURROUNDVIEW, press Enter, use the arrow keys to select Enable, and then press... Chipset Features Feature Value AGP Aperture Size 128 UMA Frame Buffer Size 64MB Feature Value Feature Value Feature Value ESC = Quit F10 = Save & Exit Setup BIOS Settings -
... Screen Integrated Peripherals Feature [Status] Feature [Status] Init Display First [AGP] SURROUNDVIEW [Enabled] Feature [Status] Feature [Status] Feature [Status] Feature [Status] Feature [Status] Item Help BIOS Settings - 10 Enabling SURROUNDVIEW™ 7 Use the arrow keys to navigate to SURROUNDVIEW, press Enter, use the arrow keys to select Enable, and then press... Chipset Features Feature Value AGP Aperture Size 128 UMA Frame Buffer Size 64MB Feature Value Feature Value Feature Value ESC = Quit F10 = Save & Exit Setup BIOS Settings -

Motherboard DIY Troubleshooting Guide
Page 21
Index A Accessories getting additional 2 AGP and PCI slots 7 B BIOS 9 C CMOS Setup 9 CMOS setup utility 10 D Displays enabling 12 setting up 11 E Enabling displays 12 Enabling SURROUNDVIEW 9 External ATI graphics card ...installing 7 F Flight Simulator 13 Frequently Asked Questions 16 I Installing the external ATI graphics card 7 P Primary monitor setting 11 S Setting up displays 11 SURROUNDVIEW BIOS settings 10 enabling 9 System requirements 2 U Using SURROUNDVIEW 11 business applications 15 with business applications 15 with Flight Simulator 13 W Warranty customer service 3 hardware 4...
Index A Accessories getting additional 2 AGP and PCI slots 7 B BIOS 9 C CMOS Setup 9 CMOS setup utility 10 D Displays enabling 12 setting up 11 E Enabling displays 12 Enabling SURROUNDVIEW 9 External ATI graphics card ...installing 7 F Flight Simulator 13 Frequently Asked Questions 16 I Installing the external ATI graphics card 7 P Primary monitor setting 11 S Setting up displays 11 SURROUNDVIEW BIOS settings 10 enabling 9 System requirements 2 U Using SURROUNDVIEW 11 business applications 15 with business applications 15 with Flight Simulator 13 W Warranty customer service 3 hardware 4...

P4R800-V Deluxe User Manual
Page 4
... Reporter 3-2 3.3.1 Vocal POST messages 3-2 3.3.2 Winbond Voice Editor 3-4 3.4 Powering off the computer 3-7 Chapter 4: BIOS setup 4.1 Managing and updating your BIOS 4-1 4.1.1 Creating a bootable floppy disk 4-1 4.1.2 Updating BIOS using the AwardBIOS Flash Utility .. 4-2 4.1.3 Recovering the BIOS with CrashFree BIOS 2 ....... 4-4 4.1.4 ASUS Update 4-6 4.2 BIOS Setup program 4-8 4.2.1 BIOS menu screen 4-9 4.2.2 Menu bar 4-9 4.2.3 Legend bar 4-10 4.2.4 General help 4-10 4.2.5 Sub-menu 4-10 4.2.6 Pop-up window...
... Reporter 3-2 3.3.1 Vocal POST messages 3-2 3.3.2 Winbond Voice Editor 3-4 3.4 Powering off the computer 3-7 Chapter 4: BIOS setup 4.1 Managing and updating your BIOS 4-1 4.1.1 Creating a bootable floppy disk 4-1 4.1.2 Updating BIOS using the AwardBIOS Flash Utility .. 4-2 4.1.3 Recovering the BIOS with CrashFree BIOS 2 ....... 4-4 4.1.4 ASUS Update 4-6 4.2 BIOS Setup program 4-8 4.2.1 BIOS menu screen 4-9 4.2.2 Menu bar 4-9 4.2.3 Legend bar 4-10 4.2.4 General help 4-10 4.2.5 Sub-menu 4-10 4.2.6 Pop-up window...

P4R800-V Deluxe User Manual
Page 8
...motherboard. • Chapter 3: Powering up This chapter describes the power up sequence and gives information on the BIOS beep codes and the ASUS Post Reporter™ feature. • Chapter 4: BIOS setup This chapter tells how to perform when installing system components. Detailed descriptions of the... BIOS parameters are also provided. • Chapter 5: Software support This chapter describes the contents of the ...
...motherboard. • Chapter 3: Powering up This chapter describes the power up sequence and gives information on the BIOS beep codes and the ASUS Post Reporter™ feature. • Chapter 4: BIOS setup This chapter tells how to perform when installing system components. Detailed descriptions of the... BIOS parameters are also provided. • Chapter 5: Software support This chapter describes the contents of the ...

P4R800-V Deluxe User Manual
Page 10
... 6-channel audio CODEC POST Reporter™ Instant Music C.P.R. (CPU Parameter Recall) CrashFree BIOS 2 Multi-language BIOS Q-Fan MyLogo2 (Continued on the next page) x P4R800-V Deluxe specification summary* CPU Chipset Front Side Bus Memory Expansion slots Storage Integrated Graphics IEEE 1394 LAN Audio ASUS unique features Socket 478 for Intel® Pentium® 4/Celeron processor with...
... 6-channel audio CODEC POST Reporter™ Instant Music C.P.R. (CPU Parameter Recall) CrashFree BIOS 2 Multi-language BIOS Q-Fan MyLogo2 (Continued on the next page) x P4R800-V Deluxe specification summary* CPU Chipset Front Side Bus Memory Expansion slots Storage Integrated Graphics IEEE 1394 LAN Audio ASUS unique features Socket 478 for Intel® Pentium® 4/Celeron processor with...

P4R800-V Deluxe User Manual
Page 11
xi P4R800-V Deluxe specification summary* Rear panel I/O Internal I/O BIOS features Industry standard Manageability Supported OS Power requirement Form Factor Support CD contents 1 x Parallel port 1 x VGA port 1 x S-Video port 1 x Composite video port 1 x PS/2 ... S/PDIF Out connector CD/AUX/Modem audio connectors Front panel audio connector Panel connector Chassis intrusion connector 4MB Flash ROM, Phoenix Award BIOS, PnP, DMI2.0, WfM2.0, SM BIOS 2.3, ACPI, ASUS MyLogo2, AWDFlash PCI 2.2, USB 2.0 DMI 2.0, chassis intrusion Windows® ME/2000/XP ATX power supply (with 4-pin 12V plug...
xi P4R800-V Deluxe specification summary* Rear panel I/O Internal I/O BIOS features Industry standard Manageability Supported OS Power requirement Form Factor Support CD contents 1 x Parallel port 1 x VGA port 1 x S-Video port 1 x Composite video port 1 x PS/2 ... S/PDIF Out connector CD/AUX/Modem audio connectors Front panel audio connector Panel connector Chassis intrusion connector 4MB Flash ROM, Phoenix Award BIOS, PnP, DMI2.0, WfM2.0, SM BIOS 2.3, ACPI, ASUS MyLogo2, AWDFlash PCI 2.2, USB 2.0 DMI 2.0, chassis intrusion Windows® ME/2000/XP ATX power supply (with 4-pin 12V plug...

P4R800-V Deluxe User Manual
Page 18
...USB) 2.0 specification, dramatically increasing the connection speed from a bootable floppy disk, when the BIOS codes and data are corrupted. See page 2-25. 1.3.2 ASUS unique features Ai BIOS The Ai Bios is backward compatible with USB 1.1. IEEE 1394 support The onboard VIA6307 controller supports two IEEE 1394... on USB 2.0. CrashFree BIOS2 This feature allows you to restore the original BIOS data from the support CD, or from the 12 Mbps bandwidth on USB 1.1 to a wide range of three ASUS intelligent solutions: CrachFree BIOS2, Q-Fan and Post Reporter. This protection eliminates ...
...USB) 2.0 specification, dramatically increasing the connection speed from a bootable floppy disk, when the BIOS codes and data are corrupted. See page 2-25. 1.3.2 ASUS unique features Ai BIOS The Ai Bios is backward compatible with USB 1.1. IEEE 1394 support The onboard VIA6307 controller supports two IEEE 1394... on USB 2.0. CrashFree BIOS2 This feature allows you to restore the original BIOS data from the support CD, or from the 12 Mbps bandwidth on USB 1.1 to a wide range of three ASUS intelligent solutions: CrachFree BIOS2, Q-Fan and Post Reporter. This protection eliminates ...

P4R800-V Deluxe User Manual
Page 19
... choice from Utilities menu in the support CD. eliminates the need to overclocking, C.P.R. Simply shut down and reboot the system, and BIOS automatically restores the CPU default setting for future upgrades. See page 2-17. C.P.R. (CPU Parameter Recall) The C.P.R. When the system... with an exclusive Software Access Point (AP) feature to save the extra cost of a stand-alone AP. ASUS P4R800-V Deluxe motherboard user guide 1-5 The ASUS MyLogo2 is specifically designed for settingup a wireless LAN environment. POST Reporter™ The motherboard offers a new exciting feature...
... choice from Utilities menu in the support CD. eliminates the need to overclocking, C.P.R. Simply shut down and reboot the system, and BIOS automatically restores the CPU default setting for future upgrades. See page 2-17. C.P.R. (CPU Parameter Recall) The C.P.R. When the system... with an exclusive Software Access Point (AP) feature to save the extra cost of a stand-alone AP. ASUS P4R800-V Deluxe motherboard user guide 1-5 The ASUS MyLogo2 is specifically designed for settingup a wireless LAN environment. POST Reporter™ The motherboard offers a new exciting feature...

P4R800-V Deluxe User Manual
Page 27
... (CPU) 2.3.1 Overview The Intel® Pentium® CPU has a gold triangular mark on Intel® Hyper-Threading Technology 1. P4R800-V DELUXE ® Gold Arrow P4R800-V DELUXE Socket 478 Incorrect installation of the CPU socket. If you install Windows® XP Service Pack 1. 3. Notes on one corner. It... that should match a specific corner of the CPU into the socket may bend the pins and severely damage the CPU! ASUS P4R800-V Deluxe motherboard user guide 2-5 This mark indicates the processor Pin 1 that you are using any other operating systems, disable the Hyper-Threading...
... (CPU) 2.3.1 Overview The Intel® Pentium® CPU has a gold triangular mark on Intel® Hyper-Threading Technology 1. P4R800-V DELUXE ® Gold Arrow P4R800-V DELUXE Socket 478 Incorrect installation of the CPU socket. If you install Windows® XP Service Pack 1. 3. Notes on one corner. It... that should match a specific corner of the CPU into the socket may bend the pins and severely damage the CPU! ASUS P4R800-V Deluxe motherboard user guide 2-5 This mark indicates the processor Pin 1 that you are using any other operating systems, disable the Hyper-Threading...
P4R800-V Deluxe User Manual
Page 36
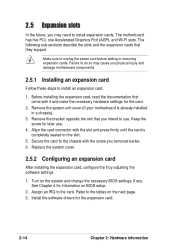
... do so may need to the chassis with the screw you removed earlier. 6. Remove the system unit cover (if your motherboard is completely seated on BIOS setup. 2. Keep the screw for information on the slot. 5. Assign an IRQ to install an expansion card. 1. Turn on the next page. 3. 2.5 Expansion slots In... with the slot and press firmly until the card is already installed in a chassis). 3. Refer to the tables on the system and change the necessary BIOS settings, if any.
... do so may need to the chassis with the screw you removed earlier. 6. Remove the system unit cover (if your motherboard is completely seated on BIOS setup. 2. Keep the screw for information on the slot. 5. Assign an IRQ to install an expansion card. 1. Turn on the next page. 3. 2.5 Expansion slots In... with the slot and press firmly until the card is already installed in a chassis). 3. Refer to the tables on the system and change the necessary BIOS settings, if any.

P4R800-V Deluxe User Manual
Page 40
... the boot process and enter BIOS setup to pins 2-3. 3. Turn OFF the computer and unplug the power cord. 2. 2.6 Jumpers 1. Clear RTC RAM (CLRTC) This jumper allows you to overclocking. The RAM data in CMOS. Plug the power cord and turn ON the computer. 4. P4R800-V DELUXE ® CLRTC 12 23 ...Clear CMOS Normal (Default) P4R800-V DELUXE Clear RTC RAM You do not need to clear the RTC when the system hangs due to clear the Real Time...
... the boot process and enter BIOS setup to pins 2-3. 3. Turn OFF the computer and unplug the power cord. 2. 2.6 Jumpers 1. Clear RTC RAM (CLRTC) This jumper allows you to overclocking. The RAM data in CMOS. Plug the power cord and turn ON the computer. 4. P4R800-V DELUXE ® CLRTC 12 23 ...Clear CMOS Normal (Default) P4R800-V DELUXE Clear RTC RAM You do not need to clear the RTC when the system hangs due to clear the Real Time...

P4R800-V Deluxe User Manual
Page 51
Power LED Speaker Connector PLED+ PLED+5V Ground Ground Speaker P4R800-V DELUXE IDE_LED+ IDE_LED- PWR Ground Reset Ground ® P4R800-V DELUXE System Panel Connector IDE_LED Reset SW ATX Power Switch* * Requires an ATX power supply. • System Power LED Lead (3-1 pin PLED) This...mode. • Speaker Connector (4-pin SPEAKER) This 4-pin connector connects to the case-mounted speaker and allows you turn on the BIOS or OS settings. ASUS P4R800-V Deluxe motherboard user guide 2-29 Pressing the power switch turns the system between ON and SLEEP, or ON and SOFT OFF, depending on ...
Power LED Speaker Connector PLED+ PLED+5V Ground Ground Speaker P4R800-V DELUXE IDE_LED+ IDE_LED- PWR Ground Reset Ground ® P4R800-V DELUXE System Panel Connector IDE_LED Reset SW ATX Power Switch* * Requires an ATX power supply. • System Power LED Lead (3-1 pin PLED) This...mode. • Speaker Connector (4-pin SPEAKER) This 4-pin connector connects to the case-mounted speaker and allows you turn on the BIOS or OS settings. ASUS P4R800-V Deluxe motherboard user guide 2-29 Pressing the power switch turns the system between ON and SLEEP, or ON and SOFT OFF, depending on ...

P4R800-V Deluxe User Manual
Page 53
Powering up sequence and gives information on the BIOS beep codes and the ASUS POST Reporter™ feature. Chapter 3 This chapter describes the power up
Powering up sequence and gives information on the BIOS beep codes and the ASUS POST Reporter™ feature. Chapter 3 This chapter describes the power up

P4R800-V Deluxe User Manual
Page 54
Chapter summary 3.1 Starting up for the first time 3-1 3.2 BIOS beep codes 3-1 3.3 ASUS POST Reporter 3-2 3.4 Powering off the computer 3-7 ASUS P4R800-V Deluxe motherboard
Chapter summary 3.1 Starting up for the first time 3-1 3.2 BIOS beep codes 3-1 3.3 ASUS POST Reporter 3-2 3.4 Powering off the computer 3-7 ASUS P4R800-V Deluxe motherboard

P4R800-V Deluxe User Manual
Page 55
...cord to the power connector at a lower frequency ASUS P4R800-V Deluxe motherboard user guide 3-1 For ATX power supplies, the system LED lights up or switch between orange and green after the system LED turns on the screen. If you do not see BIOS beep codes table below) or additional messages appear...power standby" feature, the monitor LED may have failed a power-on the power, the system may light up when you will hear BIOS beeps. Refer to enter BIOS Setup. Turn on the system front panel case lights up for assistance. 7. The system then runs the power-on , hold down...
...cord to the power connector at a lower frequency ASUS P4R800-V Deluxe motherboard user guide 3-1 For ATX power supplies, the system LED lights up or switch between orange and green after the system LED turns on the screen. If you do not see BIOS beep codes table below) or additional messages appear...power standby" feature, the monitor LED may have failed a power-on the power, the system may light up when you will hear BIOS beeps. Refer to enter BIOS Setup. Turn on the system front panel case lights up for assistance. 7. The system then runs the power-on , hold down...

P4R800-V Deluxe User Manual
Page 57
ASUS P4R800-V Deluxe motherboard user guide 3-3 See page 4-22 for assistance. Refer to the system. • Make sure that your CPU fan supports the fan speed detection function. • Check your CPU settings in BIOS overclocking and make sure it turns on the motherboard. • Check if the ... information. • No action required • No action required You may enable or disable the ASUS POST Reporter™ by adjusting the Speech IC Reporter BIOS option. See section "4.4 Advanced menu." • Check your keyboard if properly connected to the purple PS/2 port on the ...
ASUS P4R800-V Deluxe motherboard user guide 3-3 See page 4-22 for assistance. Refer to the system. • Make sure that your CPU fan supports the fan speed detection function. • Check your CPU settings in BIOS overclocking and make sure it turns on the motherboard. • Check if the ... information. • No action required • No action required You may enable or disable the ASUS POST Reporter™ by adjusting the Speech IC Reporter BIOS option. See section "4.4 Advanced menu." • Check your keyboard if properly connected to the purple PS/2 port on the ...

P4R800-V Deluxe User Manual
Page 61
See section "4.5 Power Menu" in Chapter 4. ASUS P4R800-V Deluxe motherboard user guide 3-7 For ATX power supplies, you use Windows® ME/2000/XP, click Start > Shut Down, then the OK button to soft-off mode, depending on the BIOS setting. Pressing the power switch for less than 4 seconds lets the system enter the soft-off... mode regardless of the BIOS setting. Using the OS shut down function If you can now safely turn off after exiting or shutting down . The power supply should turn off ...
See section "4.5 Power Menu" in Chapter 4. ASUS P4R800-V Deluxe motherboard user guide 3-7 For ATX power supplies, you use Windows® ME/2000/XP, click Start > Shut Down, then the OK button to soft-off mode, depending on the BIOS setting. Pressing the power switch for less than 4 seconds lets the system enter the soft-off... mode regardless of the BIOS setting. Using the OS shut down function If you can now safely turn off after exiting or shutting down . The power supply should turn off ...


