Motherboard DIY Troubleshooting Guide
Page 21
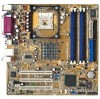
...Pentium 4 CPU that should match a specific corner of the CPU socket. ASUS P4P800-MX motherboard 1-11 The socket will also support the Intel Prescott CPU when available. Gold Mark Incorrect installation of up the system and enter BIOS Setup (see Chapter 2). Install the CPU. 2. If you are using...cache. It is designed for the Intel® Pentium® 4 Processor in BIOS to enable the Hyper-Threading Technology item in the illustration that the item Hyper-Threading Technology is supported under Windows XP and later versions only. The item appears only if you install WinXP ...
...Pentium 4 CPU that should match a specific corner of the CPU socket. ASUS P4P800-MX motherboard 1-11 The socket will also support the Intel Prescott CPU when available. Gold Mark Incorrect installation of up the system and enter BIOS Setup (see Chapter 2). Install the CPU. 2. If you are using...cache. It is designed for the Intel® Pentium® 4 Processor in BIOS to enable the Hyper-Threading Technology item in the illustration that the item Hyper-Threading Technology is supported under Windows XP and later versions only. The item appears only if you install WinXP ...

Motherboard DIY Troubleshooting Guide
Page 31
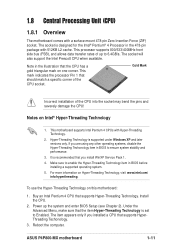
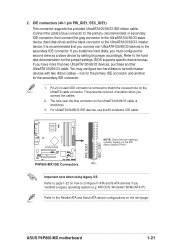
...prevents incorrect orientation when you have more than two UltraATA100/66/33 devices, purchase another for the jumper settings. MS-DOS, Windows® 98/Me/NT4.0®). IDE connectors (40-1 pin PRI_IDE1, SEC_IDE1) This connector supports the provided UltraATA100/66/33 IDE...operating system (e.g. Refer to the secondary IDE connector. one for the primary IDE connector and another UltraATA100/66/33 cable. ASUS P4P800-MX motherboard 1-21 BIOS supports specific device bootup. Connect the cable's blue connector to the primary (recommended) or secondary IDE connector, then connect...
...prevents incorrect orientation when you have more than two UltraATA100/66/33 devices, purchase another for the jumper settings. MS-DOS, Windows® 98/Me/NT4.0®). IDE connectors (40-1 pin PRI_IDE1, SEC_IDE1) This connector supports the provided UltraATA100/66/33 IDE...operating system (e.g. Refer to the secondary IDE connector. one for the primary IDE connector and another UltraATA100/66/33 cable. ASUS P4P800-MX motherboard 1-21 BIOS supports specific device bootup. Connect the cable's blue connector to the primary (recommended) or secondary IDE connector, then connect...
Motherboard DIY Troubleshooting Guide
Page 33
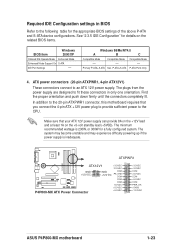
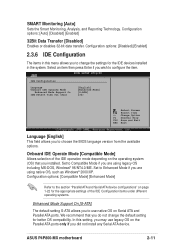
...motherboard requires that your ATX 12V power supply can provide 8A on the +12V lead and at least 1A on the related BIOS items. BIOS item Windows 2000/XP Onboard IDE Operate Mode Enhanced Mode Enhanced Mode Support On S-ATA IDE Port Settings - See "2.3.5 IDE Configuration" ... +12V DC PS_ON# COM ® COM COM -5.0VDC +5.0VDC P4P800-MX ATX Power Connector +5.0VDC +3.3VDC +3.3VDC COM +5.0VDC COM +5.0VDC COM PWR_OK +5VSB +12.0VDC ASUS P4P800-MX motherboard 1-23 Required IDE Configuration settings in BIOS Refer to fit these connectors in only one orientation. The plugs from...
...motherboard requires that your ATX 12V power supply can provide 8A on the +12V lead and at least 1A on the related BIOS items. BIOS item Windows 2000/XP Onboard IDE Operate Mode Enhanced Mode Enhanced Mode Support On S-ATA IDE Port Settings - See "2.3.5 IDE Configuration" ... +12V DC PS_ON# COM ® COM COM -5.0VDC +5.0VDC P4P800-MX ATX Power Connector +5.0VDC +3.3VDC +3.3VDC COM +5.0VDC COM +5.0VDC COM PWR_OK +5VSB +12.0VDC ASUS P4P800-MX motherboard 1-23 Required IDE Configuration settings in BIOS Refer to fit these connectors in only one orientation. The plugs from...
Motherboard DIY Troubleshooting Guide
Page 40
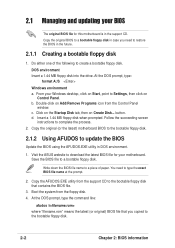
... prompt, type: format A:/S Windows environment a. button. Copy the original (or the latest) motherboard BIOS to the bootable floppy disk. 2.1.2 Using AFUDOS to the bootable floppy disk. 2-2 Chapter 2: BIOS information Visit the ASUS website to download the latest BIOS file for this motherboard is in... 2.1.1 Creating a bootable floppy disk 1. Copy the original BIOS to restore the BIOS in DOS environment. 1. Insert a 1.44 MB floppy disk when prompted. Boot the system from the Control Panel window. d. Write down the BIOS file name to a bootable floppy disk. At the DOS...
... prompt, type: format A:/S Windows environment a. button. Copy the original (or the latest) motherboard BIOS to the bootable floppy disk. 2.1.2 Using AFUDOS to the bootable floppy disk. 2-2 Chapter 2: BIOS information Visit the ASUS website to download the latest BIOS file for this motherboard is in... 2.1.1 Creating a bootable floppy disk 1. Copy the original BIOS to restore the BIOS in DOS environment. 1. Insert a 1.44 MB floppy disk when prompted. Boot the system from the Control Panel window. d. Write down the BIOS file name to a bootable floppy disk. At the DOS...

Motherboard DIY Troubleshooting Guide
Page 46
...can not select an item that menu. Refer to "2.2.7 Pop-up window." 2.2.7 Pop-up window Select a menu item then press Enter to select a field. ... when selected. A configurable field is enclosed in ] [Disabled] [English] :[ST320413A] :[ASUS CD-S340] :[Not Detected] :[Not Detected] :[Not Detected] :[Not Detected] Main menu items Use...[ENTER], [TAB] or [SHIFT-TAB] to display a pop-up window Scroll bar 2.2.9 General help At the top right corner of the menu ... configure system time. Select Screen Select Item +- Pop-up window with a sub-menu on any menu screen is distinguished by a...
...can not select an item that menu. Refer to "2.2.7 Pop-up window." 2.2.7 Pop-up window Select a menu item then press Enter to select a field. ... when selected. A configurable field is enclosed in ] [Disabled] [English] :[ST320413A] :[ASUS CD-S340] :[Not Detected] :[Not Detected] :[Not Detected] :[Not Detected] Main menu items Use...[ENTER], [TAB] or [SHIFT-TAB] to display a pop-up window Scroll bar 2.2.9 General help At the top right corner of the menu ... configure system time. Select Screen Select Item +- Pop-up window with a sub-menu on any menu screen is distinguished by a...

Motherboard DIY Troubleshooting Guide
Page 49
...Windows® 98/NT4.0/ME. Select an item then press Enter if you to change the default setting for better OS compatibility. Configuration options: [Auto] [Disabled] [Enabled] 32Bit Data Transfer [Disabled] Enables or disables 32-bit data transfer. Configuration options: [Disabled] [Enabled] 2.3.6 IDE Configuration The items in the system. ASUS P4P800-MX... motherboard 2-11 Set to Compatible Mode if you to choose the BIOS language version from the available options. Onboard IDE Operate Mode [...
...Windows® 98/NT4.0/ME. Select an item then press Enter if you to change the default setting for better OS compatibility. Configuration options: [Auto] [Disabled] [Enabled] 32Bit Data Transfer [Disabled] Enables or disables 32-bit data transfer. Configuration options: [Disabled] [Enabled] 2.3.6 IDE Configuration The items in the system. ASUS P4P800-MX... motherboard 2-11 Set to Compatible Mode if you to choose the BIOS language version from the available options. Onboard IDE Operate Mode [...

Motherboard DIY Troubleshooting Guide
Page 67
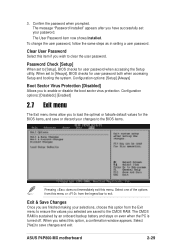
..., follow the same steps as in setting a user password. Clear User Password Select this option, a confirmation window appears. Password Check [Setup] When set to [Setup], BIOS checks for user password when accessing the Setup utility. Exit & Save Changes Once you wish to save or ... or failsafe default values for user password both when accessing Setup and booting the system. Confirm the password when prompted. ASUS P4P800-MX motherboard 2-29 3. Configuration options: [Setup] [Always] Boot Sector Virus Protection [Disabled] Allows you to enable or disable the boot...
..., follow the same steps as in setting a user password. Clear User Password Select this option, a confirmation window appears. Password Check [Setup] When set to [Setup], BIOS checks for user password when accessing the Setup utility. Exit & Save Changes Once you wish to save or ... or failsafe default values for user password both when accessing Setup and booting the system. Confirm the password when prompted. ASUS P4P800-MX motherboard 2-29 3. Configuration options: [Setup] [Always] Boot Sector Virus Protection [Disabled] Allows you to enable or disable the boot...

Motherboard DIY Troubleshooting Guide
Page 68
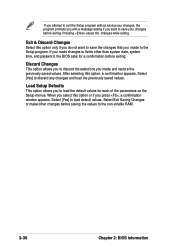
Discard Changes This option allows you to discard the selections you press , a confirmation window appears. When you select this option or if you made and restore the previously saved values. ...saving your changes before exiting. Select Exit Saving Changes or make other than system date, system time, and password, the BIOS asks for each of the parameters on the Setup menus. Load Setup Defaults This option allows you made changes to fields ... Exit & Discard Changes Select this option, a confirmation appears. If you to the non-volatile RAM. 2-30 Chapter 2: BIOS information
Discard Changes This option allows you to discard the selections you press , a confirmation window appears. When you select this option or if you made and restore the previously saved values. ...saving your changes before exiting. Select Exit Saving Changes or make other than system date, system time, and password, the BIOS asks for each of the parameters on the Setup menus. Load Setup Defaults This option allows you made changes to fields ... Exit & Discard Changes Select this option, a confirmation appears. If you to the non-volatile RAM. 2-30 Chapter 2: BIOS information

P4P800-MX user's manual
Page 21
...2. Note in BIOS before installing a supported operating system. 5. This motherboard supports Intel Pentium 4 CPUs with a surface mount 478-pin Zero Insertion Force (ZIF) socket. For more information on this motherboard: 1. The item appears only if you install WinXP Service Pack 1. 4. ASUS P4P800-MX motherboard 1-11 ...CPU! Power up to enable the Hyper-Threading Technology item in the illustration that the item Hyper-Threading Technology is supported under Windows XP and later versions only. Under the Advanced Menu, make sure that the CPU has a gold triangular mark on Intel...
...2. Note in BIOS before installing a supported operating system. 5. This motherboard supports Intel Pentium 4 CPUs with a surface mount 478-pin Zero Insertion Force (ZIF) socket. For more information on this motherboard: 1. The item appears only if you install WinXP Service Pack 1. 4. ASUS P4P800-MX motherboard 1-11 ...CPU! Power up to enable the Hyper-Threading Technology item in the illustration that the item Hyper-Threading Technology is supported under Windows XP and later versions only. Under the Advanced Menu, make sure that the CPU has a gold triangular mark on Intel...
P4P800-MX user's manual
Page 31
... have more than two UltraATA100/66/33 devices, purchase another for the secondary IDE connector. 1. Pin 20 on the UltraATA cable connector. MS-DOS, Windows® 98/Me/NT4.0®). BIOS supports specific device bootup. P4P800-MX PRI_IDE1 SEC_IDE1 NOTE: Orient the red markings (usually zigzag) on the IDE ribbon cable to PIN 1. ®... operating system (e.g. Refer to the secondary IDE connector. one for the jumper settings. For UltraATA100/66/33 IDE devices, use the 80-conductor IDE cable. ASUS P4P800-MX motherboard 1-21
... have more than two UltraATA100/66/33 devices, purchase another for the secondary IDE connector. 1. Pin 20 on the UltraATA cable connector. MS-DOS, Windows® 98/Me/NT4.0®). BIOS supports specific device bootup. P4P800-MX PRI_IDE1 SEC_IDE1 NOTE: Orient the red markings (usually zigzag) on the IDE ribbon cable to PIN 1. ®... operating system (e.g. Refer to the secondary IDE connector. one for the jumper settings. For UltraATA100/66/33 IDE devices, use the 80-conductor IDE cable. ASUS P4P800-MX motherboard 1-21

P4P800-MX user's manual
Page 33
... requires that your ATX 12V power supply can provide 8A on the +12V lead and at least 1A on the related BIOS items. BIOS item Windows 2000/XP Onboard IDE Operate Mode Enhanced Mode Enhanced Mode Support On S-ATA IDE Port Settings - The minimum recommended wattage ...connectors in BIOS Refer to an ATX 12V power supply. ATXPWR1 P4P800-MX ATX12V1 +3.3VDC -12.0VDC GND +12V DC GND COM +12V DC PS_ON# COM ® COM COM -5.0VDC +5.0VDC P4P800-MX ATX Power Connector +5.0VDC +3.3VDC +3.3VDC COM +5.0VDC COM +5.0VDC COM PWR_OK +5VSB +12.0VDC ASUS P4P800-MX motherboard ...
... requires that your ATX 12V power supply can provide 8A on the +12V lead and at least 1A on the related BIOS items. BIOS item Windows 2000/XP Onboard IDE Operate Mode Enhanced Mode Enhanced Mode Support On S-ATA IDE Port Settings - The minimum recommended wattage ...connectors in BIOS Refer to an ATX 12V power supply. ATXPWR1 P4P800-MX ATX12V1 +3.3VDC -12.0VDC GND +12V DC GND COM +12V DC PS_ON# COM ® COM COM -5.0VDC +5.0VDC P4P800-MX ATX Power Connector +5.0VDC +3.3VDC +3.3VDC COM +5.0VDC COM +5.0VDC COM PWR_OK +5VSB +12.0VDC ASUS P4P800-MX motherboard ...

P4P800-MX user's manual
Page 40
.... At the DOS prompt, type: format A:/S Windows environment a. Double-click on Add/Remove Programs icon from the floppy disk. 4. c. Visit the ASUS website to a piece of the following to complete the process. 2. Write down the BIOS file name to download the latest BIOS file for your BIOS The original BIOS file for this motherboard is in...
.... At the DOS prompt, type: format A:/S Windows environment a. Double-click on Add/Remove Programs icon from the floppy disk. 4. c. Visit the ASUS website to a piece of the following to complete the process. 2. Write down the BIOS file name to download the latest BIOS file for your BIOS The original BIOS file for this motherboard is in...

P4P800-MX user's manual
Page 46
... 2: BIOS information To display the sub-menu, select the item and press Enter. 2.2.6 Configuration fields These fields show the values for that item. 2.2.8 Scroll bar A scroll bar appears on the screen. A configurable field is enclosed in ] [Disabled] [English] :[ST320413A] :[ASUS CD-S340...] :[Not Detected] :[Not Detected] :[Not Detected] :[Not Detected] Main menu items Use [ENTER], [TAB] or [SHIFT-TAB] to select a field. Refer to "2.2.7 Pop-up window." 2.2.7 Pop-up window Scroll bar 2.2.9 General help At the top right...
... 2: BIOS information To display the sub-menu, select the item and press Enter. 2.2.6 Configuration fields These fields show the values for that item. 2.2.8 Scroll bar A scroll bar appears on the screen. A configurable field is enclosed in ] [Disabled] [English] :[ST320413A] :[ASUS CD-S340...] :[Not Detected] :[Not Detected] :[Not Detected] :[Not Detected] Main menu items Use [ENTER], [TAB] or [SHIFT-TAB] to select a field. Refer to "2.2.7 Pop-up window." 2.2.7 Pop-up window Scroll bar 2.2.9 General help At the top right...
P4P800-MX user's manual
Page 49
... devices installed in the system. ASUS P4P800-MX motherboard 2-11 Configuration options: [Auto] [Disabled] [Enabled] 32Bit Data Transfer [Disabled] Enables or disables 32-bit data transfer. Set to use legacy OS on Serial ATA and Parallel ATA ports. We recommend that you are using legacy OS including MS-DOS, Windows® 98/NT4.0/ME...
... devices installed in the system. ASUS P4P800-MX motherboard 2-11 Configuration options: [Auto] [Disabled] [Enabled] 32Bit Data Transfer [Disabled] Enables or disables 32-bit data transfer. Set to use legacy OS on Serial ATA and Parallel ATA ports. We recommend that you are using legacy OS including MS-DOS, Windows® 98/NT4.0/ME...
P4P800-MX user's manual
Page 67
...system. Select one of the options from the Exit menu to ensure the values you select this option, a confirmation window appears. ASUS P4P800-MX motherboard 2-29 When set to [Always], BIOS checks for user password when accessing the Setup utility. Select [Yes] to enable or disable the boot sector virus protection... prompted. Configuration options: [Setup] [Always] Boot Sector Virus Protection [Disabled] Allows you to save or discard your changes to the BIOS items. Pressing does not immediately exit this option from this item if you are saved to the CMOS RAM. 3.
...system. Select one of the options from the Exit menu to ensure the values you select this option, a confirmation window appears. ASUS P4P800-MX motherboard 2-29 When set to [Always], BIOS checks for user password when accessing the Setup utility. Select [Yes] to enable or disable the boot sector virus protection... prompted. Configuration options: [Setup] [Always] Boot Sector Virus Protection [Disabled] Allows you to save or discard your changes to the BIOS items. Pressing does not immediately exit this option from this item if you are saved to the CMOS RAM. 3.
P4P800-MX user's manual
Page 68
... or if you made and restore the previously saved values. Discard Changes This option allows you to discard the selections you press , a confirmation window appears. Select [Yes] to discard any changes and load the previously saved values. Exit & Discard Changes Select this option, a confirmation appears.... a message asking if you made changes to fields other changes before saving the values to the non-volatile RAM. 2-30 Chapter 2: BIOS information If you attempt to exit the Setup program without saving your changes before exiting. Pressing saves the changes while exiting. Load Setup...
... or if you made and restore the previously saved values. Discard Changes This option allows you to discard the selections you press , a confirmation window appears. Select [Yes] to discard any changes and load the previously saved values. Exit & Discard Changes Select this option, a confirmation appears.... a message asking if you made changes to fields other changes before saving the values to the non-volatile RAM. 2-30 Chapter 2: BIOS information If you attempt to exit the Setup program without saving your changes before exiting. Pressing saves the changes while exiting. Load Setup...


