Motherboard DIY Troubleshooting Guide
Page 4
... Powering up 3-1 3.1 Starting up for the first time 3-1 3.3 Powering off the computer 3-2 Chapter 4: BIOS setup 4-1 4.1 Managing and updating your BIOS 4-1 4.1.1 Using the computer system for the first time 4-1 4.1.2 Updating BIOS procedures 4-3 4.2 BIOS Setup program 4-5 4.2.1 BIOS menu bar 4-6 4.2.2 Legend bar 4-6 4.3 Main menu 4-8 4.3.1 Primary & Secondary Master/Slave 4-9 4.3.2 ... Support CD information 5-1 5.2.1 Running the support CD 5-1 5.2.2 Main menu 5-2 5.2.3 Software menu 5-3 5.2.4 Drivers menu 5-5 5.2.5 DOS Utilities menu 5-6 5.2.6 ASUS Contact Information 5-6 iv
... Powering up 3-1 3.1 Starting up for the first time 3-1 3.3 Powering off the computer 3-2 Chapter 4: BIOS setup 4-1 4.1 Managing and updating your BIOS 4-1 4.1.1 Using the computer system for the first time 4-1 4.1.2 Updating BIOS procedures 4-3 4.2 BIOS Setup program 4-5 4.2.1 BIOS menu bar 4-6 4.2.2 Legend bar 4-6 4.3 Main menu 4-8 4.3.1 Primary & Secondary Master/Slave 4-9 4.3.2 ... Support CD information 5-1 5.2.1 Running the support CD 5-1 5.2.2 Main menu 5-2 5.2.3 Software menu 5-3 5.2.4 Drivers menu 5-5 5.2.5 DOS Utilities menu 5-6 5.2.6 ASUS Contact Information 5-6 iv
Motherboard DIY Troubleshooting Guide
Page 8
.... How this guide This user guide contains the information you need when installing the ASUS P4B-LX motherboard. viii It includes brief descriptions of the special attributes of the topics found in this document. Detailed descriptions of the BIOS parameters are also provided. • Chapter 5: Software support This chapter describes the contents of the...
.... How this guide This user guide contains the information you need when installing the ASUS P4B-LX motherboard. viii It includes brief descriptions of the special attributes of the topics found in this document. Detailed descriptions of the BIOS parameters are also provided. • Chapter 5: Software support This chapter describes the contents of the...
Motherboard DIY Troubleshooting Guide
Page 16
This 2Mb firmware contains the programmable BIOS program. 11 PCI-based IEEE 1394 host controller. The chip also provides PCI bus master bursting and is capable of transferring a cacheline of the Intel ...
This 2Mb firmware contains the programmable BIOS program. 11 PCI-based IEEE 1394 host controller. The chip also provides PCI bus master bursting and is capable of transferring a cacheline of the Intel ...
Motherboard DIY Troubleshooting Guide
Page 34
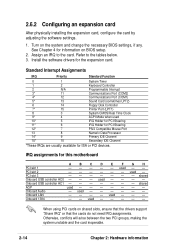
...H PCI slot 1 - - - - - PCI slot 3 shared Onboard USB controller HC0 - - - When using PCI cards on the system and change the necessary BIOS settings, if any. PCI slot 2 - - - - - - Onboard USB controller HC1 shared AGP used - used Onboard Audio - Refer to the card. Standard ... Port 13 8 Numeric Data Processor 14* 9 Primary IDE Channel 15* 10 Secondary IDE Channel *These IRQs are usually available for information on BIOS setup. 2. used - - - - - used - - - Otherwise, conflicts will arise between the two PCI groups, making the system...
...H PCI slot 1 - - - - - PCI slot 3 shared Onboard USB controller HC0 - - - When using PCI cards on the system and change the necessary BIOS settings, if any. PCI slot 2 - - - - - - Onboard USB controller HC1 shared AGP used - used Onboard Audio - Refer to the card. Standard ... Port 13 8 Numeric Data Processor 14* 9 Primary IDE Channel 15* 10 Secondary IDE Channel *These IRQs are usually available for information on BIOS setup. 2. used - - - - - used - - - Otherwise, conflicts will arise between the two PCI groups, making the system...
Motherboard DIY Troubleshooting Guide
Page 36
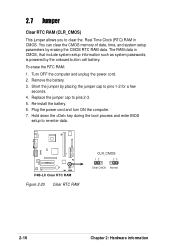
Re-install the battery. 6. The RAM data in CMOS. Plug the power cord and turn ON the computer. 7. P4B-LX P4B-LX Clear RTC RAM Figure 2-20 Clear RTC RAM CLR_CMOS 12 23 Clear CMOS Normal 2-16 Chapter 2: Hardware information Turn OFF the computer and unplug the ... the RTC RAM: 1. Short the jumper by placing the jumper cap to re-enter data. Hold down the key during the boot process and enter BIOS setup to pins 1-2 for a few seconds. 4. You can clear the CMOS memory of date, time, and system setup parameters by the onboard button cell battery...
Re-install the battery. 6. The RAM data in CMOS. Plug the power cord and turn ON the computer. 7. P4B-LX P4B-LX Clear RTC RAM Figure 2-20 Clear RTC RAM CLR_CMOS 12 23 Clear CMOS Normal 2-16 Chapter 2: Hardware information Turn OFF the computer and unplug the ... the RTC RAM: 1. Short the jumper by placing the jumper cap to re-enter data. Hold down the key during the boot process and enter BIOS setup to pins 1-2 for a few seconds. 4. You can clear the CMOS memory of date, time, and system setup parameters by the onboard button cell battery...
Motherboard DIY Troubleshooting Guide
Page 38
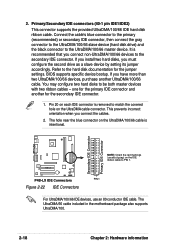
... match the covered hole on the IDE ribbon cable to PIN 1. Secondary IDE Connector Primary IDE Connector P4B-LX NOTE: Orient the red markings (usually zigzag) on the UltraDMA cable connector. 2. BIOS supports specific device bootup. one for the primary IDE connector and another UltraDMA/100/66 cable. This ... on the UltraDMA/100/66 cable is recommended that you have more than two UltraDMA/100/66 devices, purchase another for the jumper settings. P4B-LX IDE Connectors PIN 1 Figure 2-22 IDE Connectors For UltraDMA/100/66 IDE devices, use an 80-conductor IDE cable. Connect the cable's...
... match the covered hole on the IDE ribbon cable to PIN 1. Secondary IDE Connector Primary IDE Connector P4B-LX NOTE: Orient the red markings (usually zigzag) on the UltraDMA cable connector. 2. BIOS supports specific device bootup. one for the primary IDE connector and another UltraDMA/100/66 cable. This ... on the UltraDMA/100/66 cable is recommended that you have more than two UltraDMA/100/66 devices, purchase another for the jumper settings. P4B-LX IDE Connectors PIN 1 Figure 2-22 IDE Connectors For UltraDMA/100/66 IDE devices, use an 80-conductor IDE cable. Connect the cable's...
Motherboard DIY Troubleshooting Guide
Page 43
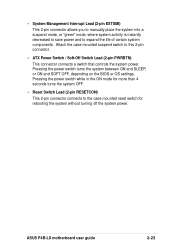
ASUS P4B-LX motherboard user guide 2-23 Attach the case-mounted suspend switch to the case-mounted reset switch for more than 4 seconds turns the system OFF. • ... the life of certain system components. Pressing the power switch turns the system between ON and SLEEP, or ON and SOFT OFF, depending on the BIOS or OS settings.
ASUS P4B-LX motherboard user guide 2-23 Attach the case-mounted suspend switch to the case-mounted reset switch for more than 4 seconds turns the system OFF. • ... the life of certain system components. Pressing the power switch turns the system between ON and SLEEP, or ON and SOFT OFF, depending on the BIOS or OS settings.
Motherboard DIY Troubleshooting Guide
Page 45
Chapter 3 This chapter describes the power up Powering up sequence and gives information on the BIOS beep codes.
Chapter 3 This chapter describes the power up Powering up sequence and gives information on the BIOS beep codes.
Motherboard DIY Troubleshooting Guide
Page 47
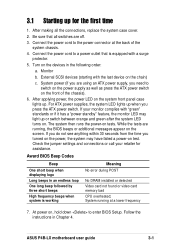
... on. If your retailer for the first time 1. The system then runs the power-on the screen. ASUS P4B-LX motherboard user guide 3-1 3.1 Starting up . Connect the power cord to enter BIOS Setup. Check the jumper settings and connections or call your monitor complies with the last device on the devices... in Chapter 4. System running , the BIOS beeps or additional messages appear on tests. Monitor b. While the tests are running at the back of the chassis). 6. At power on the...
... on. If your retailer for the first time 1. The system then runs the power-on the screen. ASUS P4B-LX motherboard user guide 3-1 3.1 Starting up . Connect the power cord to enter BIOS Setup. Check the jumper settings and connections or call your monitor complies with the last device on the devices... in Chapter 4. System running , the BIOS beeps or additional messages appear on tests. Monitor b. While the tests are running at the back of the chassis). 6. At power on the...
Motherboard DIY Troubleshooting Guide
Page 49
Chapter 4 This chapter tells how to change system settings through the BIOS Setup menus. BIOS setup Detailed descriptions of the BIOS parameters are also provided.
Chapter 4 This chapter tells how to change system settings through the BIOS Setup menus. BIOS setup Detailed descriptions of the BIOS parameters are also provided.
Motherboard DIY Troubleshooting Guide
Page 51
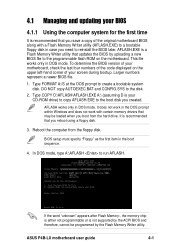
.... 1. AFLASH works only in the boot sequence. 4. Reboot the computer from the hard drive. ASUS P4B-LX motherboard user guide 4-1 4.1 Managing and updating your BIOS 4.1.1 Using the computer system for the first time It is recommended that you reboot using a floppy disk. 3. Type FORMAT A:/S at the DOS... prompt to run AFLASH. It is not supported by the ACPI BIOS and therefore, cannot be loaded when you created. If the word "unknown" appears after Flash Memory:, the memory chip is either not programmable or...
.... 1. AFLASH works only in the boot sequence. 4. Reboot the computer from the hard drive. ASUS P4B-LX motherboard user guide 4-1 4.1 Managing and updating your BIOS 4.1.1 Using the computer system for the first time It is recommended that you reboot using a floppy disk. 3. Type FORMAT A:/S at the DOS... prompt to run AFLASH. It is not supported by the ACPI BIOS and therefore, cannot be loaded when you created. If the word "unknown" appears after Flash Memory:, the memory chip is either not programmable or...

Motherboard DIY Troubleshooting Guide
Page 52
Save Current BIOS to File from the Main menu and press . Type a filename and the path, for example, A:\XXX-XX.XXX, then press . 4-2 Chapter 4: BIOS Setup 5. Select 1. The Save Current BIOS To File screen appears. 6.
Save Current BIOS to File from the Main menu and press . Type a filename and the path, for example, A:\XXX-XX.XXX, then press . 4-2 Chapter 4: BIOS Setup 5. Select 1. The Save Current BIOS To File screen appears. 6.
Motherboard DIY Troubleshooting Guide
Page 53
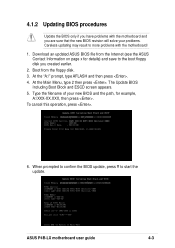
...ASUS P4B-LX motherboard user guide 4-3 Download an updated ASUS BIOS file from the floppy disk. 3. The Update BIOS Including Boot Block and ESCD screen appears. 5. 4.1.2 Updating BIOS procedures Update the BIOS only if you have problems with the motherboard and you are sure that the new BIOS revision will solve your new BIOS...boot floppy disk you created earlier. 2. At the "A:\" prompt, type AFLASH and then press . 4. When prompted to confirm the BIOS update, press Y to more problems with the motherboard! 1. To cancel this operation, press . 6. Type the filename of your ...
...ASUS P4B-LX motherboard user guide 4-3 Download an updated ASUS BIOS file from the floppy disk. 3. The Update BIOS Including Boot Block and ESCD screen appears. 5. 4.1.2 Updating BIOS procedures Update the BIOS only if you have problems with the motherboard and you are sure that the new BIOS revision will solve your new BIOS...boot floppy disk you created earlier. 2. At the "A:\" prompt, type AFLASH and then press . 4. When prompted to confirm the BIOS update, press Y to more problems with the motherboard! 1. To cancel this operation, press . 6. Type the filename of your ...
Motherboard DIY Troubleshooting Guide
Page 54
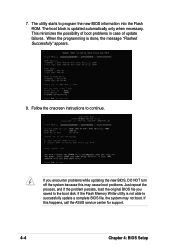
If you encounter problems while updating the new BIOS, DO NOT turn off the system because this happens, call the ASUS service center for support. 4-4 Chapter 4: BIOS Setup If this may not boot. Follow the onscreen instructions to the boot disk. This minimizes the possibility of ...boot problems in case of update failures. The utility starts to successfully update a complete BIOS file, the system...
If you encounter problems while updating the new BIOS, DO NOT turn off the system because this happens, call the ASUS service center for support. 4-4 Chapter 4: BIOS Setup If this may not boot. Follow the onscreen instructions to the boot disk. This minimizes the possibility of ...boot problems in case of update failures. The utility starts to successfully update a complete BIOS file, the system...
Motherboard DIY Troubleshooting Guide
Page 55
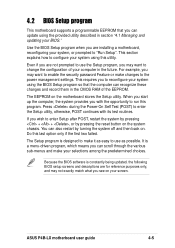
...the computer can recognize these changes and record them in the CMOS RAM of your computer in section "4.1 Managing and updating your BIOS." Even if you with its test routines. When you start up the computer, the system provides you are not prompted to enable..., otherwise, POST continues with the opportunity to "Run Setup". ASUS P4B-LX motherboard user guide 4-5 Do this utility. The EEPROM on your system, or prompted to run this program. It is constantly being updated, the following BIOS setup screens and descriptions are installing a motherboard, reconfiguring your screen...
...the computer can recognize these changes and record them in the CMOS RAM of your computer in section "4.1 Managing and updating your BIOS." Even if you with its test routines. When you start up the computer, the system provides you are not prompted to enable..., otherwise, POST continues with the opportunity to "Run Setup". ASUS P4B-LX motherboard user guide 4-5 Do this utility. The EEPROM on your system, or prompted to run this program. It is constantly being updated, the following BIOS setup screens and descriptions are installing a motherboard, reconfiguring your screen...
Motherboard DIY Troubleshooting Guide
Page 56
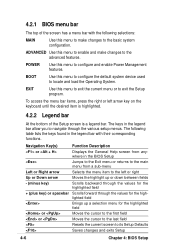
Navigation Key(s) Function Description or Displays the General Help screen from anywhere in the BIOS Setup Jumps to the Exit menu or returns to the main menu from a sub-menu ...lists the keys found in the legend bar allow you to its Setup Defaults Saves changes and exits Setup 4-6 Chapter 4: BIOS Setup POWER Use this menu to exit the current menu or to exit the Setup program. To access the menu bar ... configuration. The following selections: MAIN Use this menu to make changes to the advanced features. 4.2.1 BIOS menu bar The top of the Setup screen is a legend bar.
Navigation Key(s) Function Description or Displays the General Help screen from anywhere in the BIOS Setup Jumps to the Exit menu or returns to the main menu from a sub-menu ...lists the keys found in the legend bar allow you to its Setup Defaults Saves changes and exits Setup 4-6 Chapter 4: BIOS Setup POWER Use this menu to exit the current menu or to exit the Setup program. To access the menu bar ... configuration. The following selections: MAIN Use this menu to make changes to the advanced features. 4.2.1 BIOS menu bar The top of the Setup screen is a legend bar.
Motherboard DIY Troubleshooting Guide
Page 57
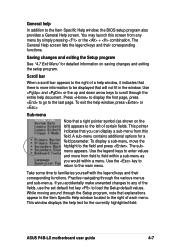
...that there is more information to be displayed that a right pointer symbol (as you accidentally make unwanted changes to field within a menu. ASUS P4B-LX motherboard user guide 4-7 General help document. A sub-menu contains additional options for the currently highlighted field. Press to display the first ...keys and their corresponding functions. Scroll bar When a scroll bar appears to the Item Specific Help window, the BIOS setup program also provides a General Help screen. Practice navigating through the entire help In addition to the right of each menu.
...that there is more information to be displayed that a right pointer symbol (as you accidentally make unwanted changes to field within a menu. ASUS P4B-LX motherboard user guide 4-7 General help document. A sub-menu contains additional options for the currently highlighted field. Press to display the first ...keys and their corresponding functions. Scroll bar When a scroll bar appears to the Item Specific Help window, the BIOS setup program also provides a General Help screen. Practice navigating through the entire help In addition to the right of each menu.
Motherboard DIY Troubleshooting Guide
Page 58
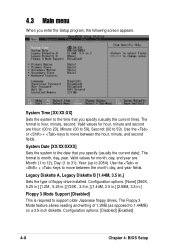
... year are Hour: (00 to 23), Minute: (00 to 59), Second: (00 to 2084). The format is hour, minute, second. Configuration options: [Disabled] [Enabled] 4-8 Chapter 4: BIOS Setup The format is month, day, year. Use the or + keys to the time that you specify (usually the current date). 4.3 Main menu When you...
... year are Hour: (00 to 23), Minute: (00 to 59), Second: (00 to 2084). The format is hour, minute, second. Configuration options: [Disabled] [Enabled] 4-8 Chapter 4: BIOS Setup The format is month, day, year. Use the or + keys to the time that you specify (usually the current date). 4.3 Main menu When you...
Motherboard DIY Troubleshooting Guide
Page 60
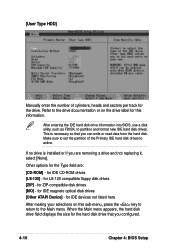
... disk. Make sure to set the partition of cylinders, heads and sectors per track for the hard disk drive that you configured. 4-10 Chapter 4: BIOS Setup for IDE CD-ROM drives [LS-120] - When the Main menu appears, the hard disk drive field displays the size for the drive. ...After entering the IDE hard disk drive information into BIOS, use a disk utility, such as FDISK, to partition and format new IDE hard disk drives. for ZIP-compatible disk drives [MO] - for IDE magneto...
... disk. Make sure to set the partition of cylinders, heads and sectors per track for the hard disk drive that you configured. 4-10 Chapter 4: BIOS Setup for IDE CD-ROM drives [LS-120] - When the Main menu appears, the hard disk drive field displays the size for the drive. ...After entering the IDE hard disk drive information into BIOS, use a disk utility, such as FDISK, to partition and format new IDE hard disk drives. for ZIP-compatible disk drives [MO] - for IDE magneto...
Motherboard DIY Troubleshooting Guide
Page 61
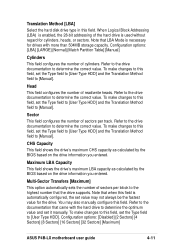
... the drive's maximum LBA capacity as calculated by the BIOS based on the drive information you entered. To make changes to this field. Configuration options: [Disabled] [2 Sectors] [4 Sectors] [8 Sectors] [16 Sectors] [32 Sectors] [Maximum] ASUS P4B-LX motherboard user guide 4-11 Note that came with more ...sectors per block to determine the correct value. CHS Capacity This field shows the drive's maximum CHS capacity as calculated by the BIOS based on the drive information you entered. Translation Method [LBA] Select the hard disk drive type in this field, set the ...
... the drive's maximum LBA capacity as calculated by the BIOS based on the drive information you entered. To make changes to this field. Configuration options: [Disabled] [2 Sectors] [4 Sectors] [8 Sectors] [16 Sectors] [32 Sectors] [Maximum] ASUS P4B-LX motherboard user guide 4-11 Note that came with more ...sectors per block to determine the correct value. CHS Capacity This field shows the drive's maximum CHS capacity as calculated by the BIOS based on the drive information you entered. Translation Method [LBA] Select the hard disk drive type in this field, set the ...


