
P3V4X User Manual
Page 4
...'s Manual FEATURES 8 2.1 The ASUS P3V4X 8 2.1.1 Specifications 8 2.1.2 Special Features 10 2.1.3 Performance Features 10 2.1.4 Intelligence 11 2.2 P3V4X Motherboard Components 12 3. HARDWARE SETUP 14 3.1 P3V4X Motherboard Layout 14 3.2 Layout Contents 15 3.3 Hardware Setup Procedure 16 3.4 Motherboard Settings 16 3.5 System Memory (DIMM 20 3.6 Central Processing Unit (CPU 23 3.6.1 Quick CPU Installation Procedure 23 3.6.2 Attaching the Heatsink 24 3.6.3 Installing the Universal...
...'s Manual FEATURES 8 2.1 The ASUS P3V4X 8 2.1.1 Specifications 8 2.1.2 Special Features 10 2.1.3 Performance Features 10 2.1.4 Intelligence 11 2.2 P3V4X Motherboard Components 12 3. HARDWARE SETUP 14 3.1 P3V4X Motherboard Layout 14 3.2 Layout Contents 15 3.3 Hardware Setup Procedure 16 3.4 Motherboard Settings 16 3.5 System Memory (DIMM 20 3.6 Central Processing Unit (CPU 23 3.6.1 Quick CPU Installation Procedure 23 3.6.2 Attaching the Heatsink 24 3.6.3 Installing the Universal...
P3V4X User Manual
Page 5
...SOFTWARE SETUP 77 5.1 Operating Systems 77 5.1.1 Windows 98 First Time Installation 77 5.2 P3V Series Motherboard Support CD 78 5.3 Install ASUS PC Probe Vx.xx 79 5.4 Install PC-Cillin 98 Vx.xx 80 5.5 Install ADOBE AcroBat Reader Vx.xx 80 5.6 VIA ...1 Driver 82 5.7 Uninstalling Programs 82 6. APPENDIX 89 7.1 S370 Series CPU Cards 89 7.1.1 Using the ASUS S370 Series CPU Cards 90 7.1.2 Setting up the ASUS S370 Series CPU Cards 90 7.2 ASUS PCI-L101 Fast Ethernet Card 91 7.3 Glossary 93 ASUS P3V4X User's Manual 5 CONTENTS 4.2 BIOS Setup Program 47 4.2.1 BIOS Menu Bar...
...SOFTWARE SETUP 77 5.1 Operating Systems 77 5.1.1 Windows 98 First Time Installation 77 5.2 P3V Series Motherboard Support CD 78 5.3 Install ASUS PC Probe Vx.xx 79 5.4 Install PC-Cillin 98 Vx.xx 80 5.5 Install ADOBE AcroBat Reader Vx.xx 80 5.6 VIA ...1 Driver 82 5.7 Uninstalling Programs 82 6. APPENDIX 89 7.1 S370 Series CPU Cards 89 7.1.1 Using the ASUS S370 Series CPU Cards 90 7.1.2 Setting up the ASUS S370 Series CPU Cards 90 7.2 ASUS PCI-L101 Fast Ethernet Card 91 7.3 Glossary 93 ASUS P3V4X User's Manual 5 CONTENTS 4.2 BIOS Setup Program 47 4.2.1 BIOS Menu Bar...
P3V4X User Manual
Page 7
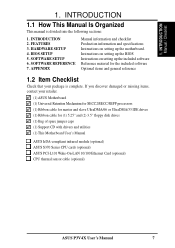
... (1) Bag of spare jumper caps (1) Support CD with drivers and utilities (1) This Motherboard User's Manual ASUS IrDA-compliant infrared module (optional) ASUS S370 Series CPU cards (optional) ASUS PCI-L101 Wake-On-LAN 10/100 Ethernet Card (optional) CPU thermal sensor cable (optional) ASUS P3V4X User's Manual 7 If you discover damaged or missing items, contact your retailer...
... (1) Bag of spare jumper caps (1) Support CD with drivers and utilities (1) This Motherboard User's Manual ASUS IrDA-compliant infrared module (optional) ASUS S370 Series CPU cards (optional) ASUS PCI-L101 Wake-On-LAN 10/100 Ethernet Card (optional) CPU thermal sensor cable (optional) ASUS P3V4X User's Manual 7 If you discover damaged or missing items, contact your retailer...
P3V4X User Manual
Page 9
...most devices for virtually automatic setup. • IrDA: Supports an optional infrared port module for wireless interfacing with EPP and ECP capabilities. ASUS P3V4X User's Manual 9 2. FEATURES Specifications 2. UART2 can support Bus Master PCI cards, such as SCSI or LAN cards (PCI supports ...SECC) or a Celeron™ processor packaged in a Single Edge Processor Package (SEPP). • Smart BIOS: 2MB firmware provides Vcore and CPU/SDRAM frequency adjustments, boot block write protection, and HD/SCSI/MO/ZIP/CD/Floppy boot selection. • Integrated Infrared Support: Integrated IR ...
...most devices for virtually automatic setup. • IrDA: Supports an optional infrared port module for wireless interfacing with EPP and ECP capabilities. ASUS P3V4X User's Manual 9 2. FEATURES Specifications 2. UART2 can support Bus Master PCI cards, such as SCSI or LAN cards (PCI supports ...SECC) or a Celeron™ processor packaged in a Single Edge Processor Package (SEPP). • Smart BIOS: 2MB firmware provides Vcore and CPU/SDRAM frequency adjustments, boot block write protection, and HD/SCSI/MO/ZIP/CD/Floppy boot selection. • Integrated Infrared Support: Integrated IR ...
P3V4X User Manual
Page 11
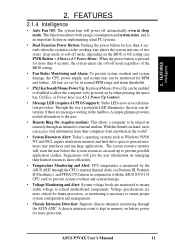
When the power button is pressed for more than 4 seconds when the system is kept in conjunction with the ASUS S370-133 CPU card) to prevent system overheat and system damage. • Voltage Monitoring and Alert: System voltage levels are used up to ensure proper ... ACPI OS support): Turbo LEDs now act as information providers. ASUS P3V4X User's Manual 11 Through the way a particular LED illuminates, the user can be powered on by the ASUS ASIC through the CPU's internal thermal diode (on remotely through the ASUS ASIC. Suggestions will power off mode, depending on battery power ...
When the power button is pressed for more than 4 seconds when the system is kept in conjunction with the ASUS S370-133 CPU card) to prevent system overheat and system damage. • Voltage Monitoring and Alert: System voltage levels are used up to ensure proper ... ACPI OS support): Turbo LEDs now act as information providers. ASUS P3V4X User's Manual 11 Through the way a particular LED illuminates, the user can be powered on by the ASUS ASIC through the CPU's internal thermal diode (on remotely through the ASUS ASIC. Suggestions will power off mode, depending on battery power ...
P3V4X User Manual
Page 14
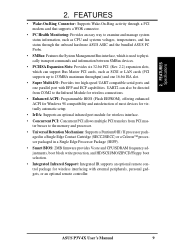
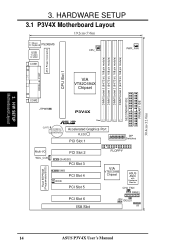
... Layout 19.2cm (7.6in) T: Mouse B: Keyboard PS2KBMS USB T: USB1 B: USB2 COM1 CPU_FAN PWR_FAN PARALLEL PORT ATX Power Connector CPU Slot 1 VIA VT82C694X Chipset COM2 JTPWR P3V4X CLRTC CR2032 3V Lithium Cell (CMOS Power) Row 0 1 2 3 4 5 6 7 R Accelerated Graphics Port PLED2 PCI Slot 1 1 2 3 4 5 6 7 8 9 10 O DIP N Switches ... PCI Slot 3 SMB PCI Slot 4 WOR PCI Slot 5 PCI Slot 6 ISA Slot FLOPPY VIA VT82C596B Chipset ASUS ASIC with Hardware Monitor CHA_FAN PANEL JEN IDELED IR 14 ASUS P3V4X User's Manual DIMM Socket 0 (64/72 bit, 168 pin module) DIMM Socket 1 (64/72 bit, ...
... Layout 19.2cm (7.6in) T: Mouse B: Keyboard PS2KBMS USB T: USB1 B: USB2 COM1 CPU_FAN PWR_FAN PARALLEL PORT ATX Power Connector CPU Slot 1 VIA VT82C694X Chipset COM2 JTPWR P3V4X CLRTC CR2032 3V Lithium Cell (CMOS Power) Row 0 1 2 3 4 5 6 7 R Accelerated Graphics Port PLED2 PCI Slot 1 1 2 3 4 5 6 7 8 9 10 O DIP N Switches ... PCI Slot 3 SMB PCI Slot 4 WOR PCI Slot 5 PCI Slot 6 ISA Slot FLOPPY VIA VT82C596B Chipset ASUS ASIC with Hardware Monitor CHA_FAN PANEL JEN IDELED IR 14 ASUS P3V4X User's Manual DIMM Socket 0 (64/72 bit, 168 pin module) DIMM Socket 1 (64/72 bit, ...
P3V4X User Manual
Page 15
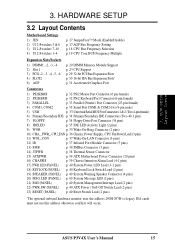
... Connector (34 pins) 8) IDELED p. 35 IDE LED Activity Light (2 pins) 9) WOR p. 35 Wake-On-Ring Connector (2 pins) 10) CHA_, PWR_, CPU_FAN p. 36 Chassis, Power Supply, CPU Fan Power Lead (3 pins) 11) WOL_CON p. 37 Wake-On-LAN Connector (3 pins) 12) IR p. 37 Infrared Port Module Connector (5 pins) 13) SMB p. 38 SMBus Connector... optional onboard hardware monitor uses the address 290H-297H so legacy ISA cards must not use this address otherwise conflicts will occur. 3. H/W SETUP Layout Contents 3. ASUS P3V4X User's Manual 15
... Connector (34 pins) 8) IDELED p. 35 IDE LED Activity Light (2 pins) 9) WOR p. 35 Wake-On-Ring Connector (2 pins) 10) CHA_, PWR_, CPU_FAN p. 36 Chassis, Power Supply, CPU Fan Power Lead (3 pins) 11) WOL_CON p. 37 Wake-On-LAN Connector (3 pins) 12) IR p. 37 Infrared Port Module Connector (5 pins) 13) SMB p. 38 SMBus Connector... optional onboard hardware monitor uses the address 290H-297H so legacy ISA cards must not use this address otherwise conflicts will occur. 3. H/W SETUP Layout Contents 3. ASUS P3V4X User's Manual 15
P3V4X User Manual
Page 16
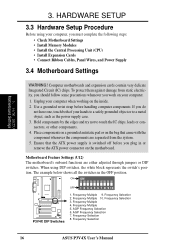
...components. 4. Frequency Multiple 9. If you plug in the OFF position. Frequency Multiple 10. Frequency Selection 3. Frequency Selection 16 ASUS P3V4X User's Manual To protect them against damage from the system. 5. Ensure that came with the component whenever the components are... the following steps: • Check Motherboard Settings • Install Memory Modules • Install the Central Processing Unit (CPU) • Install Expansion Cards • Connect Ribbon Cables, Panel Wires, and Power Supply 3.4 Motherboard Settings WARNING! Frequency Selection 2. ...
...components. 4. Frequency Multiple 9. If you plug in the OFF position. Frequency Multiple 10. Frequency Selection 3. Frequency Selection 16 ASUS P3V4X User's Manual To protect them against damage from the system. 5. Ensure that came with the component whenever the components are... the following steps: • Check Motherboard Settings • Install Memory Modules • Install the Central Processing Unit (CPU) • Install Expansion Cards • Connect Ribbon Cables, Panel Wires, and Power Supply 3.4 Motherboard Settings WARNING! Frequency Selection 2. ...

P3V4X User Manual
Page 17
...Freq. 3. Setting JEN Enable (JumperFree) [2-3] (default) Disable (Jumper) [1-2] P3V4X R JEN 123 123 Jumper JumperFree P3V4X Jumper Mode Setting 2. ON ON 1 2 3 4 5 6 7 8 9 10 1 2 3 4 5 6 7 8 9 10 P3V4X AGP Bus Freq. x1/2 P3V4X AGP Bus Frequency Setting ASUS P3V4X User's Manual 17 HARDWARE SETUP 1. JumperFree™ Mode (JEN) This jumper ... sets the frequency ratio between the AGP bus frequency and the DRAM (CPU bus) frquency. x1 =DRAM Freq. H/W SETUP Motherboard Settings 3. When the CPU/DRAM frequency is set to 66MHz, set Switch 5 to be set...
...Freq. 3. Setting JEN Enable (JumperFree) [2-3] (default) Disable (Jumper) [1-2] P3V4X R JEN 123 123 Jumper JumperFree P3V4X Jumper Mode Setting 2. ON ON 1 2 3 4 5 6 7 8 9 10 1 2 3 4 5 6 7 8 9 10 P3V4X AGP Bus Freq. x1/2 P3V4X AGP Bus Frequency Setting ASUS P3V4X User's Manual 17 HARDWARE SETUP 1. JumperFree™ Mode (JEN) This jumper ... sets the frequency ratio between the AGP bus frequency and the DRAM (CPU bus) frquency. x1 =DRAM Freq. H/W SETUP Motherboard Settings 3. When the CPU/DRAM frequency is set to 66MHz, set Switch 5 to be set...
P3V4X User Manual
Page 18
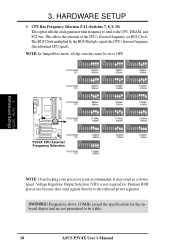
...be set to the onboard power regulator. This allows the selection of the CPU's External frequency (or BUS Clock). NOTE: In JumperFree mode, all dip switches must be stable. 18 ASUS P3V4X User's Manual It may result in a slower speed. The BUS Clock... multiplied by the BUS Multiple equals the CPU's Internal frequency (the advertised CPU speed). ON ON ON 1 2 3 4 5 6 7 8 9 10 CPU/DRAM PCI 80MHz 40MHz ON 1 2 3 4 5 6 7 8 9 10 75MHz 37MHz ON...
...be set to the onboard power regulator. This allows the selection of the CPU's External frequency (or BUS Clock). NOTE: In JumperFree mode, all dip switches must be stable. 18 ASUS P3V4X User's Manual It may result in a slower speed. The BUS Clock... multiplied by the BUS Multiple equals the CPU's Internal frequency (the advertised CPU speed). ON ON ON 1 2 3 4 5 6 7 8 9 10 CPU/DRAM PCI 80MHz 40MHz ON 1 2 3 4 5 6 7 8 9 10 75MHz 37MHz ON...
P3V4X User Manual
Page 19
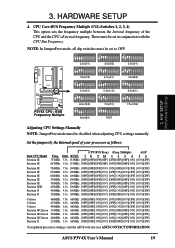
... [OFF][OFF][ON][ON] [OFF][OFF][ON][ON] [ON][OFF] For updated processor settings, visit the ASUS web site (see ASUS CONTACT INFORMATION) ASUS P3V4X User's Manual 19 Multiple) AGP Freq. These must be set in conjunction with the CPU Bus Frequency. ON ON ON 1 2 3 4 5 6 7 8 9 10 2.0x(2/1) ON 1 2 3 4 5 6 7 8 9 10 2.5x(5/2) ON 1 2 3 4 5 6 7 8 9 10 3.0x(3/1) ON 1 2 3 4 5 6 7 8 9 10...
... [OFF][OFF][ON][ON] [OFF][OFF][ON][ON] [ON][OFF] For updated processor settings, visit the ASUS web site (see ASUS CONTACT INFORMATION) ASUS P3V4X User's Manual 19 Multiple) AGP Freq. These must be set in conjunction with the CPU Bus Frequency. ON ON ON 1 2 3 4 5 6 7 8 9 10 2.0x(2/1) ON 1 2 3 4 5 6 7 8 9 10 2.5x(5/2) ON 1 2 3 4 5 6 7 8 9 10 3.0x(3/1) ON 1 2 3 4 5 6 7 8 9 10...
P3V4X User Manual
Page 23
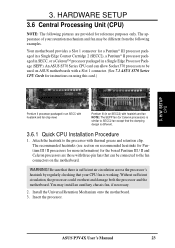
...Pentium II processor packaged in an SECC with heatsink and fan (top view) Pentium III (in a Single Edge Processor Package (SEPP). ASUS P3V4X User's Manual 23 WARNING! Install the Universal Retention Mechanism onto the motherboard. 3. Insert the processor. Attach the heatsink to be different ... those with three-pin fans that can allow Socket 370 processors to the processor with a Slot 1 connector. (See 7.1 ASUS S370 Series CPU Cards for reference purposes only. Be sure that there is sufficient air circulation across the processor's heatsink by regularly checking that...
...Pentium II processor packaged in an SECC with heatsink and fan (top view) Pentium III (in a Single Edge Processor Package (SEPP). ASUS P3V4X User's Manual 23 WARNING! Install the Universal Retention Mechanism onto the motherboard. 3. Insert the processor. Attach the heatsink to be different ... those with three-pin fans that can allow Socket 370 processors to the processor with a Slot 1 connector. (See 7.1 ASUS S370 Series CPU Cards for reference purposes only. Be sure that there is sufficient air circulation across the processor's heatsink by regularly checking that...

P3V4X User Manual
Page 24
3. otherwise, the CPU will overheat. HARDWARE SETUP 3.6.2 Attaching the Heatsink NOTE: If provided, you should follow the heatsink ...to the processor core with your heatsink. 1. Mount the heatsink to provide adequate circulation across the processor's passive heatsink. 24 ASUS P3V4X User's Manual Using SECC fan with Pentium® III Insert the four heatsink's pins through the holes of the pins and ...are provided only as a general guide and may install an auxiliary fan to the processor package. H/W SETUP CPU 3. Place the metal clip on the ends of the SECC2. WARNING!
3. otherwise, the CPU will overheat. HARDWARE SETUP 3.6.2 Attaching the Heatsink NOTE: If provided, you should follow the heatsink ...to the processor core with your heatsink. 1. Mount the heatsink to provide adequate circulation across the processor's passive heatsink. 24 ASUS P3V4X User's Manual Using SECC fan with Pentium® III Insert the four heatsink's pins through the holes of the pins and ...are provided only as a general guide and may install an auxiliary fan to the processor package. H/W SETUP CPU 3. Place the metal clip on the ends of the SECC2. WARNING!
P3V4X User Manual
Page 25
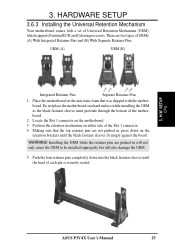
.... 5. There are two types of each pin is securely seated. 3. WARNING! HARDWARE SETUP 3.6.3 Installing the Universal Retention Mechanism Your motherboard comes with the motherboard. H/W SETUP CPU ASUS P3V4X User's Manual 25 3.
.... 5. There are two types of each pin is securely seated. 3. WARNING! HARDWARE SETUP 3.6.3 Installing the Universal Retention Mechanism Your motherboard comes with the motherboard. H/W SETUP CPU ASUS P3V4X User's Manual 25 3.
P3V4X User Manual
Page 26
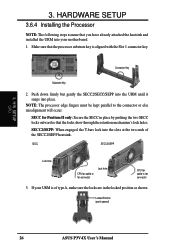
...: Secure the SECC in the locked position as shown. SECC SECC2/SEPP Lock hole CPU fan cable to fan connector Lock hole CPU fan cable to the connector or else misalignment will occur. Locked Position (push upward) 26 ASUS P3V4X User's Manual HARDWARE SETUP 3.6.4 Installing the Processor NOTE: The following steps assume that the...
...: Secure the SECC in the locked position as shown. SECC SECC2/SEPP Lock hole CPU fan cable to fan connector Lock hole CPU fan cable to the connector or else misalignment will occur. Locked Position (push upward) 26 ASUS P3V4X User's Manual HARDWARE SETUP 3.6.4 Installing the Processor NOTE: The following steps assume that the...

P3V4X User Manual
Page 27
SECC2/SEPP Push lock inward CPU fan cable to fan connector CPU fan cable to the motherboard's CPU fan connector. CAUTION! ASUS P3V4X User's Manual 27 HARDWARE SETUP 3.6.5 Removing the Processor SECC: Push the SECC's two locks inward to disengage the latch feature and firmly lift ...SECC2 heatsink and fan except that can monitor the fan's RPM and use the alert function with the Intel LANDesk Client Manager (LDCM) or the ASUS PC Probe software. 3. These heatsinks dissipate heat more efficiently and with an optional hardware monitor, they can be connected to fan connector SECC2/SEPP...
SECC2/SEPP Push lock inward CPU fan cable to fan connector CPU fan cable to the motherboard's CPU fan connector. CAUTION! ASUS P3V4X User's Manual 27 HARDWARE SETUP 3.6.5 Removing the Processor SECC: Push the SECC's two locks inward to disengage the latch feature and firmly lift ...SECC2 heatsink and fan except that can monitor the fan's RPM and use the alert function with the Intel LANDesk Client Manager (LDCM) or the ASUS PC Probe software. 3. These heatsinks dissipate heat more efficiently and with an optional hardware monitor, they can be connected to fan connector SECC2/SEPP...

P3V4X User Manual
Page 28
To prevent system overheat and/or damage, it is important to the internal thermal diode. Therefore, the CPU temperature reported may cause unreliable operation. If, however, the BIOS and/or your hardware monitoring program is no through...be higher than those from motherboards that is a thermal sensor that take readings from the processor thermal diode. 3. H/W SETUP CPU 28 ASUS P3V4X User's Manual There is reporting a CPU temperature above its maximum specified operating temperature will shorten the processor lifetime and may be continuous with a strong retention clip. 4....
To prevent system overheat and/or damage, it is important to the internal thermal diode. Therefore, the CPU temperature reported may cause unreliable operation. If, however, the BIOS and/or your hardware monitoring program is no through...be higher than those from motherboards that is a thermal sensor that take readings from the processor thermal diode. 3. H/W SETUP CPU 28 ASUS P3V4X User's Manual There is reporting a CPU temperature above its maximum specified operating temperature will shorten the processor lifetime and may be continuous with a strong retention clip. 4....
P3V4X User Manual
Page 36
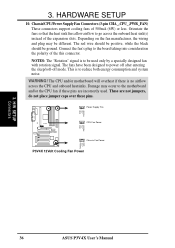
...to the motherboard and/or the CPU fan if these pins are not jumpers, do not place jumper caps over these pins. NOTES: The "Rotation" signal is to power off after entering the sleep/soft-off mode. H/W SETUP Connectors 36 ASUS P3V4X User's Manual The fans have... been designed to reduce both energy consumption and system noise. Power Supply Fan GND +12V Rotation P3V4X R CPU Fan Power GND +12V Rotation Rotation +12V GND Chassis Fan Power P3V4X 12Volt Cooling Fan Power 3. 3. HARDWARE SETUP...
...to the motherboard and/or the CPU fan if these pins are not jumpers, do not place jumper caps over these pins. NOTES: The "Rotation" signal is to power off after entering the sleep/soft-off mode. H/W SETUP Connectors 36 ASUS P3V4X User's Manual The fans have... been designed to reduce both energy consumption and system noise. Power Supply Fan GND +12V Rotation P3V4X R CPU Fan Power GND +12V Rotation Rotation +12V GND Chassis Fan Power P3V4X 12Volt Cooling Fan Power 3. 3. HARDWARE SETUP...
P3V4X User Manual
Page 41
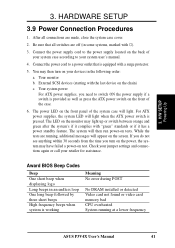
... power supply if a switch is working Meaning No error during POST No DRAM installed or detected Video card not found or video card memory bad CPU overheated System running , additional messages will then run power-on the screen. If you do not see anything within 30 seconds from the time you... the tests are made, close the system case cover. 2. Connect the power supply cord to a power outlet that all connections are running at a lower frequency ASUS P3V4X User's Manual 41 Connect the power cord to the power supply located on the chain) c. H/W SETUP Powering Up 3.
... power supply if a switch is working Meaning No error during POST No DRAM installed or detected Video card not found or video card memory bad CPU overheated System running , additional messages will then run power-on the screen. If you do not see anything within 30 seconds from the time you... the tests are made, close the system case cover. 2. Connect the power supply cord to a power outlet that all connections are running at a lower frequency ASUS P3V4X User's Manual 41 Connect the power cord to the power supply located on the chain) c. H/W SETUP Powering Up 3.
P3V4X User Manual
Page 56
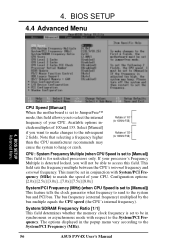
.... Available options include multiples of your CPU. 4. BIOS SETUP 4.4 Advanced Menu 4. If your CPU. Note that selecting a frequency higher than the CPU manufacturer recommends may cause the system to the System/PCI Frequency (MHz). 56 ASUS P3V4X User's Manual The bus frequency (external... frequency) multiplied by the bus multiple equals the CPU speed (the CPU's internal frequency). System/SDRAM Frequency Ratio [1/1] This field determines whether the...
.... Available options include multiples of your CPU. 4. BIOS SETUP 4.4 Advanced Menu 4. If your CPU. Note that selecting a frequency higher than the CPU manufacturer recommends may cause the system to the System/PCI Frequency (MHz). 56 ASUS P3V4X User's Manual The bus frequency (external... frequency) multiplied by the bus multiple equals the CPU speed (the CPU's internal frequency). System/SDRAM Frequency Ratio [1/1] This field determines whether the...


