User Guide
Page 8
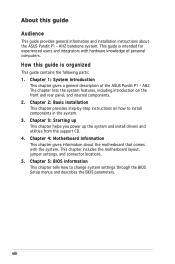
... for experienced users and integrators with the system. How this guide Audience This guide provides general information and installation instructions about the motherboard that comes with hardware knowledge of the ASUS Pundit P1 - AH2. This guide is organized This guide contains the following parts: 1. Chapter 3: Starting up This chapter helps you power up the system...
... for experienced users and integrators with the system. How this guide Audience This guide provides general information and installation instructions about the motherboard that comes with hardware knowledge of the ASUS Pundit P1 - AH2. This guide is organized This guide contains the following parts: 1. Chapter 3: Starting up This chapter helps you power up the system...
User Guide
Page 10
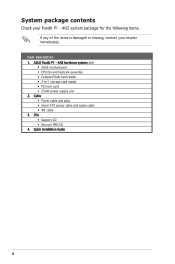
...AH2 barebone system with • ASUS motherboard • CPU fan and heatsink assembly • CompactFlash card reader • 3-in-1 storage card reader • PCI riser card • 250W power supply unit 2. Cable • Power cable and plug • Serial ATA power cable and signal cable • IDE cable 3. Quick installation Guide x ASUS Pundit P1... - System package contents Check your retailer immediately. CDs • Support CD • Recover PRO CD 4. Item description 1. AH2 system package for the following items. ...
...AH2 barebone system with • ASUS motherboard • CPU fan and heatsink assembly • CompactFlash card reader • 3-in-1 storage card reader • PCI riser card • 250W power supply unit 2. Cable • Power cable and plug • Serial ATA power cable and signal cable • IDE cable 3. Quick installation Guide x ASUS Pundit P1... - System package contents Check your retailer immediately. CDs • Support CD • Recover PRO CD 4. Item description 1. AH2 system package for the following items. ...
User Guide
Page 12
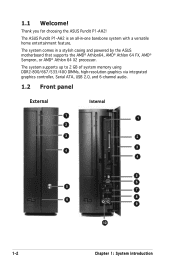
..., Serial ATA, USB 2.0, and 6-channel audio. 1.2 Front panel External Internal 1 1 2 3 2 3 4 4 5 6 5 7 6 8 9 10 1-2 Chapter 1: System introduction Thank you for choosing the ASUS Pundit P1-AH2! The ASUS Pundit P1-AH2 is an all-in a stylish casing and powered by the ASUS motherboard that supports the AMD® Athlon64, AMD® Athlon 64 FX, AMD® Sempron, or AMD® Athlon 64 X2...
..., Serial ATA, USB 2.0, and 6-channel audio. 1.2 Front panel External Internal 1 1 2 3 2 3 4 4 5 6 5 7 6 8 9 10 1-2 Chapter 1: System introduction Thank you for choosing the ASUS Pundit P1-AH2! The ASUS Pundit P1-AH2 is an all-in a stylish casing and powered by the ASUS motherboard that supports the AMD® Athlon64, AMD® Athlon 64 FX, AMD® Sempron, or AMD® Athlon 64 X2...
User Guide
Page 25
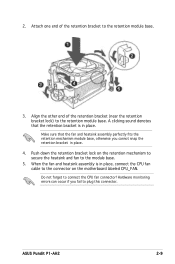
... the connector on the retention mechanism to secure the heatsink and fan to the module base. 5. Push down the retention bracket lock on the motherboard labeled CPU_FAN. ASUS Pundit P1-AH2 2-9 2. A clicking sound denotes that the fan and heatsink assembly perfectly fits the retention mechanism module base, otherwise you fail to connect the CPU...
... the connector on the retention mechanism to secure the heatsink and fan to the module base. 5. Push down the retention bracket lock on the motherboard labeled CPU_FAN. ASUS Pundit P1-AH2 2-9 2. A clicking sound denotes that the fan and heatsink assembly perfectly fits the retention mechanism module base, otherwise you fail to connect the CPU...
User Guide
Page 29
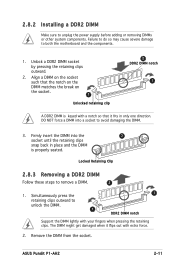
Failure to do so may cause severe damage to remove a DIMM. 2 1. ASUS Pundit P1-AH2 2-11 The DIMM might get damaged when it fits in place and the DIMM is keyed with a notch so that it flips out ... into the 3 socket until the retaining clips snap back in only one direction. Locked Retaining Clip 2.8.3 Removing a DDR2 DIMM Follow these steps to both the motherboard and the components. 1. Unlock a DDR2 DIMM socket by pressing the retaining clips outward. 2. 2.8.2 Installing a DDR2 DIMM Make sure to unlock the DIMM. 1 1 DDR2 DIMM notch...
Failure to do so may cause severe damage to remove a DIMM. 2 1. ASUS Pundit P1-AH2 2-11 The DIMM might get damaged when it fits in place and the DIMM is keyed with a notch so that it flips out ... into the 3 socket until the retaining clips snap back in only one direction. Locked Retaining Clip 2.8.3 Removing a DDR2 DIMM Follow these steps to both the motherboard and the components. 1. Unlock a DDR2 DIMM socket by pressing the retaining clips outward. 2. 2.8.2 Installing a DDR2 DIMM Make sure to unlock the DIMM. 1 1 DDR2 DIMM notch...
User Guide
Page 31
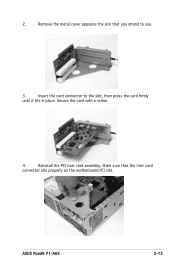
2. Remove the metal cover opposite the slot that the riser card connector sits properly on the motherboard PCI slot. ASUS Pundit P1-AH2 2-13 Secure the card with a screw. 4. Reinstall the PCI riser card assembly. Make sure that you intend to the slot, then press the card firmly until it fits in place. Insert the card connector to use. 3.
2. Remove the metal cover opposite the slot that the riser card connector sits properly on the motherboard PCI slot. ASUS Pundit P1-AH2 2-13 Secure the card with a screw. 4. Reinstall the PCI riser card assembly. Make sure that you intend to the slot, then press the card firmly until it fits in place. Insert the card connector to use. 3.
User Guide
Page 37
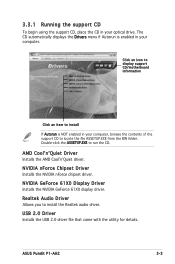
...;nʼQuiet Driver Installs the AMD CoolʼnʼQuiet driver. Click an icon to display support CD/motherboard information Click an item to install If Autorun is enabled in your optical drive. ASUS Pundit P1-AH2 3-3 The CD automatically displays the Drivers menu if Autorun is NOT enabled in your computer. 3.3.1 Running the support...
...;nʼQuiet Driver Installs the AMD CoolʼnʼQuiet driver. Click an icon to display support CD/motherboard information Click an item to install If Autorun is enabled in your optical drive. ASUS Pundit P1-AH2 3-3 The CD automatically displays the Drivers menu if Autorun is NOT enabled in your computer. 3.3.1 Running the support...
User Guide
Page 45
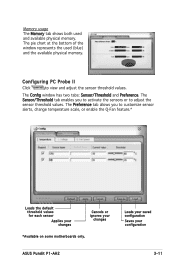
... two tabs: Sensor/Threshold and Preference. The Sensor/Threshold tab enables you to view and adjust the sensor threshold values. ASUS Pundit P1-AH2 Loads your saved configuration Saves your changes *Available on some motherboards only. Configuring PC Probe II Click to customize sensor alerts, change temperature scale, or enable the Q-Fan feature.* Loads the...
... two tabs: Sensor/Threshold and Preference. The Sensor/Threshold tab enables you to view and adjust the sensor threshold values. ASUS Pundit P1-AH2 Loads your saved configuration Saves your changes *Available on some motherboards only. Configuring PC Probe II Click to customize sensor alerts, change temperature scale, or enable the Q-Fan feature.* Loads the...

User Guide
Page 50
This chapter includes the motherboard layout, jumper settings, and connector locations. ASUS Pundit P1-AH2 Motherboard info Chapter 4 This chapter gives information about the motherboard that comes with the system.
This chapter includes the motherboard layout, jumper settings, and connector locations. ASUS Pundit P1-AH2 Motherboard info Chapter 4 This chapter gives information about the motherboard that comes with the system.
User Guide
Page 51
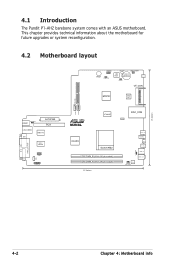
4.1 Introduction The Pundit P1-AH2 barebone system comes with an ASUS motherboard. This chapter provides technical information about the motherboard for future upgrades or system reconfiguration. 4.2 Motherboard layout USB56 BUZ1 USBPW56 SB_PWR1 LED_CON1 4Mb BIOS CR2032 3V Lithium Cell CMOS Power CLRTC RSTCON1 CF_CON MCP51 SMSC 2227 PRI_IDE SATA1 SATA2 USBPW34 KBMS1 ...) DDR2 DIMM_A1(64 bit,240-pin module) 13.3inches 3IN1_CON ADP3186 SPDIF_OUT IE1394_1 PWR SW1 IE 1394_2 USB1 2 FRONT_AUD1 ATX12V1 CPU_FAN1 USBPW12 10.4inches 4-2 Chapter 4: Motherboard info
4.1 Introduction The Pundit P1-AH2 barebone system comes with an ASUS motherboard. This chapter provides technical information about the motherboard for future upgrades or system reconfiguration. 4.2 Motherboard layout USB56 BUZ1 USBPW56 SB_PWR1 LED_CON1 4Mb BIOS CR2032 3V Lithium Cell CMOS Power CLRTC RSTCON1 CF_CON MCP51 SMSC 2227 PRI_IDE SATA1 SATA2 USBPW34 KBMS1 ...) DDR2 DIMM_A1(64 bit,240-pin module) 13.3inches 3IN1_CON ADP3186 SPDIF_OUT IE1394_1 PWR SW1 IE 1394_2 USB1 2 FRONT_AUD1 ATX12V1 CPU_FAN1 USBPW12 10.4inches 4-2 Chapter 4: Motherboard info

User Guide
Page 56
... R 1 USB+5V USB_P5USB_P5+ GND USB 2.0 Connector ASUS Pundit P1-AH2 4-7 These are for USB 2.0 ports. Tachometer +12V GND 4. USB connector (10-1 pin USB56) These connectors are not jumpers! Connect the fan cables to the fan connectors on the fan connectors! 5. Do not place jumper caps on the motherboard, making sure that supports up to 480...
... R 1 USB+5V USB_P5USB_P5+ GND USB 2.0 Connector ASUS Pundit P1-AH2 4-7 These are for USB 2.0 ports. Tachometer +12V GND 4. USB connector (10-1 pin USB56) These connectors are not jumpers! Connect the fan cables to the fan connectors on the fan connectors! 5. Do not place jumper caps on the motherboard, making sure that supports up to 480...
User Guide
Page 63
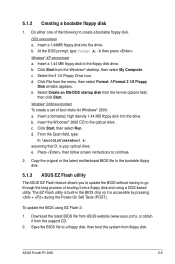
...from a floppy disk and using EZ Flash 2: 1. e. Copy the original or the latest motherboard BIOS file to the bootable floppy disk. 5.1.3 ASUS EZ Flash utility The ASUS EZ Flash feature allows you to update the BIOS without having to create a bootable floppy ...the support CD. 2. Download the latest BIOS file from floppy disk. d. Insert a formatted, high density 1.44 MB floppy disk into the drive. ASUS Pundit P1-AH2 5-5 A Format 3 1/2 Floppy Disk window appears. To update the BIOS using a DOS-based utility. Select the 3 1/2 Floppy...
...from a floppy disk and using EZ Flash 2: 1. e. Copy the original or the latest motherboard BIOS file to the bootable floppy disk. 5.1.3 ASUS EZ Flash utility The ASUS EZ Flash feature allows you to update the BIOS without having to create a bootable floppy ...the support CD. 2. Download the latest BIOS file from floppy disk. d. Insert a formatted, high density 1.44 MB floppy disk into the drive. ASUS Pundit P1-AH2 5-5 A Format 3 1/2 Floppy Disk window appears. To update the BIOS using a DOS-based utility. Select the 3 1/2 Floppy...
User Guide
Page 69
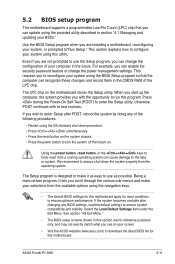
...figuration of your computer in section "4.1 Managing and updating your BIOS." Select the Load Default Settings item under the Exit Menu. ASUS Pundit P1-AH2 5-11 5.2 BIOS setup program This motherboard supports a programmable Low-Pin Count (LPC) chip that the computer can recognize these changes and record them in this section are for...the opportunity to enter the Setup utility; The LPC chip on . See section "4.8 Exit Menu." • The BIOS setup screens shown in the CMOS RAM of the following procedures: • Restart using the provided utility described in the future.
...figuration of your computer in section "4.1 Managing and updating your BIOS." Select the Load Default Settings item under the Exit Menu. ASUS Pundit P1-AH2 5-11 5.2 BIOS setup program This motherboard supports a programmable Low-Pin Count (LPC) chip that the computer can recognize these changes and record them in this section are for...the opportunity to enter the Setup utility; The LPC chip on . See section "4.8 Exit Menu." • The BIOS setup screens shown in the CMOS RAM of the following procedures: • Restart using the provided utility described in the future.

User Guide
Page 87
... items in rotations per minute (RPM). CPU Temperature, M/B Temperature The onboard hardware monitor automatically detects and displays the motherboard and CPU temperatures. Configuration options: [Disabled] [800 RPM] [1200 RPM] [1600 RPM] ASUS Pundit P1-AH2 5-29 Select an item then press to enable or disable. CPU Fan Speed warning [ 800 RPM] Allows you...
... items in rotations per minute (RPM). CPU Temperature, M/B Temperature The onboard hardware monitor automatically detects and displays the motherboard and CPU temperatures. Configuration options: [Disabled] [800 RPM] [1200 RPM] [1600 RPM] ASUS Pundit P1-AH2 5-29 Select an item then press to enable or disable. CPU Fan Speed warning [ 800 RPM] Allows you...


