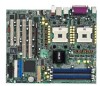
Disk Array & Driver Installation Guide English Version
Page 1
Server systems and motherboards RAID configuration and driver installation guide For • AP130-E1 5U Rackmount Server • AP1720-E2 5U Rackmount Server • NCCH-DL Motherboard • PSCH-L Motherboard
Disk Array & Driver Installation Guide English Version
Page 2
...infringe. 2 RAID configuration and driver installation Products and corporate names appearing in this manual, including the products and software described in any form or by any means, except documentation kept by ASUS; All Rights Reserved. IN NO EVENT SHALL ASUS, ITS DIRECTORS, OFFICERS, EMPLOYEES OR...retrieval system, or translated into any language in it, may not be registered trademarks or copyrights of alteration is defaced or missing. ASUS PROVIDES THIS MANUAL "AS IS" WITHOUT WARRANTY OF ANY KIND, EITHER EXPRESS OR IMPLIED, INCLUDING BUT NOT LIMITED TO THE IMPLIED ...
Disk Array & Driver Installation Guide English Version
Page 3
.../2003 Server 41 2.1.2 Red Hat® Linux 9.0 42 2.2 Installing the Intel® 6300ESB RAID controller driver .. 43 2.2.1 Windows® 2000/2003 Server OS 43 2.2.2 Red Hat® Linux 9.0 47 2.3 Installing the Promise® PDC20319 RAID controller driver .. 50 2.3.1 Windows...Server 54 2.3.3 Red Hat® Linux 9.0 59 3. VGA driver installation 65 4.1 Windows® 2000/2003 Server 65 4.2 Red Hat® Linux 9.0 65 RAID configuration and driver installation 3 RAID configurations 4 1.1 RAID definitions 4 1.2 Installing hard disk drives 5 1.3 Setting the RAID item in BIOS 5 ...
Disk Array & Driver Installation Guide English Version
Page 4
...+ 1 is required for this setup. RAID 1 (Data mirroring) copies and maintains an identical image of data from the support CD to a floppy disk before you install an operating system to the selected hard disk drive. Use four new hard disk drives or use an existing drive and a new drive for this...or use an existing drive and three new drives for this setup. J B O D (Spanning) stands for details. 4 RAID configuration and driver installation With the RAID 0+1 configuration you want to boot the system from a hard disk drive included in the other RAID performance benefits. RAID driver...
Disk Array & Driver Installation Guide English Version
Page 5
...t e c R A I D C o n f i g u r a t i o n U t i l i t y if you can create a RAID set configuration. RAID configuration and driver installation 5 Go to the A d v a n c e d M e n u, select I D, then press to the power connector on the SATA connectors supported by the Intel® ESB6300 Southbridge. For optimal performance...Connect a SATA power cable to display the configuration options. 4. For example, use , you installed SATA hard disk drives on each RAID controller. 1.2 Installing hard disk drives The motherboard supports Serial ATA hard disk drives for RAID set (s). Select Y ...
Disk Array & Driver Installation Guide English Version
Page 6
During POST, the Adaptec HostRAID™ technology automatically detects the installed SATA hard disk drives and displays any existing RAID set (s) from SATA hard disk drives connected to the SATA connectors supported by the motherboard Southbridge ... you to check and verify SATA hard disk drives. The keys on the legend box vary according to the menu level. 6 RAID configuration and driver installation Use the arrow keys to enter the utility. 3. Press to highlight an option. 1.5 Adaptec RAID Configuration Utility The Adaptec RAID Configuration Utility allows you to...
Disk Array & Driver Installation Guide English Version
Page 7
Select the first drive you want to add to the array, then press . 1.5.1 Creating a RAID 0 set (Striped) To create a RAID 0 set requires two identical hard disk drives. From the Main Menu, select C r e a t e A r r a y, then press . 3. A RAID 0 set : 1. The selected drive appears in the S e l e c t e d D r i v e s section. RAID configuration and driver installation 7 From the Adaptec RAID Configuration Utility initial menu, highlight A r r a y C o n f i g u r a t i o n U t i l i t y, then press . 2.
Disk Array & Driver Installation Guide English Version
Page 8
4. When all array information on screen, warning users that initialization will erase all the drives required for a RAID 0 set . 6. Select A r r a y T y p e > R A I D 0 ( S t r i p e ), then press . 8 RAID configuration and driver installation A message appears on the drives. Press to proceed or press to abort creating the RAID 0 set appear in the S e l e c t e d D r i v e s field, press . 5. After disk initialization, the utility displays the A r r a y P r o p e r t i e s menu.
Disk Array & Driver Installation Guide English Version
Page 9
For server systems, we recommend a higher array block size for optimum performance. For multimedia computer systems used mainly for the RAID 0 set. Press when done. 8. 7. Move the cursor to the S t r i p e S i z e option, select 6 4 K B from the menu, then press to the A r r a y L a b e l option, then type a name for audio and video editing, we recommend that you use a lower array block size. Move the cursor to select. RAID configuration and driver installation 9
Disk Array & Driver Installation Guide English Version
Page 10
When you have finished setting the array properties, move the cursor to D o n e, then press to select. 10. Move the cursor to the C r e a t e R A I D v i a option, select N o I n i t from the menu, then press to create the RAID 0 set. 10 RAID configuration and driver installation 9.
Disk Array & Driver Installation Guide English Version
Page 11
Press to return to view the array properties. 12. 11. The screen displays the array properties. RAID configuration and driver installation 11 Select M a n a g e A r r a y s to display the array, then press to the previous menu. After you have created the RAID 0 set, the utility main menu appears.
Disk Array & Driver Installation Guide English Version
Page 12
Follow instructions 1 to the A r r a y L a b e l option, then type a name for the RAID 1 set (Stripe)." 2. Move the cursor to 5 of the section "Creating a RAID 0 set . Press when finished. 12 RAID configuration and driver installation From the A r r a y P r o p e r t i e s menu, select A r r a y T y p e > R A I D 1 ( M i r r o r ), then press . 3. 1.5.2 Creating a RAID 1 set (Mirrored) To create a RAID 1 set: 1.
Disk Array & Driver Installation Guide English Version
Page 13
When you to select. 5. RAID configuration and driver installation 13 Press any key to create the RAID 1 set. 6. Move the cursor to the C r e a t e R A I D v i a option, select Q u i c k I n i t from the menu, then press to run a Verify W/FIX on the drives for consistency. A message appears on screen informing you that a RAID 1 array created with Quick Init requires you have finished setting the array properties, move the cursor to D o n e, then press to continue. 4.
Disk Array & Driver Installation Guide English Version
Page 14
Press to the previous menu. 9. The screen displays the array properties. 7. To exit the utility, press , highlight Y e s, then press . 14 RAID configuration and driver installation Press to return to view the array properties. 8. After you have created the RAID 1 set . Select M a n a g e A r r a y to display the created set , the utility main menu appears.
Disk Array & Driver Installation Guide English Version
Page 15
RAID configuration and driver installation 15 A message appears on screen informing you want to continue. Press + . Press to make as bootable. 2. 1.5.3 Creating a bootable RAID set To create a bootable RAID set you that all other arrays (if available) will become non-bootable. From the main menu, select M a n a g e A r r a y s, then select the RAID set : 1.
Disk Array & Driver Installation Guide English Version
Page 16
During POST, press to the previous menu. 4. Use the up or down arrow to select. Exit the utility, then reboot the system. 5. Press to return to select the boot device. 6. The system boots from the RAID set (HostRAID#0-#0 6300ESB), then press to highlight the bootable RAID set . 16 RAID configuration and driver installation An asterisk precedes a bootable array for easy identification. 3. The RAID 0 array becomes bootable.
Disk Array & Driver Installation Guide English Version
Page 17
1.5.4 Deleting a RAID 0 set To delete a RAID 0 set ; From the array list, select the RAID set you want to delete the selected RAID set : 1. Move the cursor to D e l e t e, then press to delete, then press . otherwise, move the cursor to C a n c e l to close the dialog box. The Array Properties dialog box appears. 2. RAID configuration and driver installation 17
Disk Array & Driver Installation Guide English Version
Page 18
When prompted, press to delete the RAID set or press to abort the operation. 4. A N o A r r a y s P r e s e n t message pops up on the screen if no array is detected. 18 RAID configuration and driver installation 3. To verify if the array was deleted, select M a n a g e A r r a y s from the main menu.
Disk Array & Driver Installation Guide English Version
Page 19
Move the cursor to D e l e t e, then press to close the dialog box. otherwise, move the cursor to C a n c e l to delete the selected RAID set; RAID configuration and driver installation 19 The Array Properties dialog box appears. 2. From the array list, select the RAID set : 1. 1.5.5 Deleting a RAID 1 set To delete a RAID 1 set you want to delete, then press .
Disk Array & Driver Installation Guide English Version
Page 20
Select [ N o n e ] or [ B o t h ] if you want to abort the operation. 4. To verify if the array was deleted, select M a n a g e A r r a y s from the main menu. A N o A r r a y s P r e s e n t message pops up on the screen if no array is detected. 20 RAID configuration and driver installation When prompted, press to delete the RAID set member. When prompted, use the arrow keys to select either M e m b e r # 0 or M e m b e r # 1 to delete a RAID 1 set or press to delete the entire array. 5. 3.