
User Guide
Page 1
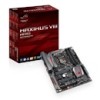
Motherboard MAXIMUS VIII HERO
Motherboard MAXIMUS VIII HERO
User Guide
Page 3
Contents Safety information...vi About this guide...vii MAXIMUS VIII HERO specifications summary ix Package contents...xiv Installation tools and components xv Chapter 1: Product Introduction 1.1 Special features 1-1 1.1.1 Product highlights 1-1 1.1.2 ROG Gaming Features 1-3 1.1.3 ROG Exclusive Features 1-4 1.1.4 ASUS Special Features 1-4 1.1.5 ROG rich bundled software 1-5 1.2 Motherboard overview 1-6 1.2.1 Before you proceed 1-6 1.2.2 Motherboard layout 1-7 1.2.3 Central Processing Unit (CPU 1-9 1.2.4 System memory 1-10 1.2.5 Expansion...
Contents Safety information...vi About this guide...vii MAXIMUS VIII HERO specifications summary ix Package contents...xiv Installation tools and components xv Chapter 1: Product Introduction 1.1 Special features 1-1 1.1.1 Product highlights 1-1 1.1.2 ROG Gaming Features 1-3 1.1.3 ROG Exclusive Features 1-4 1.1.4 ASUS Special Features 1-4 1.1.5 ROG rich bundled software 1-5 1.2 Motherboard overview 1-6 1.2.1 Before you proceed 1-6 1.2.2 Motherboard layout 1-7 1.2.3 Central Processing Unit (CPU 1-9 1.2.4 System memory 1-10 1.2.5 Expansion...
User Guide
Page 6
Contact a qualified service technician or your area. Operation safety • Before installing the motherboard and adding devices on it may become wet. • Place the product on a stable surface. • If you add a device. • Before connecting or .... • Seek professional assistance before using , contact your dealer immediately. • To avoid short circuits, keep paper clips, screws, and staples away from the motherboard, ensure that all the manuals that came with the product, contact a qualified service technician or your retailer. If you are not sure about the voltage...
Contact a qualified service technician or your area. Operation safety • Before installing the motherboard and adding devices on it may become wet. • Place the product on a stable surface. • If you add a device. • Before connecting or .... • Seek professional assistance before using , contact your dealer immediately. • To avoid short circuits, keep paper clips, screws, and staples away from the motherboard, ensure that all the manuals that came with the product, contact a qualified service technician or your retailer. If you are not sure about the voltage...
User Guide
Page 7
...; Chapter 4: Software Support This chapter describes the contents of the motherboard and the new technology it supports. ASUS website The ASUS website (www.asus.com) provides updated information on the motherboard. • Chapter 2: Basic Installation This chapter lists the hardware setup procedures that comes with the motherboard package and the software. • Chapter 5: RAID Support This...
...; Chapter 4: Software Support This chapter describes the contents of the motherboard and the new technology it supports. ASUS website The ASUS website (www.asus.com) provides updated information on the motherboard. • Chapter 2: Basic Installation This chapter lists the hardware setup procedures that comes with the motherboard package and the software. • Chapter 5: RAID Support This...

User Guide
Page 14
xiv Package contents Check your motherboard package for the following items. Motherboard Cables Accessories Application DVD Documentation ROG MAXIMUS VIII HERO 3 x 2-in-1 SATA 6 Gb/s cables 1 x SLI® bridge 1 x I/O Shield 1 x 12-in-1 ROG cable label 1 x 2-in-1 Q-Connector kit 1 x ROG Door Hanger 1 x CPU Installation Tool 1 x CPU Fan Label 1 x M.2 Screw ROG motherboard support DVD User guide If any of the above items is damaged or missing, contact your retailer.
xiv Package contents Check your motherboard package for the following items. Motherboard Cables Accessories Application DVD Documentation ROG MAXIMUS VIII HERO 3 x 2-in-1 SATA 6 Gb/s cables 1 x SLI® bridge 1 x I/O Shield 1 x 12-in-1 ROG cable label 1 x 2-in-1 Q-Connector kit 1 x ROG Door Hanger 1 x CPU Installation Tool 1 x CPU Fan Label 1 x M.2 Screw ROG motherboard support DVD User guide If any of the above items is damaged or missing, contact your retailer.

User Guide
Page 15
xv Installation tools and components 1 Bag of screws Phillips (cross) screwdriver PC chassis Power supply unit Intel LGA 1151 CPU Intel LGA 1151 compatible CPU Fan DDR4 DIMM SATA hard disk drive SATA optical disc drive (optional) Graphics card (optional) The tools and components in the table above are not included in the motherboard package.
xv Installation tools and components 1 Bag of screws Phillips (cross) screwdriver PC chassis Power supply unit Intel LGA 1151 CPU Intel LGA 1151 compatible CPU Fan DDR4 DIMM SATA hard disk drive SATA optical disc drive (optional) Graphics card (optional) The tools and components in the table above are not included in the motherboard package.
User Guide
Page 17
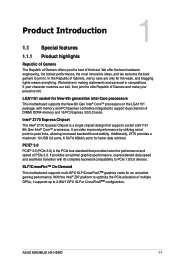
... that provides twice the performance and speed of Gamers, mercy rules are only for New 6th generation Intel Core processors This motherboard supports the New 6th Gen Intel® Core™ processors on the LGA1151 package, with its complete backward compatibility to ... Additionally, Z170 provides a maximum 10 USB 3.0 ports, 6 SATA 6Gbit/s ports for an unrivalled gaming performance. ASUS MAXIMUS VIII HERO 1-1 SLI®/CrossFire™ On-Demand This motherboard supports multi-GPU SLI®/CrossFireX™ graphics cards for faster data retrieval. In the Republic of PCIe 2.0. ...
... that provides twice the performance and speed of Gamers, mercy rules are only for New 6th generation Intel Core processors This motherboard supports the New 6th Gen Intel® Core™ processors on the LGA1151 package, with its complete backward compatibility to ... Additionally, Z170 provides a maximum 10 USB 3.0 ports, 6 SATA 6Gbit/s ports for an unrivalled gaming performance. ASUS MAXIMUS VIII HERO 1-1 SLI®/CrossFire™ On-Demand This motherboard supports multi-GPU SLI®/CrossFireX™ graphics cards for faster data retrieval. In the Republic of PCIe 2.0. ...

User Guide
Page 18
... ports 1 and 2 and will automatically disable those ports when an M.2 card is inserted. Complete USB 3.0 integration This motherboard offers you the strategic USB 3.0 accessibility for both PCIE and SATA modes. Chapter 1 M.2 Support This motherboard features an M.2 slot, which supports both the front and rear panels, allowing you to experience the convenience of...
... ports 1 and 2 and will automatically disable those ports when an M.2 card is inserted. Complete USB 3.0 integration This motherboard offers you the strategic USB 3.0 accessibility for both PCIE and SATA modes. Chapter 1 M.2 Support This motherboard features an M.2 slot, which supports both the front and rear panels, allowing you to experience the convenience of...
User Guide
Page 19
The Japan-made premium Nichicon capacitor ensures warm natural sound with exceptional clarity for the motherboard that automatically detects your high-quality headphones as simple as plugging them in. letting you hear games, movies, music,... overlay display that simulates 7.1 channels even through a stereo (2.0-channel) headset with its compatibility with lower CPU utilization for better hearing awareness. ASUS MAXIMUS VIII HERO 1-3 SupremeFX 2015 revolutionizes the way you rule and discover a totally whole new dimension of true audiophile-grade performance that is an audio tuning...
The Japan-made premium Nichicon capacitor ensures warm natural sound with exceptional clarity for the motherboard that automatically detects your high-quality headphones as simple as plugging them in. letting you hear games, movies, music,... overlay display that simulates 7.1 channels even through a stereo (2.0-channel) headset with its compatibility with lower CPU utilization for better hearing awareness. ASUS MAXIMUS VIII HERO 1-3 SupremeFX 2015 revolutionizes the way you rule and discover a totally whole new dimension of true audiophile-grade performance that is an audio tuning...
User Guide
Page 21
... collections on personal computers, and sending encoded bitstreams out of a digital audio connection (such as 7.1 channels of reporting your system. ASUS MAXIMUS VIII HERO 1-5 DAEMON Tools Pro Standard DAEMON Tools Pro offers essential functionality to a home theatre system. DTS Interactive is automatically updated even without ... up mixes stereo sources (CDs, MP3s, WMAs, internet radio) into virtual discs and emulates devices to make your CPU, motherboard, memory, and the whole component. It is renowned for about three seconds, and the UEFI BIOS is capable of performing ...
... collections on personal computers, and sending encoded bitstreams out of a digital audio connection (such as 7.1 channels of reporting your system. ASUS MAXIMUS VIII HERO 1-5 DAEMON Tools Pro Standard DAEMON Tools Pro offers essential functionality to a home theatre system. DTS Interactive is automatically updated even without ... up mixes stereo sources (CDs, MP3s, WMAs, internet radio) into virtual discs and emulates devices to make your CPU, motherboard, memory, and the whole component. It is renowned for about three seconds, and the UEFI BIOS is capable of performing ...

User Guide
Page 22
... 1.2.1 Before you proceed Take note of the following precautions before you install motherboard components or change any component. • Before handling components, use a grounded wrist strap or touch a safely grounded object or a metal object, such as the power ... remove any component, ensure that the ATX power supply is switched off or the power cord is detached from the wall socket before touching any motherboard settings. • Unplug the power cord from the power supply. Failure to do so may cause severe damage to avoid touching the ICs on them...
... 1.2.1 Before you proceed Take note of the following precautions before you install motherboard components or change any component. • Before handling components, use a grounded wrist strap or touch a safely grounded object or a metal object, such as the power ... remove any component, ensure that the ATX power supply is switched off or the power cord is detached from the wall socket before touching any motherboard settings. • Unplug the power cord from the power supply. Failure to do so may cause severe damage to avoid touching the ICs on them...
User Guide
Page 23
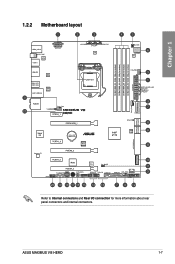
ASUS MAXIMUS VIII HERO 1-7 1.2.2 Motherboard layout Chapter 1 Refer to Internal connectors and Rear I/O connection for more information about rear panel connectors and internal connectors.
ASUS MAXIMUS VIII HERO 1-7 1.2.2 Motherboard layout Chapter 1 Refer to Internal connectors and Rear I/O connection for more information about rear panel connectors and internal connectors.
User Guide
Page 25
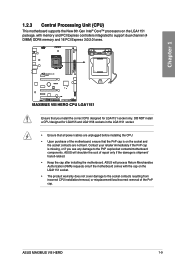
... Return Merchandise Authorization (RMA) requests only if the motherboard comes with memory and PCI Express controllers integrated to support dual-channel (4 DIMM) DDR4 memory and 16 PCI Express 3.0/2.0 lanes. ASUS will shoulder the cost of the PnP cap. Contact your retailer immediately ...misplacement/loss/incorrect removal of repair only if the damage is shipment/ transit-related. • Keep the cap after installing the motherboard. ASUS MAXIMUS VIII HERO 1-9 DO NOT install a CPU designed for LGA1151 socket only. Chapter 1 Ensure that all power cables are not bent. 1.2.3 Central ...
... Return Merchandise Authorization (RMA) requests only if the motherboard comes with memory and PCI Express controllers integrated to support dual-channel (4 DIMM) DDR4 memory and 16 PCI Express 3.0/2.0 lanes. ASUS will shoulder the cost of the PnP cap. Contact your retailer immediately ...misplacement/loss/incorrect removal of repair only if the damage is shipment/ transit-related. • Keep the cap after installing the motherboard. ASUS MAXIMUS VIII HERO 1-9 DO NOT install a CPU designed for LGA1151 socket only. Chapter 1 Ensure that all power cables are not bent. 1.2.3 Central ...

User Guide
Page 26
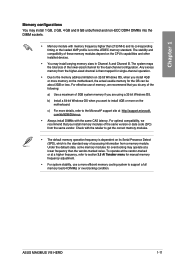
Chapter 1 1.2.4 System memory The motherboard comes with four Double Data Rate 4 (DDR4) Dual Inline Memory Modules (DIMM) slots. A DDR4 module is notched differently from a DDR, DDR2, or DDR3 module. Recommended memory configurations 1-10 Chapter 1: Product Introduction DO NOT install a DDR, DDR2, or DDR3 memory module to the DDR4 slot.
Chapter 1 1.2.4 System memory The motherboard comes with four Double Data Rate 4 (DDR4) Dual Inline Memory Modules (DIMM) slots. A DDR4 module is notched differently from a DDR, DDR2, or DDR3 module. Recommended memory configurations 1-10 Chapter 1: Product Introduction DO NOT install a DDR, DDR2, or DDR3 memory module to the DDR4 slot.
User Guide
Page 27
... at a lower frequency than 2133 MHz and its Serial Presence Detect (SPD), which is not the JEDEC memory standard. ASUS MAXIMUS VIII HERO 1-11 For effective use a more on the motherboard, the actual usable memory for manual memory frequency adjustment. • For system stability, use of memory, we recommend that... you do any of the following: a) Use a maximum of 3GB system memory if you install 4GB or more memory on the motherboard. Under the default state, some memory modules for the dual-channel configuration. The system maps the total size of the lower-sized channel ...
... at a lower frequency than 2133 MHz and its Serial Presence Detect (SPD), which is not the JEDEC memory standard. ASUS MAXIMUS VIII HERO 1-11 For effective use a more on the motherboard, the actual usable memory for manual memory frequency adjustment. • For system stability, use of memory, we recommend that... you do any of the following: a) Use a maximum of 3GB system memory if you install 4GB or more memory on the motherboard. Under the default state, some memory modules for the dual-channel configuration. The system maps the total size of the lower-sized channel ...

User Guide
Page 28
...) SS - - 16-18-18-38 1.35V DIMM socket support (Optional) 2 4 • • • • • • • DDR4 3300 MHz capability Vendors Part No. Chapter 1 MAXIMUS VIII HERO Motherboard Qualified Vendors Lists (QVL) DDR4 3466 MHz capability Vendors Part No. Timing Voltage CORSAIR CMK16GX4M4B3400C16 16GB (4 x 4GB) SS - - 16-18-18-40 1.35V G.SKILL F4...
...) SS - - 16-18-18-38 1.35V DIMM socket support (Optional) 2 4 • • • • • • • DDR4 3300 MHz capability Vendors Part No. Chapter 1 MAXIMUS VIII HERO Motherboard Qualified Vendors Lists (QVL) DDR4 3466 MHz capability Vendors Part No. Timing Voltage CORSAIR CMK16GX4M4B3400C16 16GB (4 x 4GB) SS - - 16-18-18-40 1.35V G.SKILL F4...

User Guide
Page 34
Slot Description 1 PCIe 3.0 x1_1 slot 2 PCIe 3.0 x16/x8_1 slot 3 PCIe 3.0 x1_2 slot 4 PCIe 3.0 x8_2 slot 5 PCIe 3.0 x1_3 slot 6 PCIe 3.0 x4_3 slot 1-18 Chapter 1: Product Introduction Failure to do so may cause you physical injury and damage motherboard components. Chapter 1 Slot No. 1.2.5 Expansion slots Unplug the power cord before adding or removing expansion cards.
Slot Description 1 PCIe 3.0 x1_1 slot 2 PCIe 3.0 x16/x8_1 slot 3 PCIe 3.0 x1_2 slot 4 PCIe 3.0 x8_2 slot 5 PCIe 3.0 x1_3 slot 6 PCIe 3.0 x4_3 slot 1-18 Chapter 1: Product Introduction Failure to do so may cause you physical injury and damage motherboard components. Chapter 1 Slot No. 1.2.5 Expansion slots Unplug the power cord before adding or removing expansion cards.
User Guide
Page 35
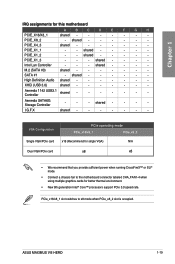
... PCIE_X1_2 - - shared - - - - shared - - - - PCIe_x16/x8_1 slot switches to the motherboard connector labeled CHA_FAN1-4 when using multiple graphics cards for this motherboard A B C D E F G H PCIE_X16/X8_1 shared - - - - - - - PCIE_X1_3 - - - shared - - - - XHCI (USB 3.0) shared - - - - - - - Asmedia SATA6G Storage Controller - - - PCIE_X1_1 - - SATA #1 - Asmedia 1142 USB3.1 Controller shared - - - - - - - ASUS MAXIMUS VIII HERO 1-19 Chapter 1 IRQ assignments for better thermal environment. • New...
... PCIE_X1_2 - - shared - - - - shared - - - - PCIe_x16/x8_1 slot switches to the motherboard connector labeled CHA_FAN1-4 when using multiple graphics cards for this motherboard A B C D E F G H PCIE_X16/X8_1 shared - - - - - - - PCIE_X1_3 - - - shared - - - - XHCI (USB 3.0) shared - - - - - - - Asmedia SATA6G Storage Controller - - - PCIE_X1_1 - - SATA #1 - Asmedia 1142 USB3.1 Controller shared - - - - - - - ASUS MAXIMUS VIII HERO 1-19 Chapter 1 IRQ assignments for better thermal environment. • New...

User Guide
Page 36
x1 - PCIE_X16/X8_1 - x1 - PCIEX4_3 x1 x4 x1 x4 • PCIEX4_3 shares bandwidth with PCIEX1_2 and PCIEX1_3. • PCIEX4_3 will run in X2 mode by default with PCIEX1_2 and PCIEX1_3 enabled. • When a PCIEx4 card is inserted into the PCIEX4_3 slot, PCIEX1_2 and PCIEX1_3 will be disabled and the PCIEX4 card will run in X4 mode. 1-20 Chapter 1: Product Introduction Chapter 1 PCIe operating mode Motherboard Layout M.2 M.2 M.2 M.2 M.2 PCIEX1_1 Modes Auto PCIe PCIe X1 X4 x1 x1 x1 - PCIEX1_2 x1 - PCIE_X8_2 ---- x1 - - PCIEX1_3 x1 -
x1 - PCIE_X16/X8_1 - x1 - PCIEX4_3 x1 x4 x1 x4 • PCIEX4_3 shares bandwidth with PCIEX1_2 and PCIEX1_3. • PCIEX4_3 will run in X2 mode by default with PCIEX1_2 and PCIEX1_3 enabled. • When a PCIEx4 card is inserted into the PCIEX4_3 slot, PCIEX1_2 and PCIEX1_3 will be disabled and the PCIEX4 card will run in X4 mode. 1-20 Chapter 1: Product Introduction Chapter 1 PCIe operating mode Motherboard Layout M.2 M.2 M.2 M.2 M.2 PCIEX1_1 Modes Auto PCIe PCIe X1 X4 x1 x1 x1 - PCIEX1_2 x1 - PCIE_X8_2 ---- x1 - - PCIEX1_3 x1 -
User Guide
Page 37
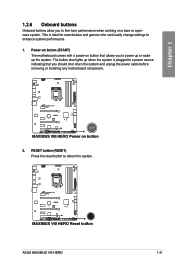
... button that allows you to a power source indicating that you should shut down the system and unplug the power cable before removing or installing any motherboard component. 2. ASUS MAXIMUS VIII HERO 1-21 RESET button (RESET) Press the reset button to enhance system performance. 1. The button also lights up the system.
... button that allows you to a power source indicating that you should shut down the system and unplug the power cable before removing or installing any motherboard component. 2. ASUS MAXIMUS VIII HERO 1-21 RESET button (RESET) Press the reset button to enhance system performance. 1. The button also lights up the system.


