User Manual
Page 6
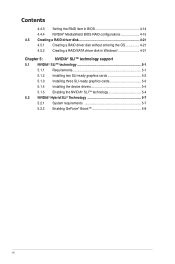
Contents 4.4.3 Setting the RAID item in BIOS 4-14 4.4.4 NVIDIA® MediaShield BIOS RAID configurations 4-15 4.5 Creating a RAID driver disk 4-21 4.5.1 Creating a RAID driver disk without entering the OS 4-21 4.5.2 Creating a RAID/SATA driver disk in Windows 4-21 Chapter 5: NVIDIA® SLI™ technology support 5.1 NVIDIA® SLI™ technology 5-1 5.1.1 Requirements 5-1 5.1.2 Installing two SLI-ready graphics cards 5-2 5.1.3 Installing three SLI-ready graphics cards 5-3 5.1.4 Installing the device drivers 5-4 5.1.5 Enabling the NVIDIA® SLI™ technology...
Contents 4.4.3 Setting the RAID item in BIOS 4-14 4.4.4 NVIDIA® MediaShield BIOS RAID configurations 4-15 4.5 Creating a RAID driver disk 4-21 4.5.1 Creating a RAID driver disk without entering the OS 4-21 4.5.2 Creating a RAID/SATA driver disk in Windows 4-21 Chapter 5: NVIDIA® SLI™ technology support 5.1 NVIDIA® SLI™ technology 5-1 5.1.1 Requirements 5-1 5.1.2 Installing two SLI-ready graphics cards 5-2 5.1.3 Installing three SLI-ready graphics cards 5-3 5.1.4 Installing the device drivers 5-4 5.1.5 Enabling the NVIDIA® SLI™ technology...

User Manual
Page 31
...-bit Windows OS when you obtain memory modules from a memory module. Timing DIMM (BIOS) DIMM socket Voltage support (Optional) A* B* 2GB (Kit of the lower-sized channel for the OS can be about 3GB or less. M4N82 Deluxe Motherboard Qualified Vendors Lists (QVL) DDR2-1200 MHz capability Vendor OCZ Part No. For effective use a more memory on its Serial Presence Detect (SPD), which is supported by AM3/AM2+ CPU for overclocking may install varying memory sizes...
...-bit Windows OS when you obtain memory modules from a memory module. Timing DIMM (BIOS) DIMM socket Voltage support (Optional) A* B* 2GB (Kit of the lower-sized channel for the OS can be about 3GB or less. M4N82 Deluxe Motherboard Qualified Vendors Lists (QVL) DDR2-1200 MHz capability Vendor OCZ Part No. For effective use a more memory on its Serial Presence Detect (SPD), which is supported by AM3/AM2+ CPU for overclocking may install varying memory sizes...
User Manual
Page 43
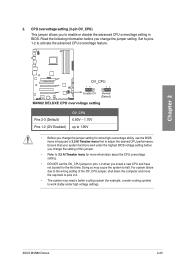
... the desired CPU performance. ASUS M4N82 Deluxe 2-23 CPU overvoltage setting (3-pin OV_CPU) This jumper allows you install a new CPU and have not booted for extra-high overvoltage ability, use the BIOS items introduced in 3.5 Ai Tweaker menu first to enable or disable the advanced CPU overvoltage setting in BIOS. Chapter 2 Pins 2-3 (Default) Pins 1-2 (OV Enabled) OV_CPU 0.80V - 1.70V up to 1.90V • Before you change the jumper setting for the first time. For system failure due to...
... the desired CPU performance. ASUS M4N82 Deluxe 2-23 CPU overvoltage setting (3-pin OV_CPU) This jumper allows you install a new CPU and have not booted for extra-high overvoltage ability, use the BIOS items introduced in 3.5 Ai Tweaker menu first to enable or disable the advanced CPU overvoltage setting in BIOS. Chapter 2 Pins 2-3 (Default) Pins 1-2 (OV Enabled) OV_CPU 0.80V - 1.70V up to 1.90V • Before you change the jumper setting for the first time. For system failure due to...

User Manual
Page 50
...SLI controller. If you intend to create a Serial ATA RAID set using these connectors, set any of the SATA ports to RAID mode, all SATA ports run at RAID mode simultaneously. • You must install Windows® XP Service Pack 2 or later version before connecting devices to the SATA1-5 connectors, you install SATA hard disk drives to the SATA 5 connector. Chapter 2 • The SATA 5 connector supports AHCI mode and RAID mode only. 4. These connectors are not supported by default. Ensure to install the AHCI driver or RAID driver in the BIOS to [SATA Mode] by the onboard SATA...
...SLI controller. If you intend to create a Serial ATA RAID set using these connectors, set any of the SATA ports to RAID mode, all SATA ports run at RAID mode simultaneously. • You must install Windows® XP Service Pack 2 or later version before connecting devices to the SATA1-5 connectors, you install SATA hard disk drives to the SATA 5 connector. Chapter 2 • The SATA 5 connector supports AHCI mode and RAID mode only. 4. These connectors are not supported by default. Ensure to install the AHCI driver or RAID driver in the BIOS to [SATA Mode] by the onboard SATA...

User Manual
Page 61
... as storage device configuration, overclocking settings, advanced power management, and boot device configuration that requires further BIOS settings or update. We recommend that you change the default BIOS settings except in the following utilities allow you not change the BIOS settings only with the help of the BIOS may result in the future. However, BIOS updating is no problem using the motherboard support DVD or a USB flash drive when the BIOS file fails or gets corrupted. Save a copy of BIOS, DO NOT manually update the BIOS. ASUS M4N82 Deluxe 3-1 Inappropriate BIOS updating...
... as storage device configuration, overclocking settings, advanced power management, and boot device configuration that requires further BIOS settings or update. We recommend that you change the default BIOS settings except in the following utilities allow you not change the BIOS settings only with the help of the BIOS may result in the future. However, BIOS updating is no problem using the motherboard support DVD or a USB flash drive when the BIOS file fails or gets corrupted. Save a copy of BIOS, DO NOT manually update the BIOS. ASUS M4N82 Deluxe 3-1 Inappropriate BIOS updating...

User Manual
Page 62
... 3: BIOS setup Installing ASUS Update To install ASUS Update: 1. From the Main menu, click the Utilities tab, then click Install ASUS Update VX.XX.XX. 3. Updating the BIOS through the Internet To update the BIOS through a network or an Internet Service Provider (ISP). From the Windows® desktop, click 2. Select Update BIOS from the Internet from the Internet • View the BIOS version information This utility is available in the support DVD that allows you update the BIOS using this utility. Quit all Windows...
... 3: BIOS setup Installing ASUS Update To install ASUS Update: 1. From the Main menu, click the Utilities tab, then click Install ASUS Update VX.XX.XX. 3. Updating the BIOS through the Internet To update the BIOS through a network or an Internet Service Provider (ISP). From the Windows® desktop, click 2. Select Update BIOS from the Internet from the Internet • View the BIOS version information This utility is available in the support DVD that allows you update the BIOS using this utility. Quit all Windows...
User Manual
Page 64
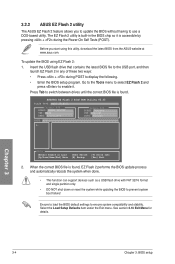
... switch between drives until the correct BIOS file is accessible by pressing + during POST to display the following. • Enter the BIOS setup program. Select the Load Setup Defaults item under the Exit menu. Insert the USB flash drive that contains the latest BIOS file to use a DOS‑based utility. Ensure to load the BIOS default settings to prevent system boot failure! Before you to update the BIOS without having to the USB port, and then launch EZ Flash 2 in the BIOS chip...
... switch between drives until the correct BIOS file is accessible by pressing + during POST to display the following. • Enter the BIOS setup program. Select the Load Setup Defaults item under the Exit menu. Insert the USB flash drive that contains the latest BIOS file to use a DOS‑based utility. Ensure to load the BIOS default settings to prevent system boot failure! Before you to update the BIOS without having to the USB port, and then launch EZ Flash 2 in the BIOS chip...

User Manual
Page 68
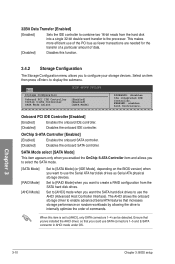
...; Select Item +- Main BIOS SETUP UTILITY SATA 1 Device : Hard Disk Vendor : HDT722516DLA380 Size : 164.7GB LBA Mode : Supported Block Mode : 16Sectors PIO Mode : 4 Async DMA : MultiWord DMA-2 Ultra DMA : Ultra DMA-6 SMART Monitoring:Supported LBA/Large Mode [Auto] Block(Multi-sector Transfer)M [Auto] PIO Mode [Auto] DMA Mode [Auto] SMART Monitoring [Auto] 32Bit Data Transfer [Enabled] Select the type of IDE/SATA devices. These values are not user-configurable. Refer to 3.3.1 BIOS menu screen for each IDE/SATA device. Use [+] or [-] to configure system Date...
...; Select Item +- Main BIOS SETUP UTILITY SATA 1 Device : Hard Disk Vendor : HDT722516DLA380 Size : 164.7GB LBA Mode : Supported Block Mode : 16Sectors PIO Mode : 4 Async DMA : MultiWord DMA-2 Ultra DMA : Ultra DMA-6 SMART Monitoring:Supported LBA/Large Mode [Auto] Block(Multi-sector Transfer)M [Auto] PIO Mode [Auto] DMA Mode [Auto] SMART Monitoring [Auto] 32Bit Data Transfer [Enabled] Select the type of IDE/SATA devices. These values are not user-configurable. Refer to 3.3.1 BIOS menu screen for each IDE/SATA device. Use [+] or [-] to configure system Date...
User Manual
Page 70
... SATA hard disk drives to use SATA connectors 1-5 and E-SATA connector in AHCI mode under OS. Select an item then press to display the submenu. Onboard PCI IDE Controller [Enabled] [Enabled] Enables the onboard IDE controller. [Disabled] Disables the onboard IDE controller. Set to [RAID Mode] when you want to create a RAID configuration from the hard disk into a single 32-bit double word transfer to the processor. Main Storage Configuration Onboard PCI IDE Controller OnChip S-ATA Controller SATA Mode select BIOS SETUP UTILITY [Enabled] [Enabled] [SATA Mode] DISABLED: disables...
... SATA hard disk drives to use SATA connectors 1-5 and E-SATA connector in AHCI mode under OS. Select an item then press to display the submenu. Onboard PCI IDE Controller [Enabled] [Enabled] Enables the onboard IDE controller. [Disabled] Disables the onboard IDE controller. Set to [RAID Mode] when you want to create a RAID configuration from the hard disk into a single 32-bit double word transfer to the processor. Main Storage Configuration Onboard PCI IDE Controller OnChip S-ATA Controller SATA Mode select BIOS SETUP UTILITY [Enabled] [Enabled] [SATA Mode] DISABLED: disables...

User Manual
Page 72
... the CPU Core Clock and the FSB Frequency. The valid value ranges vary according to be auto-adjusted. FSB Frequency [200] Displays the frequency sent by the clock generator to adjust the ratio. The values range from 200 to [Manual]. Main Ai Tweaker BIOS SETUP UTILITY Advanced Power Boot Configure System Frequency/Voltage AI Overclocking DRAM Frequency Control HT Link Speed CPU Voltage CPU/NB Voltage CPU/LDT Spread Spectrum PCIE Spread Spectrum SATA Spread Spectrum PCI Spread Spectrum [Auto] [Auto] [Auto] [Auto] [Auto] [Disabled] [Disabled] [Disabled] [Disabled...
... the CPU Core Clock and the FSB Frequency. The valid value ranges vary according to be auto-adjusted. FSB Frequency [200] Displays the frequency sent by the clock generator to adjust the ratio. The values range from 200 to [Manual]. Main Ai Tweaker BIOS SETUP UTILITY Advanced Power Boot Configure System Frequency/Voltage AI Overclocking DRAM Frequency Control HT Link Speed CPU Voltage CPU/NB Voltage CPU/LDT Spread Spectrum PCIE Spread Spectrum SATA Spread Spectrum PCI Spread Spectrum [Auto] [Auto] [Auto] [Auto] [Auto] [Disabled] [Disabled] [Disabled] [Disabled...
User Manual
Page 73
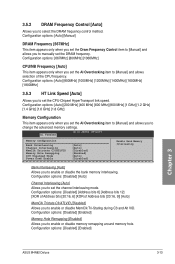
... set the Dram Frequency Control item to [Manual] and allows you to set the AI Overclocking item to [Manual] and allows you to manually set the channel interleaving mode. Configuration options: [Auto] [800MHz] [1000MHz] [1200MHz] [1400MHz] [1600MHz] [1800MHz] 3.5.3 HT Link Speed [Auto] Allows you to select the DRAM frequency control method. Ai Tweaker BIOS SETUP UTILITY Memory Configuration Bank Interleaving Channel Interleaving MemClk Tristate C3/ATLVID Memory Hole Remapping DCT Unganged Mode Power Down Enable [Auto] [Auto] [Disabled] [Enabled] [Auto] [Disabled] Enable...
... set the Dram Frequency Control item to [Manual] and allows you to set the AI Overclocking item to [Manual] and allows you to manually set the channel interleaving mode. Configuration options: [Auto] [800MHz] [1000MHz] [1200MHz] [1400MHz] [1600MHz] [1800MHz] 3.5.3 HT Link Speed [Auto] Allows you to select the DRAM frequency control method. Ai Tweaker BIOS SETUP UTILITY Memory Configuration Bank Interleaving Channel Interleaving MemClk Tristate C3/ATLVID Memory Hole Remapping DCT Unganged Mode Power Down Enable [Auto] [Auto] [Disabled] [Enabled] [Auto] [Disabled] Enable...
User Manual
Page 79
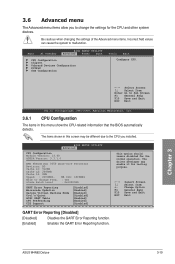
...function. [Enabled] Enables the GART Error Reporting function. Main Ai Tweaker BIOS SETUP UTILITY Advanced Power Boot CPU Configuration Chipset Onboard Devices Configuration PCIPnP USB Configuration Tools Exit Configure CPU. ←→ Select Screen ↑↓ Select Item Enter Go to change the settings for testing purpose. ←→ Select Screen ↑↓ Select Item +- The items shown in this screen may enable it for the CPU and other system devices. BIOS SETUP UTILITY Advanced CPU Configuration Module Version: 13.40 AGESA Version: 3.3.1.0 AMD Phenom...
...function. [Enabled] Enables the GART Error Reporting function. Main Ai Tweaker BIOS SETUP UTILITY Advanced Power Boot CPU Configuration Chipset Onboard Devices Configuration PCIPnP USB Configuration Tools Exit Configure CPU. ←→ Select Screen ↑↓ Select Item Enter Go to change the settings for testing purpose. ←→ Select Screen ↑↓ Select Item +- The items shown in this screen may enable it for the CPU and other system devices. BIOS SETUP UTILITY Advanced CPU Configuration Module Version: 13.40 AGESA Version: 3.3.1.0 AMD Phenom...
User Manual
Page 81
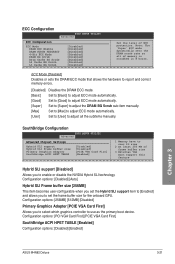
... ASUS M4N82 Deluxe 3-21 ECC Configuration BIOS SETUP UTILITY Advanced ECC Configuration ECC Mode DRAM ECC Enable DRAM SCRUB REDIRECT 4-Bit ECC Mode DRAM BG Scrub Data Cache BG Scrub L2 Cache BG Scrub L3 Cache BG Scrub [Disabled] [Disabled] [Disabled] [Disabled] [Disabled] [Disabled] [Disabled] [Disabled] Set the level of memory is scrubbed in 8 hours. Set to [User] to adjust all of ECC protection. Configuration options: [256MB] [512MB] [Disabled] Primary Graphics Adapter [PCIE VGA Card First] Allows you to use as the primary boot device. SouthBridge Configuration BIOS...
... ASUS M4N82 Deluxe 3-21 ECC Configuration BIOS SETUP UTILITY Advanced ECC Configuration ECC Mode DRAM ECC Enable DRAM SCRUB REDIRECT 4-Bit ECC Mode DRAM BG Scrub Data Cache BG Scrub L2 Cache BG Scrub L3 Cache BG Scrub [Disabled] [Disabled] [Disabled] [Disabled] [Disabled] [Disabled] [Disabled] [Disabled] Set the level of memory is scrubbed in 8 hours. Set to [User] to adjust all of ECC protection. Configuration options: [256MB] [512MB] [Disabled] Primary Graphics Adapter [PCIE VGA Card First] Allows you to use as the primary boot device. SouthBridge Configuration BIOS...

User Manual
Page 82
...Onboard Devices Configuration BIOS SETUP UTILITY Advanced Onboard Devices Configuration Onboard LAN OnBoard LAN Boot ROM Onboard 1394 On-board AUDIO Front Panel Select SPDIF Mode Setting Serial Port1 Address [Enabled] [Disabled] [Enabled] [Enabled] [HD Audio] [SPDIF Output] [3F8/IRQ4] Options Enabled Disabled Onboard LAN [Enabled] [Enabled] Enables the onboard LAN controller. [Disabled] Disables the onboard controller. The following item appears only when you to [Enabled]. Front Panel Type [HD Audio] [AC97] Sets the front panel audio connector (AAFP) mode to legacy...
...Onboard Devices Configuration BIOS SETUP UTILITY Advanced Onboard Devices Configuration Onboard LAN OnBoard LAN Boot ROM Onboard 1394 On-board AUDIO Front Panel Select SPDIF Mode Setting Serial Port1 Address [Enabled] [Disabled] [Enabled] [Enabled] [HD Audio] [SPDIF Output] [3F8/IRQ4] Options Enabled Disabled Onboard LAN [Enabled] [Enabled] Enables the onboard LAN controller. [Disabled] Disables the onboard controller. The following item appears only when you to [Enabled]. Front Panel Type [HD Audio] [AC97] Sets the front panel audio connector (AAFP) mode to legacy...

User Manual
Page 83
... Configuration Module Version - 2.24.3-13.4 USB Devices Enabled: None Options Enabled Disabled USB Support USB 2.0 Controller Legacy USB Support USB 2.0 Controller Mode [Enabled] [Enabled] [Enabled] [HiSpeed] Chapter 3 The USB Devices Enabled item shows the auto-detected values. USB 2.0 Controller [Enabled] [Enabled] Enables the USB 2.0 controller. [Disabled] Disables the controller. Select an item then press to malfunction. ASUS M4N82 Deluxe 3-23 YES: lets the operating system configure Plug and Play (PnP) devices not required for PCI/PnP devices. BIOS SETUP UTILITY...
... Configuration Module Version - 2.24.3-13.4 USB Devices Enabled: None Options Enabled Disabled USB Support USB 2.0 Controller Legacy USB Support USB 2.0 Controller Mode [Enabled] [Enabled] [Enabled] [HiSpeed] Chapter 3 The USB Devices Enabled item shows the auto-detected values. USB 2.0 Controller [Enabled] [Enabled] Enables the USB 2.0 controller. [Disabled] Disables the controller. Select an item then press to malfunction. ASUS M4N82 Deluxe 3-23 YES: lets the operating system configure Plug and Play (PnP) devices not required for PCI/PnP devices. BIOS SETUP UTILITY...

User Manual
Page 91
... in setting a user password. See section 2.6 Jumpers for information on top of at least six letters and/or numbers, then press . 3. The message Password Uninstalled appears. After you have set a Supervisor Password: 1. Chapter 3 ASUS M4N82 Deluxe 3-31 Select an item then press to set a password, this item to display the configuration options. From the password box, type a password composed of the screen shows the default Not Installed. To change the supervisor password. Change Supervisor Password...
... in setting a user password. See section 2.6 Jumpers for information on top of at least six letters and/or numbers, then press . 3. The message Password Uninstalled appears. After you have set a Supervisor Password: 1. Chapter 3 ASUS M4N82 Deluxe 3-31 Select an item then press to set a password, this item to display the configuration options. From the password box, type a password composed of the screen shows the default Not Installed. To change the supervisor password. Change Supervisor Password...

User Manual
Page 99
...® RAID/AHCI driver disk. Double-click the ASSETUP.EXE to maximize the features of the support DVD to install. Always install the latest OS version and corresponding updates to run the DVD. The DVD automatically displays the Drivers menu if Autorun is NOT enabled in your computer, browse the contents of your hardware. • Motherboard settings and hardware options vary. The Manual menu contains the list of the user manual. Use the setup procedures presented...
...® RAID/AHCI driver disk. Double-click the ASSETUP.EXE to maximize the features of the support DVD to install. Always install the latest OS version and corresponding updates to run the DVD. The DVD automatically displays the Drivers menu if Autorun is NOT enabled in your computer, browse the contents of your hardware. • Motherboard settings and hardware options vary. The Manual menu contains the list of the user manual. Use the setup procedures presented...

User Manual
Page 104
... pictures. When installed on USB HDDs and Flash drives, connect the drives to zero (0); See chapter 2 for the exact location of the application icons to enter Express Gate environment and launch the selected application Turn off the computer Continue booting to existing OS when the timer above the Exit icon counts down to the motherboard USB port before use. • ASUS Express Gate supports SATA devices in IDE mode only. 4.3.4 ASUS Express Gate ASUS Express Gate is...
... pictures. When installed on USB HDDs and Flash drives, connect the drives to zero (0); See chapter 2 for the exact location of the application icons to enter Express Gate environment and launch the selected application Turn off the computer Continue booting to existing OS when the timer above the Exit icon counts down to the motherboard USB port before use. • ASUS Express Gate supports SATA devices in IDE mode only. 4.3.4 ASUS Express Gate ASUS Express Gate is...

User Manual
Page 113
... menu options. MediaShield BIOS Aug 18 2008 - Chapter 4 ASUS M4N82 Deluxe 4-15 Boot up your MediaShield settings after the CMOS is cleared; otherwise, the system will not recognize your RAID setup. • For detailed descriptions on your motherboard support DVD. • When using Windows® XP operating system, ensure to install the Windows® XP Service Pack 2 or later versions. These keys allow you to re-enter your computer. 2. 4.4.4 NVIDIA® MediaShield BIOS RAID configurations To enter...
... menu options. MediaShield BIOS Aug 18 2008 - Chapter 4 ASUS M4N82 Deluxe 4-15 Boot up your MediaShield settings after the CMOS is cleared; otherwise, the system will not recognize your RAID setup. • For detailed descriptions on your motherboard support DVD. • When using Windows® XP operating system, ensure to install the Windows® XP Service Pack 2 or later versions. These keys allow you to re-enter your computer. 2. 4.4.4 NVIDIA® MediaShield BIOS RAID configurations To enter...

User Manual
Page 119
... a RAID/SATA driver disk without entering the OS: 1. Save changes and exit BIOS. 6. Follow the succeeding screen instructions to complete the installation. To install the RAID driver in a RAID set. Follow the succeeding screen instructions to complete the process. Insert the floppy disk/USB device with RAID driver into the floppy disk drive/USB port. 2. Boot your computer. 2. Start Windows®. 2. Insert a floppy disk into the optical drive. 5. The motherboard does not provide a floppy drive connector. Write-protect the floppy disk to use either a floppy disk or a USB device with...
... a RAID/SATA driver disk without entering the OS: 1. Save changes and exit BIOS. 6. Follow the succeeding screen instructions to complete the installation. To install the RAID driver in a RAID set. Follow the succeeding screen instructions to complete the process. Insert the floppy disk/USB device with RAID driver into the floppy disk drive/USB port. 2. Boot your computer. 2. Start Windows®. 2. Insert a floppy disk into the optical drive. 5. The motherboard does not provide a floppy drive connector. Write-protect the floppy disk to use either a floppy disk or a USB device with...


