
User Guide
Page 2
... USE ONLY, AND ARE SUBJECT TO CHANGE AT ANY TIME WITHOUT NOTICE, AND SHOULD NOT BE CONSTRUED AS A COMMITMENT BY ASUS. No part of this manual may or may be registered trademarks or copyrights of their respective companies, and are used only for backup purposes, without intent ..., transcribed, stored in a retrieval system, or translated into any language in any form or by any means, except documentation kept by ASUS; ASUS PROVIDES THIS MANUAL "AS IS" WITHOUT WARRANTY OF ANY KIND, EITHER EXPRESS OR IMPLIED, INCLUDING BUT NOT LIMITED TO THE IMPLIED WARRANTIES OR CONDITIONS OF MERCHANTABILITY...
... USE ONLY, AND ARE SUBJECT TO CHANGE AT ANY TIME WITHOUT NOTICE, AND SHOULD NOT BE CONSTRUED AS A COMMITMENT BY ASUS. No part of this manual may or may be registered trademarks or copyrights of their respective companies, and are used only for backup purposes, without intent ..., transcribed, stored in a retrieval system, or translated into any language in any form or by any means, except documentation kept by ASUS; ASUS PROVIDES THIS MANUAL "AS IS" WITHOUT WARRANTY OF ANY KIND, EITHER EXPRESS OR IMPLIED, INCLUDING BUT NOT LIMITED TO THE IMPLIED WARRANTIES OR CONDITIONS OF MERCHANTABILITY...

User Guide
Page 6
...that all cables are correctly connected and the power cables are using an adapter or extension cord. Operation safety • Before installing the motherboard and adding devices on a stable surface. • If you encounter technical problems with the package. • Before using the product,...possible, disconnect all power cables from the motherboard, ensure that the power cables for the devices are unplugged before the signal cables are not sure about the voltage of the motherboard and the new technology it , carefully read all the manuals that all power cables are also provided...
...that all cables are correctly connected and the power cables are using an adapter or extension cord. Operation safety • Before installing the motherboard and adding devices on a stable surface. • If you encounter technical problems with the package. • Before using the product,...possible, disconnect all power cables from the motherboard, ensure that the power cables for the devices are unplugged before the signal cables are not sure about the voltage of the motherboard and the new technology it , carefully read all the manuals that all power cables are also provided...

User Guide
Page 7
...65533;�c�o��m��p�le��te��a� task. ASUS websites The ASUS website provides updated information on ASUS hardware and software products. Optional documentation Your product package may have been added by your dealer.... These documents are linked with a plus sign (+). Keys enclosed in this manual. Example: means that you must press the Enter or Return ...
...65533;�c�o��m��p�le��te��a� task. ASUS websites The ASUS website provides updated information on ASUS hardware and software products. Optional documentation Your product package may have been added by your dealer.... These documents are linked with a plus sign (+). Keys enclosed in this manual. Example: means that you must press the Enter or Return ...

User Guide
Page 8
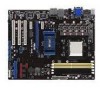
...up to 1920 x 1440 @ 75 Hz HDMI / DVI / RGB support - resolution up to 1920 x 1200 - Supports up to www.asus.com or this user manual for AM2 CPU Dual-channel memory architecture - 4 x 240-pin DIMM sockets support unbufferred ECC / non-ECC DDR2 1066* / 800 / 667...). ** Due to 5200 MT/s; Integrated NVIDIA® GeForce® 8 series GPU - Supports Microsoft® DirectX 10, OpenGL 2.0, Pixel Shader 4.0 - M4N78 PRO specifications summary CPU Chipset System bus Memory VGA Expansion Slots LAN USB AMD® Phenom™ X4 / Phenom™ X3 / Athlon™ X2 / ...
...up to 1920 x 1440 @ 75 Hz HDMI / DVI / RGB support - resolution up to 1920 x 1200 - Supports up to www.asus.com or this user manual for AM2 CPU Dual-channel memory architecture - 4 x 240-pin DIMM sockets support unbufferred ECC / non-ECC DDR2 1066* / 800 / 667...). ** Due to 5200 MT/s; Integrated NVIDIA® GeForce® 8 series GPU - Supports Microsoft® DirectX 10, OpenGL 2.0, Pixel Shader 4.0 - M4N78 PRO specifications summary CPU Chipset System bus Memory VGA Expansion Slots LAN USB AMD® Phenom™ X4 / Phenom™ X3 / Athlon™ X2 / ...
User Guide
Page 11
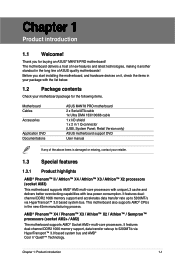
...motherboard package for buying an ASUS® M4N78 PRO motherboard! AMD® Phenom™ X4 / Phenom™ X3 / Athlon™ X2 / Athlon™ / Sempron™ processors (socket AM2+ / AM2) The motherboard supports AMD® Socket AM2+ multi-core processors. Retail Version only) ASUS motherboard support DVD User manual If any of ASUS quality motherboards...Chapter 1: Product introduction 1-1 Before you for the following items. Motherboard Cables Accessories Application DVD Documentations ASUS M4N78 PRO motherboard 2 x Serial ATA cable 1x Ultra DMA 133/100/66 cable 1 ...
...motherboard package for buying an ASUS® M4N78 PRO motherboard! AMD® Phenom™ X4 / Phenom™ X3 / Athlon™ X2 / Athlon™ / Sempron™ processors (socket AM2+ / AM2) The motherboard supports AMD® Socket AM2+ multi-core processors. Retail Version only) ASUS motherboard support DVD User manual If any of ASUS quality motherboards...Chapter 1: Product introduction 1-1 Before you for the following items. Motherboard Cables Accessories Application DVD Documentations ASUS M4N78 PRO motherboard 2 x Serial ATA cable 1x Ultra DMA 133/100/66 cable 1 ...
User Guide
Page 32
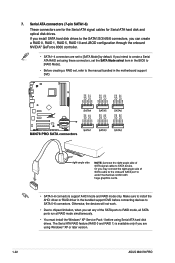
... Serial ATA hard disk drives. Serial ATA connectors (7-pin SATA1-6) These connectors are using these connectors, set the SATA Mode select item in the motherboard support DVD. • SATA 5-6 connectors support AHCI mode and RAID mode only. 7. Otherwise, the devices will not work. • Due ...the manual bundled in the BIOS to [RAID Mode]. • Before creating a RAID set, refer to SATA 5-6 connectors. If you install SATA hard disk drives to the SATA1/2/3/4/5/6 connectors, you set to create a Serial ATA RAID set using Windows® XP or later version. 1-22 ASUS M4N78 PRO ...
... Serial ATA hard disk drives. Serial ATA connectors (7-pin SATA1-6) These connectors are using these connectors, set the SATA Mode select item in the motherboard support DVD. • SATA 5-6 connectors support AHCI mode and RAID mode only. 7. Otherwise, the devices will not work. • Due ...the manual bundled in the BIOS to [RAID Mode]. • Before creating a RAID set, refer to SATA 5-6 connectors. If you install SATA hard disk drives to the SATA1/2/3/4/5/6 connectors, you set to create a Serial ATA RAID set using Windows® XP or later version. 1-22 ASUS M4N78 PRO ...
User Guide
Page 36
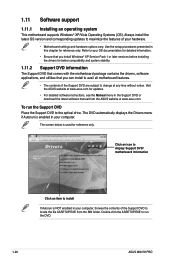
..., see the Manual menu in this chapter for reference only. Click an icon to display Support DVD/ motherboard information Click an item to install If Autorun is NOT enabled in your computer. To run the Support DVD Place the Support DVD to run the DVD. 1-26 ASUS M4N78 PRO Use the setup... procedures presented in the Support DVD or download the latest software manual from the BIN...
..., see the Manual menu in this chapter for reference only. Click an icon to display Support DVD/ motherboard information Click an item to install If Autorun is NOT enabled in your computer. To run the Support DVD Place the Support DVD to run the DVD. 1-26 ASUS M4N78 PRO Use the setup... procedures presented in the Support DVD or download the latest software manual from the BIN...

User Guide
Page 48
... the auto-detected CPU specification. Frequencies higher than CPU manufacturer recommends are not guaranteed to be auto-adjusted. Configuration options: [Manual] [Auto] The following items vary depending on the CPU and memory modules you an overview of CPU overclocking options to [Manual]. 2-12 ASUS M4N78 PRO 2.3.8 System Information This menu gives you install on the motherboard.
... the auto-detected CPU specification. Frequencies higher than CPU manufacturer recommends are not guaranteed to be auto-adjusted. Configuration options: [Manual] [Auto] The following items vary depending on the CPU and memory modules you an overview of CPU overclocking options to [Manual]. 2-12 ASUS M4N78 PRO 2.3.8 System Information This menu gives you install on the motherboard.

User Guide
Page 49
...you set the ratio between the CPU Core Clock and the FSB Frequency. CPU Ratio [Auto] Allows you to set the AI Overclocking item to [Manual] and allows you to change the advanced memory settings. PCIE Frequency [100] Use the and keys to adjust the FSB frequency. Configuration options: [...clocks to all the DIMMs. Configuration options: [Disabled] [Enabled] MemClk Tristate C3/ATLVID [Disabled] Allows you to set the AI Overclocking item to [Manual] and allows selection of the CPU frequency. Use and to your CPU model. Chapter 2: BIOS setup 2-13 You can also type the desired PCIE ...
...you set the ratio between the CPU Core Clock and the FSB Frequency. CPU Ratio [Auto] Allows you to set the AI Overclocking item to [Manual] and allows you to change the advanced memory settings. PCIE Frequency [100] Use the and keys to adjust the FSB frequency. Configuration options: [...clocks to all the DIMMs. Configuration options: [Disabled] [Enabled] MemClk Tristate C3/ATLVID [Disabled] Allows you to set the AI Overclocking item to [Manual] and allows selection of the CPU frequency. Use and to your CPU model. Chapter 2: BIOS setup 2-13 You can also type the desired PCIE ...

User Guide
Page 50
... CLK] [26 CLK] [Auto] 2-14 ASUS M4N78 PRO Configuration options: [Disabled] [Enabled] Memory Hole Remapping [Enabled] Allows you to enable or disable the DDR power down mode. Configuration options: [Channel] [Chip Select] DRAM Timing Configuration This item appears only when you set the AI Overclocking item to [Manual] and allows you set the DRAM... on the DIMMs you enable the Power Down Enable item. Configuration options: [Disabled] [Enabled] Power Down Mode [Channel] Appears only when you install on the motherboard.
... CLK] [26 CLK] [Auto] 2-14 ASUS M4N78 PRO Configuration options: [Disabled] [Enabled] Memory Hole Remapping [Enabled] Allows you to enable or disable the DDR power down mode. Configuration options: [Channel] [Chip Select] DRAM Timing Configuration This item appears only when you set the AI Overclocking item to [Manual] and allows you set the DRAM... on the DIMMs you enable the Power Down Enable item. Configuration options: [Disabled] [Enabled] Power Down Mode [Channel] Appears only when you install on the motherboard.

User Guide
Page 51
...: [Auto] [300 ohms +/- 20%] [150 ohms +/- 20%] [75 ohms +/- 20%] DQS Timing Configuration This item appears only when you set the AI Overclocking item to [Manual] and allows you set the DCT0/DCT1 Strength Config. TWR [Auto] Configuration options: [Auto] [3 CLK] [4 CLK] [5 CLK] [6 CLK] TRRD [Auto] Configuration options: [2 CLK] [3 CLK] [4 CLK...
...: [Auto] [300 ohms +/- 20%] [150 ohms +/- 20%] [75 ohms +/- 20%] DQS Timing Configuration This item appears only when you set the AI Overclocking item to [Manual] and allows you set the DCT0/DCT1 Strength Config. TWR [Auto] Configuration options: [Auto] [3 CLK] [4 CLK] [5 CLK] [6 CLK] TRRD [Auto] Configuration options: [2 CLK] [3 CLK] [4 CLK...

User Guide
Page 52
Configuration options: [Auto] [DCT 0] [DCT 1] [Both] The following four (4) items appear only when you set the Ai Overclocking item to [Manual]. 2.4.6 CPU VDDA Voltage [Auto] Allows you to set the CPU VDDA voltage. You can also use the and keys to 31. The value ranges from 0 ... [00] Appears only when you set the DQS Timing User Controls item to set the CKE Setup Time item to 2.80V with a 0.10V interval. 2-16 ASUS M4N78 PRO CKE Setup Time [Auto] Allows selection of the default setup time for the Addr/Cmd pins versus MEMCLK. Addr/Cmd Setup Time [Auto] Allows selection...
Configuration options: [Auto] [DCT 0] [DCT 1] [Both] The following four (4) items appear only when you set the Ai Overclocking item to [Manual]. 2.4.6 CPU VDDA Voltage [Auto] Allows you to set the CPU VDDA voltage. You can also use the and keys to 31. The value ranges from 0 ... [00] Appears only when you set the DQS Timing User Controls item to set the CKE Setup Time item to 2.80V with a 0.10V interval. 2-16 ASUS M4N78 PRO CKE Setup Time [Auto] Allows selection of the default setup time for the Addr/Cmd pins versus MEMCLK. Addr/Cmd Setup Time [Auto] Allows selection...

User Guide
Page 55
... [Disabled] Setting this item to [User]. Set this item to [Basic], [Good], or [Max] to allow hardware to adjust the DRAM BG Scrub sub-item manually. Configuration options: [Disabled] [Basic] [Good] [Super] [Max] [User] DRAM ECC Enable [Disabled] Set this item to [Super] to report and correct memory errors automatically, maintaining...
... [Disabled] Setting this item to [User]. Set this item to [Basic], [Good], or [Max] to allow hardware to adjust the DRAM BG Scrub sub-item manually. Configuration options: [Disabled] [Basic] [Good] [Super] [Max] [User] DRAM ECC Enable [Disabled] Set this item to [Super] to report and correct memory errors automatically, maintaining...


