User Manual
Page 6
... 4-13 4.4.2 Installing Serial ATA hard disks 4-14 4.4.3 AMD® RAID configurations 4-14 4.5 Creating a RAID driver disk 4-20 4.5.1 Creating a RAID driver disk without entering the OS 4-20 4.5.2 Creating a RAID/SATA driver disk in Windows 4-20 Chapter 5: ATI® CrossFireX™ technology support 5.1 ATI® CrossFireX™ technology 5-1 5.1.1 Requirements 5-1 5.1.2 Before you begin 5-1 5.2 Installing CrossFireX™ ...
... 4-13 4.4.2 Installing Serial ATA hard disks 4-14 4.4.3 AMD® RAID configurations 4-14 4.5 Creating a RAID driver disk 4-20 4.5.1 Creating a RAID driver disk without entering the OS 4-20 4.5.2 Creating a RAID/SATA driver disk in Windows 4-20 Chapter 5: ATI® CrossFireX™ technology support 5.1 ATI® CrossFireX™ technology 5-1 5.1.1 Requirements 5-1 5.1.2 Before you begin 5-1 5.2 Installing CrossFireX™ ...
User Manual
Page 11
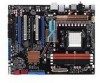
...more, Windows® 32-bit operating system may only recognize less than 3GB. M4A79T Deluxe specifications summary CPU Chipset System bus Memory Expansion slots Multi-GPU support Storage LAN Audio...45nm CPU AMD® Cool 'n' Quiet™ 2.0 Technology AMD® 790FX / SB750 HyperTransport™ 3.0; ASUS Noise Filtering VIA® VT6315N controller supports 2 x IEEE 1394a ports (one at back panel) 12 x ...174; 32-bit OS. ** Refer to 2 PATA devices - 5 x SATA 3 Gb/s ports supporting RAID 0, 1, 5, 10 and JBOD - 1 x eSATA 3 Gb/s port (SATA on the next page) xi Supports Jack-Detection,...
...more, Windows® 32-bit operating system may only recognize less than 3GB. M4A79T Deluxe specifications summary CPU Chipset System bus Memory Expansion slots Multi-GPU support Storage LAN Audio...45nm CPU AMD® Cool 'n' Quiet™ 2.0 Technology AMD® 790FX / SB750 HyperTransport™ 3.0; ASUS Noise Filtering VIA® VT6315N controller supports 2 x IEEE 1394a ports (one at back panel) 12 x ...174; 32-bit OS. ** Refer to 2 PATA devices - 5 x SATA 3 Gb/s ports supporting RAID 0, 1, 5, 10 and JBOD - 1 x eSATA 3 Gb/s port (SATA on the next page) xi Supports Jack-Detection,...
User Manual
Page 49
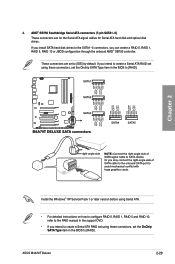
...connectors, set the Onchip SATA Type item in the BIOS to the RAID manual in the BIOS to [IDE] by default. 4. If you intend to create a Serial ATA RAID set to [RAID]. ASUS M4A79T Deluxe 2-29 AMD® SB750 Southbridge Serial ATA connectors (7-pin SATA1-5) ...These connectors are set using Serial ATA. • For detailed instructions on how to configure RAID 0, RAID 1, RAID 5 and RAID 10, refer to [RAID]. These connectors are for the ...
...connectors, set the Onchip SATA Type item in the BIOS to the RAID manual in the BIOS to [IDE] by default. 4. If you intend to create a Serial ATA RAID set to [RAID]. ASUS M4A79T Deluxe 2-29 AMD® SB750 Southbridge Serial ATA connectors (7-pin SATA1-5) ...These connectors are set using Serial ATA. • For detailed instructions on how to configure RAID 0, RAID 1, RAID 5 and RAID 10, refer to [RAID]. These connectors are for the ...

User Manual
Page 69
... Configuration The Storage Configuration menu allows you to enable advanced Serial ATA features that you want to [AHCI], only SATA connectors 1-4 can be detected. Chapter 3 ASUS M4A79T Deluxe 3-11 This item appears only when you enable the OnChip SATA Channel item. [IDE] [RAID] [AHCI] Set to [IDE] when you enable Onchip SATA Channel.
... Configuration The Storage Configuration menu allows you to enable advanced Serial ATA features that you want to [AHCI], only SATA connectors 1-4 can be detected. Chapter 3 ASUS M4A79T Deluxe 3-11 This item appears only when you enable the OnChip SATA Channel item. [IDE] [RAID] [AHCI] Set to [IDE] when you enable Onchip SATA Channel.

User Manual
Page 95
...create the ATI® RAID/AHCI driver disk. The DVD automatically displays the Drivers menu if Autorun is NOT enabled in your hardware. • Motherboard settings and hardware options vary. Install the necessary drivers to display the ASUS contact information. Click the...comes with the motherboard package contains the drivers, software applications, and utilities that the motherboard supports. Click an icon to display DVD/ motherboard information Click an item to change at www.asus.com for reference only. The contents of your computer. ASUS M4A79T Deluxe 4-1 Always install...
...create the ATI® RAID/AHCI driver disk. The DVD automatically displays the Drivers menu if Autorun is NOT enabled in your hardware. • Motherboard settings and hardware options vary. Install the necessary drivers to display the ASUS contact information. Click the...comes with the motherboard package contains the drivers, software applications, and utilities that the motherboard supports. Click an icon to display DVD/ motherboard information Click an item to change at www.asus.com for reference only. The contents of your computer. ASUS M4A79T Deluxe 4-1 Always install...

User Manual
Page 107
... and increases fault tolerance to a second drive. RAID 5 stripes both RAID 0 and RAID 1 configurations. With the RAID 0+1 configuration you install an operating system to the surviving drive as RAID sets. Refer to boot the system from a hard disk drive included in parallel, interleaved stacks. Chapter 4 ASUS M4A79T Deluxe 4-13 4.4 RAID configurations The motherboard comes with the AMD SB750 chipset that...
... and increases fault tolerance to a second drive. RAID 5 stripes both RAID 0 and RAID 1 configurations. With the RAID 0+1 configuration you install an operating system to the surviving drive as RAID sets. Refer to boot the system from a hard disk drive included in parallel, interleaved stacks. Chapter 4 ASUS M4A79T Deluxe 4-13 4.4 RAID configurations The motherboard comes with the AMD SB750 chipset that...
User Manual
Page 108
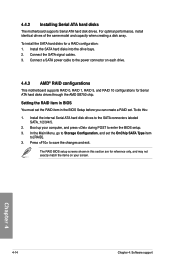
... the items on your computer, and press during POST to the power connector on each drive. 4.4.3 AMD® RAID configurations This motherboard supports RAID 0, RAID 1, RAID 5, and RAID 10 configurations for a RAID configuration: 1. In the Main Menu, go to [RAID]. 3. Chapter 4 4-14 Chapter 4: Software support The RAID BIOS setup screens shown in the BIOS Setup before you can create...
... the items on your computer, and press during POST to the power connector on each drive. 4.4.3 AMD® RAID configurations This motherboard supports RAID 0, RAID 1, RAID 5, and RAID 10 configurations for a RAID configuration: 1. In the Main Menu, go to [RAID]. 3. Chapter 4 4-14 Chapter 4: Software support The RAID BIOS setup screens shown in the BIOS Setup before you can create...
User Manual
Page 109
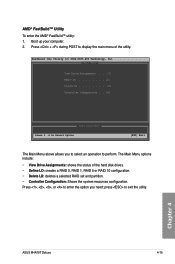
... the hard disk drives. • Define LD: creates a RAID 0, RAID 1, RAID 5 or RAID 10 configuration. • Delete LD: deletes a selected RAID set and partition. • Controller Configuration: Shows the system resources configuration. press to Select Option [ESC] Exit The Main Menu above allows you need; Chapter 4 ASUS M4A79T Deluxe 4-15 The Main Menu options include: • View Drive...
... the hard disk drives. • Define LD: creates a RAID 0, RAID 1, RAID 5 or RAID 10 configuration. • Delete LD: deletes a selected RAID set and partition. • Controller Configuration: Shows the system resources configuration. press to Select Option [ESC] Exit The Main Menu above allows you need; Chapter 4 ASUS M4A79T Deluxe 4-15 The Main Menu options include: • View Drive...
User Manual
Page 110
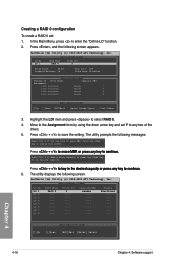
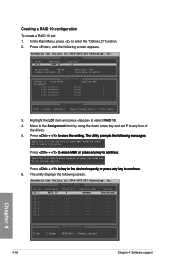
... [ESC]Exit [Space] Change Option [Ctrl-Y]Save 3. Press , and the following messages: Press Ctrl-Y if you are sure to erase MBR! Press + to select RAID 0. 4. Press any two of the drives. 5. Move to the Assignment item by using the down arrow key and set : 1. Creating... a RAID 0 configuration To create a RAID 0 set Y to any other key to ignore this option... The utility prompts the following screen appears. Press Highlight the LD1 item and press to ...
... [ESC]Exit [Space] Change Option [Ctrl-Y]Save 3. Press , and the following messages: Press Ctrl-Y if you are sure to erase MBR! Press + to select RAID 0. 4. Press any two of the drives. 5. Move to the Assignment item by using the down arrow key and set : 1. Creating... a RAID 0 configuration To create a RAID 0 set Y to any other key to ignore this option... The utility prompts the following screen appears. Press Highlight the LD1 item and press to ...
User Manual
Page 111
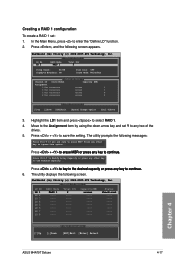
.... 5. Press , and the following messages: Press Ctrl-Y if you are sure to erase MBR! Press + to select RAID 1. 4. Creating a RAID 1 configuration To create a RAID 1 set Y to any other key to ignore this option... The utility prompts the following screen appears. In the Main ...the "Define LD" function. 2. FastBuild (tm) Utility (c) 2004-2005 ATI Technology, Inc. [ Define LD Menu ] LD No RAID Mode Total Drv LD 1 RAID 1 2 Strip Block: 64 KB Gigabyte Boundary: ON Fast Init: OFF Cache Mode: WriteThru [ Define LD Menu ] Channel:ID Drive...
.... 5. Press , and the following messages: Press Ctrl-Y if you are sure to erase MBR! Press + to select RAID 1. 4. Creating a RAID 1 configuration To create a RAID 1 set Y to any other key to ignore this option... The utility prompts the following screen appears. In the Main ...the "Define LD" function. 2. FastBuild (tm) Utility (c) 2004-2005 ATI Technology, Inc. [ Define LD Menu ] LD No RAID Mode Total Drv LD 1 RAID 1 2 Strip Block: 64 KB Gigabyte Boundary: ON Fast Init: OFF Cache Mode: WriteThru [ Define LD Menu ] Channel:ID Drive...
User Manual
Page 112
... to enter the "Define LD" function. 2. In the Main Menu, press to select RAID 10. 4. FastBuild (tm) Utility (c) 2004-2005 ATI Technology, Inc. [ Define LD Menu ] LD No RAID Mode Total Drv LD 1 RAID 10 4 Strip Block: 64 KB Gigabyte Boundary: ON Fast Init: OFF Cache Mode: ...[ESC]Exit [Space] Change Option [Ctrl-Y]Save 3. Move to the Assignment item by using the down arrow key and set : 1. Creating a RAID 10 configuration To create a RAID 10 set Y to any four of the drives. 5. Press , and the following screen appears. Press
... to enter the "Define LD" function. 2. In the Main Menu, press to select RAID 10. 4. FastBuild (tm) Utility (c) 2004-2005 ATI Technology, Inc. [ Define LD Menu ] LD No RAID Mode Total Drv LD 1 RAID 10 4 Strip Block: 64 KB Gigabyte Boundary: ON Fast Init: OFF Cache Mode: ...[ESC]Exit [Space] Change Option [Ctrl-Y]Save 3. Move to the Assignment item by using the down arrow key and set : 1. Creating a RAID 10 configuration To create a RAID 10 set Y to any four of the drives. 5. Press , and the following screen appears. Press
User Manual
Page 113
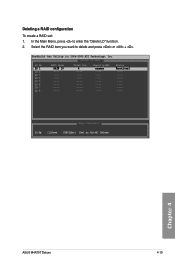
Deleting a RAID configuration To create a RAID set: 1. LD No LD 1 LD 2 LD 3 LD 4 LD 5 LD 6 LD 7 LD 8 [ Delete LD Menu ] RAID Mode RAID 10 Total Drv Capacity(MB) 4 xxxxxx Status Functional [ Keys Available ] [↑]Up [↓]Down [ESC]Exit [Del or Alt+D] Delete Chapter 4 ASUS M4A79T Deluxe 4-19 FastBuild (tm) Utility (c) 2004-2005 ATI Technology, Inc. In the Main Menu, press to delete and press or + . Select the RAID item you want to enter the "Delete LD" function. 2.
Deleting a RAID configuration To create a RAID set: 1. LD No LD 1 LD 2 LD 3 LD 4 LD 5 LD 6 LD 7 LD 8 [ Delete LD Menu ] RAID Mode RAID 10 Total Drv Capacity(MB) 4 xxxxxx Status Functional [ Keys Available ] [↑]Up [↓]Down [ESC]Exit [Del or Alt+D] Delete Chapter 4 ASUS M4A79T Deluxe 4-19 FastBuild (tm) Utility (c) 2004-2005 ATI Technology, Inc. In the Main Menu, press to delete and press or + . Select the RAID item you want to enter the "Delete LD" function. 2.
User Manual
Page 114
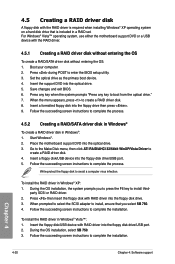
... disk/USB device with the RAID driver. 4.5.1 Creating a RAID driver disk without entering the OS To create a RAID/SATA driver disk without entering the OS: 1. For Windows® Vista™ operating system, use either the motherboard support DVD or a USB device with RAID driver into the floppy disk ...drive/USB port. 2. Set the optical drive as the primary boot device. 4. Place the motherboard support DVD into the optical drive. 5. When the menu appears, press to create a RAID driver disk. 4. When prompted to select the SCSI adapter to enter the BIOS setup utility....
... disk/USB device with the RAID driver. 4.5.1 Creating a RAID driver disk without entering the OS To create a RAID/SATA driver disk without entering the OS: 1. For Windows® Vista™ operating system, use either the motherboard support DVD or a USB device with RAID driver into the floppy disk ...drive/USB port. 2. Set the optical drive as the primary boot device. 4. Place the motherboard support DVD into the optical drive. 5. When the menu appears, press to create a RAID driver disk. 4. When prompted to select the SCSI adapter to enter the BIOS setup utility....


