
User Manual
Page 4
... up for the first time 2-37 2.9 Turning off the computer 2-37 Chapter 3: BIOS set up 3.1 Knowing BIOS 3-1 3.2 Updating BIOS 3-1 3.2.1 ASUS Update utility 3-2 3.2.2 Creating a bootable floppy disk 3-4 3.2.3 ASUS EZ Flash 2 utility 3-5 3.2.4 ASUS CrashFree BIOS 3 utility 3-6 3.3 BIOS setup program 3-7 3.3.1 BIOS menu screen 3-7 3.3.2 Menu bar...3-7 3.3.3 Navigation keys 3-8 3.3.4 Menu items 3-8 3.3.5 Submenu items 3-8 3.3.6 Configuration fields 3-8 3.3.7 Pop-up window 3-8 3.3.8 Scroll...
... up for the first time 2-37 2.9 Turning off the computer 2-37 Chapter 3: BIOS set up 3.1 Knowing BIOS 3-1 3.2 Updating BIOS 3-1 3.2.1 ASUS Update utility 3-2 3.2.2 Creating a bootable floppy disk 3-4 3.2.3 ASUS EZ Flash 2 utility 3-5 3.2.4 ASUS CrashFree BIOS 3 utility 3-6 3.3 BIOS setup program 3-7 3.3.1 BIOS menu screen 3-7 3.3.2 Menu bar...3-7 3.3.3 Navigation keys 3-8 3.3.4 Menu items 3-8 3.3.5 Submenu items 3-8 3.3.6 Configuration fields 3-8 3.3.7 Pop-up window 3-8 3.3.8 Scroll...
User Manual
Page 9
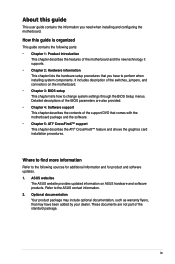
... this guide is organized This guide contains the following sources for additional information and for product and software updates. 1. ASUS websites The ASUS website provides updated information on the motherboard. • Chapter 3: BIOS setup This chapter tells how to perform when installing system components. How this guide This user guide contains the information you...
... this guide is organized This guide contains the following sources for additional information and for product and software updates. 1. ASUS websites The ASUS website provides updated information on the motherboard. • Chapter 3: BIOS setup This chapter tells how to perform when installing system components. How this guide This user guide contains the information you...

User Manual
Page 19
After the easy setup, Turbo Key can boost performances without preparing a bootable diskette or using an OS-based flash utility. 1.3.3 ASUS intelligent performance and overclocking features TurboV Feel the adrenaline rush of real-time OC-now a reality with just one touch!... to overclocking failure. C.P.R. This easy OC tool allows you to launch the utility and update the BIOS without exiting or rebooting the OS; ASUS M4A78T-E 1-5 Simply press the predefined hotkey to turn the PC power button into a physical overclocking button. settings in TurboV provides the best O.C. ...
After the easy setup, Turbo Key can boost performances without preparing a bootable diskette or using an OS-based flash utility. 1.3.3 ASUS intelligent performance and overclocking features TurboV Feel the adrenaline rush of real-time OC-now a reality with just one touch!... to overclocking failure. C.P.R. This easy OC tool allows you to launch the utility and update the BIOS without exiting or rebooting the OS; ASUS M4A78T-E 1-5 Simply press the predefined hotkey to turn the PC power button into a physical overclocking button. settings in TurboV provides the best O.C. ...

User Manual
Page 36
...press firmly until the card is already installed in a chassis). 3. Refer to the card. Remove the system unit cover (if your motherboard is completely seated on the next page. 3. The following sub‑sections describe the slots and the expansion cards that you intend to.... 6. Chapter 2 2.5 Expansion slots In the future, you may cause you physical injury and damage motherboard components. 2.5.1 Installing an expansion card To install an expansion card: 1. Turn on BIOS setup. 2. Failure to unplug the power cord before adding or removing expansion cards. Keep the screw for ...
...press firmly until the card is already installed in a chassis). 3. Refer to the card. Remove the system unit cover (if your motherboard is completely seated on the next page. 3. The following sub‑sections describe the slots and the expansion cards that you intend to.... 6. Chapter 2 2.5 Expansion slots In the future, you may cause you physical injury and damage motherboard components. 2.5.1 Installing an expansion card To install an expansion card: 1. Turn on BIOS setup. 2. Failure to unplug the power cord before adding or removing expansion cards. Keep the screw for ...

User Manual
Page 39
... plug the power cord before rebooting the system. Shut down the key during the boot process and enter BIOS setup to clear the Real Time Clock (RTC) RAM in CMOS, which include system setup information such as system passwords. You can automatically reset parameter settings to default values. • Due to the..., use the C.P.R. (CPU Parameter Recall) feature. Hold down and reboot the system so the BIOS can clear the CMOS memory of date, time, and system setup parameters by erasing the CMOS RTC RAM data. ASUS M4A78T-E 2-19
... plug the power cord before rebooting the system. Shut down the key during the boot process and enter BIOS setup to clear the Real Time Clock (RTC) RAM in CMOS, which include system setup information such as system passwords. You can automatically reset parameter settings to default values. • Due to the..., use the C.P.R. (CPU Parameter Recall) feature. Hold down and reboot the system so the BIOS can clear the CMOS memory of date, time, and system setup parameters by erasing the CMOS RTC RAM data. ASUS M4A78T-E 2-19

User Manual
Page 54
...connector to [HD]. if you connect a high-definition front panel audio module to this connector, set to avail of the motherboard's high-definition audio capability. If��y�o�u��w��a�n�t�t�o��c�o�n�...;�o�n�n�e��c�to��r,�s��e�t the Front Panel Type item in the BIOS setup to [AC97]. 12. By default, this connector. • We recommend that supports either HD Audio or legacy AC`97 ...
...connector to [HD]. if you connect a high-definition front panel audio module to this connector, set to avail of the motherboard's high-definition audio capability. If��y�o�u��w��a�n�t�t�o��c�o�n�...;�o�n�n�e��c�to��r,�s��e�t the Front Panel Type item in the BIOS setup to [AC97]. 12. By default, this connector. • We recommend that supports either HD Audio or legacy AC`97 ...

User Manual
Page 57
... 3. 2.9 Turning off mode, depending on the BIOS setting. Connect the power cord to enter the BIOS Setup. External SCSI devices (starting with "green" standards or if it has a "power standby" feature, the... switches are running, the BIOS beeps (see anything within 30 seconds from the time you press the ATX power button. Turn on , hold down the key to a power outlet that all the connections, ... below) or additional messages appear on the system front panel case lights up for details. ASUS M4A78T-E 2-37 If your retailer for more than four seconds puts the system to sleep mode ...
... 3. 2.9 Turning off mode, depending on the BIOS setting. Connect the power cord to enter the BIOS Setup. External SCSI devices (starting with "green" standards or if it has a "power standby" feature, the... switches are running, the BIOS beeps (see anything within 30 seconds from the time you press the ATX power button. Turn on , hold down the key to a power outlet that all the connections, ... below) or additional messages appear on the system front panel case lights up for details. ASUS M4A78T-E 2-37 If your retailer for more than four seconds puts the system to sleep mode ...
User Manual
Page 59
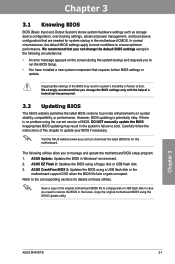
.... Chapter 3 ASUS M4A78T-E 3-1 Inappropriate BIOS updating may result in case you to run the BIOS Setup. • You have installed a new system component that you not change the BIOS settings only with the help of a trained service personnel. 3.2 Updating BIOS The ASUS website publishes the latest BIOS versions to boot. Copy the original motherboard BIOS...
.... Chapter 3 ASUS M4A78T-E 3-1 Inappropriate BIOS updating may result in case you to run the BIOS Setup. • You have installed a new system component that you not change the BIOS settings only with the help of a trained service personnel. 3.2 Updating BIOS The ASUS website publishes the latest BIOS versions to boot. Copy the original motherboard BIOS...
User Manual
Page 60
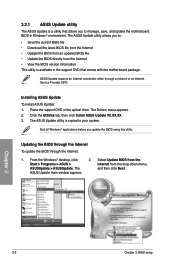
...: 1. Place the support DVD in the support DVD that allows you to your system. The ASUS Update main window appears. Chapter 3 3-2 Chapter 3: BIOS setup 3.2.1 ASUS Update utility The ASUS Update is a utility that comes with the motherboard package. The ASUS Update utility allows you update the BIOS using this utility. The Drivers menu appears. 2. Click the...
...: 1. Place the support DVD in the support DVD that allows you to your system. The ASUS Update main window appears. Chapter 3 3-2 Chapter 3: BIOS setup 3.2.1 ASUS Update utility The ASUS Update is a utility that comes with the motherboard package. The ASUS Update utility allows you update the BIOS using this utility. The Drivers menu appears. 2. Click the...
User Manual
Page 61
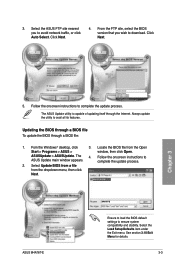
... Select Update BIOS from a file from the Open Start > Programs > ASUS > window, then click Open. From the FTP site, select the BIOS version that you to complete the update process. M4A78T-E.ROM ASUS M4A78T-E M4A78T-E Ensure to load the BIOS default settings to download. Updating the BIOS... through a BIOS file To update the BIOS through the Internet. 3. Select the Load Setup Defaults item under the Exit menu. See ...
... Select Update BIOS from a file from the Open Start > Programs > ASUS > window, then click Open. From the FTP site, select the BIOS version that you to complete the update process. M4A78T-E.ROM ASUS M4A78T-E M4A78T-E Ensure to load the BIOS default settings to download. Updating the BIOS... through a BIOS file To update the BIOS through the Internet. 3. Select the Load Setup Defaults item under the Exit menu. See ...

User Manual
Page 62
.... 2. A Format 3 1/2 Floppy Disk window appears. From the Windows® desktop, click > Computer. c. Select the Create an MS-DOS startup disk check box. Chapter 3 3-4 Chapter 3: BIOS setup At the DOS prompt, type format A:/S then press . Click File from the format options field, then click Start. 3.2.2 Creating a bootable floppy disk 1. Insert a formatted, high...
.... 2. A Format 3 1/2 Floppy Disk window appears. From the Windows® desktop, click > Computer. c. Select the Create an MS-DOS startup disk check box. Chapter 3 3-4 Chapter 3: BIOS setup At the DOS prompt, type format A:/S then press . Click File from the format options field, then click Start. 3.2.2 Creating a bootable floppy disk 1. Insert a formatted, high...
User Manual
Page 63
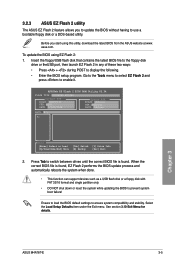
...only. • DO NOT shut down or reset the system while updating the BIOS to display the following. • Enter the BIOS setup program. Chapter 3 ASUS M4A78T-E 3-5 Insert the floppy/USB flash disk that contains the latest BIOS file to the floppy disk drive or theUSB port, then launch EZ... Flash 2 in any of these two ways: • Press + during POST to prevent system boot failure! Select the Load Setup Defaults item under ...
...only. • DO NOT shut down or reset the system while updating the BIOS to display the following. • Enter the BIOS setup program. Chapter 3 ASUS M4A78T-E 3-5 Insert the floppy/USB flash disk that contains the latest BIOS file to the floppy disk drive or theUSB port, then launch EZ... Flash 2 in any of these two ways: • Press + during POST to prevent system boot failure! Select the Load Setup Defaults item under ...

User Manual
Page 64
... DVD or the floppy disk containing the updated motherboard BIOS before using the motherboard support DVD or the floppy disk that allows you ...BIOS recovery... Ensure to load the BIOS default settings to the floppy disk or optical drive. 3. 3.2.4 ASUS CrashFree BIOS 2 utility The ASUS CrashFree BIOS 2 is an auto recovery tool that contains the updated BIOS file. Floppy found , the ...so can update a corrupted BIOS file using this utility. Select the Load Setup Defaults item under the Exit menu. Starting BIOS recovery... See section 3.10 Exit Menu for floppy... Chapter 3 3-6 Chapter...
... DVD or the floppy disk containing the updated motherboard BIOS before using the motherboard support DVD or the floppy disk that allows you ...BIOS recovery... Ensure to load the BIOS default settings to the floppy disk or optical drive. 3. 3.2.4 ASUS CrashFree BIOS 2 utility The ASUS CrashFree BIOS 2 is an auto recovery tool that contains the updated BIOS file. Floppy found , the ...so can update a corrupted BIOS file using this utility. Select the Load Setup Defaults item under the Exit menu. Starting BIOS recovery... See section 3.10 Exit Menu for floppy... Chapter 3 3-6 Chapter...

User Manual
Page 65
... settings Chapter 3 ASUS M4A78T-E 3-7 Press during the Power-On Self-Test (POST) to configure the System Time. See section 2.6 Jumpers for details. • If the system fails to boot after changing any BIOS setting, try to clear the CMOS and reset the motherboard to the default value...in this last option only if the first two failed. Submenu items Navigation keys 3.3.2 Menu bar The menu bar on . 3.3 BIOS setup program A BIOS Setup program is designed to make it lets you scroll through the various submenus and select from the available options using the navigation keys. &#...
... settings Chapter 3 ASUS M4A78T-E 3-7 Press during the Power-On Self-Test (POST) to configure the System Time. See section 2.6 Jumpers for details. • If the system fails to boot after changing any BIOS setting, try to clear the CMOS and reset the motherboard to the default value...in this last option only if the first two failed. Submenu items Navigation keys 3.3.2 Menu bar The menu bar on . 3.3 BIOS setup program A BIOS Setup program is designed to make it lets you scroll through the various submenus and select from the available options using the navigation keys. &#...

User Manual
Page 66
.... If an item is not userconfigurable. Refer to 3.3.7 Pop-up window. 3.3.7 Pop-up window with the configuration options for that particular menu. Chapter 3 3-8 Chapter 3: BIOS setup To display the submenu, select the item and press . 3.3.6 Configuration fields These fields show the values for that menu. A configurable field is highlighted when selected...
.... If an item is not userconfigurable. Refer to 3.3.7 Pop-up window. 3.3.7 Pop-up window with the configuration options for that particular menu. Chapter 3 3-8 Chapter 3: BIOS setup To display the submenu, select the item and press . 3.3.6 Configuration fields These fields show the values for that menu. A configurable field is highlighted when selected...

User Manual
Page 67
...TAB] or [SHIFT-TAB] to select a field. Select Screen Select Item +- Select a device item then press to configure the System Time. Chapter 3 ASUS M4A78T-E 3-9 The BIOS automatically detects the values opposite the dimmed items (Device, Vendor, Size, LBA Mode, Block Mode, PIO Mode, Async DMA, Ultra DMA...Help F10 Save and Exit ESC Exit v02.61 (C)Copyright 1985-2008, American Megatrends, Inc. 3.4 Main menu When you enter the BIOS Setup program, the Main menu screen appears, giving you an overview of floppy drive installed. Use [+] or [-] to display the SATA device ...
...TAB] or [SHIFT-TAB] to select a field. Select Screen Select Item +- Select a device item then press to configure the System Time. Chapter 3 ASUS M4A78T-E 3-9 The BIOS automatically detects the values opposite the dimmed items (Device, Vendor, Size, LBA Mode, Block Mode, PIO Mode, Async DMA, Ultra DMA...Help F10 Save and Exit ESC Exit v02.61 (C)Copyright 1985-2008, American Megatrends, Inc. 3.4 Main menu When you enter the BIOS Setup program, the Main menu screen appears, giving you an overview of floppy drive installed. Use [+] or [-] to display the SATA device ...
User Manual
Page 68
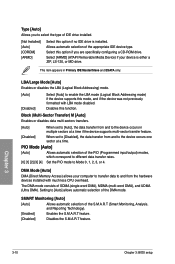
... specifically configuring a CD-ROM drive. Disables this mode, and if the device was not previously formatted with much less CPU overhead. Chapter 3 3-10 Chapter 3: BIOS setup The DMA mode consists of IDE drive installed. [Not Installed] [Auto] [CDROM] [ARMD] Select this option if you to Mode 0, 1, 2, 3, or 4. Select [ARMD] (ATAPI Removable...
... specifically configuring a CD-ROM drive. Disables this mode, and if the device was not previously formatted with much less CPU overhead. Chapter 3 3-10 Chapter 3: BIOS setup The DMA mode consists of IDE drive installed. [Not Installed] [Auto] [CDROM] [ARMD] Select this option if you to Mode 0, 1, 2, 3, or 4. Select [ARMD] (ATAPI Removable...

User Manual
Page 69
... BIOS SETUP UTILITY OnChip SATA channel OnChip SATA Type [Enabled] [IDE] Options OnChip SATA Channel [Enabled] [Enabled] Enables the onboard channel SATA port. [Disabled] Disables the onboard channel SATA port. The AHCI allows the onboard storage driver to enable advanced Serial ATA features that you to configure your storage devices. Chapter 3 ASUS M4A78T...
... BIOS SETUP UTILITY OnChip SATA channel OnChip SATA Type [Enabled] [IDE] Options OnChip SATA Channel [Enabled] [Enabled] Enables the onboard channel SATA port. [Disabled] Disables the onboard channel SATA port. The AHCI allows the onboard storage driver to enable advanced Serial ATA features that you to configure your storage devices. Chapter 3 ASUS M4A78T...
User Manual
Page 70
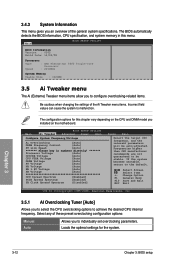
... when changing the settings of the general system specifications. Select Screen Select Item +- The configuration options for the system. BIOS SETUP UTILITY Main Ai Tweaker Advanced Power Boot Tools Exit Configure System Frequency/Voltage Ai Overclocking [Auto] DRAM Frequency Control [Auto] ...Exit v02.61 (C)Copyright 1985-2008, American Megatrends, Inc. 3.5.1 AI Overclocking Tuner [Auto] Allows you installed on the motherboard. Select any of these preset overclocking configuration options: Manual Auto Allows you an overview of the Ai Tweaker menu items. ...
... when changing the settings of the general system specifications. Select Screen Select Item +- The configuration options for the system. BIOS SETUP UTILITY Main Ai Tweaker Advanced Power Boot Tools Exit Configure System Frequency/Voltage Ai Overclocking [Auto] DRAM Frequency Control [Auto] ...Exit v02.61 (C)Copyright 1985-2008, American Megatrends, Inc. 3.5.1 AI Overclocking Tuner [Auto] Allows you installed on the motherboard. Select any of these preset overclocking configuration options: Manual Auto Allows you an overview of the Ai Tweaker menu items. ...

User Manual
Page 72
...: [Auto] [Disabled] [Enabled] Power Down Enable [Disabled] Enables or disables the DDR power down mode. Configuration options: [Disabled] [IC] [DC] [Both] Chapter 3 3-14 Chapter 3: BIOS setup Bank Interleaving [Auto] Configuration options: [Disabled] [Auto] Channel Interleaving [XOR of Address bit] Configuration options: [Disabled] [Address bits 6] [Address bits 12] [XOR of Address bits...
...: [Auto] [Disabled] [Enabled] Power Down Enable [Disabled] Enables or disables the DDR power down mode. Configuration options: [Disabled] [IC] [DC] [Both] Chapter 3 3-14 Chapter 3: BIOS setup Bank Interleaving [Auto] Configuration options: [Disabled] [Auto] Channel Interleaving [XOR of Address bit] Configuration options: [Disabled] [Address bits 6] [Address bits 12] [XOR of Address bits...


