
User Manual
Page 14
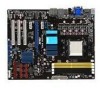
... vital components. AMD® Hybrid CrossFireX Technology Hybrid CrossFireX Technology is a unique multi-GPU technology combining the onboard GPU and the discrete graphics card together to AM2+ CPU limitation, only one DDR2 1066 is the latest AMD chipset designed for both HT1.0 and 5200MT/s HyperTransport™ 3.0 (HT 3.0) interface speed and external graphics in PCI Express 2.0 standard. It delivers high power efficiency and supreme overclocking ability. ASUS M4A78 PRO also features...
... vital components. AMD® Hybrid CrossFireX Technology Hybrid CrossFireX Technology is a unique multi-GPU technology combining the onboard GPU and the discrete graphics card together to AM2+ CPU limitation, only one DDR2 1066 is the latest AMD chipset designed for both HT1.0 and 5200MT/s HyperTransport™ 3.0 (HT 3.0) interface speed and external graphics in PCI Express 2.0 standard. It delivers high power efficiency and supreme overclocking ability. ASUS M4A78 PRO also features...
User Manual
Page 18
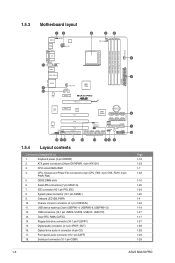
1.5.3 Motherboard layout 1.5.4 Layout contents Connectors/Jumpers/Slots 1. Keyboard power (3-pin KBPWR) 2. IDE connector (40-1 pin PRI_IDE) 8. Optical drive audio in connector (4-pin CD) 17. Onboard LED (SB_PWR) 10. USB device wake-up (3-pin USBPW1-4, USBPW5-8, USBPW9-12) 12. Clear RTC RAM (CLRTC) 14. Front panel audio connector (10-1 pin AAFP) 18. Digital audio connector (4-1 pin SPDIF_OUT) 16. Chassis intrusion connector (4-1 pin CHASSIS) 11. Serial ATA connectors (7-pin SATA1-6) 7. Serial port connector (10-1 pin COM1) Page 1-18 1-23 1-7 1-...
1.5.3 Motherboard layout 1.5.4 Layout contents Connectors/Jumpers/Slots 1. Keyboard power (3-pin KBPWR) 2. IDE connector (40-1 pin PRI_IDE) 8. Optical drive audio in connector (4-pin CD) 17. Onboard LED (SB_PWR) 10. USB device wake-up (3-pin USBPW1-4, USBPW5-8, USBPW9-12) 12. Clear RTC RAM (CLRTC) 14. Front panel audio connector (10-1 pin AAFP) 18. Digital audio connector (4-1 pin SPDIF_OUT) 16. Chassis intrusion connector (4-1 pin CHASSIS) 11. Serial ATA connectors (7-pin SATA1-6) 7. Serial port connector (10-1 pin COM1) Page 1-18 1-23 1-7 1-...

User Manual
Page 28
... PCI slots support cards such as a LAN card, SCSI card, USB card, and other cards that comply with PCI specifications. 1.8.4 PCI Express x1 slots This motherboard supports PCI Express x1 network cards, SCSI cards, and other cards that comply with the PCI Express specifications. 1.8.5 PCI Express x16 slot This motherboard supports a PCI Express x16 graphics card that came with the PCI Express specifications. 1-16 ASUS M4A78 PRO Otherwise, conflicts will arise between the two PCI groups, making the system unstable and the card inoperable. Failure to do not need to the table on BIOS setup...
... PCI slots support cards such as a LAN card, SCSI card, USB card, and other cards that comply with PCI specifications. 1.8.4 PCI Express x1 slots This motherboard supports PCI Express x1 network cards, SCSI cards, and other cards that comply with the PCI Express specifications. 1.8.5 PCI Express x16 slot This motherboard supports a PCI Express x16 graphics card that came with the PCI Express specifications. 1-16 ASUS M4A78 PRO Otherwise, conflicts will arise between the two PCI groups, making the system unstable and the card inoperable. Failure to do not need to the table on BIOS setup...
User Manual
Page 30
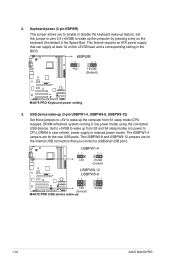
... rear USB ports. Keyboard power (3-pin KBPWR) This jumper allows you connect to wake up from S1 sleep mode (CPU stopped, DRAM refreshed, system running in the BIOS. 3. The USBPW5-8 and USBPW9-12 jumpers are for the internal USB connectors that can supply at least 1A on the keyboard (the default is the Space Bar). 2. This feature requires an ATX power supply that you to wake up feature. Set this jumper to pins 2-3 (+5VSB) to additional USB ports. 1-18 ASUS M4A78 PRO Set...
... rear USB ports. Keyboard power (3-pin KBPWR) This jumper allows you connect to wake up from S1 sleep mode (CPU stopped, DRAM refreshed, system running in the BIOS. 3. The USBPW5-8 and USBPW9-12 jumpers are for the internal USB connectors that can supply at least 1A on the keyboard (the default is the Space Bar). 2. This feature requires an ATX power supply that you to wake up feature. Set this jumper to pins 2-3 (+5VSB) to additional USB ports. 1-18 ASUS M4A78 PRO Set...

User Manual
Page 33
... display on your HDTV screen. Install AMD Chipset Driver from the motherboard support DVD. 2. Click Scaling Options. 5. Troubleshooting on HDTV overscaling or underscaling: If your desktop is extending beyond the viewable display area or the desktop or image is adjustable only when you are using the onboard HDMI out port and the HDMI cable, you can resize the desktop appearing on the HDMI™ DTV. Right-click the desktop and select ATI CATALYST(R) Control...
... display on your HDTV screen. Install AMD Chipset Driver from the motherboard support DVD. 2. Click Scaling Options. 5. Troubleshooting on HDTV overscaling or underscaling: If your desktop is extending beyond the viewable display area or the desktop or image is adjustable only when you are using the onboard HDMI out port and the HDMI cable, you can resize the desktop appearing on the HDMI™ DTV. Right-click the desktop and select ATI CATALYST(R) Control...

User Manual
Page 43
... that you install Windows® XP Service Pack 1 or later versions before installing the drivers for better compatibility and system stability. 1.11.2 Support DVD information The Support DVD that comes with the motherboard package contains the drivers, software applications, and utilities that you can install to avail all motherboard features. • The contents of the Support DVD to change at www.asus.com for updates. • For detailed software instructions, see the Manual menu in this...
... that you install Windows® XP Service Pack 1 or later versions before installing the drivers for better compatibility and system stability. 1.11.2 Support DVD information The Support DVD that comes with the motherboard package contains the drivers, software applications, and utilities that you can install to avail all motherboard features. • The contents of the Support DVD to change at www.asus.com for updates. • For detailed software instructions, see the Manual menu in this...

User Manual
Page 46
... support DVD that you wish to download, and then click Next. Follow the onscreen instructions to launch the ASUS Update utility. 2. b. Click the Utilities tab, and then click Install ASUS Update. 3. Updating from a file, and then click Next. Installing ASUS Update To install ASUS Update: 1. 2.1.2 ASUS Update utility The ASUS Update is a utility that allows you to complete the updating process. 2-2 ASUS M4A78 PRO Follow the onscreen instructions to manage, save, and update the motherboard BIOS in Windows® environment. • ASUS Update requires an Internet connection...
... support DVD that you wish to download, and then click Next. Follow the onscreen instructions to launch the ASUS Update utility. 2. b. Click the Utilities tab, and then click Install ASUS Update. 3. Updating from a file, and then click Next. Installing ASUS Update To install ASUS Update: 1. 2.1.2 ASUS Update utility The ASUS Update is a utility that allows you to complete the updating process. 2-2 ASUS M4A78 PRO Follow the onscreen instructions to manage, save, and update the motherboard BIOS in Windows® environment. • ASUS Update requires an Internet connection...
User Manual
Page 49
...Reading file "M4A78PRO.ROM". Chapter 2: BIOS setup 2-5 Download the latest BIOS file from the ASUS website at www.asus.com. When found ! If no floppy disk is an auto recovery tool that contains the updated BIOS file. • Prepare the motherboard support DVD, the floppy disk, or the USB flash disk containing the updated motherboard BIOS before using the motherboard support DVD, a floppy disk, or a USB flash disk that allows you use a PATA optical drive. • Always connect the SATA cable to the disk drive or port. 3. Floppy found , the utility reads the BIOS file and starts...
...Reading file "M4A78PRO.ROM". Chapter 2: BIOS setup 2-5 Download the latest BIOS file from the ASUS website at www.asus.com. When found ! If no floppy disk is an auto recovery tool that contains the updated BIOS file. • Prepare the motherboard support DVD, the floppy disk, or the USB flash disk containing the updated motherboard BIOS before using the motherboard support DVD, a floppy disk, or a USB flash disk that allows you use a PATA optical drive. • Always connect the SATA cable to the disk drive or port. 3. Floppy found , the utility reads the BIOS file and starts...
User Manual
Page 53
...] (ATAPI Removable Media Device) if your device is installed in .] Sets the type of floppy drive installed. The BIOS automatically detects the values opposite the dimmed items (Device, Vendor, Size, LBA Mode, Block Mode, PIO Mode, Async DMA, Ultra DMA, and SMART monitoring). Setting to set the system time. 2.3.2 System Date [Day xx/xx/xxxx] Allows you to [Auto] allows automatic selection of IDE devices. Select [CDROM] if you are not user-configurable. Change Field...
...] (ATAPI Removable Media Device) if your device is installed in .] Sets the type of floppy drive installed. The BIOS automatically detects the values opposite the dimmed items (Device, Vendor, Size, LBA Mode, Block Mode, PIO Mode, Async DMA, Ultra DMA, and SMART monitoring). Setting to set the system time. 2.3.2 System Date [Day xx/xx/xxxx] Allows you to [Auto] allows automatic selection of IDE devices. Select [CDROM] if you are not user-configurable. Change Field...
User Manual
Page 54
.... Configuration options: [Auto] SMART Monitoring [Auto] Sets the Smart Monitoring, Analysis, and Reporting Technology. The BIOS automatically detects the values opposite the dimmed items (Device, Vendor, Size, LBA Mode, Block Mode, PIO Mode, Async DMA, Ultra DMA, and SMART monitoring). Setting to display the SATA device information. Configuration options: [Disabled] [Auto] Block (Multi-Sector Transfer) M [Auto] Enables or disables data multi-sectors transfers. There is installed in the system. Select a device item then press to [Auto] enables the LBA mode if the device supports...
.... Configuration options: [Auto] SMART Monitoring [Auto] Sets the Smart Monitoring, Analysis, and Reporting Technology. The BIOS automatically detects the values opposite the dimmed items (Device, Vendor, Size, LBA Mode, Block Mode, PIO Mode, Async DMA, Ultra DMA, and SMART monitoring). Setting to display the SATA device information. Configuration options: [Disabled] [Auto] Block (Multi-Sector Transfer) M [Auto] Enables or disables data multi-sectors transfers. There is installed in the system. Select a device item then press to [Auto] enables the LBA mode if the device supports...

User Manual
Page 55
...the auto-detected CPU specification. System Memory Displays the auto-detected system memory. Configuration options: [Enabled] [Disabled] OnChip SATA Type [IDE] Allows you to select the SATA type. Configuration options: [Disabled] [Enabled] 2.3.6 Storage Configuration This menu allows you to configure the SATA devices. BIOS Information Displays the auto-detected BIOS information. Configuration options: [Auto] SMART Monitoring [Auto] Sets the Smart Monitoring, Analysis, and Reporting Technology. Ensure to install the AHCI driver to detect and use the Serial ATA hard disk drives...
...the auto-detected CPU specification. System Memory Displays the auto-detected system memory. Configuration options: [Enabled] [Disabled] OnChip SATA Type [IDE] Allows you to select the SATA type. Configuration options: [Disabled] [Enabled] 2.3.6 Storage Configuration This menu allows you to configure the SATA devices. BIOS Information Displays the auto-detected BIOS information. Configuration options: [Auto] SMART Monitoring [Auto] Sets the Smart Monitoring, Analysis, and Reporting Technology. Ensure to install the AHCI driver to detect and use the Serial ATA hard disk drives...

User Manual
Page 56
...Select Screen ↑↓ Select Item +- Configuration options: [Auto] [Manual] 2-12 ASUS M4A78 PRO If the system becomes unstable, return to the system bus and PCI bus. You can also type the desired PCIE frequency using the numeric keypad. BIOS SETUP UTILITY Main Ai Tweaker Advanced Power Boot Tools Exit Configure System Frequency/Voltage AI Overclocking [Auto] DRAM Frequency Control [Auto] HT Link Speed [Auto] ******* Please key in numbers directly! ******* Processor Voltage [Auto] CPU/NB Voltage [Auto] CPU VDDA Voltage...
...Select Screen ↑↓ Select Item +- Configuration options: [Auto] [Manual] 2-12 ASUS M4A78 PRO If the system becomes unstable, return to the system bus and PCI bus. You can also type the desired PCIE frequency using the numeric keypad. BIOS SETUP UTILITY Main Ai Tweaker Advanced Power Boot Tools Exit Configure System Frequency/Voltage AI Overclocking [Auto] DRAM Frequency Control [Auto] HT Link Speed [Auto] ******* Please key in numbers directly! ******* Processor Voltage [Auto] CPU/NB Voltage [Auto] CPU VDDA Voltage...
User Manual
Page 57
... the DIMMs you install on the motherboard. Configuration options: [Channel] [Chip Select] DRAM Timing Configuration This item appears only when you set the AI Overclocking item to [Manual] and allows you to enable or disable MemClk Tri-Stating during C3 and Alt VID. The configuration options for some of Address bits [20:16, 9]] MemClk Tristate C3/ATLVID [Disabled] Allows you to change the advanced memory settings. Chapter 2: BIOS setup 2-13 Configuration options: [Auto] [200 MHz...
... the DIMMs you install on the motherboard. Configuration options: [Channel] [Chip Select] DRAM Timing Configuration This item appears only when you set the AI Overclocking item to [Manual] and allows you to enable or disable MemClk Tri-Stating during C3 and Alt VID. The configuration options for some of Address bits [20:16, 9]] MemClk Tristate C3/ATLVID [Disabled] Allows you to change the advanced memory settings. Chapter 2: BIOS setup 2-13 Configuration options: [Auto] [200 MHz...

User Manual
Page 61
BIOS SETUP UTILITY Main Ai Tweaker Advanced Power Boot Tools Exit CPU Configuration Chipset Onboard Devices Configuration USB Configuration Configure CPU. ←→ Select Screen ↑↓ Select Item Enter Go to malfunction. Configuration options: [Disabled] [Enabled] Microcode Updation [Enabled] Allows you to enable or disable the AMD Secure Virtual Machine mode (SVM). Configuration options: [Enabled] [Disabled] Chapter 2: BIOS setup 2-17 The driver developer may enable it for the normal operation. Configuration options: [Disabled] [Enabled] ...
BIOS SETUP UTILITY Main Ai Tweaker Advanced Power Boot Tools Exit CPU Configuration Chipset Onboard Devices Configuration USB Configuration Configure CPU. ←→ Select Screen ↑↓ Select Item Enter Go to malfunction. Configuration options: [Disabled] [Enabled] Microcode Updation [Enabled] Allows you to enable or disable the AMD Secure Virtual Machine mode (SVM). Configuration options: [Enabled] [Disabled] Chapter 2: BIOS setup 2-17 The driver developer may enable it for the normal operation. Configuration options: [Disabled] [Enabled] ...
User Manual
Page 63
...Auto] [x1 Mode.] [x2] [x4] [x8 Mode.] [x16] Chapter 2: BIOS setup 2-19 RS780 Configuration Internal Graphics Configuration This menu allows you to enable or disable the GFX Engine Clock Override support. Internal Graphics Mode [UMA] Allows you may use the internal graphics as the secondary display. Surround View [Auto] If you set the PCI Express device as the primary display and enable this item, you to set the frame buffer location for the onboard GPU. GFX Dual Slot Configuration [Auto] Configuration options: [Auto] [Enable] [Disabled] GPP Slots Power Limit, W [25] Use the and keys...
...Auto] [x1 Mode.] [x2] [x4] [x8 Mode.] [x16] Chapter 2: BIOS setup 2-19 RS780 Configuration Internal Graphics Configuration This menu allows you to enable or disable the GFX Engine Clock Override support. Internal Graphics Mode [UMA] Allows you may use the internal graphics as the secondary display. Surround View [Auto] If you set the PCI Express device as the primary display and enable this item, you to set the frame buffer location for the onboard GPU. GFX Dual Slot Configuration [Auto] Configuration options: [Auto] [Enable] [Disabled] GPP Slots Power Limit, W [25] Use the and keys...
User Manual
Page 64
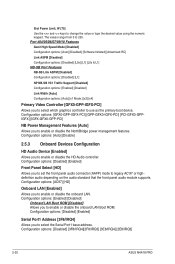
... [Disabled] [Enabled] Serial Port1 Address [3F8/IRQ4] Allows you to enable or disable the HD Audio controller. Configuration options: [Disabled] [Enabled] Front Panel Select [HD] Allows you to enable or disable the onboard LAN Boot ROM. Configuration options: [Auto] [Disable] 2.5.3 Onboard Devices Configuration HD Audio Device [Enabled] Allows you to set the front panel audio connector (AAFP) mode to use as the primary boot device. Configuration options: [Disabled] [3F8/IRQ4][2F8/IRQ3] [3E8/IRQ4] [2E8/IRQ3] 2-20 ASUS M4A78 PRO Port #04/05/06/07/09/10 Features Gen2 High Speed Mode...
... [Disabled] [Enabled] Serial Port1 Address [3F8/IRQ4] Allows you to enable or disable the HD Audio controller. Configuration options: [Disabled] [Enabled] Front Panel Select [HD] Allows you to enable or disable the onboard LAN Boot ROM. Configuration options: [Auto] [Disable] 2.5.3 Onboard Devices Configuration HD Audio Device [Enabled] Allows you to set the front panel audio connector (AAFP) mode to use as the primary boot device. Configuration options: [Disabled] [3F8/IRQ4][2F8/IRQ3] [3E8/IRQ4] [2E8/IRQ3] 2-20 ASUS M4A78 PRO Port #04/05/06/07/09/10 Features Gen2 High Speed Mode...
User Manual
Page 65
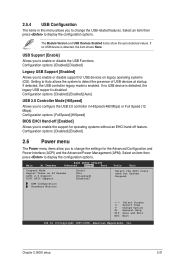
...) or Full Speed (12 Mbps). The Module Version and USB Devices Enabled items show the auto-detected values. USB Support [Enable] Allows you to enable or disable the USB Functions. Configuration options: [Enabled] [Disabled] Legacy USB Support [Enabled] Allows you to enable the support for operating systems without an EHCI hand‑off [Enabled] Allows you to change the USB-related features. BIOS SETUP UTILITY Main Ai Tweaker Advanced Power Boot Tools Exit Suspend Mode Repost Video on legacy operating systems (OS). Change Option F1 General...
...) or Full Speed (12 Mbps). The Module Version and USB Devices Enabled items show the auto-detected values. USB Support [Enable] Allows you to enable or disable the USB Functions. Configuration options: [Enabled] [Disabled] Legacy USB Support [Enabled] Allows you to enable the support for operating systems without an EHCI hand‑off [Enabled] Allows you to change the USB-related features. BIOS SETUP UTILITY Main Ai Tweaker Advanced Power Boot Tools Exit Suspend Mode Repost Video on legacy operating systems (OS). Change Option F1 General...
User Manual
Page 68
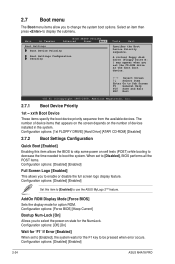
2.7 Boot menu The Boot menu items allow you to enable or disable the full screen logo display feature. Configuration options: [Disabled] [Enabled] 2-24 ASUS M4A78 PRO AddOn ROM Display Mode [Force BIOS] Sets the display mode for 'F1' If Error [Enabled] When set the CD-ROM drive as the first boot device. ←→ Select Screen ↑↓ Select Item Enter Go to select the power-on the number of devices installed in the system. A virtual floppy disk drive (Floppy Drive B: ) may appear when you to Sub Screen F1 General Help F10...
2.7 Boot menu The Boot menu items allow you to enable or disable the full screen logo display feature. Configuration options: [Disabled] [Enabled] 2-24 ASUS M4A78 PRO AddOn ROM Display Mode [Force BIOS] Sets the display mode for 'F1' If Error [Enabled] When set the CD-ROM drive as the first boot device. ←→ Select Screen ↑↓ Select Item Enter Go to select the power-on the number of devices installed in the system. A virtual floppy disk drive (Floppy Drive B: ) may appear when you to Sub Screen F1 General Help F10...
User Manual
Page 70
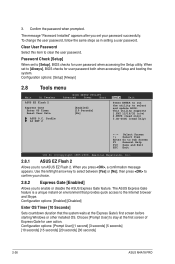
... [Disabled] Enter OS Timer [10 Seconds] Sets countdown duration that provides quick access to enable or disable the ASUS Express Gate feature. Confirm the password when prompted. Configuration options: [Setup] [Always] 2.8 Tools menu BIOS SETUP UTILITY Main Ai Tweaker Advanced Power Boot Tools Exit ASUS EZ Flash 2 Express Gate Enter OS Timer Reset User Data ASUS O.C. Clear User Password Select this item to select and update BIOS. The message "Password Installed" appears after you press , a confirmation message appears. This utility supports 1.FAT...
... [Disabled] Enter OS Timer [10 Seconds] Sets countdown duration that provides quick access to enable or disable the ASUS Express Gate feature. Confirm the password when prompted. Configuration options: [Setup] [Always] 2.8 Tools menu BIOS SETUP UTILITY Main Ai Tweaker Advanced Power Boot Tools Exit ASUS EZ Flash 2 Express Gate Enter OS Timer Reset User Data ASUS O.C. Clear User Password Select this item to select and update BIOS. The message "Password Installed" appears after you press , a confirmation message appears. This utility supports 1.FAT...
User Manual
Page 71
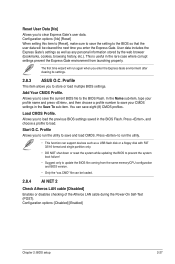
... or load multiple BIOS settings. Press to save your CMOS settings in the rare case where corrupt settings prevent the Express Gate environment from the same memory/CPU configuration and BIOS version. • Only the "xxx.CMO" file can save the setting to clear Express Gate's user data. Reset User Data [No] Allows you enter the Express Gate environment after clearing its settings. 2.8.3 ASUS O.C. Profile This item allows you to run the utility. • This function can support devices...
... or load multiple BIOS settings. Press to save your CMOS settings in the rare case where corrupt settings prevent the Express Gate environment from the same memory/CPU configuration and BIOS version. • Only the "xxx.CMO" file can save the setting to clear Express Gate's user data. Reset User Data [No] Allows you enter the Express Gate environment after clearing its settings. 2.8.3 ASUS O.C. Profile This item allows you to run the utility. • This function can support devices...


