
User Manual
Page 6
...digital apparatus complies with FCC regulations. DO NOT throw the mercury-containing button cell battery in a residential installation. However, there is connected. Consult the dealer or an experienced radio/TV technician for disposal of electronic products. This symbol of the crossed out wheeled bin ...to comply with manufacturer's instructions, may cause undesired operation. DO NOT throw the motherboard in our products at ASUS REACH website at http://green.asus.com/english/REACH.htm. vi Operation is encouraged to try to this unit not expressly approved by turning the...
...digital apparatus complies with FCC regulations. DO NOT throw the mercury-containing button cell battery in a residential installation. However, there is connected. Consult the dealer or an experienced radio/TV technician for disposal of electronic products. This symbol of the crossed out wheeled bin ...to comply with manufacturer's instructions, may cause undesired operation. DO NOT throw the motherboard in our products at ASUS REACH website at http://green.asus.com/english/REACH.htm. vi Operation is encouraged to try to this unit not expressly approved by turning the...

User Manual
Page 7
... screws, and staples away from the electric outlet before you are unplugged. Place the product on it may become wet. Before connecting or removing signal cables from the motherboard, ensure that all the manuals that came with the product, contact a qualified service technician ...the motherboard and adding devices on a stable surface. If you detect any area where it , carefully read all cables are correctly connected and the power cables are also provided. Safety information Electrical safety To prevent electric shock hazard, disconnect the power cable from connectors,...
... screws, and staples away from the electric outlet before you are unplugged. Place the product on it may become wet. Before connecting or removing signal cables from the motherboard, ensure that all the manuals that came with the product, contact a qualified service technician ...the motherboard and adding devices on a stable surface. If you detect any area where it , carefully read all cables are correctly connected and the power cables are also provided. Safety information Electrical safety To prevent electric shock hazard, disconnect the power cable from connectors,...

User Manual
Page 15
It is enhanced with the OpenGL standard. ASUS M4A78-EM/1394 1-3 The external SATA port provides smart setup and hot-plug ... downloading to USB drives only. • Express Gate complies with an ACPI management function to http://support.asus.com for Express Gate source codes. Gigabit LAN solution The onboard LAN controller is a highly integrated Gb ... the audio I/O jacks and notifies users of inappropriate connection, which means there will be no more confusion of Line-in, Line-out, and Mic jacks. 1.3.2 Innovative ASUS features ASUS Express Gate Express Gate is a unique OS built ...
It is enhanced with the OpenGL standard. ASUS M4A78-EM/1394 1-3 The external SATA port provides smart setup and hot-plug ... downloading to USB drives only. • Express Gate complies with an ACPI management function to http://support.asus.com for Express Gate source codes. Gigabit LAN solution The onboard LAN controller is a highly integrated Gb ... the audio I/O jacks and notifies users of inappropriate connection, which means there will be no more confusion of Line-in, Line-out, and Mic jacks. 1.3.2 Innovative ASUS features ASUS Express Gate Express Gate is a unique OS built ...

User Manual
Page 16
...open the system chassis and clear the RTC data. eliminates the need to convert your favorite photo into a physical overclocking button. ASUS Q-Fan ASUS Q-Fan technology intelligently adjusts CPU fan speeds according to system loading to turn the PC power button into a 256-color boot...loadings and adjusts the power consumption in line with the ASUS vision of Hazardous Substances (RoHS). ASUS AI NET2 ASUS AI NET2 remotely detects the cable connection immediately after turning on the system, and any faulty cable connections are reported back up to safeguard consumers' health while ...
...open the system chassis and clear the RTC data. eliminates the need to convert your favorite photo into a physical overclocking button. ASUS Q-Fan ASUS Q-Fan technology intelligently adjusts CPU fan speeds according to system loading to turn the PC power button into a 256-color boot...loadings and adjusts the power consumption in line with the ASUS vision of Hazardous Substances (RoHS). ASUS AI NET2 ASUS AI NET2 remotely detects the cable connection immediately after turning on the system, and any faulty cable connections are reported back up to safeguard consumers' health while ...

User Manual
Page 21
The lever clicks on the motherboard. 7. Hardware monitoring errors can also refer to the CPU_FAN connector on the side tab to plug this connector. ASUS M4A78-EM/1394 1-9 Install a CPU heatsink and fan following the instructions that it is in place, push down the socket lever to connect the CPU fan connector! When the CPU is locked. DO NOT forget to secure the CPU. 5. 6. You can occur if you fail to indicate that comes with the heatsink package. Connect the CPU fan cable to section 1.6.2 Installing heatsink and fan for instructions.
The lever clicks on the motherboard. 7. Hardware monitoring errors can also refer to the CPU_FAN connector on the side tab to plug this connector. ASUS M4A78-EM/1394 1-9 Install a CPU heatsink and fan following the instructions that it is in place, push down the socket lever to connect the CPU fan connector! When the CPU is locked. DO NOT forget to secure the CPU. 5. 6. You can occur if you fail to indicate that comes with the heatsink package. Connect the CPU fan cable to section 1.6.2 Installing heatsink and fan for instructions.

User Manual
Page 23
... other end of the DDR2 DIMM sockets: Channel Channel A Channel B Sockets DIMM_A1 and DIMM_A2 DIMM_B1 and DIMM_B2 ASUS M4A78-EM/1394 1-11 3. A clicking sound denotes that the fan and heatsink assembly perfectly fits the retention mechanism module base, otherwise you fail to connect the CPU fan connector! Ensure that the retention bracket is in place.
... other end of the DDR2 DIMM sockets: Channel Channel A Channel B Sockets DIMM_A1 and DIMM_A2 DIMM_B1 and DIMM_B2 ASUS M4A78-EM/1394 1-11 3. A clicking sound denotes that the fan and heatsink assembly perfectly fits the retention mechanism module base, otherwise you fail to connect the CPU fan connector! Ensure that the retention bracket is in place.

User Manual
Page 31
...Side Speaker Out port (gray). 1.10 1.10.1 Connectors Rear panel ports 1. 2. 3. 4. 5. LAN (RJ-45) port. ASUS M4A78-EM/1394 1-19 This port connects to the rear speakers in the 8-channel audio configuration. 10. LAN port LED indications Activity/Link LED Status OFF Description No link ...Speed LED Status OFF Description ACT/LINK SPEED LED LED 10Mbps connection 1Gbps connection ORANGE BLINKING Data activity ORANGE GREEN 100Mbps connection LAN port 6. 7. 8. 9. Rear Speaker Out port (black). This port connects to an external audio output device via an optical S/PDIF ...
...Side Speaker Out port (gray). 1.10 1.10.1 Connectors Rear panel ports 1. 2. 3. 4. 5. LAN (RJ-45) port. ASUS M4A78-EM/1394 1-19 This port connects to the rear speakers in the 8-channel audio configuration. 10. LAN port LED indications Activity/Link LED Status OFF Description No link ...Speed LED Status OFF Description ACT/LINK SPEED LED LED 10Mbps connection 1Gbps connection ORANGE BLINKING Data activity ORANGE GREEN 100Mbps connection LAN port 6. 7. 8. 9. Rear Speaker Out port (black). This port connects to an external audio output device via an optical S/PDIF ...

User Manual
Page 32
... (USB) ports are for audio/video devices, storage peripherals, PCs, or portable devices. 14. This 6-pin IEEE 1394a port provides high-speed connectivity for USB 2.0 devices. 13. This port connects to configure the settings. 12. This port is for any DVI-D compatible device and is HDCP compliant allowing playback of HD DVD...
... (USB) ports are for audio/video devices, storage peripherals, PCs, or portable devices. 14. This 6-pin IEEE 1394a port provides high-speed connectivity for USB 2.0 devices. 13. This port connects to configure the settings. 12. This port is for any DVI-D compatible device and is HDCP compliant allowing playback of HD DVD...

User Manual
Page 33
... on your motherboard: Dual display outputs DVI + D-Sub DVI + HDMI HDMI + D-Sub Supported Not supported • During POST, only the monitor connected to use HDCP compliant devices and software. 17. ASUS M4A78-EM/1394 1-21 Suggested list CPU DIMM BIOS setup AMD® Athlon 4400+ DDR2 800 (1GB or higher) Frame Buffer Size--256MB or...
... on your motherboard: Dual display outputs DVI + D-Sub DVI + HDMI HDMI + D-Sub Supported Not supported • During POST, only the monitor connected to use HDCP compliant devices and software. 17. ASUS M4A78-EM/1394 1-21 Suggested list CPU DIMM BIOS setup AMD® Athlon 4400+ DDR2 800 (1GB or higher) Frame Buffer Size--256MB or...
User Manual
Page 34
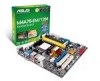
...(8.88W max.) or a total of 1A~2.22A (26.64W max.) at the back of the connector. Only the CPU fan supports the ASUS Q-Fan feature. 1-22 Chapter 1: Product introduction Connect the fan cables to the fan connectors on the fan connectors. These are not jumpers! Internal connectors The connector is purchased separately... wire of each cable matches the ground pin of the system chassis. Insufficient air flow inside the system may damage the motherboard components. 1.10.2 1. Connect the serial port module cable to the connector, then install the module to the fan connectors.
...(8.88W max.) or a total of 1A~2.22A (26.64W max.) at the back of the connector. Only the CPU fan supports the ASUS Q-Fan feature. 1-22 Chapter 1: Product introduction Connect the fan cables to the fan connectors on the fan connectors. These are not jumpers! Internal connectors The connector is purchased separately... wire of each cable matches the ground pin of the system chassis. Insufficient air flow inside the system may damage the motherboard components. 1.10.2 1. Connect the serial port module cable to the connector, then install the module to the fan connectors.
User Manual
Page 35
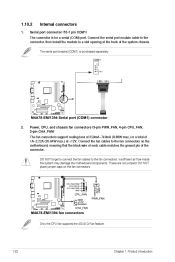
ASUS M4A78-EM/1394 1-23 ATX power connectors (24-pin EATXPWR, 4-pin ATX12V) • For a fully configured system, we recommend that you use a PSU with a higher power output when ... (PSU) that you intend to install additional devices. 3. The plugs from the power supply are for an ATX power supply. These connectors are designed to connect the 4-pin ATX12V power plug.
ASUS M4A78-EM/1394 1-23 ATX power connectors (24-pin EATXPWR, 4-pin ATX12V) • For a fully configured system, we recommend that you use a PSU with a higher power output when ... (PSU) that you intend to install additional devices. 3. The plugs from the power supply are for an ATX power supply. These connectors are designed to connect the 4-pin ATX12V power plug.

User Manual
Page 36
... signal cable. 5. If any device jumper is for Ultra DMA 133/100/66 IDE devices. There are three connectors on the Ultra DMA cable connector. Connect the blue connector to the motherboard's IDE connector, then select one of the following modes to configure your devices: Drive jumper setting Single device Cable...
... signal cable. 5. If any device jumper is for Ultra DMA 133/100/66 IDE devices. There are three connectors on the Ultra DMA cable connector. Connect the blue connector to the motherboard's IDE connector, then select one of the following modes to configure your devices: Drive jumper setting Single device Cable...

User Manual
Page 37
...signal cables for an IEEE 1394a port. The data transfer rate of the system chassis. IEEE 1394a port connector (10-1 pin IE1394_1) Never connect a USB cable to a slot opening at the back of the Serial ATA 3Gb/s is faster than the standard parallel ATA with Serial ATA... using these connectors, set the OnChip SATA Type item in the BIOS to [RAID]. ASUS M4A78-EM/1394 1-25 This connector is backward compatible with 133 MB/s (Ultra DMA133). See 2.3.4 SATA Configuration for details. 7. Connect the IEEE 1394a module cable to this connector, then install the module to the IEEE...
...signal cables for an IEEE 1394a port. The data transfer rate of the system chassis. IEEE 1394a port connector (10-1 pin IE1394_1) Never connect a USB cable to a slot opening at the back of the Serial ATA 3Gb/s is faster than the standard parallel ATA with Serial ATA... using these connectors, set the OnChip SATA Type item in the BIOS to [RAID]. ASUS M4A78-EM/1394 1-25 This connector is backward compatible with 133 MB/s (Ultra DMA133). See 2.3.4 SATA Configuration for details. 7. Connect the IEEE 1394a module cable to this connector, then install the module to the IEEE...

User Manual
Page 38
The USB 2.0 module is purchased separately. 9. 8. USB connectors (10-1 pin USB78, USB910, USB1112) Never connect a 1394 cable to 480Mbps connection speed. Doing so will damage the motherboard! These connectors are for USB 2.0 ports. These USB connectors comply with USB 2.0 specification that supports up ... these connectors, then install the module to receive stereo audio input from sound sources such as a CD-ROM, TV tuner, or MPEG card. Connect the USB module cable to any of the system chassis. Optical drive audio connector (4-pin CD) 1-26 Chapter 1: Product introduction
The USB 2.0 module is purchased separately. 9. 8. USB connectors (10-1 pin USB78, USB910, USB1112) Never connect a 1394 cable to 480Mbps connection speed. Doing so will damage the motherboard! These connectors are for USB 2.0 ports. These USB connectors comply with USB 2.0 specification that supports up ... these connectors, then install the module to receive stereo audio input from sound sources such as a CD-ROM, TV tuner, or MPEG card. Connect the USB module cable to any of the system chassis. Optical drive audio connector (4-pin CD) 1-26 Chapter 1: Product introduction
User Manual
Page 39
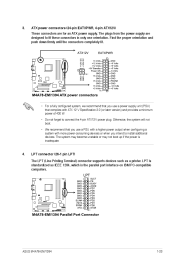
...definition audio capability. • If you want to connect a high-definition front panel audio module to this connector, set the Front Panel Select item in the BIOS setup to [AC97]. By default, this connector. ASUS M4A78-EM/1394 1-27 Digital audio connector (4-1 pin SPDIF_OUT) This... connector is set to [HD Audio]. Connect one end of the front panel audio I /O module that you connect a high-definition front panel audio module to this ...
...definition audio capability. • If you want to connect a high-definition front panel audio module to this connector, set the Front Panel Select item in the BIOS setup to [AC97]. By default, this connector. ASUS M4A78-EM/1394 1-27 Digital audio connector (4-1 pin SPDIF_OUT) This... connector is set to [HD Audio]. Connect one end of the front panel audio I /O module that you connect a high-definition front panel audio module to this ...

User Manual
Page 40
... the chassis-mounted reset button for system reboot without turning off button (2-pin PWRSW) This 2-pin connector is read from or written to this connector. Connect the chassis power LED cable to hear system beeps and warnings. The IDE LED lights up when you to this connector...
... the chassis-mounted reset button for system reboot without turning off button (2-pin PWRSW) This 2-pin connector is read from or written to this connector. Connect the chassis power LED cable to hear system beeps and warnings. The IDE LED lights up when you to this connector...

User Manual
Page 43
...manage, save, and update the motherboard BIOS in Windows® environment. • ASUS Update requires an Internet connection either of the original motherboard BIOS file to a USB flash disk in case you...ASUS M4A78-EM/1394 2-1 Follow the onscreen instructions to launch the ASUS Update utility. From the Windows® desktop, click Start > Programs > ASUS > ASUS Update > ASUS Update to complete the installation. Click the Utilities tab, then click ASUS Update. Copy the original motherboard BIOS using this utility. 3. ASUS Update utility Installing ASUS Update To install ASUS...
...manage, save, and update the motherboard BIOS in Windows® environment. • ASUS Update requires an Internet connection either of the original motherboard BIOS file to a USB flash disk in case you...ASUS M4A78-EM/1394 2-1 Follow the onscreen instructions to launch the ASUS Update utility. From the Windows® desktop, click Start > Programs > ASUS > ASUS Update > ASUS Update to complete the installation. Click the Utilities tab, then click ASUS Update. Copy the original motherboard BIOS using this utility. 3. ASUS Update utility Installing ASUS Update To install ASUS...
User Manual
Page 45
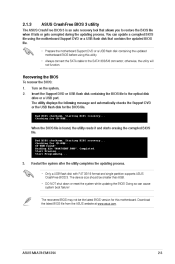
...process. • Only a USB flash disk with FAT 32/16 format and single partition supports ASUS CrashFree BIOS 3. Starting BIOS recovery...Checking for this utility. • Always connect the SATA cable to the optical disk drive or a USB port. Completed. Start Erasing...Start...corrupted during the updating process. otherwise, the utility will not function. Turn on the system. Reading file "M4A78EMF.ROM". ASUS M4A78-EM/1394 2-3 2.1.3 The ASUS CrashFree BIOS 3 is found ! You can cause system boot failure! The utility displays the following message and automatically checks ...
...process. • Only a USB flash disk with FAT 32/16 format and single partition supports ASUS CrashFree BIOS 3. Starting BIOS recovery...Checking for this utility. • Always connect the SATA cable to the optical disk drive or a USB port. Completed. Start Erasing...Start...corrupted during the updating process. otherwise, the utility will not function. Turn on the system. Reading file "M4A78EMF.ROM". ASUS M4A78-EM/1394 2-3 2.1.3 The ASUS CrashFree BIOS 3 is found ! You can cause system boot failure! The utility displays the following message and automatically checks ...

User Manual
Page 58
...186;C] [53ºC] [54ºC] ...[75ºC] 2.6 The Boot menu items allow you do not wish to enable or disable the ASUS Q-Fan feature that smartly adjusts the fan speeds for more efficient system operation. Main Advanced Power BIOS SETUP UTILITY Boot Tools Exit Specifies the... onboard hardware monitor automatically detects and displays the CPU, chassis, and power fan speed in rotations per minute (RPM). If the fan is not connected to change the system boot options. Select Ignored if you to the motherboard, the field shows N/A. Configuration options: [4.0V] [4.5V] [5.0V]...
...186;C] [53ºC] [54ºC] ...[75ºC] 2.6 The Boot menu items allow you do not wish to enable or disable the ASUS Q-Fan feature that smartly adjusts the fan speeds for more efficient system operation. Main Advanced Power BIOS SETUP UTILITY Boot Tools Exit Specifies the... onboard hardware monitor automatically detects and displays the CPU, chassis, and power fan speed in rotations per minute (RPM). If the fan is not connected to change the system boot options. Select Ignored if you to the motherboard, the field shows N/A. Configuration options: [4.0V] [4.5V] [5.0V]...


