
User Manual
Page 31
BIOS 2.1 使用 AFUDOS BIOS AFUDOS DOS BIOS BIOS 程式。AFUDOS BIOS BIOS BIOS 程式 BIOS 程式。 1.2MB BIOS 1 AFUDOS 程式(afudos. All rights reserved. done Write to file...... ok A:\> 當 BIOS DOS 31 Reading flash ..... exe 2 DOS afudos /o[filename filename A:\>afudos /oOLDBIOS1.rom 3. 按下 afudos /oOLDBIOS1.rom AMI Firmware Update Utility - Version 1.19(ASUS V2.07(03.11.24BB)) Copyright (C) 2002 American Megatrends, Inc.
BIOS 2.1 使用 AFUDOS BIOS AFUDOS DOS BIOS BIOS 程式。AFUDOS BIOS BIOS BIOS 程式 BIOS 程式。 1.2MB BIOS 1 AFUDOS 程式(afudos. All rights reserved. done Write to file...... ok A:\> 當 BIOS DOS 31 Reading flash ..... exe 2 DOS afudos /o[filename filename A:\>afudos /oOLDBIOS1.rom 3. 按下 afudos /oOLDBIOS1.rom AMI Firmware Update Utility - Version 1.19(ASUS V2.07(03.11.24BB)) Copyright (C) 2002 American Megatrends, Inc.

User Manual
Page 32
... ...... All rights reserved. WARNING!! WARNING!! Erasing flash ...... All rights reserved. done Reading flash ...... Do not turn off power during flash BIOS Reading file ....... 更新 BIOS 程式 AFUDOS BIOS 程式。 1 tw.asus.com BIOS 片中。 BIOS BIOS 2. 將 AFUDOS.EXE BIOS 3 DOS afudos /i[filename filename BIOS 程式。 A:\>afudos /iP5B-VM DO.ROM 4.
... ...... All rights reserved. WARNING!! WARNING!! Erasing flash ...... All rights reserved. done Reading flash ...... Do not turn off power during flash BIOS Reading file ....... 更新 BIOS 程式 AFUDOS BIOS 程式。 1 tw.asus.com BIOS 片中。 BIOS BIOS 2. 將 AFUDOS.EXE BIOS 3 DOS afudos /i[filename filename BIOS 程式。 A:\>afudos /iP5B-VM DO.ROM 4.

User Manual
Page 33
.../13/2006 Flash Type - 2.2 使用 AwardBIOS Flash BIOS AwardBIOS Flash AwardBIOS Flash 程式(AWDFLASH.EXE BIOS AwardBIOS Flash BIOS 程式。 1 http://tw.asus.com BIOS M2N-VM HDMI.bin FAT 32/16 格式的 USB BIOS 2 CD/DVD AwardBIOS Flash BIOS 3 DOS 4. 當 A BIOS 檔案與 AwardBIOS Flash 5 A awdflash 並按...
.../13/2006 Flash Type - 2.2 使用 AwardBIOS Flash BIOS AwardBIOS Flash AwardBIOS Flash 程式(AWDFLASH.EXE BIOS AwardBIOS Flash BIOS 程式。 1 http://tw.asus.com BIOS M2N-VM HDMI.bin FAT 32/16 格式的 USB BIOS 2 CD/DVD AwardBIOS Flash BIOS 3 DOS 4. 當 A BIOS 檔案與 AwardBIOS Flash 5 A awdflash 並按...

User Manual
Page 34
PMC Pm49FL004T LPC/FWH File Name to Continue Write OK F1 Reset No Update Write Fail 34 BIOS All Rights Reserved For C51PV-MCP51-M2A-VM HDMI-00 DATE:04/13/2006 Flash Type - PMC Pm49FL004T LPC/FWH File Name to Program: ...DATE:04/13/2006 Flash Type - OFE00 OK Write OK No Update Write Fail Warning: Don't Turn Off Power Or Reset System! 在更新 BIOS 9 Flash Complete BIOS F1 AwardBIOS Flash Utility for ASUS V1.14 (C) Phoenix Technologies Ltd. 7 BIOS N BIOS 8 BIOS BIOS AwardBIOS Flash Utility for ASUS V1.14 (C) Phoenix Technologies Ltd.
PMC Pm49FL004T LPC/FWH File Name to Continue Write OK F1 Reset No Update Write Fail 34 BIOS All Rights Reserved For C51PV-MCP51-M2A-VM HDMI-00 DATE:04/13/2006 Flash Type - PMC Pm49FL004T LPC/FWH File Name to Program: ...DATE:04/13/2006 Flash Type - OFE00 OK Write OK No Update Write Fail Warning: Don't Turn Off Power Or Reset System! 在更新 BIOS 9 Flash Complete BIOS F1 AwardBIOS Flash Utility for ASUS V1.14 (C) Phoenix Technologies Ltd. 7 BIOS N BIOS 8 BIOS BIOS AwardBIOS Flash Utility for ASUS V1.14 (C) Phoenix Technologies Ltd.
User Manual
Page 4
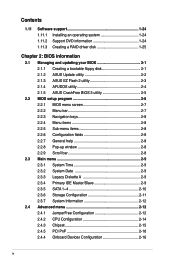
... operating system 1-24 1.11.2 Support DVD information 1-24 1.11.3 Creating a RAID driver disk 1-25 Chapter 2: BIOS information 2.1 Managing and updating your BIOS 2-1 2.1.1 Creating a bootable floppy disk 2-1 2.1.2 ASUS Update utility 2-2 2.1.3 ASUS EZ Flash 2 utility 2-3 2.1.4 AFUDOS utility 2-4 2.1.5 ASUS CrashFree BIOS 3 utility 2-5 2.2 BIOS setup program 2-6 2.2.1 BIOS menu screen 2-7 2.2.2 Menu bar 2-7 2.2.3 Navigation keys 2-8 2.2.4 Menu items 2-8 2.2.5 Sub-menu items 2-8 2.2.6 Configuration fields 2-8 2.2.7 General help...
... operating system 1-24 1.11.2 Support DVD information 1-24 1.11.3 Creating a RAID driver disk 1-25 Chapter 2: BIOS information 2.1 Managing and updating your BIOS 2-1 2.1.1 Creating a bootable floppy disk 2-1 2.1.2 ASUS Update utility 2-2 2.1.3 ASUS EZ Flash 2 utility 2-3 2.1.4 AFUDOS utility 2-4 2.1.5 ASUS CrashFree BIOS 3 utility 2-5 2.2 BIOS setup program 2-6 2.2.1 BIOS menu screen 2-7 2.2.2 Menu bar 2-7 2.2.3 Navigation keys 2-8 2.2.4 Menu items 2-8 2.2.5 Sub-menu items 2-8 2.2.6 Configuration fields 2-8 2.2.7 General help...

User Manual
Page 7
... the motherboard and the new technology it may become wet. • Place the product on the motherboard. • Chapter 2: BIOS information This chapter tells how to perform when installing system components. Contact a qualified service technician or your dealer immediately. • ...power supply is organized This guide contains the following parts: • Chapter 1: Product introduction This chapter describes the features of the BIOS parameters are using an adapter or extension cord. If possible, disconnect all cables are correctly connected and the power cables are unplugged....
... the motherboard and the new technology it may become wet. • Place the product on the motherboard. • Chapter 2: BIOS information This chapter tells how to perform when installing system components. Contact a qualified service technician or your dealer immediately. • ...power supply is organized This guide contains the following parts: • Chapter 1: Product introduction This chapter describes the features of the BIOS parameters are using an adapter or extension cord. If possible, disconnect all cables are correctly connected and the power cables are unplugged....
User Manual
Page 10
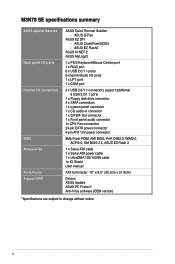
M3N78 SE specifications summary ASUS special features Back panel I/O ports Internal I /O ports 1 x LPT port 1 x COM port 3 x USB 2.0/1.1 connectors support additional 6 USB 2.0/1.1 ports 1 x Floppy disk drive connector 4 x SATA connectors 1 x system panel ... connector 1 x Front panel audio connector 1x CPU Fan connectors 24-pin EATX power connector 4-pin ATX 12V power connector 8Mb Flash ROM, AMI BIOS, PnP, DMI2.0, WfM2.0, ACPI2.0, SM BIOS 2.5, ASUS EZ Flash 2 1 x Serial ATA cable 1 x Serial ATA power cable 1 x UltraDMA 133/100/66 cable 1x IO Shield User manual ATX form factor...
M3N78 SE specifications summary ASUS special features Back panel I/O ports Internal I /O ports 1 x LPT port 1 x COM port 3 x USB 2.0/1.1 connectors support additional 6 USB 2.0/1.1 ports 1 x Floppy disk drive connector 4 x SATA connectors 1 x system panel ... connector 1 x Front panel audio connector 1x CPU Fan connectors 24-pin EATX power connector 4-pin ATX 12V power connector 8Mb Flash ROM, AMI BIOS, PnP, DMI2.0, WfM2.0, ACPI2.0, SM BIOS 2.5, ASUS EZ Flash 2 1 x Serial ATA cable 1 x Serial ATA power cable 1 x UltraDMA 133/100/66 cable 1x IO Shield User manual ATX form factor...
User Manual
Page 13
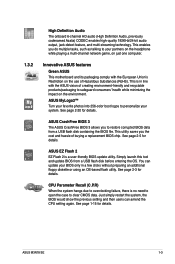
... show the previous setting and then users can update your BIOS only in line with the European Union's Restriction on just one computer. See page 2-20 for details. ASUS M3N78 SE 1-3 Innovative ASUS features Green ASUS This motherboard and its packaging comply with the ASUS vision of creating environment-friendly and recyclable products/packaging to safeguard consumers...
... show the previous setting and then users can update your BIOS only in line with the European Union's Restriction on just one computer. See page 2-20 for details. ASUS M3N78 SE 1-3 Innovative ASUS features Green ASUS This motherboard and its packaging comply with the ASUS vision of creating environment-friendly and recyclable products/packaging to safeguard consumers...
User Manual
Page 16
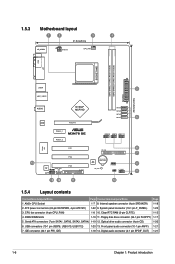
... 30.5cm(12.0in) USB34 2 LAN1_USB12 AUDIO Realtek 8211CL NVIDIA® MCP78D PCIEX16 SATA4 SATA3 SATA2 SATA1 5 PCIEX1_1 M3N78 SE PCIEX1_2 USB910 USB78 USB1112 Super I/O PCI1 6 PRI_IDE 7 PCI2 Lithium Cell 14 CMOS Power 8Mb BIOS 8 SPEAKER PCI3 ALC 662 AAFP SPDIF_OUT CD FLOPPY SB_PWR CLRTC F_PANEL 9 13 12 11 10 1.5.4 Layout contents Connectors...
... 30.5cm(12.0in) USB34 2 LAN1_USB12 AUDIO Realtek 8211CL NVIDIA® MCP78D PCIEX16 SATA4 SATA3 SATA2 SATA1 5 PCIEX1_1 M3N78 SE PCIEX1_2 USB910 USB78 USB1112 Super I/O PCI1 6 PRI_IDE 7 PCI2 Lithium Cell 14 CMOS Power 8Mb BIOS 8 SPEAKER PCI3 ALC 662 AAFP SPDIF_OUT CD FLOPPY SB_PWR CLRTC F_PANEL 9 13 12 11 10 1.5.4 Layout contents Connectors...
User Manual
Page 24
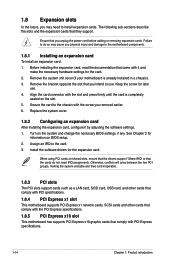
Failure to do not need to install expansion cards. Turn on BIOS setup. 2. 1.8 Expansion slots In the future, you physical injury and damage to the motherboard components. 1.8.1 Installing an expansion card To install an expansion card: 1. Ensure ... an expansion card After installing the expansion card, configure it and make the necessary hardware settings for information on the system and change the necessary BIOS settings, if any. See Chapter 2 for the card. 2. Otherwise, conflicts will arise between the two PCI groups, making the system unstable and thee card inoperable...
Failure to do not need to install expansion cards. Turn on BIOS setup. 2. 1.8 Expansion slots In the future, you physical injury and damage to the motherboard components. 1.8.1 Installing an expansion card To install an expansion card: 1. Ensure ... an expansion card After installing the expansion card, configure it and make the necessary hardware settings for information on the system and change the necessary BIOS settings, if any. See Chapter 2 for the card. 2. Otherwise, conflicts will arise between the two PCI groups, making the system unstable and thee card inoperable...

User Manual
Page 25
... system failure due to pins 2-3. Shut down the key during the boot process and enter BIOS setup to clear the Real Time Clock (RTC) RAM in CMOS, which include system setup information such as system passwords. ASUS M3N78 SE 1-15 Removing the cap will cause system boot failure! The onboard button cell battery powers...
... system failure due to pins 2-3. Shut down the key during the boot process and enter BIOS setup to clear the Real Time Clock (RTC) RAM in CMOS, which include system setup information such as system passwords. ASUS M3N78 SE 1-15 Removing the cap will cause system boot failure! The onboard button cell battery powers...
User Manual
Page 29
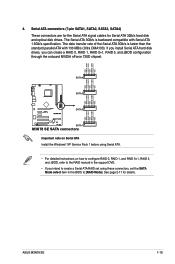
... ATA. • For detailed instructions on how to configure RAID 0, RAID 1, and RAID 0+1, RAID 5, and JBOD, refer to the RAID manual in the BIOS to [RAID Mode]. 4. ASUS M3N78 SE 1-19 GND RSATA_RXN4 RSATA_RXP4 GND RSATA_TXN4 RSATA_TXP4 GND SATA4 GND RSATA_RXN3 RSATA_RXP3 GND RSATA_TXN3 RSATA_TXP3 GND SATA3 GND RSATA_RXN2 RSATA_RXP2 GND RSATA_TXN2 RSATA_TXP2 GND...
... ATA. • For detailed instructions on how to configure RAID 0, RAID 1, and RAID 0+1, RAID 5, and JBOD, refer to the RAID manual in the BIOS to [RAID Mode]. 4. ASUS M3N78 SE 1-19 GND RSATA_RXN4 RSATA_RXP4 GND RSATA_TXN4 RSATA_TXP4 GND SATA4 GND RSATA_RXN3 RSATA_RXP3 GND RSATA_TXN3 RSATA_TXP3 GND SATA3 GND RSATA_RXN2 RSATA_RXP2 GND RSATA_TXN2 RSATA_TXP2 GND...
User Manual
Page 31
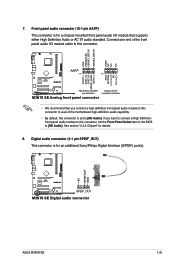
... Digital Interface (S/PDIF) port(s). +5V SPDIFOUT GND M3N78 SE SPDIF_OUT M3N78 SE Digital audio connector ASUS M3N78 SE 1-21 GND PRESENCE# SENSE1_RETUR SENSE2_RETUR AGND NC NC NC MIC2 MICPWR Line out_R NC Line out_L PORT1 L PORT1 R PORT2 R SENSE_SEND PORT1 L M3N78 SE AAFP PIN 1 PIN 1 HD-audio-compliant Legacy AC... a High Definition front panel audio module to this connector, set to this connector is set the Front Panel Select item in the BIOS to [HD Audio]. Digital audio connector (4-1 pin SPDIF_OUT) This connector is for a chassis-mounted front panel audio I /O module ...
... Digital Interface (S/PDIF) port(s). +5V SPDIFOUT GND M3N78 SE SPDIF_OUT M3N78 SE Digital audio connector ASUS M3N78 SE 1-21 GND PRESENCE# SENSE1_RETUR SENSE2_RETUR AGND NC NC NC MIC2 MICPWR Line out_R NC Line out_L PORT1 L PORT1 R PORT2 R SENSE_SEND PORT1 L M3N78 SE AAFP PIN 1 PIN 1 HD-audio-compliant Legacy AC... a High Definition front panel audio module to this connector, set to this connector is set the Front Panel Select item in the BIOS to [HD Audio]. Digital audio connector (4-1 pin SPDIF_OUT) This connector is for a chassis-mounted front panel audio I /O module ...
User Manual
Page 33
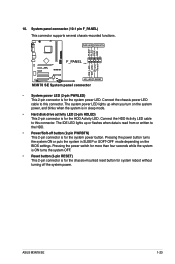
Connect the chassis power LED cable to this connector. ASUS M3N78 SE 1-23 Connect the HDD Activity LED cable to the HDD. • Power/Soft-off the system power. System panel connector (10-1 pin F_PANEL) This connector ... disk drive activity LED (2-pin HDLED) This 2-pin connector is for the HDD Activity LED. The IDE LED lights up when you turn on the BIOS settings. Ground Reset M3N78 SE F_PANEL PIN 1 HD_LED RESET M3N78 SE System panel connector • System power LED (2-pin PWRLED) This 2-pin connector is for the system power LED.
Connect the chassis power LED cable to this connector. ASUS M3N78 SE 1-23 Connect the HDD Activity LED cable to the HDD. • Power/Soft-off the system power. System panel connector (10-1 pin F_PANEL) This connector ... disk drive activity LED (2-pin HDLED) This 2-pin connector is for the HDD Activity LED. The IDE LED lights up when you turn on the BIOS settings. Ground Reset M3N78 SE F_PANEL PIN 1 HD_LED RESET M3N78 SE System panel connector • System power LED (2-pin PWRLED) This 2-pin connector is for the system power LED.
User Manual
Page 37
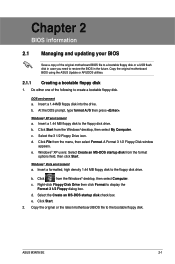
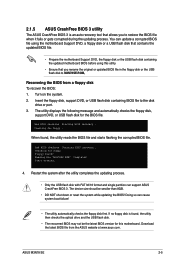
...174; XP users: Select Create an MS-DOS startup disk from the menu, then select Format. b. e. Chapter 2 BIOS information 2.1 Managing and updating your BIOS Save a copy of the following to create a bootable floppy disk. Select the Create an MS-DOS startup disk check ...disk in case you need to restore the BIOS in the future. d. c. Insert a 1.44 MB floppy disk to the bootable floppy disk. DOS environment a. e. Windows® Vista environment a. ASUS M3N78 SE 2-1 Copy the original motherboard BIOS using the ASUS Update or AFUDOS utilities. 2.1.1 Creating a bootable...
...174; XP users: Select Create an MS-DOS startup disk from the menu, then select Format. b. e. Chapter 2 BIOS information 2.1 Managing and updating your BIOS Save a copy of the following to create a bootable floppy disk. Select the Create an MS-DOS startup disk check ...disk in case you need to restore the BIOS in the future. d. c. Insert a 1.44 MB floppy disk to the bootable floppy disk. DOS environment a. e. Windows® Vista environment a. ASUS M3N78 SE 2-1 Copy the original motherboard BIOS using the ASUS Update or AFUDOS utilities. 2.1.1 Creating a bootable...
User Manual
Page 38
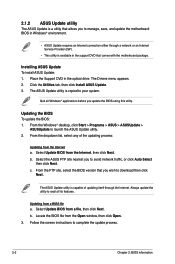
... the screen instructions to avoid network traffic, or click Auto Select then click Next. 2.1.2 ASUS Update utility The ASUS Update is a utility that allows you to manage, save, and update the motherboard BIOS in Windows® environment. • ASUS Update requires an Internet connection either through the Internet. From the Windows® desktop, click...
... the screen instructions to avoid network traffic, or click Auto Select then click Next. 2.1.2 ASUS Update utility The ASUS Update is a utility that allows you to manage, save, and update the motherboard BIOS in Windows® environment. • ASUS Update requires an Internet connection either through the Internet. From the Windows® desktop, click...
User Manual
Page 39
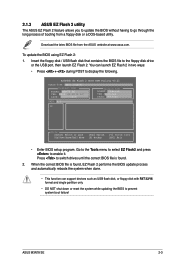
...Flash 2 in two ways: • Press + during POST to switch drives until the correct BIOS file is found . 2. ASUSTek EZ Flash 2 BIOS ROM Utility V3.21 FLASH TYPE: MXIC 25L8005 Current ROM BOARD: M3N78 SE VER: 0204 (H:00 B:00) DATE: 08/27/2008 Update ROM BOARD: Unknown VER: Unknown... Unknown PATH: A:\ A: Note [Enter] Select or Load [Up/Down/Home/End] Move [Tab] Switch [B] Backup [V] Drive Info [ESC] Exit • Enter BIOS setup program. Press to display the following. Download the lates BIOS file from a floppy disk or a DOS‑based utility. ASUS M3N78 SE 2-3
...Flash 2 in two ways: • Press + during POST to switch drives until the correct BIOS file is found . 2. ASUSTek EZ Flash 2 BIOS ROM Utility V3.21 FLASH TYPE: MXIC 25L8005 Current ROM BOARD: M3N78 SE VER: 0204 (H:00 B:00) DATE: 08/27/2008 Update ROM BOARD: Unknown VER: Unknown... Unknown PATH: A:\ A: Note [Enter] Select or Load [Up/Down/Home/End] Move [Tab] Switch [B] Backup [V] Drive Info [ESC] Exit • Enter BIOS setup program. Press to display the following. Download the lates BIOS file from a floppy disk or a DOS‑based utility. ASUS M3N78 SE 2-3
User Manual
Page 40
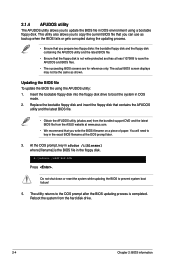
...bundled support DVD and the latest BIOS file from the hard disk drive. 2-4 Chapter 2: BIOS information Updating the BIOS file To update the BIOS file using a bootable floppy disk. You will need to boot the system in DOS mode. 2. Reboot the system from the ASUS website at www.asus.com. • We recommend... that the floppy disk is not write-protected and has at the DOS prompt later. 3. This utility also allows you to update the BIOS file in the exact BIOS filename at least 1072KB to save the...
...bundled support DVD and the latest BIOS file from the hard disk drive. 2-4 Chapter 2: BIOS information Updating the BIOS file To update the BIOS file using a bootable floppy disk. You will need to boot the system in DOS mode. 2. Reboot the system from the ASUS website at www.asus.com. • We recommend... that the floppy disk is not write-protected and has at the DOS prompt later. 3. This utility also allows you to update the BIOS file in the exact BIOS filename at least 1072KB to save the...
User Manual
Page 41
...... If no floppy disk is an auto recovery tool that you to the disk drive or port. 3. Checking for the BIOS file. Reading file "M3N78SE.ROM". Doing so can support ASUS CrashFree BIOS 3. ASUS M3N78 SE 2-5 The utility displays the following message and automatically checks the floppy disk, support DVD, or USB flash disk for floppy...
...... If no floppy disk is an auto recovery tool that you to the disk drive or port. 3. Checking for the BIOS file. Reading file "M3N78SE.ROM". Doing so can support ASUS CrashFree BIOS 3. ASUS M3N78 SE 2-5 The utility displays the following message and automatically checks the floppy disk, support DVD, or USB flash disk for floppy...
User Manual
Page 42
... the configuration of the firmware chip. This requires you are installing a motherboard, reconfiguring your BIOS." Otherwise, POST continues with the opportunity to reconfigure your screen. • Visit the ASUS website at www.asus.com to download the latest BIOS file for most conditions to ensure system compatibility and stability. We recommend to always shut...
... the configuration of the firmware chip. This requires you are installing a motherboard, reconfiguring your BIOS." Otherwise, POST continues with the opportunity to reconfigure your screen. • Visit the ASUS website at www.asus.com to download the latest BIOS file for most conditions to ensure system compatibility and stability. We recommend to always shut...


