User Manual
Page 59
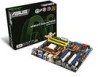
CPU DIMM BIOS setup Playback software Suggested list AMD® Athlon 4400+ DDR2 800 (1GB ...MPEG-2. • To play HD DVD or Blu-Ray Disc, ensure to the HDMI/DVI port at the rear panel. ASUS M3N-HT Deluxe Series 2-33 These 4-pin Universal Serial Bus (USB) ports are supported for connecting USB 2.0 devices. Playback of HD ... outputs DVI + D-Sub DVI + HDMI HDMI + D-Sub Supported • • Not supported • • During POST, only the monitor connected to the D-Sub port has display. Dual display output support • This table indicates that whether the...
CPU DIMM BIOS setup Playback software Suggested list AMD® Athlon 4400+ DDR2 800 (1GB ...MPEG-2. • To play HD DVD or Blu-Ray Disc, ensure to the HDMI/DVI port at the rear panel. ASUS M3N-HT Deluxe Series 2-33 These 4-pin Universal Serial Bus (USB) ports are supported for connecting USB 2.0 devices. Playback of HD ... outputs DVI + D-Sub DVI + HDMI HDMI + D-Sub Supported • • Not supported • • During POST, only the monitor connected to the D-Sub port has display. Dual display output support • This table indicates that whether the...

User Manual
Page 75
... on the system front panel case lights up for assistance. While the tests are off. 3. BIOS beep codes BIOS Beep One short beep One continuous beep followed by two short beeps then a pause (repeated) ...-on the screen. If you do not see BIOS beep codes table below) or additional messages appear on test. ASUS M3N-HT Deluxe Series 3-1 Monitor b. After making all switches are running, the BIOS beeps (see anything within 30 seconds from the... of the system chassis. 4. Turn on self tests or POST. At power on the chain) c. External SCSI devices (starting with a surge protector. 5.
... on the system front panel case lights up for assistance. While the tests are off. 3. BIOS beep codes BIOS Beep One short beep One continuous beep followed by two short beeps then a pause (repeated) ...-on the screen. If you do not see BIOS beep codes table below) or additional messages appear on test. ASUS M3N-HT Deluxe Series 3-1 Monitor b. After making all switches are running, the BIOS beeps (see anything within 30 seconds from the... of the system chassis. 4. Turn on self tests or POST. At power on the chain) c. External SCSI devices (starting with a surge protector. 5.

User Manual
Page 83
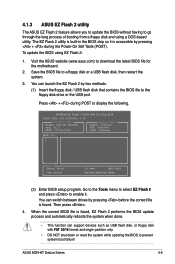
...NOT shut down or reset the system while updating the BIOS to prevent system boot failure! When the correct BIOS file is found . Visit the ASUS website (www.asus.com) to a floppy disk or a USB flash disk, then restart the system. 3. ASUS M3N-HT Deluxe Series 4-5 The EZ Flash 2 utility is found ... drive or the USB port. Then press . 4. Press + during the Power-On Self Tests (POST). ASUSTek EZ Flash 2 BIOS ROM Utility B325 FLASH TYPE: SST 25VF020B /3.3V Current ROM BOARD: M3N-HT DELUXE VER: 0110 DATE: 01/04/2008 Update ROM BOARD: Unknown VER: Unknown DATE: Unknown PATH: ...
...NOT shut down or reset the system while updating the BIOS to prevent system boot failure! When the correct BIOS file is found . Visit the ASUS website (www.asus.com) to a floppy disk or a USB flash disk, then restart the system. 3. ASUS M3N-HT Deluxe Series 4-5 The EZ Flash 2 utility is found ... drive or the USB port. Then press . 4. Press + during the Power-On Self Tests (POST). ASUSTek EZ Flash 2 BIOS ROM Utility B325 FLASH TYPE: SST 25VF020B /3.3V Current ROM BOARD: M3N-HT DELUXE VER: 0110 DATE: 01/04/2008 Update ROM BOARD: Unknown VER: Unknown DATE: Unknown PATH: ...

User Manual
Page 87
... your screen. • Visit the ASUS website (www.asus.com) to "Run Setup." If the system becomes unstable after POST, restart the system by pressing , or by turning the system off and then back on the system chassis. ASUS M3N-HT Deluxe Series 4-9 Do this utility. When ...you start up the computer, the system provides you can change the power management settings. If you wish to enter Setup after changing any BIOS...
... your screen. • Visit the ASUS website (www.asus.com) to "Run Setup." If the system becomes unstable after POST, restart the system by pressing , or by turning the system off and then back on the system chassis. ASUS M3N-HT Deluxe Series 4-9 Do this utility. When ...you start up the computer, the system provides you can change the power management settings. If you wish to enter Setup after changing any BIOS...
User Manual
Page 98
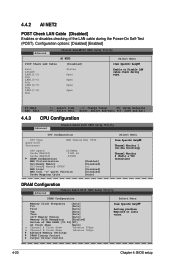
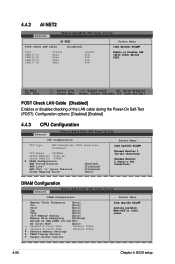
... Trp [Auto] Tras [Auto] 1T/T Memory Timing [Auto] Memory Hole Remapping [Enabled] Bottom of the LAN cable during POST. 4.4.2 AI NET2 POST Check LAN Cable [Disabled] Enables or disables checking of UMA DRAM [31:24][FC] AI Clock Skew [Auto] x Channel ...A Clock Skew Advance 300ps x Channel B Clock Skew Advance 300ps Advance Memory Settings DRAM Timing Control Output Driver Control Item Specific Help Setting platform Memclock or limit value. 4-20 Chapter 4: BIOS...
... Trp [Auto] Tras [Auto] 1T/T Memory Timing [Auto] Memory Hole Remapping [Enabled] Bottom of the LAN cable during POST. 4.4.2 AI NET2 POST Check LAN Cable [Disabled] Enables or disables checking of UMA DRAM [31:24][FC] AI Clock Skew [Auto] x Channel ...A Clock Skew Advance 300ps x Channel B Clock Skew Advance 300ps Advance Memory Settings DRAM Timing Control Output Driver Control Item Specific Help Setting platform Memclock or limit value. 4-20 Chapter 4: BIOS...
User Manual
Page 133
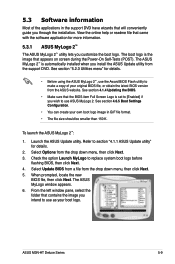
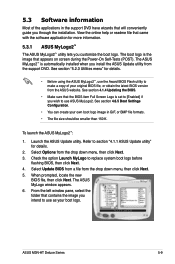
...ASUS M3N-HT Deluxe Series 5-9 Check the option Launch MyLogo to section "4.1.1 ASUS Update utility" for more information. 5.3.1 ASUS MyLogo 2™ The ASUS MyLogo 2™ utility lets you through the installation. The ASUS MyLogo window appears. 6. View the online help or readme file that contains the image you wish to use ASUS MyLogo 2. 5.3 Software information Most of your original BIOS... screen during the Power‑On Self-Tests (POST). The boot logo is automatically installed when you install the ASUS Update utility from the support DVD. Refer to replace system ...
...ASUS M3N-HT Deluxe Series 5-9 Check the option Launch MyLogo to section "4.1.1 ASUS Update utility" for more information. 5.3.1 ASUS MyLogo 2™ The ASUS MyLogo 2™ utility lets you through the installation. The ASUS MyLogo window appears. 6. View the online help or readme file that contains the image you wish to use ASUS MyLogo 2. 5.3 Software information Most of your original BIOS... screen during the Power‑On Self-Tests (POST). The boot logo is automatically installed when you install the ASUS Update utility from the support DVD. Refer to replace system ...
User Manual
Page 134
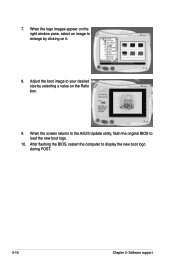
After flashing the BIOS, restart the computer to load the new boot logo. 10. Adjust the boot image to enlarge by selecting a value on it. 8. When the screen returns to the ASUS Update utility, flash the original BIOS to display the new boot logo during POST. 5-10 Chapter 5: Software support 7. When the logo images appear on the right window pane, select an image to your desired size by clicking on the Ratio box. 9.
After flashing the BIOS, restart the computer to load the new boot logo. 10. Adjust the boot image to enlarge by selecting a value on it. 8. When the screen returns to the ASUS Update utility, flash the original BIOS to display the new boot logo during POST. 5-10 Chapter 5: Software support 7. When the logo images appear on the right window pane, select an image to your desired size by clicking on the Ratio box. 9.
User Manual
Page 135
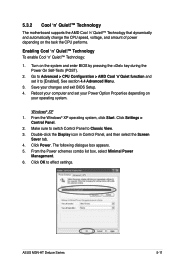
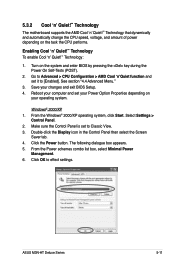
... dynamically and automatically change the CPU speed, voltage, and amount of power depending on the system and enter BIOS by pressing the key during the Power On Self-Tests (POST). 2. Click OK to Classic View. 3. ASUS M3N-HT Deluxe Series 5-11 The following dialogue box appears. 5. Click Settings > Control Panel. 2. Go to [Enabled]. Reboot your computer...
... dynamically and automatically change the CPU speed, voltage, and amount of power depending on the system and enter BIOS by pressing the key during the Power On Self-Tests (POST). 2. Click OK to Classic View. 3. ASUS M3N-HT Deluxe Series 5-11 The following dialogue box appears. 5. Click Settings > Control Panel. 2. Go to [Enabled]. Reboot your computer...
User Manual
Page 169
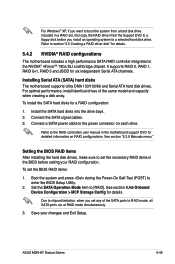
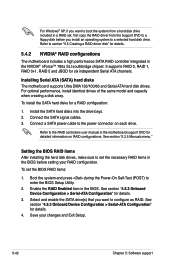
...DMA 133/100/66 and Serial ATA hard disk drives. See section "5.2.5 Manuals menu." Set the SATA Operation Mode item to enter the BIOS Setup Utility. 2. For optimal performance, install identical drives of the SATA ports to RAID mode, all SATA ports run at RAID mode ...controller integrated in the BIOS before you set the BIOS RAID items: 1. Refer to the RAID controllers user manual in the motherboard support DVD for detailed information on each drive. Boot the system and press during the Power-On Self-Test (POST) to [RAID]. ASUS M3N-HT Deluxe Series 5-45 For Windows...
...DMA 133/100/66 and Serial ATA hard disk drives. See section "5.2.5 Manuals menu." Set the SATA Operation Mode item to enter the BIOS Setup Utility. 2. For optimal performance, install identical drives of the SATA ports to RAID mode, all SATA ports run at RAID mode ...controller integrated in the BIOS before you set the BIOS RAID items: 1. Refer to the RAID controllers user manual in the motherboard support DVD for detailed information on each drive. Boot the system and press during the Power-On Self-Test (POST) to [RAID]. ASUS M3N-HT Deluxe Series 5-45 For Windows...
User Manual
Page 170
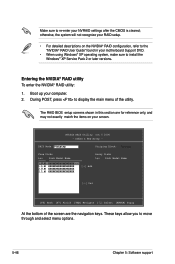
...sure to re-enter your computer. 2. Boot up your NVRAID settings after the CMOS is cleared; NVIDIA RAID Utility Oct 5 2004 - The RAID BIOS setup screens shown in your screen. RAID Mode: Striping Striping Block: Optimal Free Disks Loc Disk Model Name 1.0.M XXXXXXXXXXXXXXXXXX 1.1.M XXXXXXXXXXXXXXXXXX 2.0.M XXXXXXXXXXXXXXXXXX 2.1.M ... in this section are the navigation keys. Entering the NVIDIA® RAID utility To enter the NVIDIA® RAID utility: 1. During POST, press to move through and select menu options. 5-46 Chapter 5: Software support Define a New Array -
...sure to re-enter your computer. 2. Boot up your NVRAID settings after the CMOS is cleared; NVIDIA RAID Utility Oct 5 2004 - The RAID BIOS setup screens shown in your screen. RAID Mode: Striping Striping Block: Optimal Free Disks Loc Disk Model Name 1.0.M XXXXXXXXXXXXXXXXXX 1.1.M XXXXXXXXXXXXXXXXXX 2.0.M XXXXXXXXXXXXXXXXXX 2.1.M ... in this section are the navigation keys. Entering the NVIDIA® RAID utility To enter the NVIDIA® RAID utility: 1. During POST, press to move through and select menu options. 5-46 Chapter 5: Software support Define a New Array -
User Manual
Page 176
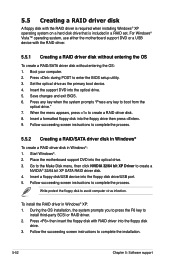
... disk. 8. Insert the support DVD into the floppy disk drive/USB port. 5. Set the optical drive as the primary boot device. 4. Save changes and exit BIOS. 6. Insert a floppy disk/USB device into the optical drive. 5. Press then insert the floppy disk with the RAID driver is required when installing Windows®... To create a RAID/SATA driver disk without entering the OS: 1. When the menu appears, press to install third-party SCSI or RAID driver. 2. Press during POST to enter the BIOS setup utility. 3.
... disk. 8. Insert the support DVD into the floppy disk drive/USB port. 5. Set the optical drive as the primary boot device. 4. Save changes and exit BIOS. 6. Insert a floppy disk/USB device into the optical drive. 5. Press then insert the floppy disk with the RAID driver is required when installing Windows®... To create a RAID/SATA driver disk without entering the OS: 1. When the menu appears, press to install third-party SCSI or RAID driver. 2. Press during POST to enter the BIOS setup utility. 3.

User Manual
Page 190
... [Auto] K8NB HT Width [Auto] CPU Spread Spectrum [Disabled] PCIE Spread Spectrum [Disabled] SATA Spread Spectrum [Down Spread] Primary Display Adapter [PCI-E] Item Specific Help 3. Visit www.asus.com for details. If the driver is enabled. See section 4.4.4 Chipset for the latest chipset driver. 6-10...Setup. 4. The onboard GPU will find the Hybrid SLI icon on the system and press during the Power-On Self-Test (POST) to enter the BIOS Setup Utility. 2. To enable GeForce Boost 1. 6.2.2 Enabling GeForce® Boost and HybridPower™ Before enabling GeForce Boost and ...
... [Auto] K8NB HT Width [Auto] CPU Spread Spectrum [Disabled] PCIE Spread Spectrum [Disabled] SATA Spread Spectrum [Down Spread] Primary Display Adapter [PCI-E] Item Specific Help 3. Visit www.asus.com for details. If the driver is enabled. See section 4.4.4 Chipset for the latest chipset driver. 6-10...Setup. 4. The onboard GPU will find the Hybrid SLI icon on the system and press during the Power-On Self-Test (POST) to enter the BIOS Setup Utility. 2. To enable GeForce Boost 1. 6.2.2 Enabling GeForce® Boost and HybridPower™ Before enabling GeForce Boost and ...
User Manual
Page 69
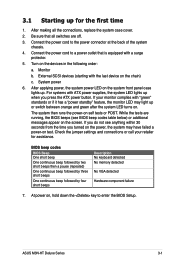
...a power-on self tests or POST. The system then runs the power-on test. ASUS M3N-HT Deluxe Series 3-1 3.1 Starting up for assistance. Connect the power cord to a power outlet that all the connections, replace the system case cover. 2. Monitor b. If you do not see BIOS beep codes table below) or ...applying power, the system power LED on , hold down the key to the power connector at the back of the system chassis. 4. BIOS beep codes BIOS Beep One short beep One continuous beep followed by two short beeps then a pause (repeated) One continuous beep followed by three short beeps...
...a power-on self tests or POST. The system then runs the power-on test. ASUS M3N-HT Deluxe Series 3-1 3.1 Starting up for assistance. Connect the power cord to a power outlet that all the connections, replace the system case cover. 2. Monitor b. If you do not see BIOS beep codes table below) or ...applying power, the system power LED on , hold down the key to the power connector at the back of the system chassis. 4. BIOS beep codes BIOS Beep One short beep One continuous beep followed by two short beeps then a pause (repeated) One continuous beep followed by three short beeps...
User Manual
Page 77
...and using EZ Flash 2: 1. Save the BIOS file to enable it is found , EZ Flash 2 performs the BIOS update process and automatically reboots the system when done. • This function can launch the EZ Flash 2 by pressing + during POST to prevent system boot failure! Press + ...the floppy disk / USB flash disk that contains the BIOS file to download the latest BIOS file for the motherboard. 2. Visit the ASUS website (www.asus.com) to the floppy disk drive or the USB port. ASUS M3N-HT Deluxe Series 4-5 To update the BIOS using a DOS‑based utility. The EZ Flash ...
...and using EZ Flash 2: 1. Save the BIOS file to enable it is found , EZ Flash 2 performs the BIOS update process and automatically reboots the system when done. • This function can launch the EZ Flash 2 by pressing + during POST to prevent system boot failure! Press + ...the floppy disk / USB flash disk that contains the BIOS file to download the latest BIOS file for the motherboard. 2. Visit the ASUS website (www.asus.com) to the floppy disk drive or the USB port. ASUS M3N-HT Deluxe Series 4-5 To update the BIOS using a DOS‑based utility. The EZ Flash ...
User Manual
Page 81
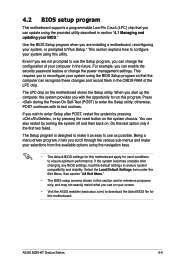
...your computer in this motherboard. For example, you can update using the BIOS Setup program so that you see on the system chassis. Press during the Power-On Self-Test (POST) to run this program. ASUS M3N-HT Deluxe Series 4-9 The LPC chip on . You can also restart by ...pressing the reset button on your BIOS." If the system becomes unstable after POST, restart the system by pressing , or by turning the...
...your computer in this motherboard. For example, you can update using the BIOS Setup program so that you see on the system chassis. Press during the Power-On Self-Test (POST) to run this program. ASUS M3N-HT Deluxe Series 4-9 The LPC chip on . You can also restart by ...pressing the reset button on your BIOS." If the system becomes unstable after POST, restart the system by pressing , or by turning the...
User Manual
Page 92
...] Select Menu Item Specific Help Thermal Monitor 1 (On-die throtting) Thermal Monitor 2 (Ratio & VID transition) DRAM Configuration Advanced Phoenix-Award BIOS CMOS Setup Utility DRAM Configuration Select Menu Memory Clock Frequency [Auto] Tcl [Auto] Trcd [Auto] Trp [Auto] Tras [Auto] 1T/T ...LAN1(7-8) Status Open Open Open Open Length N/A N/A N/A N/A Enable or Disable LAN cable check during the Power-On Self‑Test (POST). F1:Help ESC: Exit ↑↓ : Select Item -/+: Change Value F5: Setup Defaults →←: Select Menu Enter: ...
...] Select Menu Item Specific Help Thermal Monitor 1 (On-die throtting) Thermal Monitor 2 (Ratio & VID transition) DRAM Configuration Advanced Phoenix-Award BIOS CMOS Setup Utility DRAM Configuration Select Menu Memory Clock Frequency [Auto] Tcl [Auto] Trcd [Auto] Trp [Auto] Tras [Auto] 1T/T ...LAN1(7-8) Status Open Open Open Open Length N/A N/A N/A N/A Enable or Disable LAN cable check during the Power-On Self‑Test (POST). F1:Help ESC: Exit ↑↓ : Select Item -/+: Change Value F5: Setup Defaults →←: Select Menu Enter: ...
User Manual
Page 127
... than 150 K. Launch the ASUS Update utility. Select Options from the support DVD. When prompted, locate the new BIOS file, then click Next. The ASUS MyLogo2™ is the image...ASUS M3N-HT Deluxe Series 5-9 The boot logo is automatically installed when you through the installation. See section 4.6.5 Boot Settings Configuration. • You can create your boot logo. See section 4.1.4 Updating the BIOS.... • Make sure that contains the image you intend to use the Award BIOS Flash utility to use ASUS MyLogo2. View the online help ...
... than 150 K. Launch the ASUS Update utility. Select Options from the support DVD. When prompted, locate the new BIOS file, then click Next. The ASUS MyLogo2™ is the image...ASUS M3N-HT Deluxe Series 5-9 The boot logo is automatically installed when you through the installation. See section 4.6.5 Boot Settings Configuration. • You can create your boot logo. See section 4.1.4 Updating the BIOS.... • Make sure that contains the image you intend to use the Award BIOS Flash utility to use ASUS MyLogo2. View the online help ...

User Manual
Page 128
When the logo images appear on the right window pane, select an image to load the new boot logo. 10. 7. When the screen returns to the ASUS Update utility, flash the original BIOS to enlarge by selecting a value on it. 8. After flashing the BIOS, restart the computer to your desired size by clicking on the Ratio box. 9. Adjust the boot image to display the new boot logo during POST. 5-10 Chapter 5: Software support
When the logo images appear on the right window pane, select an image to load the new boot logo. 10. 7. When the screen returns to the ASUS Update utility, flash the original BIOS to enlarge by selecting a value on it. 8. After flashing the BIOS, restart the computer to your desired size by clicking on the Ratio box. 9. Adjust the boot image to display the new boot logo during POST. 5-10 Chapter 5: Software support
User Manual
Page 129
... 5. ASUS M3N-HT Deluxe Series 5-11 From the Windows® 2000/XP operating system, click Start. Click the Power button. From the Power schemes combo list box, select Minimal Power Management. 6. Reboot your computer and set your Power Option Properties depending on your changes and exit BIOS Setup....that dynamically and automatically change the CPU speed, voltage, and amount of power depending on the system and enter BIOS by pressing the key during the Power On Self-Tests (POST). 2. Turn on the task the CPU performs. Enabling Cool 'n' Quiet!™ Technology To enable Cool 'n'...
... 5. ASUS M3N-HT Deluxe Series 5-11 From the Windows® 2000/XP operating system, click Start. Click the Power button. From the Power schemes combo list box, select Minimal Power Management. 6. Reboot your computer and set your Power Option Properties depending on your changes and exit BIOS Setup....that dynamically and automatically change the CPU speed, voltage, and amount of power depending on the system and enter BIOS by pressing the key during the Power On Self-Tests (POST). 2. Turn on the task the CPU performs. Enabling Cool 'n' Quiet!™ Technology To enable Cool 'n'...
User Manual
Page 160
... high performance SATA RAID controller integrated in the BIOS. To set the necessary RAID items in the BIOS before you want to a selected hard disk ...first copy the RAID driver from the Support DVD to set the BIOS RAID items: 1. Save your RAID configuration. For optimal performance,...780a SLI southbridge chipset. See section "5.2.5 Manuals menu." Setting the BIOS RAID items After installing the hard disk drives, make sure to...and Exit Setup. 5-42 Chapter 5: Software support Refer to enter the BIOS Setup Utility. 2. It supports RAID 0, RAID 1, RAID 0+1, RAID 5 ...
... high performance SATA RAID controller integrated in the BIOS. To set the necessary RAID items in the BIOS before you want to a selected hard disk ...first copy the RAID driver from the Support DVD to set the BIOS RAID items: 1. Save your RAID configuration. For optimal performance,...780a SLI southbridge chipset. See section "5.2.5 Manuals menu." Setting the BIOS RAID items After installing the hard disk drives, make sure to...and Exit Setup. 5-42 Chapter 5: Software support Refer to enter the BIOS Setup Utility. 2. It supports RAID 0, RAID 1, RAID 0+1, RAID 5 ...


