
User Manual
Page 7
... the Canadian Department of the monitor to radio communications. Notices Federal Communications Commission Statement This device complies with Canadian ICES-003. This equipment has been tested and found to comply with the limits for connection of Communications. This class B digital apparatus complies with Part 15 of Communications Statement This digital apparatus...
... the Canadian Department of the monitor to radio communications. Notices Federal Communications Commission Statement This device complies with Canadian ICES-003. This equipment has been tested and found to comply with the limits for connection of Communications. This class B digital apparatus complies with Part 15 of Communications Statement This digital apparatus...

User Manual
Page 57
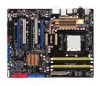
...-RW (x1) ASUS M3A79-T Deluxe 2-31 otherwise, the system will not boot. • Use of 600 W. • Do not forget to support the motherboard power requirements with more power-consuming devices. ATX power connectors (24-pin EATXPWR; 8-pin EATX12V) These connectors are for details. • The ATX 12 V Specification 2.0-compliant (1000W) PSU has been tested to connect...
...-RW (x1) ASUS M3A79-T Deluxe 2-31 otherwise, the system will not boot. • Use of 600 W. • Do not forget to support the motherboard power requirements with more power-consuming devices. ATX power connectors (24-pin EATXPWR; 8-pin EATX12V) These connectors are for details. • The ATX 12 V Specification 2.0-compliant (1000W) PSU has been tested to connect...
User Manual
Page 61
... lights up when you turned on the power, the system may light up or switch between orange and green after the system LED turns on test. Monitor b. External SCSI devices (starting with "green" standards or if it has a "power standby" feature, the monitor LED may have failed a ... anything within 30 seconds from the time you press the ATX power button. Turn on the chain) c. Check the jumper settings and connections or call your monitor complies with the last device on the devices in Chapter 3. ASUS M3A79-T Deluxe 2-35 Connect the power cord to the power connector at...
... lights up when you turned on the power, the system may light up or switch between orange and green after the system LED turns on test. Monitor b. External SCSI devices (starting with "green" standards or if it has a "power standby" feature, the monitor LED may have failed a ... anything within 30 seconds from the time you press the ATX power button. Turn on the chain) c. Check the jumper settings and connections or call your monitor complies with the last device on the devices in Chapter 3. ASUS M3A79-T Deluxe 2-35 Connect the power cord to the power connector at...
User Manual
Page 69
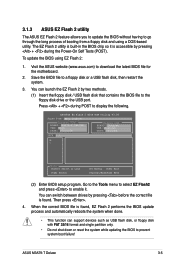
...motherboard. 2. You can launch the EZ Flash 2 by pressing + during POST to display the following. Then press . 4. Visit the ASUS website (www.asus.com) to a floppy disk or a USB flash disk, then restart the system. 3. ASUSTek EZ Flash 2 BIOS ROM Utility V3.06 FLASH TYPE: MXIC 25L8005 Current ROM BOARD: M3A79-T DELUXE... Flash 2 utility The ASUS EZ Flash 2 feature allows you to update the BIOS without having to go through the long process of booting from a floppy disk and using EZ Flash 2: 1. Press + during the Power-On Self Tests (POST). Go to the Tools menu to select EZ ...
...motherboard. 2. You can launch the EZ Flash 2 by pressing + during POST to display the following. Then press . 4. Visit the ASUS website (www.asus.com) to a floppy disk or a USB flash disk, then restart the system. 3. ASUSTek EZ Flash 2 BIOS ROM Utility V3.06 FLASH TYPE: MXIC 25L8005 Current ROM BOARD: M3A79-T DELUXE... Flash 2 utility The ASUS EZ Flash 2 feature allows you to update the BIOS without having to go through the long process of booting from a floppy disk and using EZ Flash 2: 1. Press + during the Power-On Self Tests (POST). Go to the Tools menu to select EZ ...

User Manual
Page 73
...test routines. ASUS M3A79-T Deluxe 3-9 This section explains how to configure your system using the navigation keys. • The default BIOS settings for reference purposes only, and may not exactly match what you to reconfigure your system using the provided utility described in section 3.1 Managing and updating your BIOS. Even if you are installing a motherboard..., it as possible. Do this utility. The SPI chip on . 3.2 BIOS setup program This motherboard supports a programmable firmware that the computer can recognize these changes and record them in the CMOS RAM...
...test routines. ASUS M3A79-T Deluxe 3-9 This section explains how to configure your system using the navigation keys. • The default BIOS settings for reference purposes only, and may not exactly match what you to reconfigure your system using the provided utility described in section 3.1 Managing and updating your BIOS. Even if you are installing a motherboard..., it as possible. Do this utility. The SPI chip on . 3.2 BIOS setup program This motherboard supports a programmable firmware that the computer can recognize these changes and record them in the CMOS RAM...
User Manual
Page 101
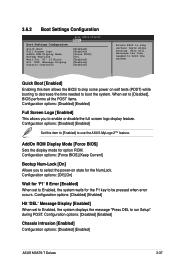
...or disable the full screen logo display feature. Configuration options: [Disabled] [Enabled] Set this item allows the BIOS to skip some power on self tests (POST) while booting to decrease the time needed to select the power-on state for the NumLock. Configuration options: [Disabled] [Enabled] Hit ... to run Setup" during POST. Configuration options: [Force BIOS] [Keep Current] Bootup Num-Lock [On] Allows you to skip certain tests while booting. Configuration options: [Disabled] [Enabled] Chassis Intrusion [Enabled] Configuration options: [Disabled] [Enabled] ASUS M3A79-T Deluxe 3-37
...or disable the full screen logo display feature. Configuration options: [Disabled] [Enabled] Set this item allows the BIOS to skip some power on self tests (POST) while booting to decrease the time needed to select the power-on state for the NumLock. Configuration options: [Disabled] [Enabled] Hit ... to run Setup" during POST. Configuration options: [Force BIOS] [Keep Current] Bootup Num-Lock [On] Allows you to skip certain tests while booting. Configuration options: [Disabled] [Enabled] Chassis Intrusion [Enabled] Configuration options: [Disabled] [Enabled] ASUS M3A79-T Deluxe 3-37

User Manual
Page 119
... Power‑On Self-Tests (POST). Launch the ASUS Update utility. Check the option Launch MyLogo to section 3.1.1 ASUS Update utility for details. 2. See section 4.2.3 Utilities menu for more information. 4.3.1 ASUS MyLogo2™ The ASUS MyLogo2™ utility lets you install the ASUS Update utility from the ...click Next. 4.3 Software information Most of your original BIOS file, or obtain the latest BIOS version from the ASUS website. ASUS M3A79-T Deluxe 4-9 View the online help or readme file that came with the software application for details. • Before using the...
... Power‑On Self-Tests (POST). Launch the ASUS Update utility. Check the option Launch MyLogo to section 3.1.1 ASUS Update utility for details. 2. See section 4.2.3 Utilities menu for more information. 4.3.1 ASUS MyLogo2™ The ASUS MyLogo2™ utility lets you install the ASUS Update utility from the ...click Next. 4.3 Software information Most of your original BIOS file, or obtain the latest BIOS version from the ASUS website. ASUS M3A79-T Deluxe 4-9 View the online help or readme file that came with the software application for details. • Before using the...
User Manual
Page 121
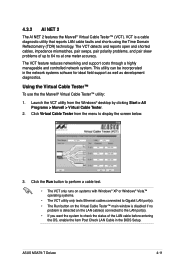
... (VCT). This utility can be incorporated in the BIOS Setup. Launch the VCT utility from the menu to 64 ns at one meter accuracy. ASUS M3A79-T Deluxe 4-11 The VCT detects and reports open and shorted cables, impedance mismatches, pair swaps, pair polarity problems, and pair skew problems of the LAN...Using the Virtual Cable Tester™ To use the the Marvell® Virtual Cable Tester™ utility: 1. Click the Run button to perform a cable test. • The VCT only runs on systems with Windows® XP or Windows® Vista™ operating systems. • The VCT utility only...
... (VCT). This utility can be incorporated in the BIOS Setup. Launch the VCT utility from the menu to 64 ns at one meter accuracy. ASUS M3A79-T Deluxe 4-11 The VCT detects and reports open and shorted cables, impedance mismatches, pair swaps, pair polarity problems, and pair skew problems of the LAN...Using the Virtual Cable Tester™ To use the the Marvell® Virtual Cable Tester™ utility: 1. Click the Run button to perform a cable test. • The VCT only runs on systems with Windows® XP or Windows® Vista™ operating systems. • The VCT utility only...
User Manual
Page 122
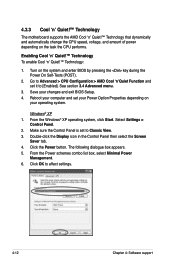
...; XP 1. Click OK to Classic View. 3. Go to [Enabled]. Select Settings > Control Panel. 2. 4.3.3 Cool 'n' Quiet!™ Technology The motherboard supports the AMD Cool 'n' Quiet!™ Technology that dynamically and automatically change the CPU speed, voltage, and amount of power depending on the system and... enter BIOS by pressing the key during the Power On Self-Tests (POST). 2. Turn on the task the CPU performs. Enabling Cool 'n' Quiet!™ Technology To enable Cool 'n' Quiet!™ Technology: ...
...; XP 1. Click OK to Classic View. 3. Go to [Enabled]. Select Settings > Control Panel. 2. 4.3.3 Cool 'n' Quiet!™ Technology The motherboard supports the AMD Cool 'n' Quiet!™ Technology that dynamically and automatically change the CPU speed, voltage, and amount of power depending on the system and... enter BIOS by pressing the key during the Power On Self-Tests (POST). 2. Turn on the task the CPU performs. Enabling Cool 'n' Quiet!™ Technology To enable Cool 'n' Quiet!™ Technology: ...

User Manual
Page 127
... Settings To configure the playback settings, click the Playback button on the control panel. Press the Test Speakers button to the current preset. Port settings Click this port settings tab to select your preferred Digital Signal Processing (DSP) preset. Move the ...Voice Clarity, Dynamics, Brilliance, and Deep Bass of the Speakers and SPDIF Interface or mute the audio. Surround settings Allows you to the factory defaults. ASUS M3A79-T Deluxe 4-17 Preset settings Click and expand the drop-down menu to display the rear panel ports configuration for the speakers or rear panel digital port...
... Settings To configure the playback settings, click the Playback button on the control panel. Press the Test Speakers button to the current preset. Port settings Click this port settings tab to select your preferred Digital Signal Processing (DSP) preset. Move the ...Voice Clarity, Dynamics, Brilliance, and Deep Bass of the Speakers and SPDIF Interface or mute the audio. Surround settings Allows you to the factory defaults. ASUS M3A79-T Deluxe 4-17 Preset settings Click and expand the drop-down menu to display the rear panel ports configuration for the speakers or rear panel digital port...

User Manual
Page 128
... of Microphone or Line In by moving the slider rightward or leftward. Port settings Click the tab to perform test recording and play the test sample through the speakers or the SPDIF interface. Record testing Click the tab to display the rear panel ports for the further configurations. Recording Settings To change the...
... of Microphone or Line In by moving the slider rightward or leftward. Port settings Click the tab to perform test recording and play the test sample through the speakers or the SPDIF interface. Record testing Click the tab to display the rear panel ports for the further configurations. Recording Settings To change the...

User Manual
Page 131
Jack configuration This screen helps you configure your computer's audio ports, depending on the audio devices you have made. You will be asked to read prewritten text to allow the AudioWizard to hear the changes you adjust microphone volume. Click the Test button to adjust the volume as you adjust speaker volume. ASUS M3A79-T Deluxe 4-21 Adjust speaker volume This screen helps you speak. Adjust microphone volume This screen helps you have installed.
Jack configuration This screen helps you configure your computer's audio ports, depending on the audio devices you have made. You will be asked to read prewritten text to allow the AudioWizard to hear the changes you adjust microphone volume. Click the Test button to adjust the volume as you adjust speaker volume. ASUS M3A79-T Deluxe 4-21 Adjust speaker volume This screen helps you speak. Adjust microphone volume This screen helps you have installed.

