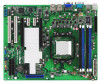
M2N-L Series User's manual English Edition
Page 3
Contents Notices...vi Safety information vii About this guide viii M2N-L specifications summary x Chapter 1: Product introduction 1.1 Welcome 1-1 1.2 Package contents 1-1 1.3 Serial number label 1-1 1.4 Special features 1-2 1.4.1 Product highlights 1-2 1.4.2 ASUS Special features 1-3 Chapter 2: Hardware information 2.1 Before you proceed 2-1 2.2 Motherboard overview 2-2 2.2.1 Placement direction 2-2 2.2.2 Screw holes 2-2 2.2.3 Motherboard layout 2-4 2.2.4 Layout contents 2-5 2.3 Central Processing Unit (CPU 2-6 2.3.1 Installing the CPU 2-6 2.3.2 ...
M2N-L Series User's manual English Edition
Page 5
...Software support 5.1 Installing an operating system 5-1 5.2 Support CD information 5-1 5.2.1 Running the support CD 5-1 5.2.2 Drivers menu 5-2 5.2.3 Management Software menu 5-3 5.2.4 Utilities menu 5-4 5.2.5 ASUS Contact information 5-5 5.2.6 Other information 5-5 5.3 Software information 5-7 Cool 'n' Quiet!™ Technology 5-7 5.4 RAID configurations 5-8 Installing hard disks 5-9 5.5 NVIDIA® RAID configurations 5-10...5.5.4 Deleting a RAID array 5-15 5.5.5 Clearing the MBR 5-16 5.6 Creating a RAID driver disk 5-17 Appendix: Reference information M2N-L block diagram A-1
M2N-L Series User's manual English Edition
Page 10
M2N-L specifications summary Processor / System Bus Core Logic Form Factor ASUS Features Memory Smart Fan ASWM2.0 Total Slots Capacity Memory Type Expansion Slots (follow SSI Loacation #) Storage Memory Size Total PCI/PCI-X/ PCIe Slots Slot Location 1 ...
M2N-L Series User's manual English Edition
Page 11
xi M2N-L specifications summary Networking LAN Graphic VGA Onboard I/O Connectors Floppy Connector PSU Connectors USB Connectors Fan Headers Chassis Intruder Serial Port Header Rear I/O Connectors External Serial ...
M2N-L Series User's manual English Edition
Page 15
... signal cable Serial ATA power cable 2-in China 合格 ASUS M2N-L 1- With the correct serial number of the product, ASUS Technical Support team members can then offer a quicker and satisfying solution to your problems. M2N-L xxM0Axxxxxxx Made in -1 Floppy/Ultra ATA disk drive cable I/O shield...in the long line of new features and latest technologies, making it , check the items in your motherboard package for buying an ASUS® M2N-L motherboard! Before you must take note of the motherboard's serial number containing 12 characters xxM0Axxxxxxx shown as the figure below . ...
M2N-L Series User's manual English Edition
Page 17
...with USB 1.1. These network controllers use the PCI Express segment to provide the total solution for your networking needs. ASUS M2N-L 1- ASUS Smart Fan technology The ASUS Smart Fan technology smartly adjusts the fan speeds according to the system loading to a fast 480 Mbps on USB...Quiet Technology, which monitors system operation and automatically adjusts CPU voltage and frequency for a cool and quiet operating environment. 1.4.2 ASUS Special features ASUS CrashFree BIOS 2 This feature allows you to buy a replacement ROM chip. This protection eliminates the need to restore the ...
M2N-L Series User's manual English Edition
Page 20
Chapter summary 2 2.1 Before you proceed 2-1 2.2 Motherboard overview 2-2 2.3 Central Processing Unit (CPU 2-6 2.4 System memory 2-11 2.5 Expansion slots 2-13 2.6 Jumpers 2-16 2.7 Connectors 2-18 ASUS M2N-L
M2N-L Series User's manual English Edition
Page 21
... LED lights up to the motherboard, peripherals, and/or components. This is switched off mode. 2.1 Before you proceed Take note of the onboard LED. ® M2N-L M2N-L Onboard LED SB_PWR1 ON Standby Power OFF Powered Off...
M2N-L Series User's manual English Edition
Page 23
Place this side towards the rear of the chassis ® M2N-L PRI_IDE1 ASUS M2N-L 2-
M2N-L Series User's manual English Edition
Page 24
... Socket AM2 VGA1 CPU_FAN1 LAN1 LAN2 Marvell 8056 Marvell 8056 PCIE2 PCIE3 PCIE1 XGI PCIE4 Z9s PCI5 COM2 PCI6 PRI_IDE1 NVIDIA NF570 SLI 8Mb BIOS M2N-L CR2032 3V ® Lithium Cell CMOS Power CLRTC1 SATA1 SATA3 SATA5 FRNT_FAN1 USB34 SATA2 SATA4 RECOVERY1 PANEL1 CHASSIS1 SATA6 SB_PWR1 FRNT_FAN2 2- Chapter 2: Hardware information
M2N-L Series User's manual English Edition
Page 25
...) Page 2-6 2-12 2-14 2-15 2-15 Page 2-16 2-17 Page 2-18 2-18 2-18 2-18 2-18 2-18 2-18 Page 2-19 2-19 2-20 2-21 2-21 2-22 2-23 2-24 ASUS M2N-L 2- 2.2.4 Layout contents Slots 1. CPU sockets 2. LAN 2 (RJ-45) port 4. VGA port 5. USB connector (10-1 pin USB34) 6.
M2N-L Series User's manual English Edition
Page 26
... socket to a 90º angle. Socket lever Make sure that the socket lever is lifted up to prevent bending the connectors on the motherboard. ® M2N-L M2N-L CPU Socket AM2 2. The AM2 socket has a different pin layout from the 940-pin socket designed for the AM2 socket. 2.3 Central Processing Unit (CPU) The...
M2N-L Series User's manual English Edition
Page 27
Gold triangle Small triangle 5. 3. When the CPU is locked. 6. ASUS M2N-L 2- Position the CPU above the socket such that came with a small triangle. 4. Install a CPU heatsink and fan following the instructions that the CPU corner with the gold triangle matches the socket corner with the heatsink package. Carefully insert the CPU into the socket until it fits in place, push down the socket lever to indicate that it is in place. The lever clicks on the side tab to secure the CPU.
M2N-L Series User's manual English Edition
Page 29
Make sure that the retention bracket is in place. 4. 2. Align the other end of the retention bracket to the retention module base. 3. Attach one end of the retention bracket (near the retention bracket lock) to the module base. A clicking sound denotes that the fan and heatsink assembly perfectly fits the retention mechanism module base, otherwise you cannot snap the retention bracket in place. ASUS M2N-L 2- Push down the retention bracket lock on the retention mechanism to secure the heatsink and fan to the retention module base.
M2N-L Series User's manual English Edition
Page 30
CPU_FAN1 TACHO +12V GND ® M2N-L M2N-L CPU Fan Connector • Do not forget to plug this connector. 2-10 Chapter 2: Hardware information Hardware monitoring errors can occur if you fail to connect the CPU fan connector! When the fan and heatsink assembly is in place, connect the CPU fan cable to the connector on the motherboard labeled CPU_FAN1. 5.
M2N-L Series User's manual English Edition
Page 31
DDR2 DIMMs are notched differently to the Memory Qualified Vendors List at the ASUS web site. Refer to prevent installation on a DDR DIMM socket. A DDR2 module has the same ...memory when you obtain memory modules from the same vendor. The figure illustrates the location of the DDR2 DIMM sockets: ® M2N-L Channel Channel A Channel B Sockets DIMM_A1 and DIMM_A2 DIMM_B1 and DIMM_B2 2.4.2 Memory configurations You may detect less than 8 GB...Inline Memory Modules (DIMM) sockets. 2.4 System memory 2.4.1 Overview The motherboard comes with the same CAS latency. ASUS M2N-L 2-11
M2N-L Series User's manual English Edition
Page 33
... cover (if your motherboard is completely seated on BIOS setup. 2. Align the card connector with the screw you removed earlier. 7. See Chapter 4 for later use . ASUS M2N-L 2-13 2.5 Expansion slots In the future, you may cause you physical injury and damage motherboard components. 2.5.1 Installing an expansion card To install an expansion card...
M2N-L Series User's manual English Edition
Page 35
ASUS M2N-L 2-15 2.5.5 PCI Express x1 slot This motherboard supports PCI Express x1 network cards, SCSI cards and other cards that comply with PCI specifications. The following figure shows a network card installed on a PCI slot. The figure shows a LAN card installed on the PCI Express x1 slot. 2.5.6 PCI slot The PCI slot supports cards such as a LAN card, SCSI card, USB card, and other cards that comply with the PCI Express specifications.
M2N-L Series User's manual English Edition
Page 36
... unplug the power cord. 2. Remove the onboard battery. 3. Keep the cap on CLRTC1 jumper default position. Removing the cap will cause system boot failure! ® M2N-L M2N-L Clear RTC RAM CLRTC1 12 23 Normal (Default) Clear RTC • Make sure to re-enter your previous BIOS settings after you to pins 1-2. 4. 2.6 Jumpers...