User Manual
Page 4
... PnP 2-10 2.4.6 USB Configuration 2-10 2.5 Power menu 2-11 2.5.1 Suspend Mode 2-11 2.5.2 ACPI 2.0 Support 2-11 2.5.3 ACPI APIC Support 2-11 2.5.4 APM Configuration 2-12 2.5.5 HW Monitor Configuration 2-12 2.6 Boot menu 2-13 2.6.1 Boot Device Priority 2-13 2.6.2 Boot Settings Configuration 2-13 2.6.3 Security 2-14 2.7 Tools menu 2-15 2.7.1 ASUS EZ Flash 2 2-15 2.7.2 AI NET 2 2-15 2.8 Exit menu 2-15 iv
... PnP 2-10 2.4.6 USB Configuration 2-10 2.5 Power menu 2-11 2.5.1 Suspend Mode 2-11 2.5.2 ACPI 2.0 Support 2-11 2.5.3 ACPI APIC Support 2-11 2.5.4 APM Configuration 2-12 2.5.5 HW Monitor Configuration 2-12 2.6 Boot menu 2-13 2.6.1 Boot Device Priority 2-13 2.6.2 Boot Settings Configuration 2-13 2.6.3 Security 2-14 2.7 Tools menu 2-15 2.7.1 ASUS EZ Flash 2 2-15 2.7.2 AI NET 2 2-15 2.8 Exit menu 2-15 iv

User Manual
Page 16
... system passwords. Move the jumper cap from pins 1-2 (default) to overclocking, use the CPU Parameter Recall (C.P.R.) feature. Shut down the key during the boot process and enter BIOS setup to wake up the computer from S3 and S4 sleep modes (no power to additional USB ports. 1-7 Chapter 1: Product introduction...enter data. The USBPW5-10 jumper is for about 5-10 seconds, then move the jumper again to pins 1-2. 3. Removing the cap will cause system boot failure! • If the steps above do not need to clear the RTC when the system hangs due to default values. 2. To erase the...
... system passwords. Move the jumper cap from pins 1-2 (default) to overclocking, use the CPU Parameter Recall (C.P.R.) feature. Shut down the key during the boot process and enter BIOS setup to wake up the computer from S3 and S4 sleep modes (no power to additional USB ports. 1-7 Chapter 1: Product introduction...enter data. The USBPW5-10 jumper is for about 5-10 seconds, then move the jumper again to pins 1-2. 3. Removing the cap will cause system boot failure! • If the steps above do not need to clear the RTC when the system hangs due to default values. 2. To erase the...
User Manual
Page 21
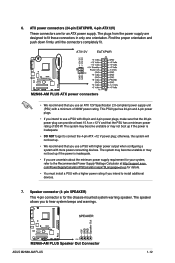
...You must install a PSU with 20-pin and 4-pin power plugs, make sure that the PSU has a minimum power rating of 300W power rating. ASUS M2N68-AM PLUS 1-12 Find the proper orientation and push down firmly until the connectors completely fit. • We recommend that you use an ATX 12V Specification 2.0‑...24-pin and 4-pin power plugs. • If you to connect the 4-pin ATX +12 V power plug; The system may become unstable or may not boot up . • We recommend that you use a PSU with a higher power rating if you are designed to use a PSU with higher power output when...
...You must install a PSU with 20-pin and 4-pin power plugs, make sure that the PSU has a minimum power rating of 300W power rating. ASUS M2N68-AM PLUS 1-12 Find the proper orientation and push down firmly until the connectors completely fit. • We recommend that you use an ATX 12V Specification 2.0‑...24-pin and 4-pin power plugs. • If you to connect the 4-pin ATX +12 V power plug; The system may become unstable or may not boot up . • We recommend that you use a PSU with a higher power rating if you are designed to use a PSU with higher power output when...
User Manual
Page 26
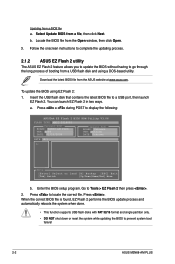
...complete the updating process. 2.1.2 ASUS EZ Flash 2 utility The ASUS EZ Flash 2 feature allows you to update the BIOS without having to display the following: ASUSTek EZ Flash 2 BIOS ROM Utility V3.06 FLASH TYPE: MXIC 25L8005 Current ROM BOARD: M2N68-AM PLUS VER: 0208 DATE: 01/16...Press to Tools > EZ Flash 2 then press . 2. Insert the USB flash disk that contains the latest BIOS file to prevent system boot failure! 2-2 ASUS M2N68-AM PLUS When the correct BIOS file is found, EZ Flash 2 performs the BIOS update process and automatically reboots the system when done. • ...
...complete the updating process. 2.1.2 ASUS EZ Flash 2 utility The ASUS EZ Flash 2 feature allows you to update the BIOS without having to display the following: ASUSTek EZ Flash 2 BIOS ROM Utility V3.06 FLASH TYPE: MXIC 25L8005 Current ROM BOARD: M2N68-AM PLUS VER: 0208 DATE: 01/16...Press to Tools > EZ Flash 2 then press . 2. Insert the USB flash disk that contains the latest BIOS file to prevent system boot failure! 2-2 ASUS M2N68-AM PLUS When the correct BIOS file is found, EZ Flash 2 performs the BIOS update process and automatically reboots the system when done. • ...
User Manual
Page 27
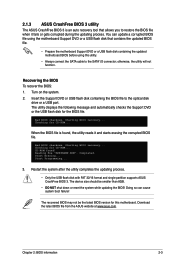
You can cause system boot failure! Checking for CD-ROM... Checking for CD-ROM... Restart the system after the utility completes the updating process. • Only the USB flash disk with FAT 32/16 format and single partition supports ASUS CrashFree BIOS 3. The recovered BIOS...file using the motherboard Support DVD or a USB flash disk that allows you to the optical disk drive or a USB port. 2.1.3 ASUS CrashFree BIOS 3 utility The ASUS CrashFree BIOS 3 is found ! Turn on the system. 2. Starting BIOS recovery... Starting BIOS recovery... Start Programming... 3. Reading file ...
You can cause system boot failure! Checking for CD-ROM... Checking for CD-ROM... Restart the system after the utility completes the updating process. • Only the USB flash disk with FAT 32/16 format and single partition supports ASUS CrashFree BIOS 3. The recovered BIOS...file using the motherboard Support DVD or a USB flash disk that allows you to the optical disk drive or a USB port. 2.1.3 ASUS CrashFree BIOS 3 utility The ASUS CrashFree BIOS 3 is found ! Turn on the system. 2. Starting BIOS recovery... Starting BIOS recovery... Start Programming... 3. Reading file ...
User Manual
Page 28
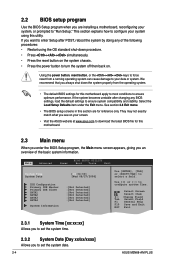
... to set the system time. 2.3.2 System Date [Day xx/xx/xxxx] Allows you to ensure optimum performance. Main Advanced Power BIOS SETUP UTILITY Boot Tools Exit System Time 19:34:30] System Date [Wed 08/27/2008] IDE Configuration Primary IDE Master Primary IDE Slave SATA1 SATA2 SATA3 SATA4... Tab Select Field F1 General Help F10 Save and Exit ESC Exit 2.3.1 System Time [xx:xx:xx] Allows you to set the system date. 2-4 ASUS M2N68-AM PLUS We recommend that you always shut down procedure. • Press ++ simultaneously. • Press the reset button on . If you want to enter Setup...
... to set the system time. 2.3.2 System Date [Day xx/xx/xxxx] Allows you to ensure optimum performance. Main Advanced Power BIOS SETUP UTILITY Boot Tools Exit System Time 19:34:30] System Date [Wed 08/27/2008] IDE Configuration Primary IDE Master Primary IDE Slave SATA1 SATA2 SATA3 SATA4... Tab Select Field F1 General Help F10 Save and Exit ESC Exit 2.3.1 System Time [xx:xx:xx] Allows you to set the system date. 2-4 ASUS M2N68-AM PLUS We recommend that you always shut down procedure. • Press ++ simultaneously. • Press the reset button on . If you want to enter Setup...
User Manual
Page 30
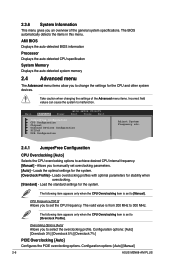
... Overclocking item is set overclocking parameters. [Auto] - Configuration options: [Auto] [Manual] 2-6 ASUS M2N68-AM PLUS The BIOS automatically detects the items in this menu. Take caution when changing the settings of the general system specifications. Main Advanced Power BIOS SETUP UTILITY Boot Tools Exit JumperFree Configuration CPU Configuration Chipset Onboard Devices Configuration PCIPnP USB...
... Overclocking item is set overclocking parameters. [Auto] - Configuration options: [Auto] [Manual] 2-6 ASUS M2N68-AM PLUS The BIOS automatically detects the items in this menu. Take caution when changing the settings of the general system specifications. Main Advanced Power BIOS SETUP UTILITY Boot Tools Exit JumperFree Configuration CPU Configuration Chipset Onboard Devices Configuration PCIPnP USB...
User Manual
Page 34
... menu items. Incorrect field values can cause the system to display the configuration options. Configuration options: [Auto] [Disabled] Onboard LAN Boot ROM [Disabled] Allows you to select the Parallel Port base addresses. The menu includes setting IRQ and DMA channel resources for either.... USB Functions [Enabled] Allows you to enable or disable the USB functions.Configuration options: [Disabled] [Enabled] 2-10 ASUS M2N68-AM PLUS Configuration options: [Enabled] [Disabled] MCP68SE ACPI HPET TABLE [Enabled] Allows you to enable or disable the MCP68SE ACPI HPET TABLE.
... menu items. Incorrect field values can cause the system to display the configuration options. Configuration options: [Auto] [Disabled] Onboard LAN Boot ROM [Disabled] Allows you to select the Parallel Port base addresses. The menu includes setting IRQ and DMA channel resources for either.... USB Functions [Enabled] Allows you to enable or disable the USB functions.Configuration options: [Disabled] [Enabled] 2-10 ASUS M2N68-AM PLUS Configuration options: [Enabled] [Disabled] MCP68SE ACPI HPET TABLE [Enabled] Allows you to enable or disable the MCP68SE ACPI HPET TABLE.

User Manual
Page 37
... options: [Removable Dev.] [Hard Drive] [ATAPI CDROM ] [Disabled] 2.6.2 Boot Settings Configuration Quick Boot [Enabled] Enabling this item to [Enabled] to use the ASUS MyLogo 2™ feature. When set the CD-ROM drive as the first boot device. 2.6.1 Boot Device Priority 1st ~ xxth Boot Device These items specify the boot device priority sequence from the available devices. Configuration...
... options: [Removable Dev.] [Hard Drive] [ATAPI CDROM ] [Disabled] 2.6.2 Boot Settings Configuration Quick Boot [Enabled] Enabling this item to [Enabled] to use the ASUS MyLogo 2™ feature. When set the CD-ROM drive as the first boot device. 2.6.1 Boot Device Priority 1st ~ xxth Boot Device These items specify the boot device priority sequence from the available devices. Configuration...
User Manual
Page 39
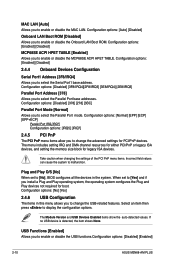
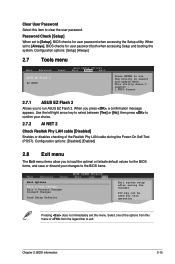
...changes to clear the user password. Configuration options: [Setup] [Always] 2.7 Tools menu Main Advanced ASUS EZ Flash 2 AI NET2 Power BIOS SETUP UTILITY Boot Tools Exit Press ENTER to run ASUS EZ Flash 2. F10 key can be used for user password when accessing the Setup utility. Select one... password both when accessing Setup and booting the system. Use the left/right arrow key to select between [Yes] or [No], then press to exit. Password Check [Setup] When set to select and update BIOS. This utility doesn't support : 1.NTFS format 2.7.1 ASUS EZ Flash 2 Allows you to ...
...changes to clear the user password. Configuration options: [Setup] [Always] 2.7 Tools menu Main Advanced ASUS EZ Flash 2 AI NET2 Power BIOS SETUP UTILITY Boot Tools Exit Press ENTER to run ASUS EZ Flash 2. F10 key can be used for user password when accessing the Setup utility. Select one... password both when accessing Setup and booting the system. Use the left/right arrow key to select between [Yes] or [No], then press to exit. Password Check [Setup] When set to select and update BIOS. This utility doesn't support : 1.NTFS format 2.7.1 ASUS EZ Flash 2 Allows you to ...


