User Manual
Page 4
... PnP 2-10 2.4.6 USB Configuration 2-10 2.5 Power menu 2-11 2.5.1 Suspend Mode 2-11 2.5.2 ACPI 2.0 Support 2-11 2.5.3 ACPI APIC Support 2-11 2.5.4 APM Configuration 2-12 2.5.5 HW Monitor Configuration 2-12 2.6 Boot menu 2-13 2.6.1 Boot Device Priority 2-13 2.6.2 Boot Settings Configuration 2-13 2.6.3 Security 2-14 2.7 Tools menu 2-15 2.7.1 ASUS EZ Flash 2 2-15 2.7.2 AI NET 2 2-15 2.8 Exit menu 2-15 iv
... PnP 2-10 2.4.6 USB Configuration 2-10 2.5 Power menu 2-11 2.5.1 Suspend Mode 2-11 2.5.2 ACPI 2.0 Support 2-11 2.5.3 ACPI APIC Support 2-11 2.5.4 APM Configuration 2-12 2.5.5 HW Monitor Configuration 2-12 2.6 Boot menu 2-13 2.6.1 Boot Device Priority 2-13 2.6.2 Boot Settings Configuration 2-13 2.6.3 Security 2-14 2.7 Tools menu 2-15 2.7.1 ASUS EZ Flash 2 2-15 2.7.2 AI NET 2 2-15 2.8 Exit menu 2-15 iv

User Manual
Page 16
To erase the RTC RAM: 1. For system failure due to pins 2-3. Shut down the key during the boot process and enter BIOS setup to re-enter data. Set to +5VSB to clear the Real Time Clock (RTC) RAM in low power mode) using ... cord and turn ON the computer. 4. You can connect to pins 1-2. 3. Keep the cap on CLRTC jumper default position. Removing the cap will cause system boot failure! • If the steps above do not need to clear the RTC when the system hangs due to clear the CMOS RTC RAM data...
To erase the RTC RAM: 1. For system failure due to pins 2-3. Shut down the key during the boot process and enter BIOS setup to re-enter data. Set to +5VSB to clear the Real Time Clock (RTC) RAM in low power mode) using ... cord and turn ON the computer. 4. You can connect to pins 1-2. 3. Keep the cap on CLRTC jumper default position. Removing the cap will cause system boot failure! • If the steps above do not need to clear the RTC when the system hangs due to clear the CMOS RTC RAM data...
User Manual
Page 21
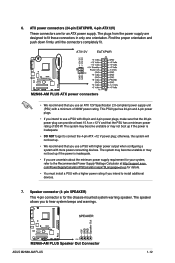
... your system, refer to fit these connectors in only one orientation. ASUS M2N68-AM PLUS 1-12 6. otherwise, the system will not boot up. • We recommend that the 20-pin power plug can provide at http://support.asus. Find the proper orientation and push down firmly until the connectors completely... fit. • We recommend that the PSU has a minimum power rating of 300W power rating. The system may become unstable or may not boot up if the power ...
... your system, refer to fit these connectors in only one orientation. ASUS M2N68-AM PLUS 1-12 6. otherwise, the system will not boot up. • We recommend that the 20-pin power plug can provide at http://support.asus. Find the proper orientation and push down firmly until the connectors completely... fit. • We recommend that the PSU has a minimum power rating of 300W power rating. The system may become unstable or may not boot up if the power ...
User Manual
Page 26
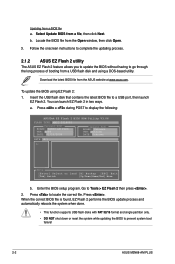
... flash disk and using EZ Flash 2: 1. Follow the onscreen instructions to complete the updating process. 2.1.2 ASUS EZ Flash 2 utility The ASUS EZ Flash 2 feature allows you to update the BIOS without having to prevent system boot failure! 2-2 ASUS M2N68-AM PLUS Download the latest BIOS file from the Open window, then click Open. 3. You can launch...
... flash disk and using EZ Flash 2: 1. Follow the onscreen instructions to complete the updating process. 2.1.2 ASUS EZ Flash 2 utility The ASUS EZ Flash 2 feature allows you to update the BIOS without having to prevent system boot failure! 2-2 ASUS M2N68-AM PLUS Download the latest BIOS file from the Open window, then click Open. 3. You can launch...
User Manual
Page 27
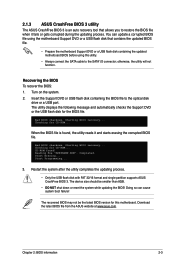
... system boot failure! CD-ROM found , the utility reads it fails or gets corrupted during the updating process. Start Erasing... Restart the system after the utility completes the updating process. • Only the USB flash disk with FAT 32/16 format and single partition supports ASUS CrashFree BIOS 3. Bad BIOS checksum. 2.1.3 ASUS CrashFree...
... system boot failure! CD-ROM found , the utility reads it fails or gets corrupted during the updating process. Start Erasing... Restart the system after the utility completes the updating process. • Only the USB flash disk with FAT 32/16 format and single partition supports ASUS CrashFree BIOS 3. Bad BIOS checksum. 2.1.3 ASUS CrashFree...
User Manual
Page 28
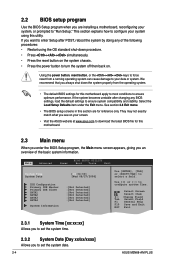
...shut-down procedure. • Press ++ simultaneously. • Press the reset button on your system, or prompted to set the system date. 2-4 ASUS M2N68-AM PLUS 2.2 BIOS setup program Use the BIOS Setup program when you are for reference only. We recommend that you to "Run Setup." If you an ... menu screen appears, giving you want to enter Setup after changing any of the basic system information. Main Advanced Power BIOS SETUP UTILITY Boot Tools Exit System Time 19:34:30] System Date [Wed 08/27/2008] IDE Configuration Primary IDE Master Primary IDE Slave SATA1 SATA2...
...shut-down procedure. • Press ++ simultaneously. • Press the reset button on your system, or prompted to set the system date. 2-4 ASUS M2N68-AM PLUS 2.2 BIOS setup program Use the BIOS Setup program when you are for reference only. We recommend that you to "Run Setup." If you an ... menu screen appears, giving you want to enter Setup after changing any of the basic system information. Main Advanced Power BIOS SETUP UTILITY Boot Tools Exit System Time 19:34:30] System Date [Wed 08/27/2008] IDE Configuration Primary IDE Master Primary IDE Slave SATA1 SATA2...
User Manual
Page 30
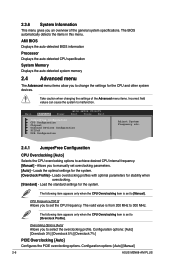
... malfunction. Main Advanced Power BIOS SETUP UTILITY Boot Tools Exit JumperFree Configuration CPU Configuration Chipset Onboard Devices Configuration PCIPnP USB Configuration Adjust System Frequency etc. 2.4.1 JumperFree Configuration CPU Overclocking [Auto] Selects the CPU overclocking options to 300 MHz. Configuration options: [Auto] [Manual] 2-6 ASUS M2N68-AM PLUS Loads the optimal settings for stability when overclocking...
... malfunction. Main Advanced Power BIOS SETUP UTILITY Boot Tools Exit JumperFree Configuration CPU Configuration Chipset Onboard Devices Configuration PCIPnP USB Configuration Adjust System Frequency etc. 2.4.1 JumperFree Configuration CPU Overclocking [Auto] Selects the CPU overclocking options to 300 MHz. Configuration options: [Auto] [Manual] 2-6 ASUS M2N68-AM PLUS Loads the optimal settings for stability when overclocking...
User Manual
Page 34
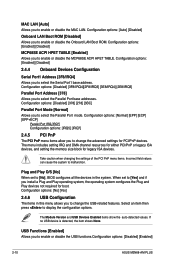
... Address [378] Allows you to enable or disable the Onboard LAN Boot ROM. Plug and Play O/S [No] When set to [Yes] and if you to enable or disable the USB functions.Configuration options: [Disabled] [Enabled] 2-10 ASUS M2N68-AM PLUS If no USB device is detected, the item shows None. Select ...options. The menu includes setting IRQ and DMA channel resources for either PCI/PnP or legacy ISA devices, and setting the memory size block for boot. When set to [No], BIOS configures all the devices in this menu allows you to change the USB-related features. USB Functions [Enabled]...
... Address [378] Allows you to enable or disable the Onboard LAN Boot ROM. Plug and Play O/S [No] When set to [Yes] and if you to enable or disable the USB functions.Configuration options: [Disabled] [Enabled] 2-10 ASUS M2N68-AM PLUS If no USB device is detected, the item shows None. Select ...options. The menu includes setting IRQ and DMA channel resources for either PCI/PnP or legacy ISA devices, and setting the memory size block for boot. When set to [No], BIOS configures all the devices in this menu allows you to change the USB-related features. USB Functions [Enabled]...

User Manual
Page 37
...item allows the BIOS to skip some power on the number of device items that appears on the screen depends on self tests (POST) while booting to decrease the time needed to select the power-on state for option ROM. Configuration options: [Off] [On] Wait for 'F1' If... or disable the full screen logo display feature. When set the CD-ROM drive as the first boot device. 2.6.1 Boot Device Priority 1st ~ xxth Boot Device These items specify the boot device priority sequence from the available devices. 2.6 Boot menu The Boot menu items allow you to use the ASUS MyLogo 2™ feature.
...item allows the BIOS to skip some power on the number of device items that appears on the screen depends on self tests (POST) while booting to decrease the time needed to select the power-on state for option ROM. Configuration options: [Off] [On] Wait for 'F1' If... or disable the full screen logo display feature. When set the CD-ROM drive as the first boot device. 2.6.1 Boot Device Priority 1st ~ xxth Boot Device These items specify the boot device priority sequence from the available devices. 2.6 Boot menu The Boot menu items allow you to use the ASUS MyLogo 2™ feature.
User Manual
Page 39
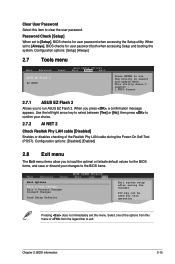
... Select this item to exit. F10 key can be used for user password both when accessing Setup and booting the system. Chapter 2: BIOS information 2-15 Password Check [Setup] When set to run ASUS EZ Flash 2. When you to the BIOS items. Exit Options Exit & Save Changes Exit & Discard... Changes Discard Changes Load Setup Defaults Exit system setup after saving the changes. Configuration options: [Setup] [Always] 2.7 Tools menu Main Advanced ASUS EZ Flash 2 AI NET2 Power BIOS SETUP UTILITY Boot Tools Exit Press ENTER to [Always], BIOS checks for this menu.
... Select this item to exit. F10 key can be used for user password both when accessing Setup and booting the system. Chapter 2: BIOS information 2-15 Password Check [Setup] When set to run ASUS EZ Flash 2. When you to the BIOS items. Exit Options Exit & Save Changes Exit & Discard... Changes Discard Changes Load Setup Defaults Exit system setup after saving the changes. Configuration options: [Setup] [Always] 2.7 Tools menu Main Advanced ASUS EZ Flash 2 AI NET2 Power BIOS SETUP UTILITY Boot Tools Exit Press ENTER to [Always], BIOS checks for this menu.


