User Manual
Page 1
Notebook PC Hardware User's Manual Product Name: L5500, L5800, L5900 Manual Revision: 1 E1281 Release Date: May 2003
Notebook PC Hardware User's Manual Product Name: L5500, L5800, L5900 Manual Revision: 1 E1281 Release Date: May 2003
User Manual
Page 3
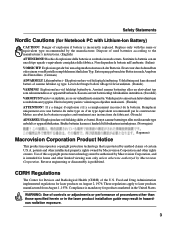
... type. Kassera använt batteri enligt fabrikantens instruktion. (Swedish) VAROITUS! Reverse engineering or disassembly is incorrectly replaced. Food and Drug Administration implemented regulations for Notebook PC with the same or equivalent type recommended by method claims of certain U.S.A. Replace only with Lithium-Ion Battery) CAUTION! Non disperdere le batterie nell...
... type. Kassera använt batteri enligt fabrikantens instruktion. (Swedish) VAROITUS! Reverse engineering or disassembly is incorrectly replaced. Food and Drug Administration implemented regulations for Notebook PC with the same or equivalent type recommended by method claims of certain U.S.A. Replace only with Lithium-Ion Battery) CAUTION! Non disperdere le batterie nell...
User Manual
Page 4
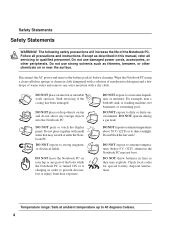
...explode. DO NOT expose to extreme temperatures above 50˚C (122˚F) or to extreme temperatures (below 0˚C (32˚F), otherwise the Notebook PC may not boot. DO NOT expose to direct sunlight. DO NOT throw batteries in order to or use damaged power cords, accessories, or ... Do not use near liquids, rain, or moisture. Seek servicing if the casing has been damaged. Do not block the fan vents! Wipe the Notebook PC using a clean cellulose sponge or chamois cloth dampened with a dry cloth. DO NOT expose to strong magnetic or electrical fields. DO NOT press...
...explode. DO NOT expose to extreme temperatures above 50˚C (122˚F) or to extreme temperatures (below 0˚C (32˚F), otherwise the Notebook PC may not boot. DO NOT expose to direct sunlight. DO NOT throw batteries in order to or use damaged power cords, accessories, or ... Do not use near liquids, rain, or moisture. Seek servicing if the casing has been damaged. Do not block the fan vents! Wipe the Notebook PC using a clean cellulose sponge or chamois cloth dampened with a dry cloth. DO NOT expose to strong magnetic or electrical fields. DO NOT press...
User Manual
Page 5
...on some models) does not contain a diskette when transporting the floppy disk drive. Charge Your Batteries If you intend to use the Notebook PC on people walking through airport Xray machines. There are three main types of the diskette when the floppy disk drive is plugged into... X-ray machines (used on items placed on conveyor belts), magnetic detectors (used on the airplane. Remember that you do not send your Notebook PC or diskettes through airport magnetic detectors or expose them to fully charge your floppy disk drive (external on long trips. NOTE: The surface...
...on some models) does not contain a diskette when transporting the floppy disk drive. Charge Your Batteries If you intend to use the Notebook PC on people walking through airport Xray machines. There are three main types of the diskette when the floppy disk drive is plugged into... X-ray machines (used on items placed on conveyor belts), magnetic detectors (used on the airplane. Remember that you do not send your Notebook PC or diskettes through airport magnetic detectors or expose them to fully charge your floppy disk drive (external on long trips. NOTE: The surface...
User Manual
Page 6
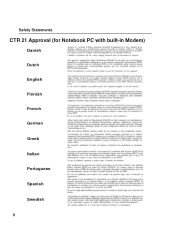
Safety Statements CTR 21 Approval (for Notebook PC with built-in Modem) Danish Dutch English Finnish French German Greek Italian Portuguese Spanish Swedish 6
Safety Statements CTR 21 Approval (for Notebook PC with built-in Modem) Danish Dutch English Finnish French German Greek Italian Portuguese Spanish Swedish 6
User Manual
Page 7
... to fire or explosion. Use only UL certified power adapters or batteries supplied by an irreversible or reversible chemical reaction. • Do not dispose the Notebook PC battery pack in a fire, as power sources in products. These batteries contain metallic lithium, or a lithium alloy, or a lithium ion, and... exceed 200V peak, 300V peak-to reduce the risk of a gas leak. Check with the National Electrical Code (NFPA 70). When using the Notebook PC modem, basic safety precautions should always be a remote risk of electric shock from other devices to -peak, and 105V rms, and installed ...
... to fire or explosion. Use only UL certified power adapters or batteries supplied by an irreversible or reversible chemical reaction. • Do not dispose the Notebook PC battery pack in a fire, as power sources in products. These batteries contain metallic lithium, or a lithium alloy, or a lithium ion, and... exceed 200V peak, 300V peak-to reduce the risk of a gas leak. Check with the National Electrical Code (NFPA 70). When using the Notebook PC modem, basic safety precautions should always be a remote risk of electric shock from other devices to -peak, and 105V rms, and installed ...

User Manual
Page 8
... Side ...16 Right Side ...18 Left Side ...18 Rear Side ...20 Front Side ...22 3. "Stand By" & "Hibernate 28 Power Management - Introducing the Notebook PC 11 About This User's Manual ...12 Notes For This Manual ...12 2. Getting Started 23 Using the Battery Pack ...24 Installing and Removing the Battery...Pack 24 Charging the Battery Pack 25 Battery Care ...25 Operating Systems ...25 Support Software ...25 Power Connection ...26 Powering ON The Notebook PC 27 The Power-On Self Test (POST 27 Power Management - "Stand By" & "Hibernate 28 Restarting or Rebooting ...28 Powering OFF the...
... Side ...16 Right Side ...18 Left Side ...18 Rear Side ...20 Front Side ...22 3. "Stand By" & "Hibernate 28 Power Management - Introducing the Notebook PC 11 About This User's Manual ...12 Notes For This Manual ...12 2. Getting Started 23 Using the Battery Pack ...24 Installing and Removing the Battery...Pack 24 Charging the Battery Pack 25 Battery Care ...25 Operating Systems ...25 Support Software ...25 Power Connection ...26 Powering ON The Notebook PC 27 The Power-On Self Test (POST 27 Power Management - "Stand By" & "Hibernate 28 Restarting or Rebooting ...28 Powering OFF the...
User Manual
Page 9
Contents Microsoft Windows™ Keys 33 Keyboard as Cursors ...34 CD Player Control Panel 35 4. Using the Notebook PC 37 Pointing Device ...38 Using the Touchpad ...38 Touchpad Usage Illustrations 38 TouchPad-Lock Button ...39 Caring for the Touchpad 40 Optical Drive ...41 ...
Contents Microsoft Windows™ Keys 33 Keyboard as Cursors ...34 CD Player Control Panel 35 4. Using the Notebook PC 37 Pointing Device ...38 Using the Touchpad ...38 Touchpad Usage Illustrations 38 TouchPad-Lock Button ...39 Caring for the Touchpad 40 Optical Drive ...41 ...

User Manual
Page 10
Contents Power State Summary ...53 Hard Disk Drive Upgrades ...54 Processor Upgrades ...54 System Memory Expansion 54 Appendix ...55 Optional Accessories...56 USB Hub (Optional) ...56 Wireless LAN Cardbus Card or USB (Optional 57 USB Flash Memory (Optional 57 USB Communication Cable (Optional 57 USB Keyboard & Mouse (Optional 58 Optional Connections ...59 Monitor Out Connection 59 External Audio Connections 59 IEEE1394 Connection ...60 Printer Connection ...60 Securing Your Notebook PC (Optional 60 Internal Modem Compliancy 61 Glossary ...63 Notebook PC Information ...68 10
Contents Power State Summary ...53 Hard Disk Drive Upgrades ...54 Processor Upgrades ...54 System Memory Expansion 54 Appendix ...55 Optional Accessories...56 USB Hub (Optional) ...56 Wireless LAN Cardbus Card or USB (Optional 57 USB Flash Memory (Optional 57 USB Communication Cable (Optional 57 USB Keyboard & Mouse (Optional 58 Optional Connections ...59 Monitor Out Connection 59 External Audio Connections 59 IEEE1394 Connection ...60 Printer Connection ...60 Securing Your Notebook PC (Optional 60 Internal Modem Compliancy 61 Glossary ...63 Notebook PC Information ...68 10

User Manual
Page 11
Introducing the Notebook PC About This User's Manual Notes For This Manual 11 1.
Introducing the Notebook PC About This User's Manual Notes For This Manual 11 1.
User Manual
Page 12
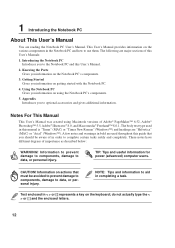
...; Appendix Introduces you information on the various components in < > or [ ] represents a key on getting started with the Notebook PC. 4. 1 Introducing the Notebook PC About This User's Manual You are "Helvetica" (MAC) or "Arial" (Windows™). These notes have different degrees of...prevent damage to components, damage to optional accessories and gives additional information. CAUTION! This User's Manual provides information on the Notebook PC's components. 3. Information to prevent damage to components, damage to aid in this guide that must be aware of this...
...; Appendix Introduces you information on the various components in < > or [ ] represents a key on getting started with the Notebook PC. 4. 1 Introducing the Notebook PC About This User's Manual You are "Helvetica" (MAC) or "Arial" (Windows™). These notes have different degrees of...prevent damage to components, damage to optional accessories and gives additional information. CAUTION! This User's Manual provides information on the Notebook PC's components. 3. Information to prevent damage to components, damage to aid in this guide that must be aware of this...
User Manual
Page 14
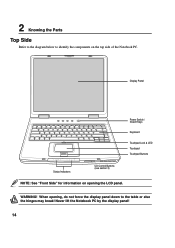
Never lift the Notebook PC by the display panel! 14 When opening the LCD panel. 2 Knowing the Parts Top Side Refer to the diagram below to identify the components on opening , do not force the display panel down to the table or else the hinges may break! WARNING! Display Panel Power Switch / Instant Keys Keyboard Touchpad Lock & LED Touchpad Touchpad Buttons Status Indicators CD Control Buttons (see section 3) NOTE: See "Front Side" for information on the top side of the Notebook PC.
Never lift the Notebook PC by the display panel! 14 When opening the LCD panel. 2 Knowing the Parts Top Side Refer to the diagram below to identify the components on opening , do not force the display panel down to the table or else the hinges may break! WARNING! Display Panel Power Switch / Instant Keys Keyboard Touchpad Lock & LED Touchpad Touchpad Buttons Status Indicators CD Control Buttons (see section 3) NOTE: See "Front Side" for information on the top side of the Notebook PC.
User Manual
Page 15
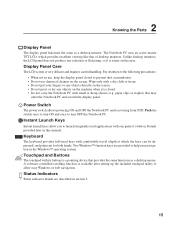
...following precautions: • When not in the Windows™ operating system. Power Switch The power switch allows powering ON and OFF the Notebook PC and recovering from STD. Keyboard The keyboard provides full-sized keys with its buttons is available after setting up the included touchpad ...to allow you to prevent dust accumulation. • Do not use , keep the display panel closed . • Do not carry the Notebook PC with one push of desktop monitors. Status Indicators Status indicator details are provided to help ease navigation in use chemical cleaners on the screen...
...following precautions: • When not in the Windows™ operating system. Power Switch The power switch allows powering ON and OFF the Notebook PC and recovering from STD. Keyboard The keyboard provides full-sized keys with its buttons is available after setting up the included touchpad ...to allow you to prevent dust accumulation. • Do not use , keep the display panel closed . • Do not carry the Notebook PC with one push of desktop monitors. Status Indicators Status indicator details are provided to help ease navigation in use chemical cleaners on the screen...
User Manual
Page 16
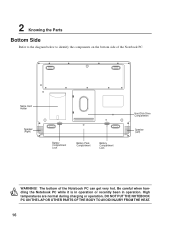
... (Right) Battery Compartment Lock Battery Pack Compartment Battery Compartment Lock Hard Disk Drive Compartment Speaker (Left) WARNING! The bottom of the Notebook PC. DO NOT PUT THE NOTEBOOK PC ON THE LAP OR OTHER PARTS OF THE BODY TO AVOID INJURY FROM THE HEAT. 16 High temperatures are normal during charging... or operation. 2 Knowing the Parts Bottom Side Refer to the diagram below to identify the components on the bottom side of the Notebook PC can get very hot. Be careful when handling the Notebook PC while it is in operation or recently been in operation.
... (Right) Battery Compartment Lock Battery Pack Compartment Battery Compartment Lock Hard Disk Drive Compartment Speaker (Left) WARNING! The bottom of the Notebook PC. DO NOT PUT THE NOTEBOOK PC ON THE LAP OR OTHER PARTS OF THE BODY TO AVOID INJURY FROM THE HEAT. 16 High temperatures are normal during charging... or operation. 2 Knowing the Parts Bottom Side Refer to the diagram below to identify the components on the bottom side of the Notebook PC can get very hot. Be careful when handling the Notebook PC while it is in operation or recently been in operation.
User Manual
Page 18
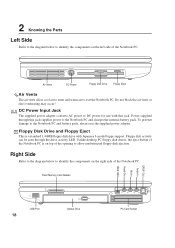
... opening to DC power for use the supplied power adapter. Right Side Refer to the diagram below to identify the components on top of the Notebook PC. DC IN DC Power Input Jack The supplied power adapter converts AC power to allow cool air to enter and warm air to the... Notebook PC and charges the internal battery pack. Floppy Disk Drive and Floppy Eject This is on the left side of the Notebook PC is a standard 1.44MB floppy disk drive with this jack supplies power to exit...
... opening to DC power for use the supplied power adapter. Right Side Refer to the diagram below to identify the components on top of the Notebook PC. DC IN DC Power Input Jack The supplied power adapter converts AC power to allow cool air to enter and warm air to the... Notebook PC and charges the internal battery pack. Floppy Disk Drive and Floppy Eject This is on the left side of the Notebook PC is a standard 1.44MB floppy disk drive with this jack supplies power to exit...
User Manual
Page 19
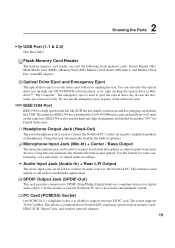
... Memory Stick Duo (with MS adapter). Audio Input Jack (Audio-In) + Rear L/R Output The stereo input jack can be used to the Notebook PC. SPDIF Output Jack (SPDIF-Out) This jack provides connection to multimedia applications. IEEE1394 is used to connect an audio source to connect an...microphone jack can be marked "DV" for opening the tray. Use this feature for digital audio output. The interface IEEE1394 has a bandwidth of Notebook PC expansion options such as memory cards, ISDN, SCSI, Smart Cards, and wireless network adapters. 19 Optical Drive Eject and Emergency Eject The...
... Memory Stick Duo (with MS adapter). Audio Input Jack (Audio-In) + Rear L/R Output The stereo input jack can be used to the Notebook PC. SPDIF Output Jack (SPDIF-Out) This jack provides connection to multimedia applications. IEEE1394 is used to connect an audio source to connect an...microphone jack can be marked "DV" for opening the tray. Use this feature for digital audio output. The interface IEEE1394 has a bandwidth of Notebook PC expansion options such as memory cards, ISDN, SCSI, Smart Cards, and wireless network adapters. 19 Optical Drive Eject and Emergency Eject The...
User Manual
Page 20
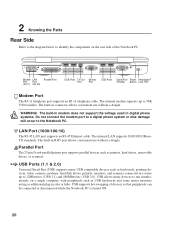
...parallel/printer port supports parallel devices such as additional plug-in RJ45 port allows convenient use without a dongle. USB supports hot-swapping of the Notebook PC. The built-in modem does not support the voltage used in a series up to 12Mbits/sec (USB 1.1) and 480Mbits/sec (USB ...2.0). 2 Knowing the Parts Rear Side Refer to the diagram below to the Notebook PC. USB allows many USB compatible devices such as keyboards, pointing devices, video cameras, modems, hard disk drives, printers, monitors, and scanners ...
...parallel/printer port supports parallel devices such as additional plug-in RJ45 port allows convenient use without a dongle. USB supports hot-swapping of the Notebook PC. The built-in modem does not support the voltage used in a series up to 12Mbits/sec (USB 1.1) and 480Mbits/sec (USB ...2.0). 2 Knowing the Parts Rear Side Refer to the diagram below to the Notebook PC. USB allows many USB compatible devices such as keyboards, pointing devices, video cameras, modems, hard disk drives, printers, monitors, and scanners ...

User Manual
Page 21
...projector to allow viewing on all standard video devices. reset Reset Button The reset button is provided for shutting down the Notebook PC if or turning OFF the power does not respond. These security products usually include a metal cable and lock that prevent the...inputs available on a larger external display. Kensington® Lock Port K The Kensington® lock port allows the Notebook PC to a television or video projection device using Kensington® compatible Notebook PC security products. TV-Out allows a high definition connection to be removed from a fixed object. To use ...
...projector to allow viewing on all standard video devices. reset Reset Button The reset button is provided for shutting down the Notebook PC if or turning OFF the power does not respond. These security products usually include a metal cable and lock that prevent the...inputs available on a larger external display. Kensington® Lock Port K The Kensington® lock port allows the Notebook PC to a television or video projection device using Kensington® compatible Notebook PC security products. TV-Out allows a high definition connection to be removed from a fixed object. To use ...
User Manual
Page 22
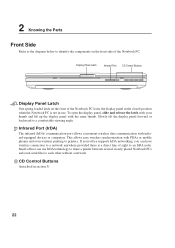
... without a network. Display Panel Latch Infrared Port CD Control Buttons Display Panel Latch One spring-loaded latch on the front side of the Notebook PC. To open the display panel, slide and release the latch with your office supports IrDA networking, you can use . If your ... offices can have wireless connection to a network anywhere provided there is not in use IrDA technology to share a printer between several closely placed Notebook PCs and even send files to a comfortable viewing angle. 2 Knowing the Parts Front Side Refer to the diagram below to identify the components...
... without a network. Display Panel Latch Infrared Port CD Control Buttons Display Panel Latch One spring-loaded latch on the front side of the Notebook PC. To open the display panel, slide and release the latch with your office supports IrDA networking, you can use . If your ... offices can have wireless connection to a network anywhere provided there is not in use IrDA technology to share a printer between several closely placed Notebook PCs and even send files to a comfortable viewing angle. 2 Knowing the Parts Front Side Refer to the diagram below to identify the components...

User Manual
Page 23
Stand By and Hibernate Restarting or Rebooting Powering OFF The Notebook PC Using the Keyboard Instant Launch Keys and Status Indicators 23 Getting Started Using the Battery Pack Operating Systems Power Connection Powering ON The Notebook PC Power Management - 3.
Stand By and Hibernate Restarting or Rebooting Powering OFF The Notebook PC Using the Keyboard Instant Launch Keys and Status Indicators 23 Getting Started Using the Battery Pack Operating Systems Power Connection Powering ON The Notebook PC Power Management - 3.


