User Manual
Page 4
... sunlight. DO NOT throw batteries in order to or use damaged power cords, accessories, or other chemicals on top and do not shove any extra moisture with a dry cloth. Seek servicing if the casing has been damaged. Check local codes for special battery disposal instructions. Do not use near liquids, rain, or moisture. Wipe the Notebook PC using a clean cellulose sponge...
... sunlight. DO NOT throw batteries in order to or use damaged power cords, accessories, or other chemicals on top and do not shove any extra moisture with a dry cloth. Seek servicing if the casing has been damaged. Check local codes for special battery disposal instructions. Do not use near liquids, rain, or moisture. Wipe the Notebook PC using a clean cellulose sponge...

User Manual
Page 8
Getting Started 23 Using the Battery Pack ...24 Installing and Removing the Battery Pack 24 Charging the Battery Pack 25 Battery Care ...25 Operating Systems ...25 Support Software ...25 Power Connection ...26 Powering ON The Notebook PC 27 The Power-On Self Test (POST 27 Power Management - Knowing the Parts 13 Top Side ...14 Bottom Side ...16 Right Side ...18 Left Side ...18 Rear Side ...20 Front Side ...22 3. "Stand By...
Getting Started 23 Using the Battery Pack ...24 Installing and Removing the Battery Pack 24 Charging the Battery Pack 25 Battery Care ...25 Operating Systems ...25 Support Software ...25 Power Connection ...26 Powering ON The Notebook PC 27 The Power-On Self Test (POST 27 Power Management - Knowing the Parts 13 Top Side ...14 Bottom Side ...16 Right Side ...18 Left Side ...18 Rear Side ...20 Front Side ...22 3. "Stand By...
User Manual
Page 9
... TouchPad-Lock Button ...39 Caring for the Touchpad 40 Optical Drive ...41 PC Card (PCMCIA) Socket 44 32-bit CardBus Support 44 Flash Memory Card Reader 44 Removing a PC Card (PCMCIA 44 Inserting a PC Card (PCMCIA 45 Modem and Network Connections 46 Modem Connection ...46 Modem Connection Example 47 Network Connection ...48 Network Connection Example 48 IR Wireless Communication 49 Guidelines for using IR communication 49 Enabling Infrared ...49 AC Power System ...50 AC Power System ...50 Battery Power...
... TouchPad-Lock Button ...39 Caring for the Touchpad 40 Optical Drive ...41 PC Card (PCMCIA) Socket 44 32-bit CardBus Support 44 Flash Memory Card Reader 44 Removing a PC Card (PCMCIA 44 Inserting a PC Card (PCMCIA 45 Modem and Network Connections 46 Modem Connection ...46 Modem Connection Example 47 Network Connection ...48 Network Connection Example 48 IR Wireless Communication 49 Guidelines for using IR communication 49 Enabling Infrared ...49 AC Power System ...50 AC Power System ...50 Battery Power...

User Manual
Page 10
Contents Power State Summary ...53 Hard Disk Drive Upgrades ...54 Processor Upgrades ...54 System Memory Expansion 54 Appendix ...55 Optional Accessories...56 USB Hub (Optional) ...56 Wireless LAN Cardbus Card or USB (Optional 57 USB Flash Memory (Optional 57 USB Communication Cable (Optional 57 USB Keyboard & Mouse (Optional 58 Optional Connections ...59 Monitor Out Connection 59 External Audio Connections 59 IEEE1394 Connection ...60 Printer Connection ...60 Securing Your Notebook PC (Optional 60 Internal Modem Compliancy 61 Glossary ...63 Notebook PC Information ...68 10
Contents Power State Summary ...53 Hard Disk Drive Upgrades ...54 Processor Upgrades ...54 System Memory Expansion 54 Appendix ...55 Optional Accessories...56 USB Hub (Optional) ...56 Wireless LAN Cardbus Card or USB (Optional 57 USB Flash Memory (Optional 57 USB Communication Cable (Optional 57 USB Keyboard & Mouse (Optional 58 Optional Connections ...59 Monitor Out Connection 59 External Audio Connections 59 IEEE1394 Connection ...60 Printer Connection ...60 Securing Your Notebook PC (Optional 60 Internal Modem Compliancy 61 Glossary ...63 Notebook PC Information ...68 10
User Manual
Page 14
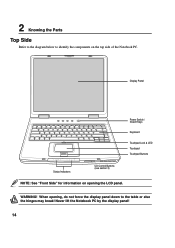
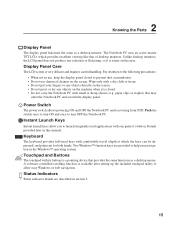
Never lift the Notebook PC by the display panel! 14 When opening the LCD panel. 2 Knowing the Parts Top Side Refer to the diagram below to identify the components on opening , do not force the display panel down to the table or else the hinges may break! WARNING! Display Panel Power Switch / Instant Keys Keyboard Touchpad Lock & LED Touchpad Touchpad Buttons Status Indicators CD Control Buttons (see section 3) NOTE: See "Front Side" for information on the top side of the Notebook PC.
Never lift the Notebook PC by the display panel! 14 When opening the LCD panel. 2 Knowing the Parts Top Side Refer to the diagram below to identify the components on opening , do not force the display panel down to the table or else the hinges may break! WARNING! Display Panel Power Switch / Instant Keys Keyboard Touchpad Lock & LED Touchpad Touchpad Buttons Status Indicators CD Control Buttons (see section 3) NOTE: See "Front Side" for information on the top side of the Notebook PC.
User Manual
Page 15
... display panel. Display Panel Care The LCD screen is available after setting up the included touchpad utility to turn OFF the Notebook PC. paper clips or staples) that of a button. 2 Knowing the Parts Display Panel The display panel functions the same as a desktop mouse. A software-controlled scrolling function is very delicate and requires careful handling. Power Switch The power switch allows powering ON and OFF the Notebook PC and recovering from STD. Details provided later in section 3. 15 Unlike desktop monitors...
... display panel. Display Panel Care The LCD screen is available after setting up the included touchpad utility to turn OFF the Notebook PC. paper clips or staples) that of a button. 2 Knowing the Parts Display Panel The display panel functions the same as a desktop mouse. A software-controlled scrolling function is very delicate and requires careful handling. Power Switch The power switch allows powering ON and OFF the Notebook PC and recovering from STD. Details provided later in section 3. 15 Unlike desktop monitors...
User Manual
Page 17
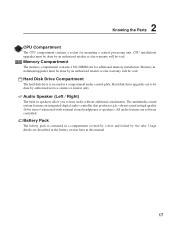
... the battery section later in a compartment covered by a door and locked by authorized service centers or dealers only. Audio Speaker (Left / Right) The built-in high quality 16-bit stereo (when used with external stereo headphones or speakers). Hard disk drive upgrades are to hear audio without additional attachments. Memory Compartment The memory compartment contains 1 SO-DIMM slot for mounting a central processing unit. 2 Knowing the Parts CPU...
... the battery section later in a compartment covered by a door and locked by authorized service centers or dealers only. Audio Speaker (Left / Right) The built-in high quality 16-bit stereo (when used with external stereo headphones or speakers). Hard disk drive upgrades are to hear audio without additional attachments. Memory Compartment The memory compartment contains 1 SO-DIMM slot for mounting a central processing unit. 2 Knowing the Parts CPU...
User Manual
Page 19
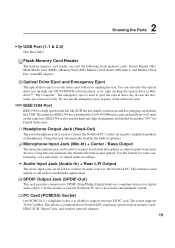
... of Notebook PC expansion options such as memory cards, ISDN, SCSI, Smart Cards, and wireless network adapters. 19 You can be used to connect an audio source to connect an external microphone or output signals from audio devices. Optical Drive Eject and Emergency Eject The optical drive eject is used mainly to add audio to SPDIF (Sony/Philips Digital Interface) compliant devices for opening the tray. Using this feature for Digital Video port. The socket supports...
... of Notebook PC expansion options such as memory cards, ISDN, SCSI, Smart Cards, and wireless network adapters. 19 You can be used to connect an audio source to connect an external microphone or output signals from audio devices. Optical Drive Eject and Emergency Eject The optical drive eject is used mainly to add audio to SPDIF (Sony/Philips Digital Interface) compliant devices for opening the tray. Using this feature for Digital Video port. The socket supports...
User Manual
Page 20
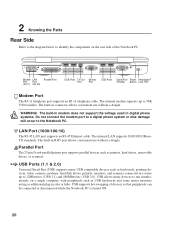
.... USB allows many USB compatible devices such as printers, hard drives, removable drives, or scanners. LAN Port (1000/100/10) The RJ-45 LAN port supports an RJ-45 Ethernet cable. Parallel Port The 25-pin D-sub parallel/printer port supports parallel devices such as keyboards, pointing devices, video cameras, modems, hard disk drives, printers, monitors, and scanners connected in connector allows convenient use without a dongle. The built-in a series up to the Notebook PC. WARNING! USB Ports (1.1 & 2.0) Universal Serial Bus (USB) supports many devices...
.... USB allows many USB compatible devices such as printers, hard drives, removable drives, or scanners. LAN Port (1000/100/10) The RJ-45 LAN port supports an RJ-45 Ethernet cable. Parallel Port The 25-pin D-sub parallel/printer port supports parallel devices such as keyboards, pointing devices, video cameras, modems, hard disk drives, printers, monitors, and scanners connected in connector allows convenient use without a dongle. The built-in a series up to the Notebook PC. WARNING! USB Ports (1.1 & 2.0) Universal Serial Bus (USB) supports many devices...

User Manual
Page 25
... part of the factory pre-install. The battery charge light turns OFF when the battery pack is turned ON. The support CD contains all drivers, utilities and software for this range will last over a year but how long beyond that the Notebook PC's internal temperature is disconnected from an authorized dealer for all rechargeable batteries, has a limit on territory) its original working order. It takes a few hours to external power...
... part of the factory pre-install. The battery charge light turns OFF when the battery pack is turned ON. The support CD contains all drivers, utilities and software for this range will last over a year but how long beyond that the Notebook PC's internal temperature is disconnected from an authorized dealer for all rechargeable batteries, has a limit on territory) its original working order. It takes a few hours to external power...
User Manual
Page 27
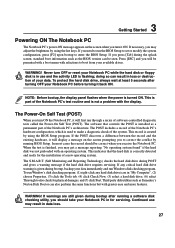
... the BIOS Setup to set or modify the system configuration, press [F2] upon bootup to enter the BIOS Setup. To protect the hard disk drive, always wait at least 5 seconds after running BIOS Setup. This record is installed as the BIOS version can be presented with a boot menu with an operating system. In most cases the record should take your Notebook PC before turning it ON. The S.M.A.R.T. (Self Monitoring and...
... the BIOS Setup to set or modify the system configuration, press [F2] upon bootup to enter the BIOS Setup. To protect the hard disk drive, always wait at least 5 seconds after running BIOS Setup. This record is installed as the BIOS version can be presented with a boot menu with an operating system. In most cases the record should take your Notebook PC before turning it ON. The S.M.A.R.T. (Self Monitoring and...
User Manual
Page 30
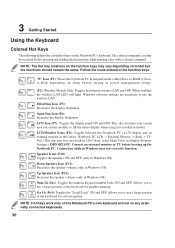
... power management setup). (F2): Wireless Models Only: Toggles the internal wireless LAN and OFF. LCD/Monitor Icons (F8): Toggles between the Notebook PC's LCD display and an external monitor in this series: Notebook PC LCD -> External Monitor -> Both -> TVOut. (This function does not work only on the Notebook PC's own keyboard and not on the Notebook PC's keyboard. Scr Lk (Del): Toggles the "Scroll Lock" ON and OFF. When enabled, the wireless LAN LED will light. Allows you to fill the entire display when using...
... power management setup). (F2): Wireless Models Only: Toggles the internal wireless LAN and OFF. LCD/Monitor Icons (F8): Toggles between the Notebook PC's LCD display and an external monitor in this series: Notebook PC LCD -> External Monitor -> Both -> TVOut. (This function does not work only on the Notebook PC's own keyboard and not on the Notebook PC's keyboard. Scr Lk (Del): Toggles the "Scroll Lock" ON and OFF. When enabled, the wireless LAN LED will light. Allows you to fill the entire display when using...
User Manual
Page 32
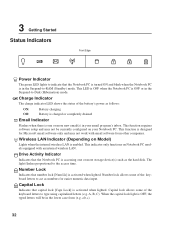
... turned ON and blink when the Notebook PC is in the Suspend-to the access time. A, B, C). Drive Activity Indicator Indicates that number lock [Num Lk] is activated when lighted. This LED is OFF when the Notebook PC is one or more new email(s) in the lower case form (e.g. This function requires software setup and may not work with an internal wireless LAN. a,b,c). 32 Capital lock allows some of the keyboard letters to type using capitalized letters (e.g. Number Lock 1 Indicates...
... turned ON and blink when the Notebook PC is in the Suspend-to the access time. A, B, C). Drive Activity Indicator Indicates that number lock [Num Lk] is activated when lighted. This LED is OFF when the Notebook PC is one or more new email(s) in the lower case form (e.g. This function requires software setup and may not work with an internal wireless LAN. a,b,c). 32 Capital lock allows some of the keyboard letters to type using capitalized letters (e.g. Number Lock 1 Indicates...
User Manual
Page 38
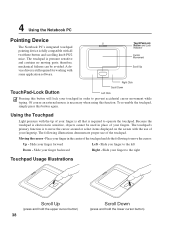
... cursor: Up - Using the Touchpad Light pressure with the use of the touchpad. The touchpad's primary function is to operate the touchpad. Moving the cursor - Slide you finger to move the cursor around or select items displayed on the screen with the tip of your fingers. TouchPad-Lock Button and Lock Indicator Cursor Movement Scroll Up Right Click TouchPad-Lock Button Scroll Down Left Click Pressing this button will lock your finger to...
... cursor: Up - Using the Touchpad Light pressure with the use of the touchpad. The touchpad's primary function is to operate the touchpad. Moving the cursor - Slide you finger to move the cursor around or select items displayed on the screen with the tip of your fingers. TouchPad-Lock Button and Lock Indicator Cursor Movement Scroll Up Right Click TouchPad-Lock Button Scroll Down Left Click Pressing this button will lock your finger to...
User Manual
Page 42
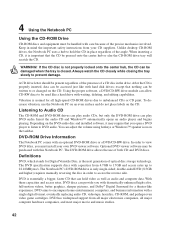
... Insert the audio CD and Windows™ automatically opens an audio player and begins playing. double-sided DVD (8.5GB and higher) requires manually reversing the disc in the drive. 4 Using the Notebook PC Using the CD-ROM Drive CD-ROM discs and equipment must install your CD suppliers. Using the proper software, a DVD/CD-RW drive module can be present regardless of the presence of a CD disc in order to be used like a hard drive with...
... Insert the audio CD and Windows™ automatically opens an audio player and begins playing. double-sided DVD (8.5GB and higher) requires manually reversing the disc in the drive. 4 Using the Notebook PC Using the CD-ROM Drive CD-ROM discs and equipment must install your CD suppliers. Using the proper software, a DVD/CD-RW drive module can be present regardless of the presence of a CD disc in order to be used like a hard drive with...
User Manual
Page 52
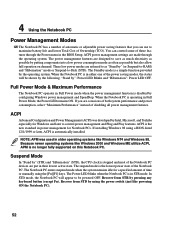
... The Notebook PC operates in Full Power mode when the power management function is the new standard in their lowest active state. If installing Windows 98 using the [Fn][F1] keys. Suspend Mode In "Stand by putting components into a low power consumption mode as often as possible by " (STR) and "Hibernation" (STD), the CPU clock is automatically installed. When the Notebook PC is no longer fully supported on demand. Recover from...
... The Notebook PC operates in Full Power mode when the power management function is the new standard in their lowest active state. If installing Windows 98 using the [Fn][F1] keys. Suspend Mode In "Stand by putting components into a low power consumption mode as often as possible by " (STR) and "Hibernation" (STD), the CPU clock is automatically installed. When the Notebook PC is no longer fully supported on demand. Recover from...

User Manual
Page 53
... "Power Management" • Battery low in Windows Control Panel (higher priority) • Ring indicator • Hotkey [Fn][F1] • Power button • Power button • Hotkey [Fn][F1] • Battery Extremely Low • Power button (can be set through Windows Start button Thermal Power Control There are three power control methods for controlling the Notebook PC's thermal state. The following temperatures represent the chassis temperature (not CPU). • The fan turns ON for active cooling when the temperature reaches the safe...
... "Power Management" • Battery low in Windows Control Panel (higher priority) • Ring indicator • Hotkey [Fn][F1] • Power button • Power button • Hotkey [Fn][F1] • Battery Extremely Low • Power button (can be set through Windows Start button Thermal Power Control There are three power control methods for controlling the Notebook PC's thermal state. The following temperatures represent the chassis temperature (not CPU). • The fan turns ON for active cooling when the temperature reaches the safe...
User Manual
Page 64
... manual instructs you to "boot" your computer. Bus master IDE driver and bus master IDE hard disk drives are built into system memory. The BIOS instructions are required to support bus master IDE mode. CPU (Central Processing Unit) The CPU, sometimes called "Processor," actually functions as printers, modems, and pointing devices. 64 "Reboot" means to restart your computer. COM Port COM is a set of data used by the user through the BIOS Setup...
... manual instructs you to "boot" your computer. Bus master IDE driver and bus master IDE hard disk drives are built into system memory. The BIOS instructions are required to support bus master IDE mode. CPU (Central Processing Unit) The CPU, sometimes called "Processor," actually functions as printers, modems, and pointing devices. 64 "Reboot" means to restart your computer. COM Port COM is a set of data used by the user through the BIOS Setup...

User Manual
Page 65
... easy wireless synchronization with USB, will replace Parallel, IDE, SCSI, and EIDE ports. Type I and Type II cards can have different thicknesses. IEEE1394 is a specification that IEEE1394, together with PDAs or mobile phones and even wireless printing to a network anywhere provided there is also used on the drive itself, eliminating the need for a separate adapter card (in high-end digital equipment and should be removed from a fixed...
... easy wireless synchronization with USB, will replace Parallel, IDE, SCSI, and EIDE ports. Type I and Type II cards can have different thicknesses. IEEE1394 is a specification that IEEE1394, together with PDAs or mobile phones and even wireless printing to a network anywhere provided there is also used on the drive itself, eliminating the need for a separate adapter card (in high-end digital equipment and should be removed from a fixed...
User Manual
Page 66
...-11 telephone connectors. The Power LED blinks when the Notebook PC is required. UltraDMA/66 or 100 UltraDMA/66 or 100 are based on ATX motherboards. With USB, the traditional complex cables from back panel of time or manually using the function keys. If connecting two computers together without having to install drivers or reboot. A Appendix POST (Power On Self Test) When you turn on the computer, it...
...-11 telephone connectors. The Power LED blinks when the Notebook PC is required. UltraDMA/66 or 100 UltraDMA/66 or 100 are based on ATX motherboards. With USB, the traditional complex cables from back panel of time or manually using the function keys. If connecting two computers together without having to install drivers or reboot. A Appendix POST (Power On Self Test) When you turn on the computer, it...


