

User Guide
Page 3
Contents Notices...vii Safety information viii About this guide ix Typography x KCMR-D12 specifications summary xi Chapter 1: Product introduction 1.1 Welcome 1-3 1.2 Package contents 1-3 1.3 Serial number label 1-4 1.4 Special features 1-4 1.4.1 Product highlights 1-4 1.4.2 Innovative ASUS features 1-6 Chapter 2: Hardware information 2.1 Before you proceed 2-3 2.2 Motherboard overview 2-6 2.2.1 Placement direction 2-6 2.2.2 Screw holes 2-6 2.2.4 Motherboard layouts 2-7 2.2.5 Layout contents 2-8 2.3 Central Processing Unit (CPU 2-10 2.3.1 Installing...
Contents Notices...vii Safety information viii About this guide ix Typography x KCMR-D12 specifications summary xi Chapter 1: Product introduction 1.1 Welcome 1-3 1.2 Package contents 1-3 1.3 Serial number label 1-4 1.4 Special features 1-4 1.4.1 Product highlights 1-4 1.4.2 Innovative ASUS features 1-6 Chapter 2: Hardware information 2.1 Before you proceed 2-3 2.2 Motherboard overview 2-6 2.2.1 Placement direction 2-6 2.2.2 Screw holes 2-6 2.2.4 Motherboard layouts 2-7 2.2.5 Layout contents 2-8 2.3 Central Processing Unit (CPU 2-10 2.3.1 Installing...

User Guide
Page 11
...Core Logic KCMR-D12 2 * socket C32 (LGA 1207) 4/6 Core AMD Opteron™ 4100 series HyperTransport™ Technology 3.0 6.4 GT/s per link (dual link) AMD SR5670 / AMD SP5100 Form Factor 12" x 13" ASUS Features Fan Speed V Control Rack Ready V (Rack and Pedestal dual use) ASWM 2.0 V Memory Total Slots ...Capacity 12 (2-channel per CPU) Maximum up to 128GB (RDIMM) Maximum up to 32GB (UDIMM) Memory Type DDR3 1066/1333 UDIMM with ECC/ ...
...Core Logic KCMR-D12 2 * socket C32 (LGA 1207) 4/6 Core AMD Opteron™ 4100 series HyperTransport™ Technology 3.0 6.4 GT/s per link (dual link) AMD SR5670 / AMD SP5100 Form Factor 12" x 13" ASUS Features Fan Speed V Control Rack Ready V (Rack and Pedestal dual use) ASWM 2.0 V Memory Total Slots ...Capacity 12 (2-channel per CPU) Maximum up to 128GB (RDIMM) Maximum up to 32GB (UDIMM) Memory Type DDR3 1066/1333 UDIMM with ECC/ ...

User Guide
Page 16
... 1.3 Serial number label Before requesting support from the ASUS Technical Support team, you must take note of DDR3 which makes it an ideal memory solution. With the correct serial number of 1333/1066 MHz to your problems. KCMR-D12 xxS2xxxxxxxxx Made in China 合格 1.4 Special ...Land Grid Array (LGA) sockets coded C32, designed for more powerful computing. DDR3 memory support The KCMR-D12 supports UDIMM and RDIMM DDR3 memory that features data transfer rates of the product, ASUS Technical Support team members can then offer a quicker and satisfying solution to meet ...
... 1.3 Serial number label Before requesting support from the ASUS Technical Support team, you must take note of DDR3 which makes it an ideal memory solution. With the correct serial number of 1333/1066 MHz to your problems. KCMR-D12 xxS2xxxxxxxxx Made in China 合格 1.4 Special ...Land Grid Array (LGA) sockets coded C32, designed for more powerful computing. DDR3 memory support The KCMR-D12 supports UDIMM and RDIMM DDR3 memory that features data transfer rates of the product, ASUS Technical Support team members can then offer a quicker and satisfying solution to meet ...

User Guide
Page 20
Chapter summary 2 2.1 Before you proceed 2-3 2.2 Motherboard overview 2-6 2.3 Central Processing Unit (CPU 2-10 2.4 System memory 2-17 2.5 Expansion slots 2-20 2.6 Jumpers 2-25 2.7 Connectors 2-29 ASUS KCMR-D12
Chapter summary 2 2.1 Before you proceed 2-3 2.2 Motherboard overview 2-6 2.3 Central Processing Unit (CPU 2-10 2.4 System memory 2-17 2.5 Expansion slots 2-20 2.6 Jumpers 2-25 2.7 Connectors 2-29 ASUS KCMR-D12

User Guide
Page 35
DDR3 modules are developed for better performance with twelve (12) Double Data Rate 3 (DDR3) Dual Inline Memory Modules (DIMM) sockets. 2.4 System memory 2.4.1 Overview The motherboard comes with less power consumption. A DDR3 module has the same physical dimensions as a DDR2 DIMM but is notched differently to prevent installation on a DDR2 DIMM socket. The figure illustrates the location of the DDR3 DIMM sockets: ASUS KCMR-D12 2-17
DDR3 modules are developed for better performance with twelve (12) Double Data Rate 3 (DDR3) Dual Inline Memory Modules (DIMM) sockets. 2.4 System memory 2.4.1 Overview The motherboard comes with less power consumption. A DDR3 module has the same physical dimensions as a DDR2 DIMM but is notched differently to prevent installation on a DDR2 DIMM socket. The figure illustrates the location of the DDR3 DIMM sockets: ASUS KCMR-D12 2-17

User Guide
Page 36
.../DR -- Always install DIMMs with the same CAS latency. SR/DR 800 800 SR/DR -- SR/DR 800 800 -- -- DR 1333 -- SR/DR 667 667 -- 2.4.2 Memory Configurations You may install 1 GB, 2 GB, 4 GB, or 8GB registered ECC/unbuffered ECC DDR3 DIMMs into the DIMM sockets using the... memory configurations in this section. SR/DR 667 667 SR/DR -- SR/DR SR/DR SR/DR 800 800 -- SR/DR 1066 1066 SR SR SR ...
.../DR -- Always install DIMMs with the same CAS latency. SR/DR 800 800 SR/DR -- SR/DR 800 800 -- -- DR 1333 -- SR/DR 667 667 -- 2.4.2 Memory Configurations You may install 1 GB, 2 GB, 4 GB, or 8GB registered ECC/unbuffered ECC DDR3 DIMMs into the DIMM sockets using the... memory configurations in this section. SR/DR 667 667 SR/DR -- SR/DR SR/DR SR/DR 800 800 -- SR/DR 1066 1066 SR SR SR ...

User Guide
Page 43
Clear RTC RAM (CLRTC1) This jumper allows you to pins 1-2. 3. You can clear the CMOS memory of date, time, and system setup parameters by erasing the CMOS RTC RAM data. To erase the RTC RAM: 1. Plug the power cord and turn ... the computer and unplug the power cord. 2. Move the jumper cap from pins 1-2 (default) to re-enter data. After the CMOS clearance, reinstall the battery. ASUS KCMR-D12 2-25 Removing the cap will cause system boot failure! 2.6 Jumpers 1. The onboard button cell battery powers the RAM data in CMOS. Hold down the key...
Clear RTC RAM (CLRTC1) This jumper allows you to pins 1-2. 3. You can clear the CMOS memory of date, time, and system setup parameters by erasing the CMOS RTC RAM data. To erase the RTC RAM: 1. Plug the power cord and turn ... the computer and unplug the power cord. 2. Move the jumper cap from pins 1-2 (default) to re-enter data. After the CMOS clearance, reinstall the battery. ASUS KCMR-D12 2-25 Removing the cap will cause system boot failure! 2.6 Jumpers 1. The onboard button cell battery powers the RAM data in CMOS. Hold down the key...

User Guide
Page 71
... Sub Screen F1 General Help F10 Save and Exit ESC Exit v02.61 (C)Copyright 1985-2010, American Megatrends, Inc. ASUS KCMR-D12 4-13 System Memory Information Displays system memory information. System Memory Displays the auto-detected system memory. Main BIOS SETUP UTILITY EC BIOS Version : MBECB-0012 Bios Information Version :0301 Build Date :10/08/10 Processor...
... Sub Screen F1 General Help F10 Save and Exit ESC Exit v02.61 (C)Copyright 1985-2010, American Megatrends, Inc. ASUS KCMR-D12 4-13 System Memory Information Displays system memory information. System Memory Displays the auto-detected system memory. Main BIOS SETUP UTILITY EC BIOS Version : MBECB-0012 Bios Information Version :0301 Build Date :10/08/10 Processor...

User Guide
Page 72
CPU1/2 Memory Configuration Displays the auto-detected memory specification. Main CPU1 Memory Configuration Node0 Speed N/A DIMM_A1 N/A DIMM_A2 N/A DIMM_A3 N/A DIMM_B1 N/A DIMM_B2 N/A DIMM_B3 N/A BIOS SETUP UTILITY 4-14 Chapter 4: BIOS setup
CPU1/2 Memory Configuration Displays the auto-detected memory specification. Main CPU1 Memory Configuration Node0 Speed N/A DIMM_A1 N/A DIMM_A2 N/A DIMM_A3 N/A DIMM_B1 N/A DIMM_B2 N/A DIMM_B3 N/A BIOS SETUP UTILITY 4-14 Chapter 4: BIOS setup

User Guide
Page 77
... Save and Exit Exit v02.61 (C)Copyright 1985-200180, American Megatrends, Inc. Memory Configuration Advanced BIOS SETUP UTILITY CMPeUmoBrryidCgoenfiCghuirpasteitonConfiguration CPU REVISION CBuarnrkenItntCeSrIleFarveiqnuge ncy CNuordreenItntMeermloerayviFnrge quen cy Channel ...Configuation options: [Disabled] [Auto] Node Interleaving [Disabled] Allows you to set the channel memory interleaving setting. Configuation options: [Disabled] [Enabled] ASUS KCMR-D12 4-19 Closed Loop Throttling - Configuation options: [Disabled] [Enabled] Bank Swizzle Mode [Enabled...
... Save and Exit Exit v02.61 (C)Copyright 1985-200180, American Megatrends, Inc. Memory Configuration Advanced BIOS SETUP UTILITY CMPeUmoBrryidCgoenfiCghuirpasteitonConfiguration CPU REVISION CBuarnrkenItntCeSrIleFarveiqnuge ncy CNuordreenItntMeermloerayviFnrge quen cy Channel ...Configuation options: [Disabled] [Auto] Node Interleaving [Disabled] Allows you to set the channel memory interleaving setting. Configuation options: [Disabled] [Enabled] ASUS KCMR-D12 4-19 Closed Loop Throttling - Configuation options: [Disabled] [Enabled] Bank Swizzle Mode [Enabled...

User Guide
Page 78
...49ms] [20.97ms] [42.00ms] [84.00ms] Data Cache BG Scrub [Disabled] Allows the L1 Data Cache ram to report and correct memory errors automatically and maintains the system integrity. Closed Loop Throttling - DRAM ECC Enable [Enabled] DRAM ECC allows hardware to be corrected while idle. ...scrubbing is on. Configuration options: [Disabled] [Enabled] DRAM BG Scrub [Disabled] DRAM scrubbing corrects the memory errors when the memory is being used and improves performance when the memory is scrubbed in 8 hours. +F1 F10 ESC Select Screen Select Item Change Option General Help Save and...
...49ms] [20.97ms] [42.00ms] [84.00ms] Data Cache BG Scrub [Disabled] Allows the L1 Data Cache ram to report and correct memory errors automatically and maintains the system integrity. Closed Loop Throttling - DRAM ECC Enable [Enabled] DRAM ECC allows hardware to be corrected while idle. ...scrubbing is on. Configuration options: [Disabled] [Enabled] DRAM BG Scrub [Disabled] DRAM scrubbing corrects the memory errors when the memory is being used and improves performance when the memory is scrubbed in 8 hours. +F1 F10 ESC Select Screen Select Item Change Option General Help Save and...
User Guide
Page 79
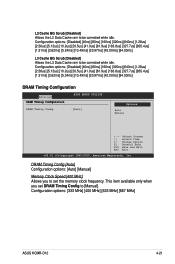
... Cache ram to be corrected while idle. Configuration options: [333 MHz] [400 MHz] [533 MHz] [667 MHz] ASUS KCMR-D12 4-21 Closed Loop Throttling - Open Loop [Auto] [Independent] [Disabled] [Disabled] [Disabled] [Disabled] +F1 F10 ESC ...] DRAM Timing Configuration Advanced BIOS SETUP UTILITY CDPRUAMBrTidmgiengChCiopnsfiegturCaotnifoignuration CPU REVISION :B0 CDuRrArMenTtimCiSnIg FCroenqfiuge ncy :[6A.u4t0o0]GT Current Memory Frequency :1066 Mhz CSI Links Speed CSI Frequency [Full-Speed] [Auto] TolitnrkasnstioOtpiftouinlolnt-shsepeCeSdI or leave them in ...
... Cache ram to be corrected while idle. Configuration options: [333 MHz] [400 MHz] [533 MHz] [667 MHz] ASUS KCMR-D12 4-21 Closed Loop Throttling - Open Loop [Auto] [Independent] [Disabled] [Disabled] [Disabled] [Disabled] +F1 F10 ESC ...] DRAM Timing Configuration Advanced BIOS SETUP UTILITY CDPRUAMBrTidmgiengChCiopnsfiegturCaotnifoignuration CPU REVISION :B0 CDuRrArMenTtimCiSnIg FCroenqfiuge ncy :[6A.u4t0o0]GT Current Memory Frequency :1066 Mhz CSI Links Speed CSI Frequency [Full-Speed] [Auto] TolitnrkasnstioOtpiftouinlolnt-shsepeCeSdI or leave them in ...

User Guide
Page 84
GFX [Disabled] Configuration options: [Disabled] [Force] IOC Peer-to set the VGA ROM boot priority. Configuration options: [PCIE VGA Card] [Onboard VGA] Debug Option Memory Decode on Sec. HT Link Tristate [Auto] Configuration options: [Auto] [Disabled] [CAD/CTL] [CAD/CTL/CLK] NB Deempasies Level [Disabled] Configuration options: [Disabled] [-0.4dB] [-1.32dB] [-2....
GFX [Disabled] Configuration options: [Disabled] [Force] IOC Peer-to set the VGA ROM boot priority. Configuration options: [PCIE VGA Card] [Onboard VGA] Debug Option Memory Decode on Sec. HT Link Tristate [Auto] Configuration options: [Auto] [Disabled] [CAD/CTL] [CAD/CTL/CLK] NB Deempasies Level [Disabled] Configuration options: [Disabled] [-0.4dB] [-1.32dB] [-2....

User Guide
Page 124
Boot from the menu. Press , then select Yes from Hard Disk Installation Repair Installed System Rescue System Check Installation Media Firmware Test Memory Test Boot Options | F1 Help F2 Language F3 Video Mode F4 Source F5 Kernel F6 Driver English(US) 1024 X768 DVD Default No 3.... Use the arrow keys to select Installation from Hard Disk Installation Repair Installed System Rescue System Check Installation Media Firmware Test Memory Test Boot Options | F1 Help F2 Language F3 Video Mode English(US) 1024 X768 F4 Source DVD Yes No File URL F5 Kernel F6...
Boot from the menu. Press , then select Yes from Hard Disk Installation Repair Installed System Rescue System Check Installation Media Firmware Test Memory Test Boot Options | F1 Help F2 Language F3 Video Mode F4 Source F5 Kernel F6 Driver English(US) 1024 X768 DVD Default No 3.... Use the arrow keys to select Installation from Hard Disk Installation Repair Installed System Rescue System Check Installation Media Firmware Test Memory Test Boot Options | F1 Help F2 Language F3 Video Mode English(US) 1024 X768 F4 Source DVD Yes No File URL F5 Kernel F6...
User Guide
Page 125
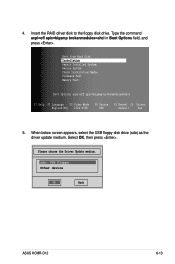
... from Hard Disk Installation Repair Installed System Rescue System Check Installation Media Firmware Test Memory Test Boot Options acpi=off apic=bigsmp brokenmodules=ahci in Boot Options field, and press . sda: USB Floppy Other device OK Back ASUS KCMR-D12 6-13 Type the command acpi=off apic=bigsmp brokenmodules=ahci F1 Help F2 Language...
... from Hard Disk Installation Repair Installed System Rescue System Check Installation Media Firmware Test Memory Test Boot Options acpi=off apic=bigsmp brokenmodules=ahci in Boot Options field, and press . sda: USB Floppy Other device OK Back ASUS KCMR-D12 6-13 Type the command acpi=off apic=bigsmp brokenmodules=ahci F1 Help F2 Language...