

K8N4-E User's Manual for English Edition
Page 4
... 1-23 Connectors 1-25 1.10.1 Rear panel connectors 1-25 1.10.2 Internal connectors 1-26 Chapter 2: BIOS setup 2.1 Managing and updating your BIOS 2-2 2.1.1 Creating a bootable floppy disk 2-2 2.1.2 Updating the BIOS 2-3 2.1.3 Saving the current BIOS file 2-5 2.1.4 ASUS CrashFree BIOS 2 utility 2-6 2.1.5 ASUS EZ Flash utility 2-8 2.1.6 ASUS Update utility 2-9 2.2 BIOS setup program 2-12 2.2.1 BIOS menu screen 2-13 2.2.2 Menu bar 2-13 2.2.3 Legend bar 2-14 2.2.4 Menu items 2-14...
... 1-23 Connectors 1-25 1.10.1 Rear panel connectors 1-25 1.10.2 Internal connectors 1-26 Chapter 2: BIOS setup 2.1 Managing and updating your BIOS 2-2 2.1.1 Creating a bootable floppy disk 2-2 2.1.2 Updating the BIOS 2-3 2.1.3 Saving the current BIOS file 2-5 2.1.4 ASUS CrashFree BIOS 2 utility 2-6 2.1.5 ASUS EZ Flash utility 2-8 2.1.6 ASUS Update utility 2-9 2.2 BIOS setup program 2-12 2.2.1 BIOS menu screen 2-13 2.2.2 Menu bar 2-13 2.2.3 Legend bar 2-14 2.2.4 Menu items 2-14...

K8N4-E User's Manual for English Edition
Page 8
...viii Where to find more information Refer to the ASUS contact information. 2. Optional documentation Your product package may have to change system settings through the BIOS Setup menus. Detailed descriptions of the BIOS parameters are not part of the motherboard and the... documentation, such as warranty flyers, that you need when installing and configuring the motherboard. ASUS websites The ASUS website provides updated information on the motherboard. • Chapter 2: BIOS setup This chapter tells how to perform when installing system components. These documents are also ...
...viii Where to find more information Refer to the ASUS contact information. 2. Optional documentation Your product package may have to change system settings through the BIOS Setup menus. Detailed descriptions of the BIOS parameters are not part of the motherboard and the... documentation, such as warranty flyers, that you need when installing and configuring the motherboard. ASUS websites The ASUS website provides updated information on the motherboard. • Chapter 2: BIOS setup This chapter tells how to perform when installing system components. These documents are also ...
K8N4-E User's Manual for English Edition
Page 10
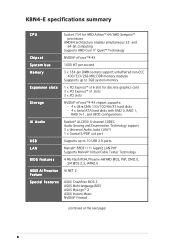
K8N4-E specifications summary CPU Chipset System bus Memory Expansion slots Storage AI Audio USB LAN BIOS features ASUS AI Proactive Feature Special features Socket 754 for discrete graphics card 3 x PCI Express™ x1 slots 3 x PCI slots NVIDIA® nForce...; 88E81111 Gigabit LAN PHY Supports Marvell® Virtual Cable Tester Technology 4 Mb Flash ROM, Phoenix-AWARD BIOS, PnP, DMI2.0, SM BIOS 2.3, WfM2.0 AI NET 2 ASUS CrashFree BIOS 2 ASUS Multi-language BIOS ASUS MyLogo™ 2 ASUS Instant Music NVIDIA® Firewall (continued on the next page) x and 64-bit computing Supports AMD ...
K8N4-E specifications summary CPU Chipset System bus Memory Expansion slots Storage AI Audio USB LAN BIOS features ASUS AI Proactive Feature Special features Socket 754 for discrete graphics card 3 x PCI Express™ x1 slots 3 x PCI slots NVIDIA® nForce...; 88E81111 Gigabit LAN PHY Supports Marvell® Virtual Cable Tester Technology 4 Mb Flash ROM, Phoenix-AWARD BIOS, PnP, DMI2.0, SM BIOS 2.3, WfM2.0 AI NET 2 ASUS CrashFree BIOS 2 ASUS Multi-language BIOS ASUS MyLogo™ 2 ASUS Instant Music NVIDIA® Firewall (continued on the next page) x and 64-bit computing Supports AMD ...

K8N4-E User's Manual for English Edition
Page 17
...is a BIOS-based diagnostic...support CD in case when the BIOS codes and data are corrupted. See pages 1-26 and 1-30 for details. ASUS Q-Fan technology The ASUS Q-Fan technology smartly adjusts the...174; proprietary UAJ® (Universal Audio Jack) technology. See page 2-6 for details. 1.3.2 ASUS Proactive features AI NET 2 AI NET 2 is backward compatible with 16-bit DAC, a ... ADC, and an AC97 2.3 compatible multi-channel audio designed for details. 1.3.3 Innovative ASUS features ASUS CrashFree BIOS 2 This feature allows you can easily monitor the condition of the Ethernet cable(s) connected...
...is a BIOS-based diagnostic...support CD in case when the BIOS codes and data are corrupted. See pages 1-26 and 1-30 for details. ASUS Q-Fan technology The ASUS Q-Fan technology smartly adjusts the...174; proprietary UAJ® (Universal Audio Jack) technology. See page 2-6 for details. 1.3.2 ASUS Proactive features AI NET 2 AI NET 2 is backward compatible with 16-bit DAC, a ... ADC, and an AC97 2.3 compatible multi-channel audio designed for details. 1.3.3 Innovative ASUS features ASUS CrashFree BIOS 2 This feature allows you can easily monitor the condition of the Ethernet cable(s) connected...

K8N4-E User's Manual for English Edition
Page 18
...16 for details. Just press the ASUS Instant Music special function keys and enjoy the music! 1-6 Chapter 1: Product introduction ASUS EZ Flash BIOS With the ASUS EZ Flash, you can easily update the system BIOS even before entering the operating system. ASUS Instant Music Lite This unique feature ...use a DOS-based utility or boot from the available options. ASUS MyLogo2™ This feature allows you to personalize and add style to your choice from a floppy disk. ASUS Multi-language BIOS The multi-language BIOS allows you to select the language of your system with customizable...
...16 for details. Just press the ASUS Instant Music special function keys and enjoy the music! 1-6 Chapter 1: Product introduction ASUS EZ Flash BIOS With the ASUS EZ Flash, you can easily update the system BIOS even before entering the operating system. ASUS Instant Music Lite This unique feature ...use a DOS-based utility or boot from the available options. ASUS MyLogo2™ This feature allows you to personalize and add style to your choice from a floppy disk. ASUS Multi-language BIOS The multi-language BIOS allows you to select the language of your system with customizable...

K8N4-E User's Manual for English Edition
Page 32
... Configuring an expansion card After installing the expansion card, configure the it and make the necessary hardware settings for later use . Turn on BIOS setup. 2. Assign an IRQ to the tables on the slot. 5. Remove the system unit cover (if your motherboard is completely seated ...describe the slots and the expansion cards that they support. Install the software drivers for information on the system and change the necessary BIOS settings, if any. 1.8 Expansion slots In the future, you physical injury and damage motherboard components. Align the card connector with ...
... Configuring an expansion card After installing the expansion card, configure the it and make the necessary hardware settings for later use . Turn on BIOS setup. 2. Assign an IRQ to the tables on the slot. 5. Remove the system unit cover (if your motherboard is completely seated ...describe the slots and the expansion cards that they support. Install the software drivers for information on the system and change the necessary BIOS settings, if any. 1.8 Expansion slots In the future, you physical injury and damage motherboard components. Align the card connector with ...

K8N4-E User's Manual for English Edition
Page 35
...erase the RTC RAM: 1. Re-install the battery. 5. For system failure due to default values. Shut down the key during the boot process and enter BIOS setup to pins 1-2. 4. Keep the cap on CLRTC jumper default position. You can automatically reset parameter settings to overclocking, use the C.P.R. (CPU Parameter Recall... RTC RAM CLRTC 12 23 Normal (Default) Clear CMOS You do not need to clear the RTC when the system hangs due to pins 2-3. ASUS K8N4-E 1-23 Clear RTC RAM (CLRTC) This jumper allows you to clear the Real Time Clock (RTC) RAM in CMOS, which include system setup ...
...erase the RTC RAM: 1. Re-install the battery. 5. For system failure due to default values. Shut down the key during the boot process and enter BIOS setup to pins 1-2. 4. Keep the cap on CLRTC jumper default position. You can automatically reset parameter settings to overclocking, use the C.P.R. (CPU Parameter Recall... RTC RAM CLRTC 12 23 Normal (Default) Clear CMOS You do not need to clear the RTC when the system hangs due to pins 2-3. ASUS K8N4-E 1-23 Clear RTC RAM (CLRTC) This jumper allows you to clear the Real Time Clock (RTC) RAM in CMOS, which include system setup ...

K8N4-E User's Manual for English Edition
Page 40
... "4.4.3 Onboard device configuration" for instructions on how to these connectors, enable the R A I D function of each port from the N V R A I D c o n f i g u r a t i o n sub-item in the BIOS. SATA4 SATA3 SATA2 SATA1 K8N4-E ® K8N4-E SATA connectors Important notes on Serial ATA • The actual data transfer rate depends on how to set up to S A T A by the NVIDIA...
... "4.4.3 Onboard device configuration" for instructions on how to these connectors, enable the R A I D function of each port from the N V R A I D c o n f i g u r a t i o n sub-item in the BIOS. SATA4 SATA3 SATA2 SATA1 K8N4-E ® K8N4-E SATA connectors Important notes on Serial ATA • The actual data transfer rate depends on how to set up to S A T A by the NVIDIA...

K8N4-E User's Manual for English Edition
Page 46
... below for details. • System power LED (Green 3-pin PLED) This 3-pin connector is in SLEEP or SOFT-OFF mode depending on the BIOS settings. Pressing the power switch for more than four seconds while the system is ON turns the system OFF. • Reset button (Blue 2-pin... RESET) This 2-pin connector is for the system power LED. PWR Ground Reset Ground K8N4-E ® IDE_LED RESET PWRSW * Requires an ATX power supply. Refer to the HDD. • System warning speaker (Orange 4-pin SPEAKER) This 4-pin connector...
... below for details. • System power LED (Green 3-pin PLED) This 3-pin connector is in SLEEP or SOFT-OFF mode depending on the BIOS settings. Pressing the power switch for more than four seconds while the system is ON turns the system OFF. • Reset button (Blue 2-pin... RESET) This 2-pin connector is for the system power LED. PWR Ground Reset Ground K8N4-E ® IDE_LED RESET PWRSW * Requires an ATX power supply. Refer to the HDD. • System warning speaker (Orange 4-pin SPEAKER) This 4-pin connector...

K8N4-E User's Manual for English Edition
Page 47
This chapter tells how to change the system settings through the BIOS Setup menus. Detailed descriptions of the BIOS parameters are also provided. 2 BIOS setup ASUS K8N4-E 2-1
This chapter tells how to change the system settings through the BIOS Setup menus. Detailed descriptions of the BIOS parameters are also provided. 2 BIOS setup ASUS K8N4-E 2-1

K8N4-E User's Manual for English Edition
Page 48
.... Insert the Windows® 2000 CD to the floppy disk drive. A S U S C r a s h F r e e B I O S F l a s h U t i l i t y (Updates the BIOS in DOS mode using a bootable floppy disk or the motherboard support CD when the BIOS file fails or gets corrupted.) 3. A S U S E Z F l a s h (Updates the BIOS in DOS using the ASUS Update or AwardBIOS Flash utilities. 2.1.1 Creating a bootable floppy disk 1. A F o r m a t 3 1 / 2 F l o p p y D i s k window appears. D O S s t a r t u p d i s k from...
.... Insert the Windows® 2000 CD to the floppy disk drive. A S U S C r a s h F r e e B I O S F l a s h U t i l i t y (Updates the BIOS in DOS mode using a bootable floppy disk or the motherboard support CD when the BIOS file fails or gets corrupted.) 3. A S U S E Z F l a s h (Updates the BIOS in DOS using the ASUS Update or AwardBIOS Flash utilities. 2.1.1 Creating a bootable floppy disk 1. A F o r m a t 3 1 / 2 F l o p p y D i s k window appears. D O S s t a r t u p d i s k from...
K8N4-E User's Manual for English Edition
Page 49
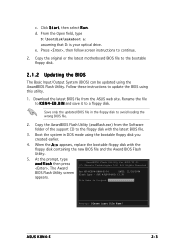
... Boot the system in the floppy disk to update the BIOS using the AwardBIOS Flash Utility. When the A : > appears, replace the bootable floppy disk with the latest BIOS file. 3. ASUS K8N4-E 2-3 c. Copy the original or the latest motherboard BIOS file to the floppy disk with the floppy disk containing ...the new BIOS file and the Award BIOS Flash Utility. 5. Rename the file to a ...
... Boot the system in the floppy disk to update the BIOS using the AwardBIOS Flash Utility. When the A : > appears, replace the bootable floppy disk with the latest BIOS file. 3. ASUS K8N4-E 2-3 c. Copy the original or the latest motherboard BIOS file to the floppy disk with the floppy disk containing ...the new BIOS file and the Award BIOS Flash Utility. 5. Rename the file to a ...

K8N4-E User's Manual for English Edition
Page 50
... Fail Warning: Don't Turn Off Power Or Reset System! The following screen appears. 8. The utility verifies the BIOS file in the F i l e N a m e t o AwardBIOS Flash Utility for ASUS V1.01 (C) Phoenix Technologies Ltd. SST 49LF004A/B /3.3V File Name to Continue restart the system. 111122223333 Write...Flash Type - All Rights Reserved message indicating that For NF-KC804-K8N4-E-00 DATE: 11/18/2004 you to Program: 1001.bin Message: Do You Want To Save Bios (Y/N) 7. SST 49LF004A/B /3.3V flashed the BIOS file. 6. Press when the utility prompts you have successfully Flash ...
... Fail Warning: Don't Turn Off Power Or Reset System! The following screen appears. 8. The utility verifies the BIOS file in the F i l e N a m e t o AwardBIOS Flash Utility for ASUS V1.01 (C) Phoenix Technologies Ltd. SST 49LF004A/B /3.3V File Name to Continue restart the system. 111122223333 Write...Flash Type - All Rights Reserved message indicating that For NF-KC804-K8N4-E-00 DATE: 11/18/2004 you to Program: 1001.bin Message: Do You Want To Save Bios (Y/N) 7. SST 49LF004A/B /3.3V flashed the BIOS file. 6. Press when the utility prompts you have successfully Flash ...

K8N4-E User's Manual for English Edition
Page 51
... - AwardBIOS Flash Utility for the current BIOS file in the Save current BIOS a s field, then press . Press when the utility prompts you to 11112222333344445555666677778888999900001111222233334444555566667777888899990000111122223333F4444i55556666l7777e8888!999900001111 ASUS K8N4-E Message: Please Wait! 2-5 The following screen Save current BIOS as : old.bin Message: Please Wait! 4. Message: 3. The utility saves the current BIOS file to the floppy disk, then returns...
... - AwardBIOS Flash Utility for the current BIOS file in the Save current BIOS a s field, then press . Press when the utility prompts you to 11112222333344445555666677778888999900001111222233334444555566667777888899990000111122223333F4444i55556666l7777e8888!999900001111 ASUS K8N4-E Message: Please Wait! 2-5 The following screen Save current BIOS as : old.bin Message: Please Wait! 4. Message: 3. The utility saves the current BIOS file to the floppy disk, then returns...

K8N4-E User's Manual for English Edition
Page 52
... utility. Restart the system after the utility completes the updating process. 2-6 Chapter 2: BIOS setup 2.1.4 ASUS CrashFree BIOS 2 utility The ASUS CrashFree BIOS 2 is an auto recovery tool that contains the updated BIOS file. The utility displays the following message and automatically checks the CD for the BIOS file. BIOS ROM checksum error Detecting IDE ATAPI device... Award BootBlock...
... utility. Restart the system after the utility completes the updating process. 2-6 Chapter 2: BIOS setup 2.1.4 ASUS CrashFree BIOS 2 utility The ASUS CrashFree BIOS 2 is an auto recovery tool that contains the updated BIOS file. The utility displays the following message and automatically checks the CD for the BIOS file. BIOS ROM checksum error Detecting IDE ATAPI device... Award BootBlock...

K8N4-E User's Manual for English Edition
Page 53
.... The utility then updates the corrupted BIOS file. Fail Detecting floppy drive A media... ASUS K8N4-E 2-7 Restart the system after the utility completes the updating process. BIOS ROM checksum error Detecting IDE ATAPI device... The recovered BIOS may not be the latest BIOS version for the original or updated BIOS file. Award BootBlock BIOS v1.0 Copyright (c) 2000, Award Software...
.... The utility then updates the corrupted BIOS file. Fail Detecting floppy drive A media... ASUS K8N4-E 2-7 Restart the system after the utility completes the updating process. BIOS ROM checksum error Detecting IDE ATAPI device... The recovered BIOS may not be the latest BIOS version for the original or updated BIOS file. Award BootBlock BIOS v1.0 Copyright (c) 2000, Award Software...

K8N4-E User's Manual for English Edition
Page 54
...the system when done. Press + during the Power-On Self Tests (POST). 2.1.5 ASUS EZ Flash utility The ASUS EZ Flash feature allows you to update the BIOS without having to continue POST 4. Visit the ASUS website (www.asus.com) to the floppy disk drive then press . Insert the floppy disk that ...contains the BIOS file to download the latest BIOS file for ASUS V1.01 (C) Phoenix Technologies Ltd. All Rights Reserved For NF-KC804-K8N4-E-00 DATE: 11/18/2004 Flash Type - SST 49LF004A/B /3.3V File Name to display ...
...the system when done. Press + during the Power-On Self Tests (POST). 2.1.5 ASUS EZ Flash utility The ASUS EZ Flash feature allows you to update the BIOS without having to continue POST 4. Visit the ASUS website (www.asus.com) to the floppy disk drive then press . Insert the floppy disk that ...contains the BIOS file to download the latest BIOS file for ASUS V1.01 (C) Phoenix Technologies Ltd. All Rights Reserved For NF-KC804-K8N4-E-00 DATE: 11/18/2004 Flash Type - SST 49LF004A/B /3.3V File Name to display ...

K8N4-E User's Manual for English Edition
Page 55
... comes with the motherboard package. The ASUS Update utility is copied to : • Save the current BIOS file • Download the latest BIOS file from the Internet • Update the BIOS from an updated BIOS file • Update the BIOS directly from the Internet, and • View the BIOS version information. ASUS K8N4-E 2-9 X X. Place the support CD in Windows...
... comes with the motherboard package. The ASUS Update utility is copied to : • Save the current BIOS file • Download the latest BIOS file from the Internet • Update the BIOS from an updated BIOS file • Update the BIOS directly from the Internet, and • View the BIOS version information. ASUS K8N4-E 2-9 X X. Place the support CD in Windows...

K8N4-E User's Manual for English Edition
Page 56
Updating the BIOS through the Internet To update the BIOS through the Internet: 1. Launch the ASUS Update utility from the nearest you to avoid network drop-down menu, then click traffic, or click A u t o S e l e c t. Select U p d a t e B I n t e r n e t option from the Windows® desktop by clicking S t a r t > P r o g r a m s > A S U S > A S U S U p d a t e > A S U S U p d a t e. Click N e x t. 2-10 Chapter 2: BIOS setup The ASUS Update main window appears. 2. Select the ASUS FTP site t h e I O S f r o m 3. N e x t.
Updating the BIOS through the Internet To update the BIOS through the Internet: 1. Launch the ASUS Update utility from the nearest you to avoid network drop-down menu, then click traffic, or click A u t o S e l e c t. Select U p d a t e B I n t e r n e t option from the Windows® desktop by clicking S t a r t > P r o g r a m s > A S U S > A S U S U p d a t e > A S U S U p d a t e. Click N e x t. 2-10 Chapter 2: BIOS setup The ASUS Update main window appears. 2. Select the ASUS FTP site t h e I O S f r o m 3. N e x t.

K8N4-E User's Manual for English Edition
Page 57
... the Internet. From the FTP site, select the BIOS version that you wish to complete the update process. Follow the screen instructions to download. Always update the utility to complete the update process. The ASUS Update main window appears. 2. ASUS K8N4-E 2-11 4. Follow the screen instructions to avail all its features. Click Next. 5. Select...
... the Internet. From the FTP site, select the BIOS version that you wish to complete the update process. Follow the screen instructions to download. Always update the utility to complete the update process. The ASUS Update main window appears. 2. ASUS K8N4-E 2-11 4. Follow the screen instructions to avail all its features. Click Next. 5. Select...


