User Guide
Page 3
... viii Typography ix K8N-DL specifications summary x Chapter 1: Product introduction 1.1 Welcome 1-1 1.2 Package contents 1-1 1.3 Special features 1-2 1.3.1 Product highlights 1-2 1.3.2 Innovative ASUS features 1-4 Chapter 2: Hardware information 2.1 Before you proceed 2-1 2.2 Motherboard overview 2-3 2.2.1 Placement direction 2-3 2.2.2 Screw holes 2-3 2.2.3 Motherboard layout 2-4 2.2.4 Layout Contents 2-5 2.3.2 Installing the CPU 2-7 2.3 Central Processing Unit (CPU 2-7 2.3.1 Overview 2-7 2.3.3 Installing the heatsink and fan 2-9 2.4 System memory 2-11 2.4.1 Overview 2-11...
... viii Typography ix K8N-DL specifications summary x Chapter 1: Product introduction 1.1 Welcome 1-1 1.2 Package contents 1-1 1.3 Special features 1-2 1.3.1 Product highlights 1-2 1.3.2 Innovative ASUS features 1-4 Chapter 2: Hardware information 2.1 Before you proceed 2-1 2.2 Motherboard overview 2-3 2.2.1 Placement direction 2-3 2.2.2 Screw holes 2-3 2.2.3 Motherboard layout 2-4 2.2.4 Layout Contents 2-5 2.3.2 Installing the CPU 2-7 2.3 Central Processing Unit (CPU 2-7 2.3.1 Overview 2-7 2.3.3 Installing the heatsink and fan 2-9 2.4 System memory 2-11 2.4.1 Overview 2-11...

User Guide
Page 32
...8226; When using one DDR DIMM module, install into DIMM_A1 and DIMM_A2 slots only. • Always install DIMMs with the same CAS latency. For optimum compatibility, it is recommended that you obtain memory modules from the same vendor. 2.4.2 Memory Configurations You may install 256 MB, 512 MB, 1 GB,... DIMMs into the DIMM sockets using two DDR DIMM modules, install into DIMM_A1 slot only. • When using the memory configurations in this section. • For dual-channel configuration, the total size of memory module(s) installed per channel must be the same for details. • ...
...8226; When using one DDR DIMM module, install into DIMM_A1 and DIMM_A2 slots only. • Always install DIMMs with the same CAS latency. For optimum compatibility, it is recommended that you obtain memory modules from the same vendor. 2.4.2 Memory Configurations You may install 256 MB, 512 MB, 1 GB,... DIMMs into the DIMM sockets using two DDR DIMM modules, install into DIMM_A1 slot only. • When using the memory configurations in this section. • For dual-channel configuration, the total size of memory module(s) installed per channel must be the same for details. • ...
User Guide
Page 37
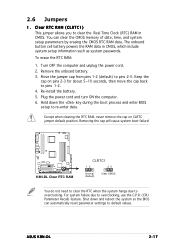
Re-install the battery. 5. Plug the power cord and turn ON the computer. 6. For system failure due to pins 1-2. 4. Keep the cap on CLRTC jumper default position. Removing the cap will cause system boot failure! ® K8N-DL K8N-DL Clear RTC RAM ...battery. 3. To erase the RTC RAM: 1. Hold down and reboot the system so the BIOS can clear the CMOS memory of date, time, and system setup parameters by erasing the CMOS RTC RAM data. 2.6 Jumpers 1. Shut down the..., then move the cap back to overclocking, use the C.P.R. (CPU Parameter Recall) feature. ASUS K8N-DL 2-17
Re-install the battery. 5. Plug the power cord and turn ON the computer. 6. For system failure due to pins 1-2. 4. Keep the cap on CLRTC jumper default position. Removing the cap will cause system boot failure! ® K8N-DL K8N-DL Clear RTC RAM ...battery. 3. To erase the RTC RAM: 1. Hold down and reboot the system so the BIOS can clear the CMOS memory of date, time, and system setup parameters by erasing the CMOS RTC RAM data. 2.6 Jumpers 1. Shut down the..., then move the cap back to overclocking, use the C.P.R. (CPU Parameter Recall) feature. ASUS K8N-DL 2-17
User Guide
Page 55
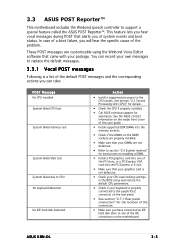
...8226; Install a supported processor to the CPU socket. You can record your package. See the ASUS contact information on the inside front cover of this user guide. • Install supported DDR DIMMs into the memory sockets...ASUS K8N-DL 3-3 In case of a boot failure, you of the problem. 3.3 ASUS POST Reporter™ This motherboard includes the Winbond speech controller to the purple PS/2 connector on the rear panel. • See section "2.7.1 Rear panel connectors" for assistance. See section "2.3 Central Processing Unit (CPU)" for details. • Check the CPU if properly installed...
...8226; Install a supported processor to the CPU socket. You can record your package. See the ASUS contact information on the inside front cover of this user guide. • Install supported DDR DIMMs into the memory sockets...ASUS K8N-DL 3-3 In case of a boot failure, you of the problem. 3.3 ASUS POST Reporter™ This motherboard includes the Winbond speech controller to the purple PS/2 connector on the rear panel. • See section "2.7.1 Rear panel connectors" for assistance. See section "2.3 Central Processing Unit (CPU)" for details. • Check the CPU if properly installed...
User Guide
Page 77
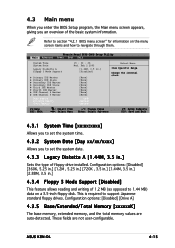
...None] xxxK xxxxxxK xxxxxxK Select Menu Item Specific Help Change the internal clock. ASUS K8N-DL 4-15 This is required to navigate through them. Configuration options: [Disabled] [Drive A] 4.3.5 Base/Extended/Total Memory [xxxxxxK] The base memory, extended memory, and the total memory values are not user-configurable. Configuration options: [Disabled] [360K, 5.25 ... IDE Slave Third IDE Master Fourth IDE Master IDE Channel 4 Master IDE Channel 5 Master Base Memory Extended Memory Total Memory 15 : 30 : 36 Wed, Feb 2 2005 [1.44M, 3.5 in .] Sets the type of floppy drive...
...None] xxxK xxxxxxK xxxxxxK Select Menu Item Specific Help Change the internal clock. ASUS K8N-DL 4-15 This is required to navigate through them. Configuration options: [Disabled] [Drive A] 4.3.5 Base/Extended/Total Memory [xxxxxxK] The base memory, extended memory, and the total memory values are not user-configurable. Configuration options: [Disabled] [360K, 5.25 ... IDE Slave Third IDE Master Fourth IDE Master IDE Channel 4 Master IDE Channel 5 Master Base Memory Extended Memory Total Memory 15 : 30 : 36 Wed, Feb 2 2005 [1.44M, 3.5 in .] Sets the type of floppy drive...

User Guide
Page 93
... to IRQ-11 assigned to IRQ-12 assigned to IRQ-14 assigned to IRQ-15 assigned to [Reserved], the IRQ is free for use of installed PCI devices. IRQ-xx assigned to [PCI Device] When set to [PCI Device] [PCI Device] [PCI Device] [PCI Device] [PCI ...PnP for devices compliant with the Plug and Play standard whether designed for PCI or ISA bus architecture. Configuration options: [PCI Device] [Reserved] ASUS K8N-DL 4-31 Memory Configuration Resources Controlled By IRQ Resources [Manual] PCI/VGA Pallete Snoop [Disabled] ** PCI Express relative items ** Maximum Payload Size [4096] Select...
... to IRQ-11 assigned to IRQ-12 assigned to IRQ-14 assigned to IRQ-15 assigned to [Reserved], the IRQ is free for use of installed PCI devices. IRQ-xx assigned to [PCI Device] When set to [PCI Device] [PCI Device] [PCI Device] [PCI Device] [PCI ...PnP for devices compliant with the Plug and Play standard whether designed for PCI or ISA bus architecture. Configuration options: [PCI Device] [Reserved] ASUS K8N-DL 4-31 Memory Configuration Resources Controlled By IRQ Resources [Manual] PCI/VGA Pallete Snoop [Disabled] ** PCI Express relative items ** Maximum Payload Size [4096] Select...


