
User Guide
Page 1
K8N-DL Motherboard
K8N-DL Motherboard
User Guide
Page 3
Contents Notices vi Safety information vii About this guide viii Typography ix K8N-DL specifications summary x Chapter 1: Product introduction 1.1 Welcome 1-1 1.2 Package contents 1-1 1.3 Special features 1-2 1.3.1 Product highlights 1-2 1.3.2 Innovative ASUS features 1-4 Chapter 2: Hardware information 2.1 Before you proceed 2-1 2.2 Motherboard overview 2-3 2.2.1 Placement direction 2-3 2.2.2 Screw holes 2-3 2.2.3 Motherboard layout 2-4 2.2.4 Layout Contents 2-5 2.3.2 Installing the CPU 2-7 2.3 Central Processing Unit (CPU 2-7 2.3.1 Overview 2-7 2.3.3 Installing the ...
Contents Notices vi Safety information vii About this guide viii Typography ix K8N-DL specifications summary x Chapter 1: Product introduction 1.1 Welcome 1-1 1.2 Package contents 1-1 1.3 Special features 1-2 1.3.1 Product highlights 1-2 1.3.2 Innovative ASUS features 1-4 Chapter 2: Hardware information 2.1 Before you proceed 2-1 2.2 Motherboard overview 2-3 2.2.1 Placement direction 2-3 2.2.2 Screw holes 2-3 2.2.3 Motherboard layout 2-4 2.2.4 Layout Contents 2-5 2.3.2 Installing the CPU 2-7 2.3 Central Processing Unit (CPU 2-7 2.3.1 Overview 2-7 2.3.3 Installing the ...
User Guide
Page 7
... extremes. Do not place the product in your area. If you add a device. • Before connecting or removing signal cables from the motherboard, ensure that all power cables are using the product, make sure all cables are correctly connected and the power cables are connected. vii If... you detect any area where it may become wet. • Place the product on it by yourself. Operation safety • Before installing the motherboard and adding devices on a stable surface. • If you are unplugged. • Seek professional assistance before using an adapter or extension cord....
... extremes. Do not place the product in your area. If you add a device. • Before connecting or removing signal cables from the motherboard, ensure that all power cables are using the product, make sure all cables are correctly connected and the power cables are connected. vii If... you detect any area where it may become wet. • Place the product on it by yourself. Operation safety • Before installing the motherboard and adding devices on a stable surface. • If you are unplugged. • Seek professional assistance before using an adapter or extension cord....
User Guide
Page 8
... the following parts: • Chapter 1: Product introduction This chapter describes the features of the switches, jumpers, and connectors on ASUS hardware and software products. ASUS websites The ASUS website provides updated information on the motherboard. • Chapter 3: Powering up This chapter describes the power up sequence and ways of the standard package. Optional documentation...
... the following parts: • Chapter 1: Product introduction This chapter describes the features of the switches, jumpers, and connectors on ASUS hardware and software products. ASUS websites The ASUS website provides updated information on the motherboard. • Chapter 3: Powering up This chapter describes the power up sequence and ways of the standard package. Optional documentation...
User Guide
Page 10
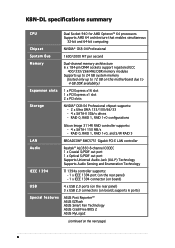
...Image 3114R RAID controller supports: - 4 x SATA-I 150 MB/s - supports 6 ports) Special features ASUS Post Reporter™ ASUS EZFlash ASUS Smart Fan Technology ASUS CrashFree BIOS 2 ASUS MyLogo2 (continued on board; K8N-DL specifications summary CPU Chipset System Bus Memory Expansion slots Storage Dual Socket 940 for AMD Opteron™ 64 ... support registered ECC 400/333/266 MHz DDR memory modules Supports up to 24 GB system memory (tested only up to 12 GB on this motherboard due to 4 GB DDR availability) 1 x PCI Express x16 slot 1 x PCI Express x1 slot 2 x PCI slots NVIDIA® CK8...
...Image 3114R RAID controller supports: - 4 x SATA-I 150 MB/s - supports 6 ports) Special features ASUS Post Reporter™ ASUS EZFlash ASUS Smart Fan Technology ASUS CrashFree BIOS 2 ASUS MyLogo2 (continued on board; K8N-DL specifications summary CPU Chipset System Bus Memory Expansion slots Storage Dual Socket 940 for AMD Opteron™ 64 ... support registered ECC 400/333/266 MHz DDR memory modules Supports up to 24 GB system memory (tested only up to 12 GB on this motherboard due to 4 GB DDR availability) 1 x PCI Express x16 slot 1 x PCI Express x1 slot 2 x PCI slots NVIDIA® CK8...
User Guide
Page 13
This chapter describes the motherboard features and the new technologies it supports. 1Product introduction
This chapter describes the motherboard features and the new technologies it supports. 1Product introduction
User Guide
Page 15
... it , check the items in the long line of the above items is damaged or missing, contact your retailer. ASUS K8N-DL 1-1 Before you for the following items. Motherboard I/O modules Cables Accessories Application CD Documentation ASUS K8N-DL motherboard IEEE1394 (1 port) module USB 2.0 + GAME port module 4 x Serial ATA signal cables (dual plugs) 4 x Serial ATA power cables (dual plugs...
... it , check the items in the long line of the above items is damaged or missing, contact your retailer. ASUS K8N-DL 1-1 Before you for the following items. Motherboard I/O modules Cables Accessories Application CD Documentation ASUS K8N-DL motherboard IEEE1394 (1 port) module USB 2.0 + GAME port module 4 x Serial ATA signal cables (dual plugs) 4 x Serial ATA power cables (dual plugs...

User Guide
Page 16
... the required bandwidth for the latest 3D graphics, multimedia, and Internet applications. PCI Express™ interface The motherboard fully supports PCI Express, the latest I/O interconnect technology that speeds up to increase the communication speed between devices...forward in packets. See pages 2-23. 1-2 Chapter 1: Product introduction 1.3 Special features 1.3.1 Product highlights Latest processor technology The motherboard comes with dual 940-pin sockets for details. HyperTransport™ Technology HyperTransport™ Technology is software compatible with lower pin count...
... the required bandwidth for the latest 3D graphics, multimedia, and Internet applications. PCI Express™ interface The motherboard fully supports PCI Express, the latest I/O interconnect technology that speeds up to increase the communication speed between devices...forward in packets. See pages 2-23. 1-2 Chapter 1: Product introduction 1.3 Special features 1.3.1 Product highlights Latest processor technology The motherboard comes with dual 940-pin sockets for details. HyperTransport™ Technology HyperTransport™ Technology is software compatible with lower pin count...
User Guide
Page 17
... rates through the onboard ALC850 CODEC with digital connectivity to powerful audio and speaker systems. See page 2-21 for details. ASUS K8N-DL 1-3 The Sil3114R controller supports four additional SATA connectors and allows RAID 0, RAID 1, RAID 0+1, and a software patch to...out support, interrupt capability and includes the Realtek® proprietary UAJ® (Universal Audio Jack) technology. Audio technology The motherboard supports 8-channel audio through simple, low-cost, high-bandwidth asynchronous (real-time) data interfacing between computers, peripherals, and ...
... rates through the onboard ALC850 CODEC with digital connectivity to powerful audio and speaker systems. See page 2-21 for details. ASUS K8N-DL 1-3 The Sil3114R controller supports four additional SATA connectors and allows RAID 0, RAID 1, RAID 0+1, and a software patch to...out support, interrupt capability and includes the Realtek® proprietary UAJ® (Universal Audio Jack) technology. Audio technology The motherboard supports 8-channel audio through simple, low-cost, high-bandwidth asynchronous (real-time) data interfacing between computers, peripherals, and ...
User Guide
Page 18
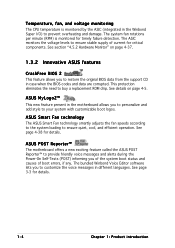
... of current for critical components. See details on page 4-37. 1.3.2 Innovative ASUS features CrashFree BIOS 2 This feature allows you to personalize and add style to prevent overheating and damage. ASUS POST Reporter™ The motherboard offers a new exciting feature called the ASUS POST Reporter™ to customize the voice messages in different languages. See...
... of current for critical components. See details on page 4-37. 1.3.2 Innovative ASUS features CrashFree BIOS 2 This feature allows you to personalize and add style to prevent overheating and damage. ASUS POST Reporter™ The motherboard offers a new exciting feature called the ASUS POST Reporter™ to customize the voice messages in different languages. See...
User Guide
Page 19
It includes description of the jumpers and connectors on the motherboard. 2 Hardware information This chapter lists the hardware setup procedures that you have to perform when installing system components.
It includes description of the jumpers and connectors on the motherboard. 2 Hardware information This chapter lists the hardware setup procedures that you have to perform when installing system components.
User Guide
Page 20
Chapter summary 2.1 Before you proceed 2-1 2.2 Motherboard overview 2-3 2.3 Central Processing Unit (CPU 2-7 2.4 System memory 2-11 2.5 Expansion slots 2-14 2.6 Jumpers 2-17 2.7 Connectors 2-20 ASUS K8N-DL
Chapter summary 2.1 Before you proceed 2-1 2.2 Motherboard overview 2-3 2.3 Central Processing Unit (CPU 2-7 2.4 System memory 2-11 2.5 Expansion slots 2-14 2.6 Jumpers 2-17 2.7 Connectors 2-20 ASUS K8N-DL
User Guide
Page 21
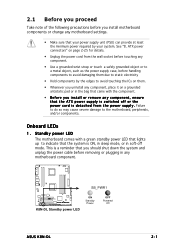
..., and/or components. Onboard LEDs 1. ATX power connectors" on a grounded antistatic pad or in any motherboard component. SB_PWR1 ® K8N-DL K8N-DL Standby power LED ON Standby Power OFF Powered Off ASUS K8N-DL 2-1 Standby power LED The motherboard comes with the component. • Before you install or remove any component, ensure that the ATX power supply is...
..., and/or components. Onboard LEDs 1. ATX power connectors" on a grounded antistatic pad or in any motherboard component. SB_PWR1 ® K8N-DL K8N-DL Standby power LED ON Standby Power OFF Powered Off ASUS K8N-DL 2-1 Standby power LED The motherboard comes with the component. • Before you install or remove any component, ensure that the ATX power supply is...
User Guide
Page 23
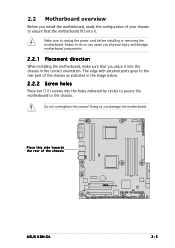
... orientation. Make sure to the chassis. Doing so can cause you place it . Failure to do so can damage the motherboard. Do not overtighten the screws! The edge with external ports goes to the rear part of your chassis to ensure that ...motherboard, make sure that the motherboard fits into it into the chassis in the image below. 2.2.2 Screw holes Place ten (10) screws into the holes indicated by circles to secure the motherboard to unplug the power cord before installing or removing the motherboard. Place this side towards the rear of the chassis ® K8N-DL ASUS K8N-DL...
... orientation. Make sure to the chassis. Doing so can cause you place it . Failure to do so can damage the motherboard. Do not overtighten the screws! The edge with external ports goes to the rear part of your chassis to ensure that ...motherboard, make sure that the motherboard fits into it into the chassis in the image below. 2.2.2 Screw holes Place ten (10) screws into the holes indicated by circles to secure the motherboard to unplug the power cord before installing or removing the motherboard. Place this side towards the rear of the chassis ® K8N-DL ASUS K8N-DL...
User Guide
Page 27
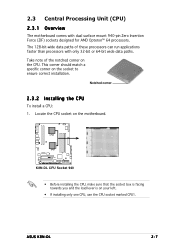
... processors. CPU2 CPU1 ® K8N-DL K8N-DL CPU Socket 940 • Before installing the CPU, make sure that the socket box is facing towards you and the load lever is on the motherboard. 2.3 Central Processing Unit (CPU) 2.3.1 Overview The motherboard comes with only 32-bit or 64-bit wide data paths. ASUS K8N-DL 2-7 This corner should match...
... processors. CPU2 CPU1 ® K8N-DL K8N-DL CPU Socket 940 • Before installing the CPU, make sure that the socket box is facing towards you and the load lever is on the motherboard. 2.3 Central Processing Unit (CPU) 2.3.1 Overview The motherboard comes with only 32-bit or 64-bit wide data paths. ASUS K8N-DL 2-7 This corner should match...
User Guide
Page 29
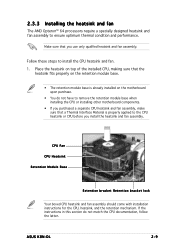
...the instructions in this section do not have to remove the retention module base when installing the CPU or installing other motherboard components. • If you purchased a separate CPU heatsink and fan assembly, make sure that a Thermal Interface Material is already installed on... the motherboard upon purchase. • You do not match the CPU documentation, follow the latter. Follow these steps to ensure optimum thermal condition and performance. Place the heatsink on top of the installed CPU, making sure that you install the heatsink and fan assembly. ASUS K8N-DL 2-9 ...
...the instructions in this section do not have to remove the retention module base when installing the CPU or installing other motherboard components. • If you purchased a separate CPU heatsink and fan assembly, make sure that a Thermal Interface Material is already installed on... the motherboard upon purchase. • You do not match the CPU documentation, follow the latter. Follow these steps to ensure optimum thermal condition and performance. Place the heatsink on top of the installed CPU, making sure that you install the heatsink and fan assembly. ASUS K8N-DL 2-9 ...
User Guide
Page 31
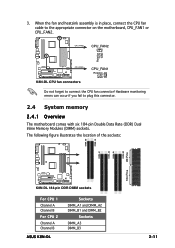
... DIMM_A2 DIMM_B1 DIMM_A1 104 Pins ® K8N-DL K8N-DL 184-pin DDR DIMM sockets For CPU 1 Channel A Channel B For CPU 2 Channel A Channel B ASUS K8N-DL Sockets DIMM_A1 and DIMM_A2 DIMM_B1 and DIMM_B2 Sockets DIMM_A3 DIMM_B3 2-11 3. Hardware monitoring errors can occur if you fail to the appropriate connector on the motherboard, CPU_FAN1 or CPU_FAN2. When the fan...
... DIMM_A2 DIMM_B1 DIMM_A1 104 Pins ® K8N-DL K8N-DL 184-pin DDR DIMM sockets For CPU 1 Channel A Channel B For CPU 2 Channel A Channel B ASUS K8N-DL Sockets DIMM_A1 and DIMM_A2 DIMM_B1 and DIMM_B2 Sockets DIMM_A3 DIMM_B3 2-11 3. Hardware monitoring errors can occur if you fail to the appropriate connector on the motherboard, CPU_FAN1 or CPU_FAN2. When the fan...
User Guide
Page 33
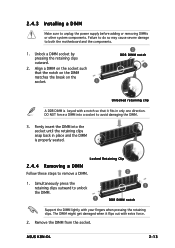
... both the motherboard and the components. 1. Remove the DIMM from the socket. Unlock a DIMM socket by pressing the retaining clips outward. 2. Align a DIMM on the socket such that the notch on the DIMM matches the break on the socket. 1 2 DDR DIMM notch 1 Unlocked retaining clip A DDR DIMM is properly seated. ASUS K8N-DL 2-13...
... both the motherboard and the components. 1. Remove the DIMM from the socket. Unlock a DIMM socket by pressing the retaining clips outward. 2. Align a DIMM on the socket such that the notch on the DIMM matches the break on the socket. 1 2 DDR DIMM notch 1 Unlocked retaining clip A DDR DIMM is properly seated. ASUS K8N-DL 2-13...
User Guide
Page 34
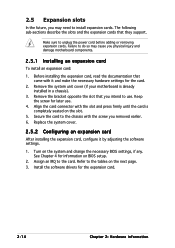
...the slot. 5. Keep the screw for the card. 2. Secure the card to the chassis with the screw you physical injury and damage motherboard components. 2.5.1 Installing an expansion card To install an expansion card: 1. Replace the system cover. 2.5.2 Configuring an expansion card After installing ...Before installing the expansion card, read the documentation that you may cause you removed earlier. 6. Remove the system unit cover (if your motherboard is completely seated on the next page. 3. Align the card connector with it by adjusting the software settings. 1. Make sure to...
...the slot. 5. Keep the screw for the card. 2. Secure the card to the chassis with the screw you physical injury and damage motherboard components. 2.5.1 Installing an expansion card To install an expansion card: 1. Replace the system cover. 2.5.2 Configuring an expansion card After installing ...Before installing the expansion card, read the documentation that you may cause you removed earlier. 6. Remove the system unit cover (if your motherboard is completely seated on the next page. 3. Align the card connector with it by adjusting the software settings. 1. Make sure to...
User Guide
Page 36
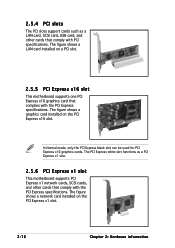
... used for PCI Express x16 graphics cards. 2.5.4 PCI slots The PCI slots support cards such as a PCI Express x1 slot. 2.5.6 PCI Express x1 slot This motherboard supports PCI Express x1 network cards, SCSI cards, and other cards that comply with the PCI Express specifications. The PCI Express white slot functions as... card, USB card, and other cards that comply with PCI specifications. The figure shows a LAN card installed on a PCI slot. 2.5.5 PCI Express x16 slot This motherboard supports one PCI Express x16 graphics card that complies with the PCI Express specifications.
... used for PCI Express x16 graphics cards. 2.5.4 PCI slots The PCI slots support cards such as a PCI Express x1 slot. 2.5.6 PCI Express x1 slot This motherboard supports PCI Express x1 network cards, SCSI cards, and other cards that comply with the PCI Express specifications. The PCI Express white slot functions as... card, USB card, and other cards that comply with PCI specifications. The figure shows a LAN card installed on a PCI slot. 2.5.5 PCI Express x16 slot This motherboard supports one PCI Express x16 graphics card that complies with the PCI Express specifications.


